


Get Started
Sales Suite
Field Ops
Marketing
Service CRM
Integrations & Apps
FloStack
Create Permission Templates
1. Feature Overview
This article shows you how to create and configure a permission template. If you’re new to the permission template feature, see LeadSquared Permission Templates. If you’ve already created a permission template and now want to apply it to your users, see How to Apply a Permission Template.
Note:
- Instead of restricting export for each entity (leads, activities, tasks, opportunities, users, and accounts) through a permission template, you can now restrict all users from exporting all LeadSquared entities through a back-end setting.
- Instead of creating a permission template to restrict access to sales activities –
- You can restrict all permissions (view, create, and edit) to all users through a backend setting.
- You can also restrict create/add permissions and grant view and edit permissions through a backend setting.
To enable any of these settings, contact your account manager, or write to support@leadsquared.com.
2. Create a Permission Template
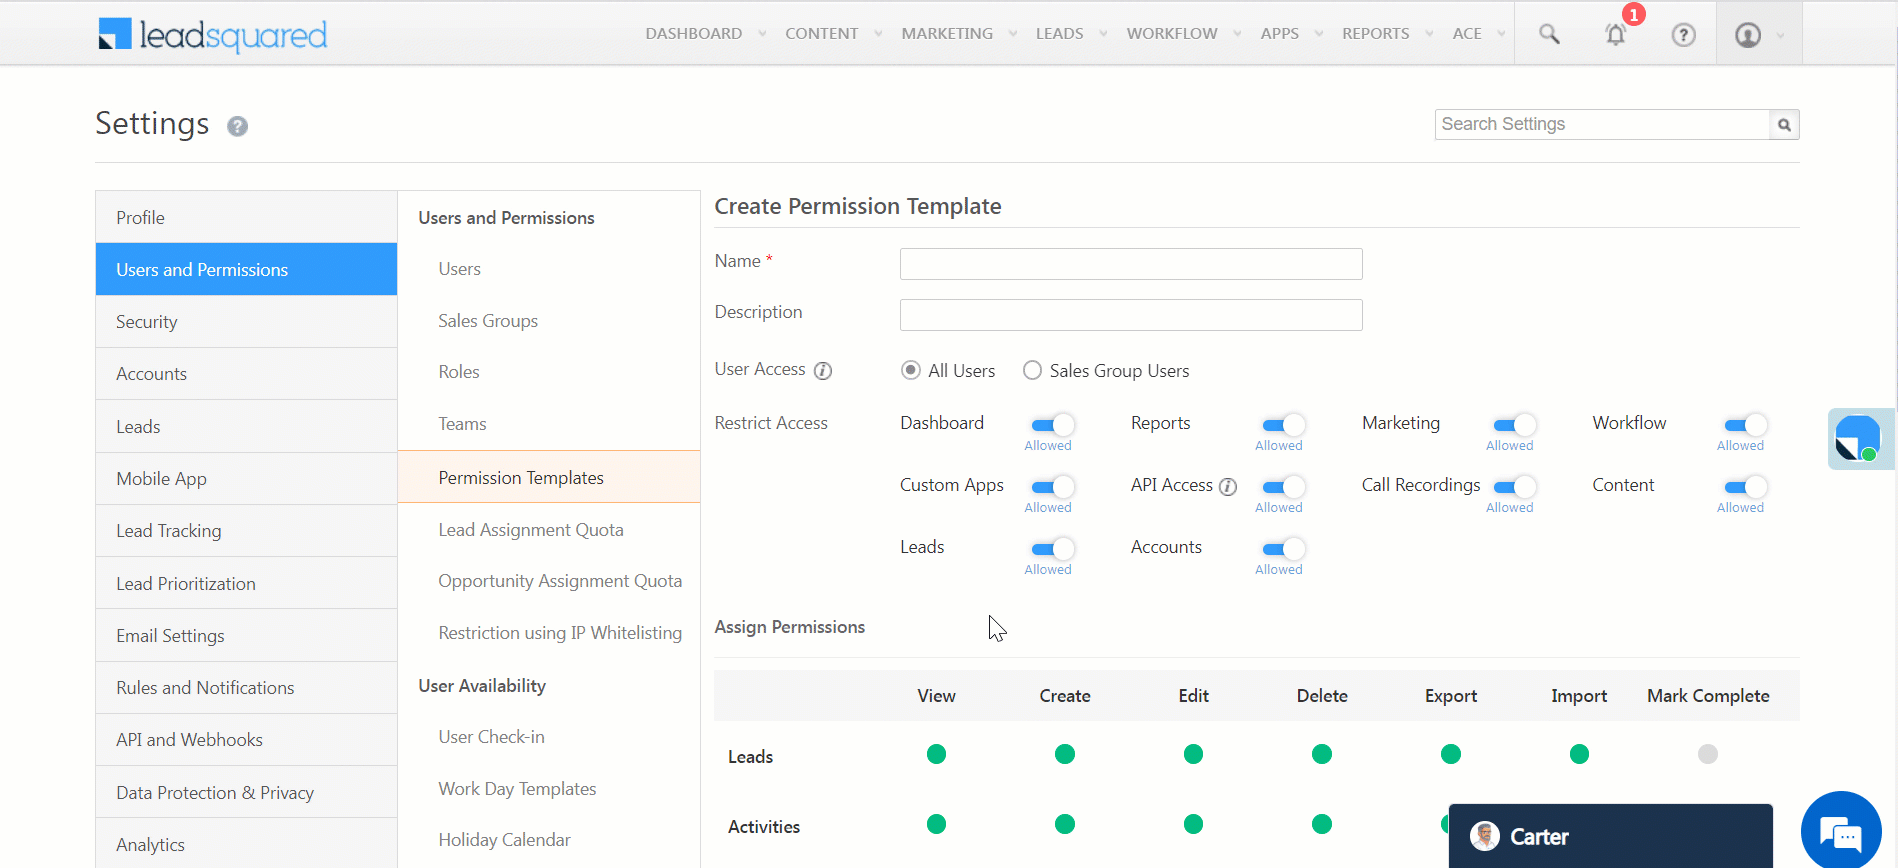
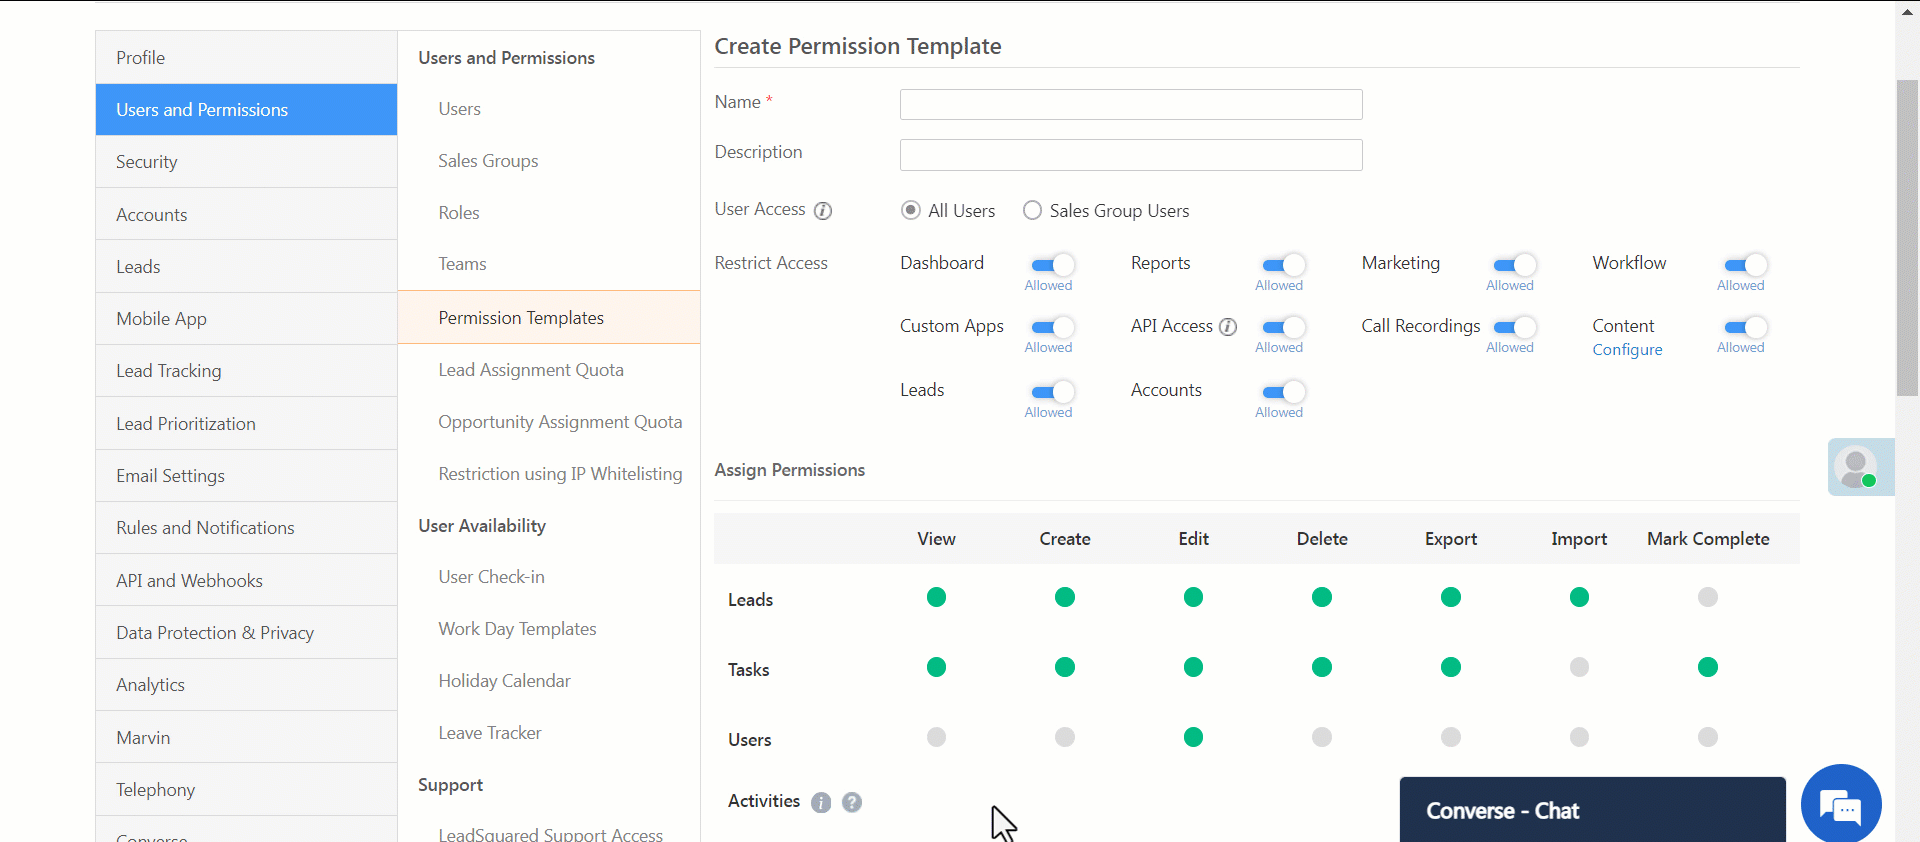
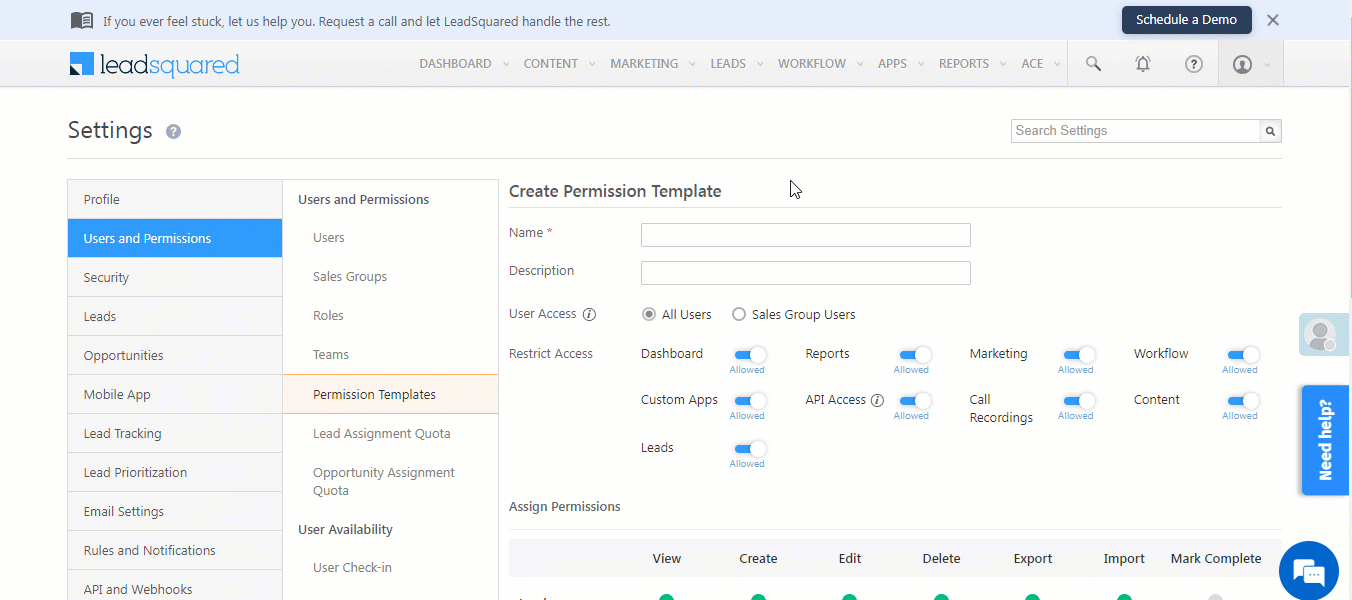
From the main menu, navigate to My Profile>Settings>Users and Permissions>Permission Templates, then click Create.
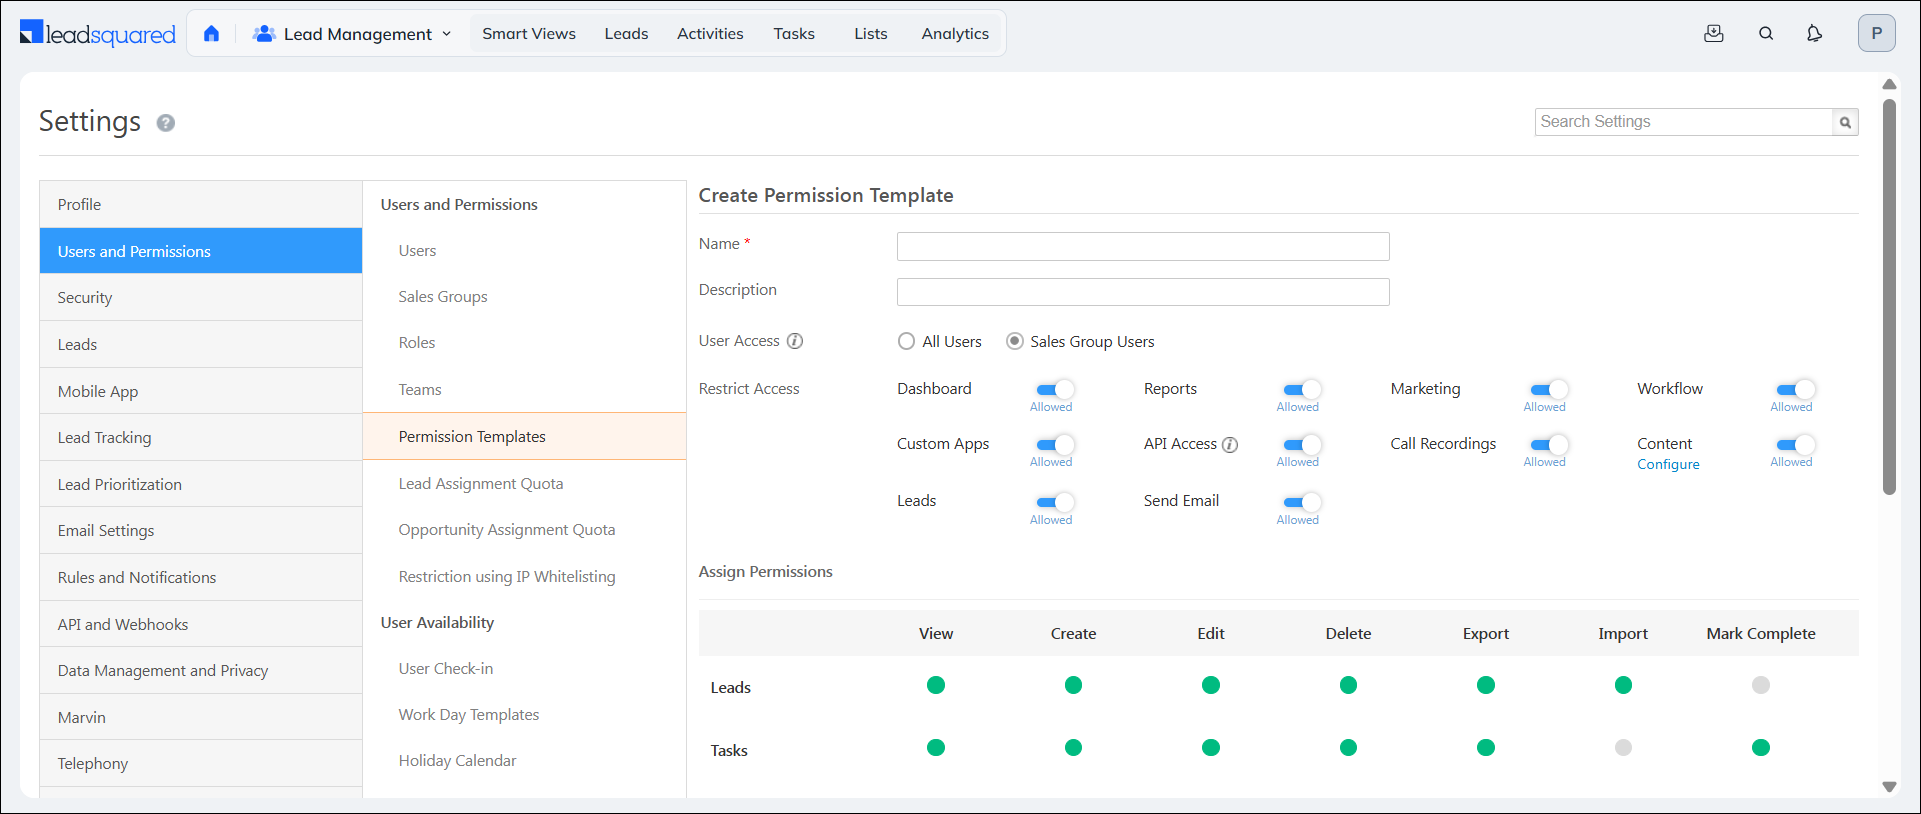
Enter the following details –
- Name: Enter a name for the permissions template.
- Description: Enter a suitable description for the template.
- User Access: Controls users that are shown in all user/owner fields drop-down fields across the application. To learn more about this feature, see How to Control Users Shown in User/Owner Drop-down Fields.
- All Users – This is the default option. All users will be shown in the user/owner drop-downs across the LeadSquared application.
- Sales Group Users – Will allow group managers to see only the users in their own sales groups, in all user/owner drop-downs across the application. Other sales users in the group (who aren’t group managers) will only be able to see themselves in these drop-downs.
- Restrict Access
- Dashboard – Users the template is applied to won’t be able to view dashboards.
- Reports – Users the template is applied to won’t be able to view reports.
- Marketing – Users this template is applied to won’t be able to access the Email Campaign, Landing Pages, and Website Widgets screens.
- Workflow – Users this template is applied to won’t be able to access the Automations, Manage Forms, Process Designer, and Manage Portals pages.
- Custom Apps – Users the template is applied to won’t be able to view custom apps.
- API Access – Users the template is applied to won’t be able to make APIs calls. This can be used when you want to give marketing access to users but don’t want them to use any APIs or connectors.
- Call Recordings – Use this option to restrict access to Call Recordings in Inbound/Outbound Phone activities.
- Content – Users this template is applied to won’t be able to view, upload or delete content in the Email Library and Images and Documents library by default. However, admins can configure the settings to grant users partial access to these libraries as needed.
- Leads – Users this template is applied to won’t be able to access the Manage Leads page.
- Send Email – Users this template is applied to will not be able to send emails. When this permission is disabled, the Send Email action is hidden across Leads, Opportunities, Objects, Activities, Tasks, and Accounts in both list and detail views. Restricted users also cannot access bulk email actions or email options available in Smart Views. Any attempt by restricted users to send emails through direct URLs or custom actions is blocked at the API level.
- Accounts – Users won’t be able to view any accounts.
- Create Users – Users this template is applied to won’t be able to create new users in your LeadSquared account. This permission template can be applied to Admins (by the Super Admin), Sales Managers, and Marketing Users (by the Admins/Super Admins). It cannot be applied to Sales Users.
- Activate Users – Users this template is applied to won’t be able to activate a user in your LeadSquared account. This permission template can only be applied to Admins (by the Super Admin), Sales Managers, and Marketing Users (by the Admin/Super Admins). It cannot be applied to Sales Users.
- Deactivate Users – Users this template is applied to won’t be able to deactivate a user in your LeadSquared account. This permission template can only be applied to Admins (by the Super Admin), Sales Managers, and Marketing Users (by the Admin, Super Admins). It cannot be applied to Sales Users.
Note:
- The following Permission Templates aren’t available by default in the platform. To enable them on your account, contact your account manager, or write to support@leadsquared.com –
- Create Users
- Activate Users
- Deactivate Users
- Restrict User Field Modification
- Access to reports and custom apps will be automatically restricted when viewing permissions are configured to hide lead and opportunity fields. This happens because lead and opportunity fields that you hide from your users still show up in connected apps and reports. If you still want users to view reports and connected apps even though you have restricted view permissions for lead and opportunity fields, manually toggle the reports and custom apps sliders.
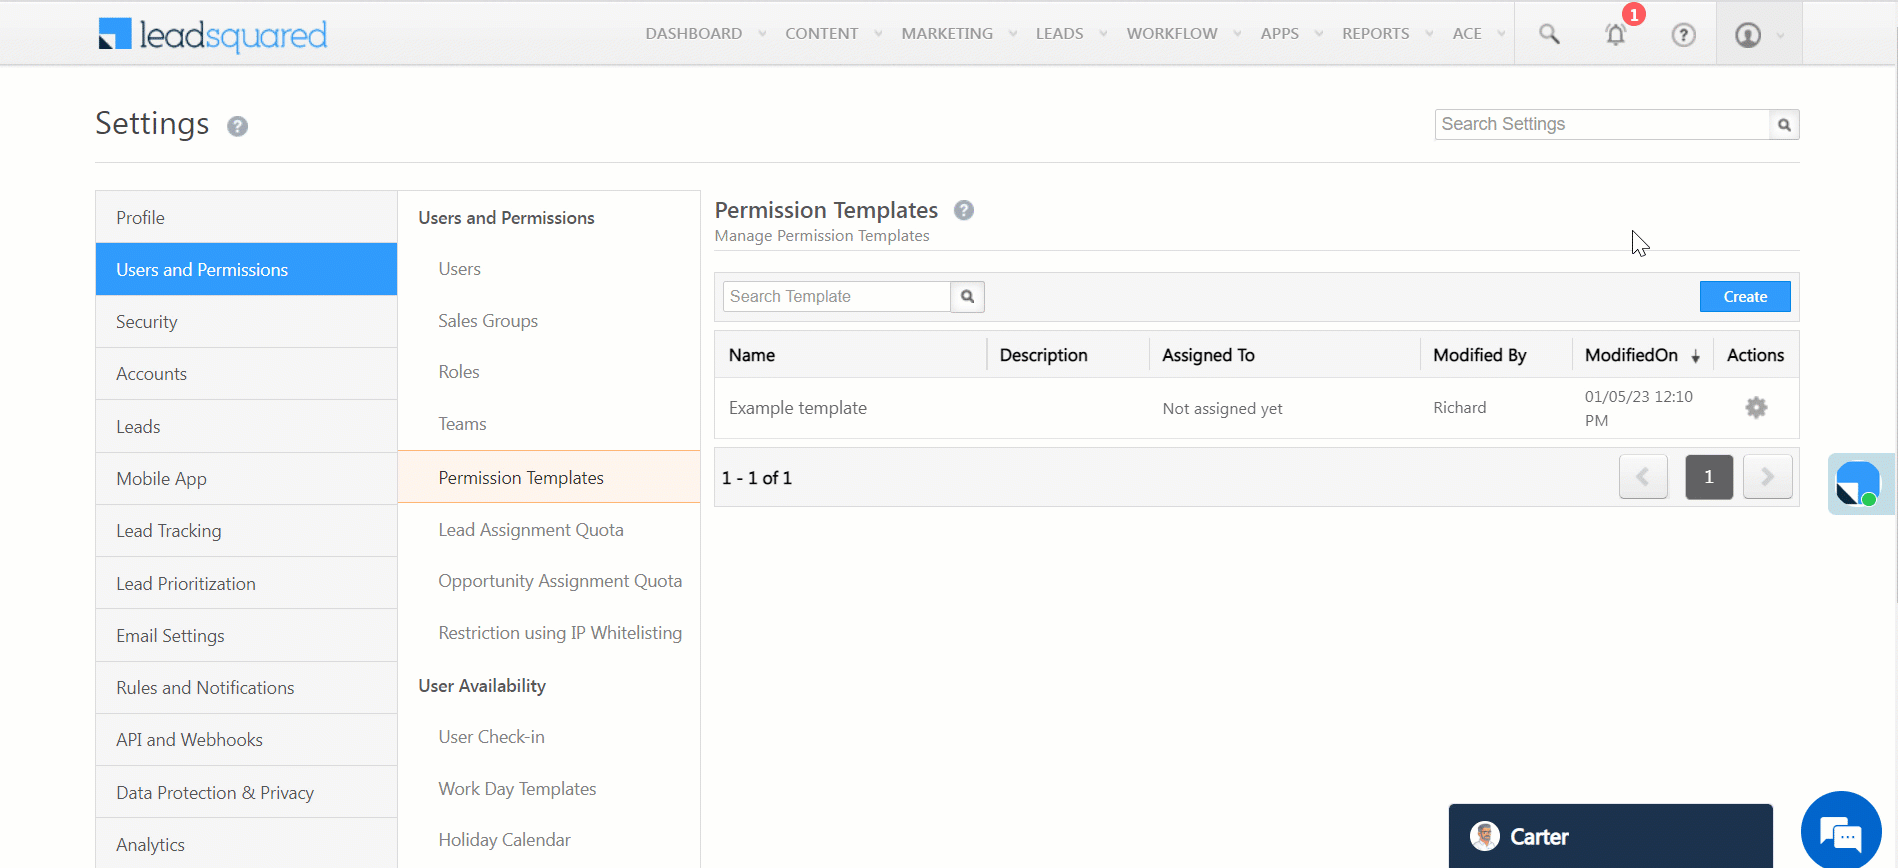
3. Clone a Permission Template
You can clone an existing Permission Template and make relevant changes to it instead of creating new templates from scratch. To clone a permission template –
- Navigate to My Profile>Settings>Users and Permissions>Permission Templates.
- Alongside the relevant Permission Template, hover your cursor over
 .
. - Select Clone and enter the relevant details. Once the Permission Template is cloned, you can edit it according to your requirements.
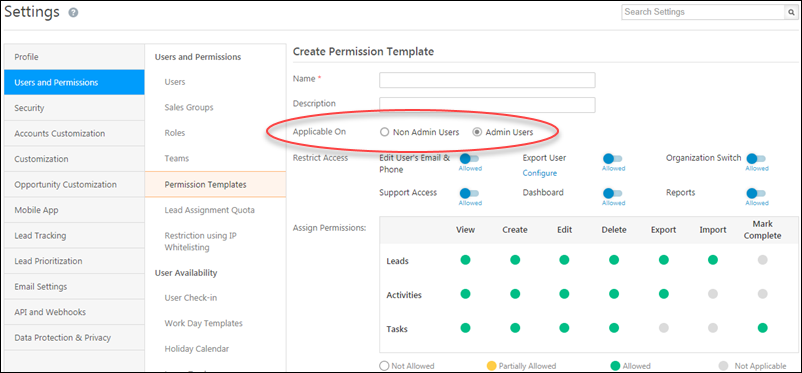
4. Permission Templates for Admins
Super admin users can apply permission templates on regular admins. In addition to the regular permissions, they can restrict access to
- Edit user’s email addresses and phone numbers
- Export users
- Organization switch
- Support access
For more information, see LeadSquared Super Admin Users.
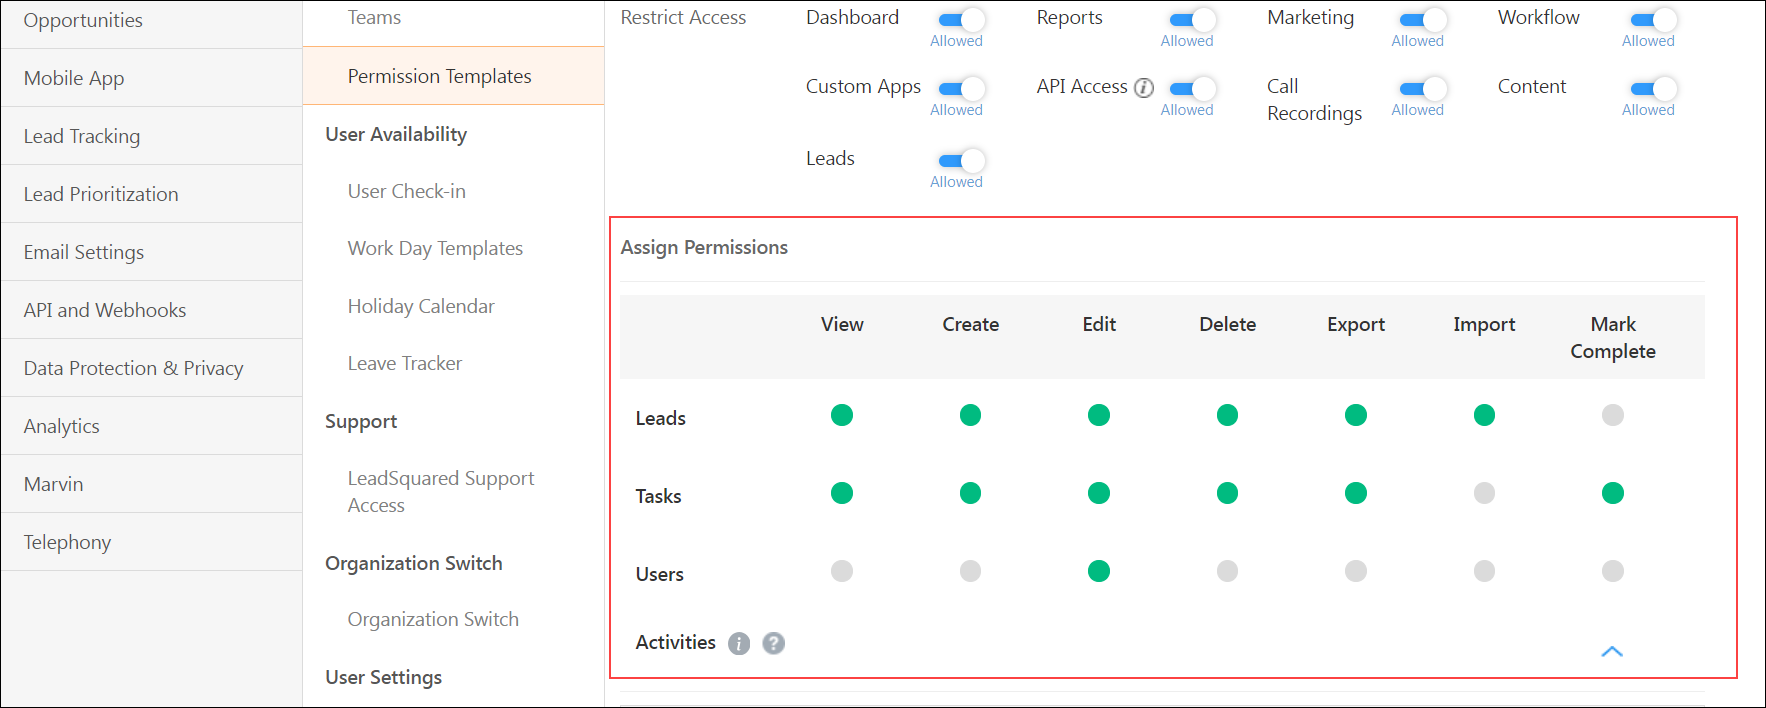
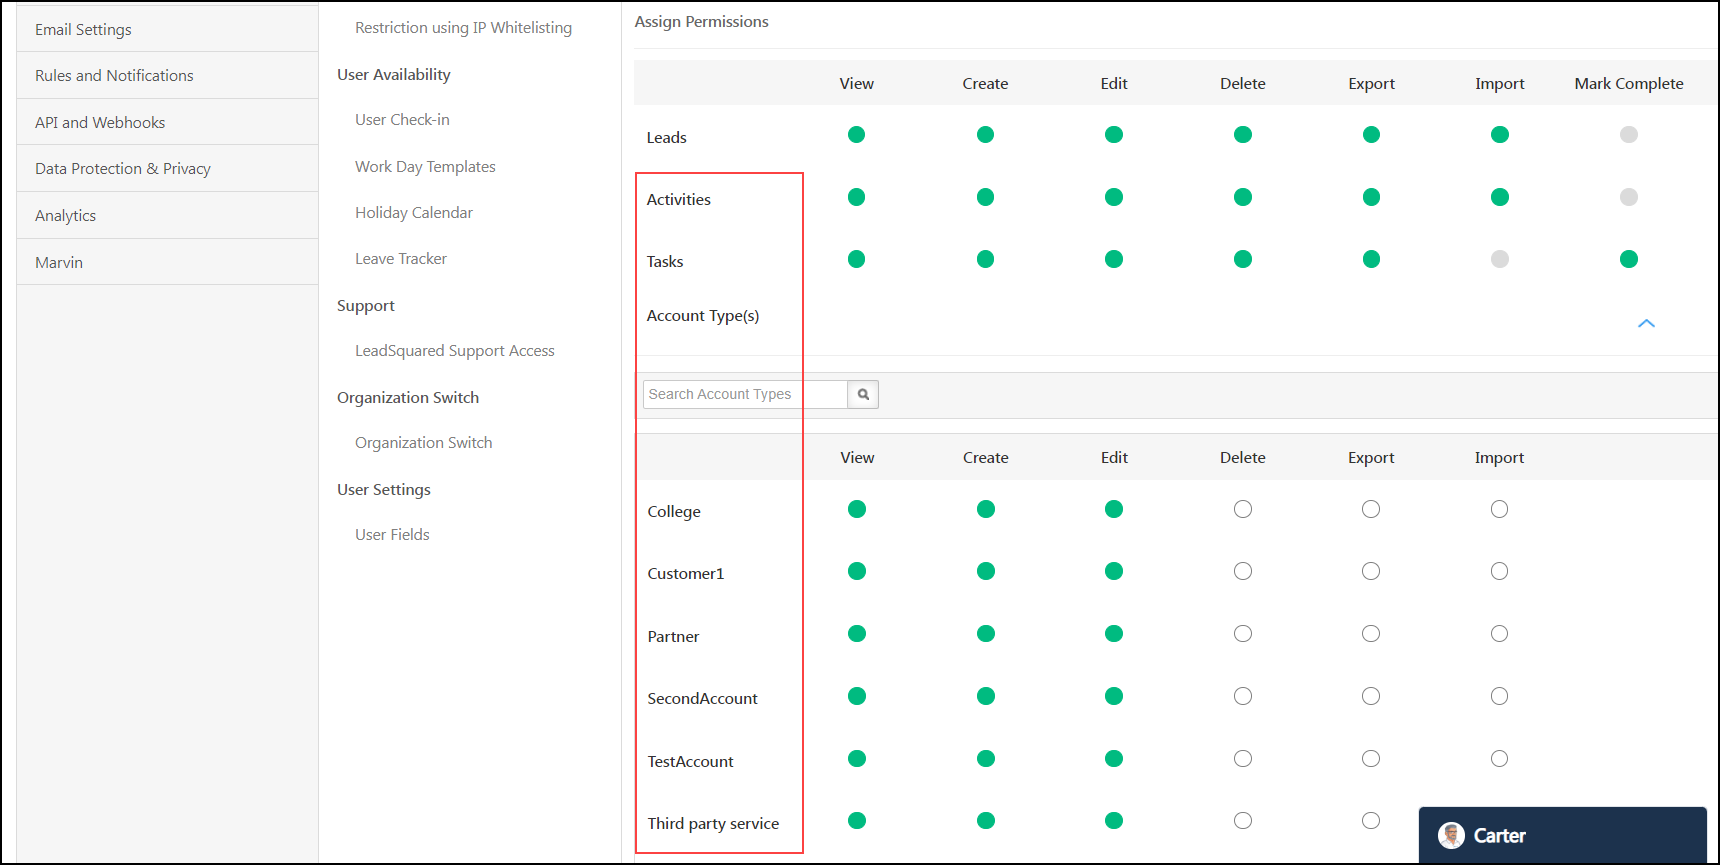
5. Assign Permissions
This allows you to set permissions for different entities. You can set restrictions on individual actions (e.g., update one Phone Call Task as ‘Complete’, etc.) and bulk actions (e.g., update all Phone Call Tasks as ‘Complete’, etc.). Refer to the table below for details.
| Permission Type | Description |
| View | Allows you to view leads, activities, tasks, opportunities, and accounts. |
| Create | Allows you to create leads, opportunities, activities, tasks, users, and accounts. |
| Edit | Allows you to edit existing leads, activities, tasks, opportunities, users and accounts. |
| Delete | Allows you to delete existing leads, activities, tasks, opportunities, and accounts. |
| Export | Allows you to export leads, activities, tasks, opportunities, and accounts. |
| Import | Allows you to import leads, activities, opportunities, and accounts. |
| Mark Complete | Allows you to mark tasks as completed. |
By clicking on the green circle, you can change the permission settings of each permission type –
Once the template details are configured, click Save. The Permission Template will save and then appear on the Manage Permission Templates page where you can edit, delete or apply it to users.
5.1 Configure Access Levels
You can give users complete access, partial access or no access to features and actions –

5.1.1 Full Access
Provides complete access to the permission type.
For example, if you give a user full access to delete leads, he can delete all the leads in your account.
5.1.2 Partial Access
Provides partial access. Allows you to selectively choose the fields you want to give users access to. For example, you can restrict users from viewing or editing system lead fields like Lead Age, Created On, Modified On, Last Activity, Last Activity Date, Origin, Lead Score, Engagement Score and Quality Score.
- When you select partial access, a Configure option appears below the yellow circle which allows you to choose the fields you want to restrict access to.
- Click Configure and choose the fields you want to restrict on the Configure Create Permission for Leads pop-up
- Click Save when you’re done.
Note:
- The following lead fields cannot be partially restricted through permission template for view, create and update lead field access: ConversionReferrerURL, CreatedOn, EngagementScore, LeadConversionDate, ProspectAutoId, Origin, QualityScore01, Score, ModifiedOn, Revenue, SourceIPAddress, SourceReferrerURL, StageRottingFlagMessage, StageRottingFlagModifiedOn, StageRottingFlagStatus
- The following opportunity fields cannot be partially restricted through permission template for view, create and update opportunity access: OwnerId, Owner, mx_Custom_1(Opportunity Name/Title), mx_Custom_2(Status), mx_Custom_19(Comment)
Restriction on Edit of User Fields
Users can be restricted from editing user fields like the their First Name, Employee ID, Email Address etc.
- Navigate to Settings>Users and Permissions>Permission Templates.
- Under Assign Permissions, you’ll find Users.
- Click on the green circle under Edit until it turns yellow.
- Click Configure under the yellow circle to restrict the required user fields.
- In the Configure Edit Permissions for Users pop-up, click Restrict alongside the relevant fields.
- Once the fields are selected, click Save.
5.1.3 Bulk Actions
Restrict Sales Users from performing bulk actions (Create, Update and Delete) on Leads, Activities, Tasks, Opportunities and Accounts. This is to ensure your users don’t misuse the Bulk Update option, especially if incentives or payouts are tied to achieving specific targets (e.g., number of tasks completed in a week, etc.).
5.1.4 No Access
Provides no access to the selected permission type.
6. Masking/Hiding Fields
You can hide/mask fields that you don’t want certain users to see. Once masked, these fields cannot be edited by users.
For example, if you have a sensitive lead field (like a bank account number, PAN/Aadhaar card number, Social Security Number, etc.) that you don’t want other users to see, you can mask it by following the video below.
Note:
- If a field is masked for a user, that user can still update it if the value is empty. This is useful in case a phone number is masked, but the user knows the number of the prospect and wants to update it.
- You cannot hide the lead age via permission templates. However you can use the Lead Details View Cusotmization feature to hide the lead age.
This feature also works for activities and tasks types you may want to hide from certain users, like say you don’t want marketing users to see sales activities or sales tasks. You can also mask CFS file type Activity fields to prevent users from attaching such files in emails. Just follow the same instructions in the video above but this time click the circle alongside the Activities, Tasks, Opportunities, or Accounts section as highlighted below.
If you wish to mask an Activity Field, before you navigate to the Permission Templates –
- Navigate to My Profile>Settings>Leads>Custom Activities & Scores.
- Alongside the relevant activity field, click
 .
. - On the Update Custom Activity Type pop-up, alongside Show As Entity, click
 . This checkbox must be enabled to mask an Activity Field.
Note:
- If you want to hide phone numbers from users, create a permission template as follows.
- Hide the phone, mobile and other phone fields using the Hide Lead Fields functionality.
- Hide lead capture and landing page submission activities using the Hide Activity functionality.
- If the phone number is masked, telephony connectors will not update the phone number in the ‘FirstName’ lead field.
7. Next Steps
Once a template is created, you can apply it at the user, role or sales group level. See How to Apply Permission Templates.
Any Questions?
Did you find this article helpful? Please let us know any feedback you may have in the comments section below. We’d love to hear from you and help you out!
Suppose i need to provide api credentials like secret key and acsses key for my telephony partner voxbay
Is it possible to create api credentials with limited acsses with the templates
Rather than sharing the same Admin api credentials which gives full control over the account
Hi, sorry for the delayed response.
Yes, this is possible. API access is governed by the Permission Template (PT) assigned to the user.
If you generate and share User-level API credentials (instead of Admin API credentials), the level of access can be restricted by assigning an appropriate Permission Template to that user. This way, the telephony partner (for example, Voxbay) will only have access to the features and actions explicitly allowed by the assigned PT, avoiding full account-level control that comes with Admin credentials.
You can find the user level keys on the user’s account, under Settings>API and Webhooks.