1. Feature Overview
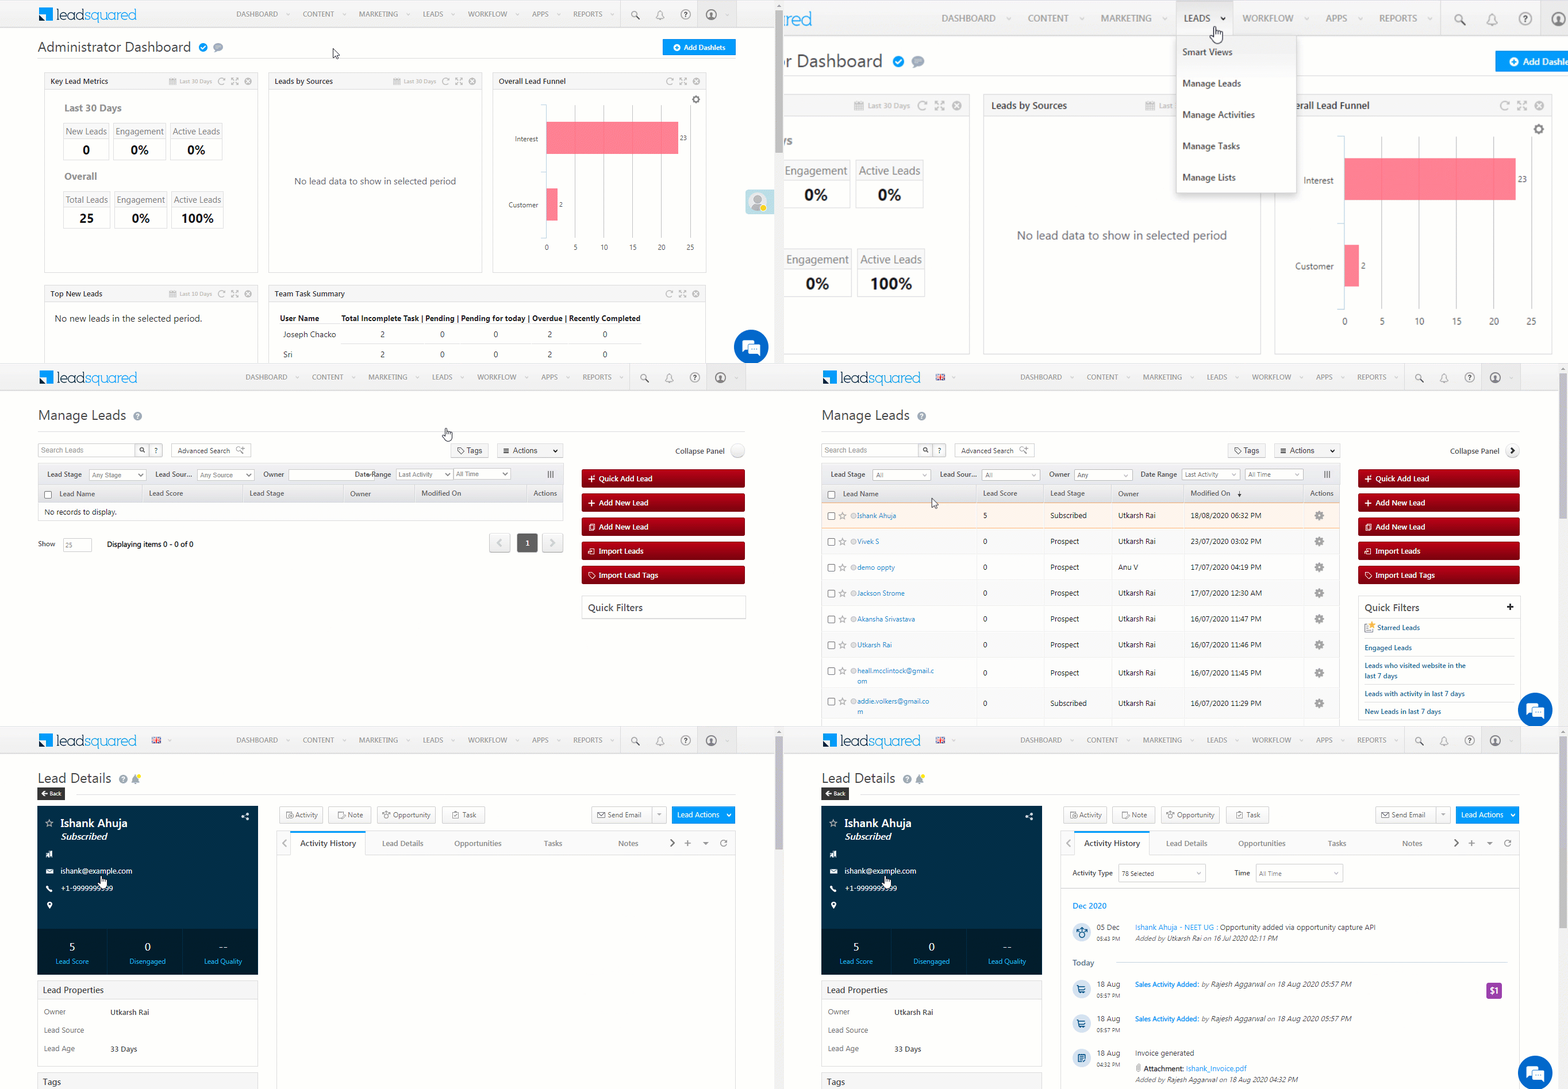
On the Lead Details page for any lead, you can view all the interactions (including activities, tasks, opportunities and notes) you’ve had with the lead, from when the lead was created, all the way to conversion. You can track the lead through various stages, and also create and modify multiple actions on the lead (such as adding custom activities, tasks, opportunities, and so on). This will ensure that all the stakeholders are on the same page when viewing your lead’s details.
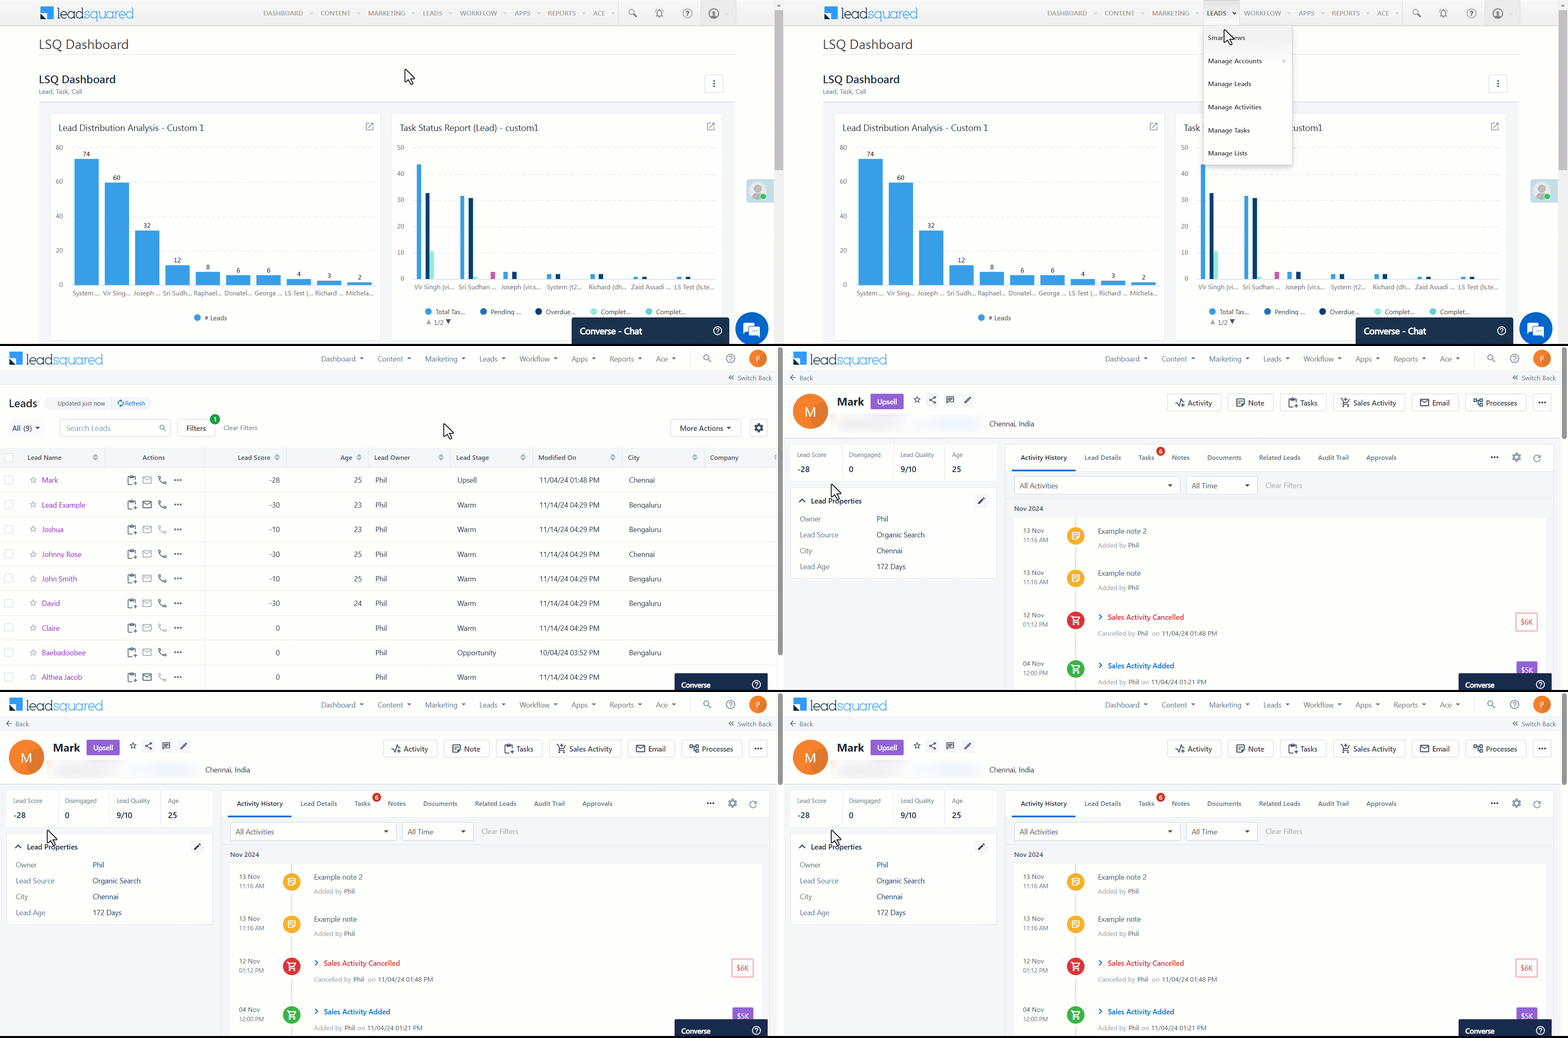
To access the Lead Details page, from the main menu, navigate to Leads>Manage Leads, and click on an existing lead.
Note:
- Restrict sales users from copying and pasting, and printing sensitive lead information from the Lead Details page and Manage Leads grid. This is to prevent the misuse and leakage of your confidential lead data. To enable this feature, contact your account manager, or write to support@leadsquared.com.
- To customise the Lead Details page, see Lead Details Customisation.
2. Prerequisites
- You must have the Permission Templates configured in your account to give access to your users to perform various actions. To configure it, from the main menu, navigate to My Profile>Settings>Users and Permissions>Permission Templates. To know more, refer to Permission Templates.
- To add activities to opportunities, you must have the opportunities feature configured in your account. To enable it, please write to support@leadsquared.com
3. How it Works
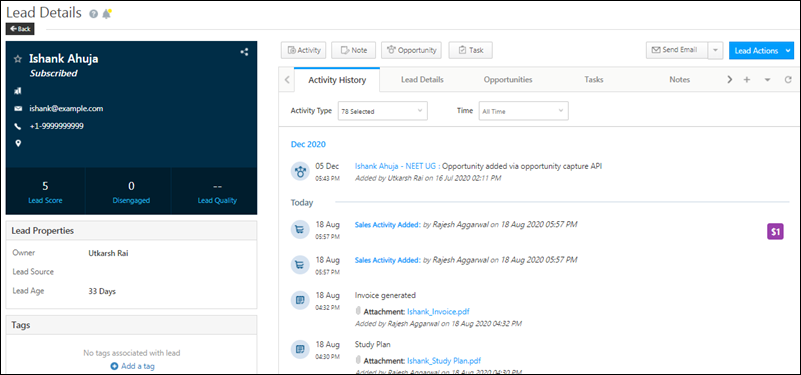
From the Lead Details page, you can –
- View and modify lead details, lead properties and lead tags to the lead.
- View, add and modify activities, tasks, opportunities and notes to the lead.
- Perform other lead actions such as sending emails, adding sales activity, deleting the lead, and so on.
4. Left Panel
4.1 Lead Details vCard
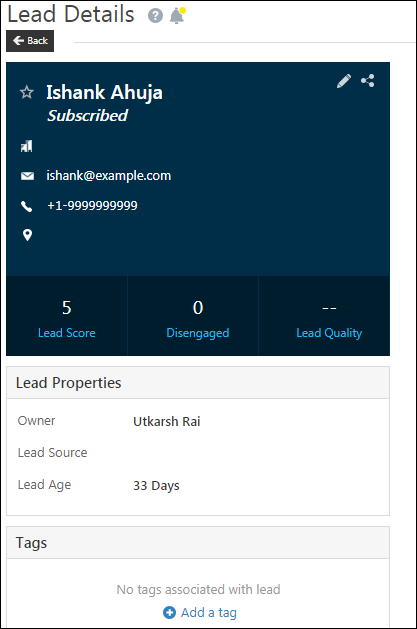
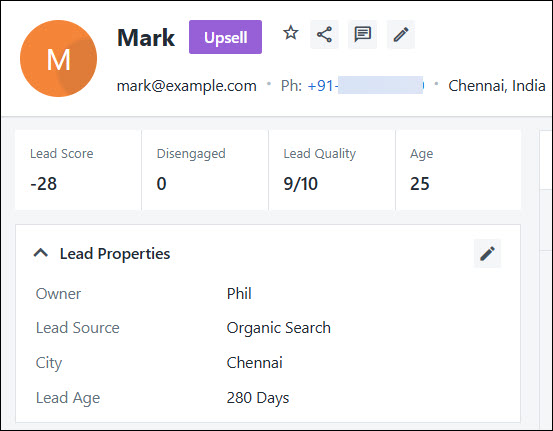
The vCard, available on the left side of the Lead Details page, allows you to view, edit and share the lead’s information.
- To edit the lead’s details from the vCard, hover your cursor on the vCard, and click the
 icon. After updating the details, click the
  icon.
icon. - To share the lead’s details via email, click the
 icon. On the Share Lead Info Via Email pop-up –
- In the Email to field, enter the email address of the LeadSquared user with whom you want to share the lead details.
- In the Notes field, enter relevant information you want to share with the user.
- Once you’re done, click Email.
Notes:
- Lead Score is the score assigned to a lead based on the interest they’ve shown in your offering, and how relevant they are to your business. The score allows you to distinguish important leads from others. For more information, refer to How does Lead Scoring Work?
- To add or remove fields from the Lead vCard, navigate to My Profile>Settings>Leads>Lead Forms, and from the Forms to Select dropdown, select Lead vCard. To know more, please refer to How to Use and Customize the Lead Details vCard?
4.2 Lead Properties
The Lead Properties view is available below the Lead vCard. Here, you can view the –
- Lead Owner
- Lead Source
- Lead Age
To edit the Lead Properties, hover your cursor on this section, and click the ![]() icon. Once you’ve updated the details, click the
icon. Once you’ve updated the details, click the ![]() icon.
icon.
4.3 Tags
You can add tags to your leads. To add tags, this setting will have to be enabled. To enable it, navigate to My Profile>Leads>Manage Leads>Manage Tags>Lead Tag Manager.
To add tags –
- Click Add a tag.
- Once you’re done, hit Enter.
5. Lead Details Tabs
The tabs on the Lead Details page allows you to add and modify details across the following categories –
5.1 Activity History
In addition to default activities, you can also create custom activities to accommodate your unique requirements. To know more, refer to How to Add a Custom Activity.
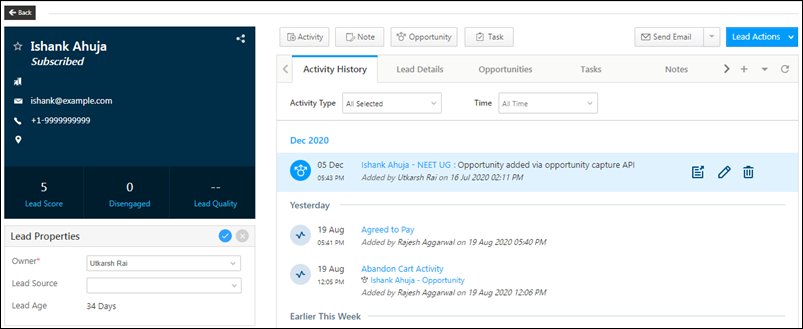
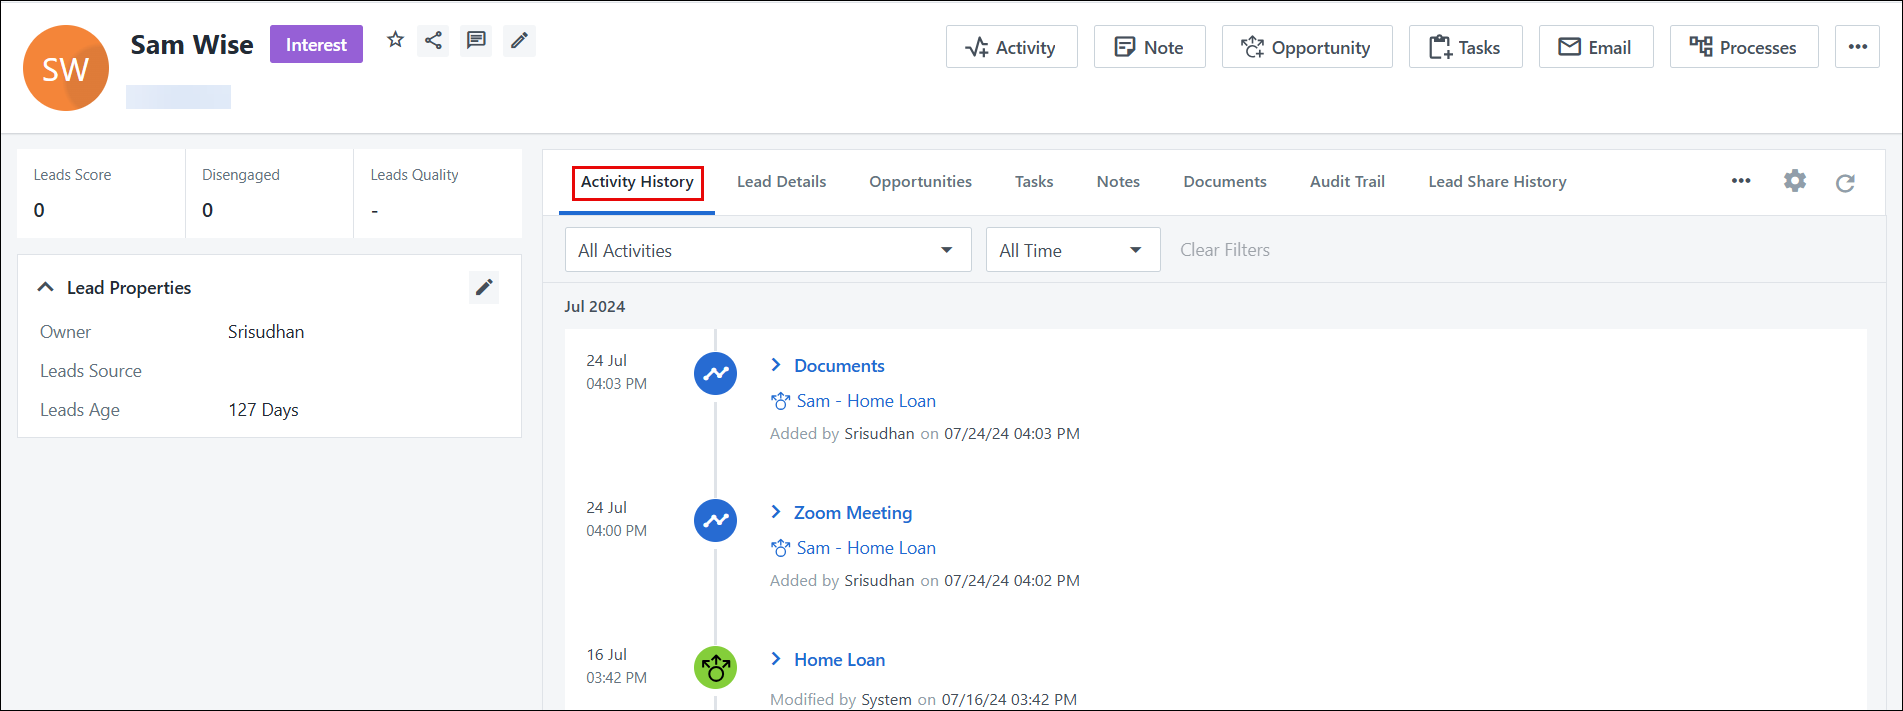
The Activity History tab enables you to view the activity details on the lead and on the opportunity, and the timeline of the lead’s interaction with you, consolidated under one tab. It also allows you to filter the activities within a specific time range.
Example – A tab to view all your email activities (like Emails Opened, Emails Clicked, Emails Bounced etc.), all in one place.
You can perform the following actions –
- Edit – To edit an existing activity, hover your cursor over the activity entry, and click the
 icon.
icon. - Delete – To delete an existing activity, hover your cursor over the activity entry, and click the
 icon.
icon.
You can also view the lead score, added or subtracted due to the actions that your lead has taken.
Note:
- Activities added to leads are denoted by the
 symbol.
 - Activities added to opportunities are denoted by the
 symbol.
 - To navigate to the Opportunity Details page directly from the Lead Details page, against the activity entry, hover your cursor on the right side, and click the
 icon.
icon.
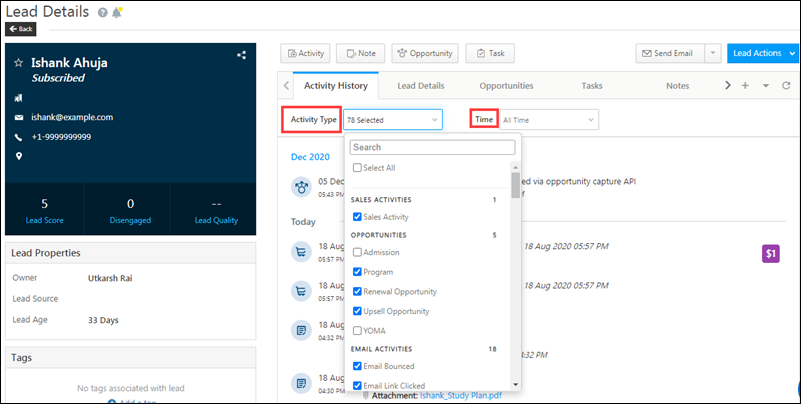
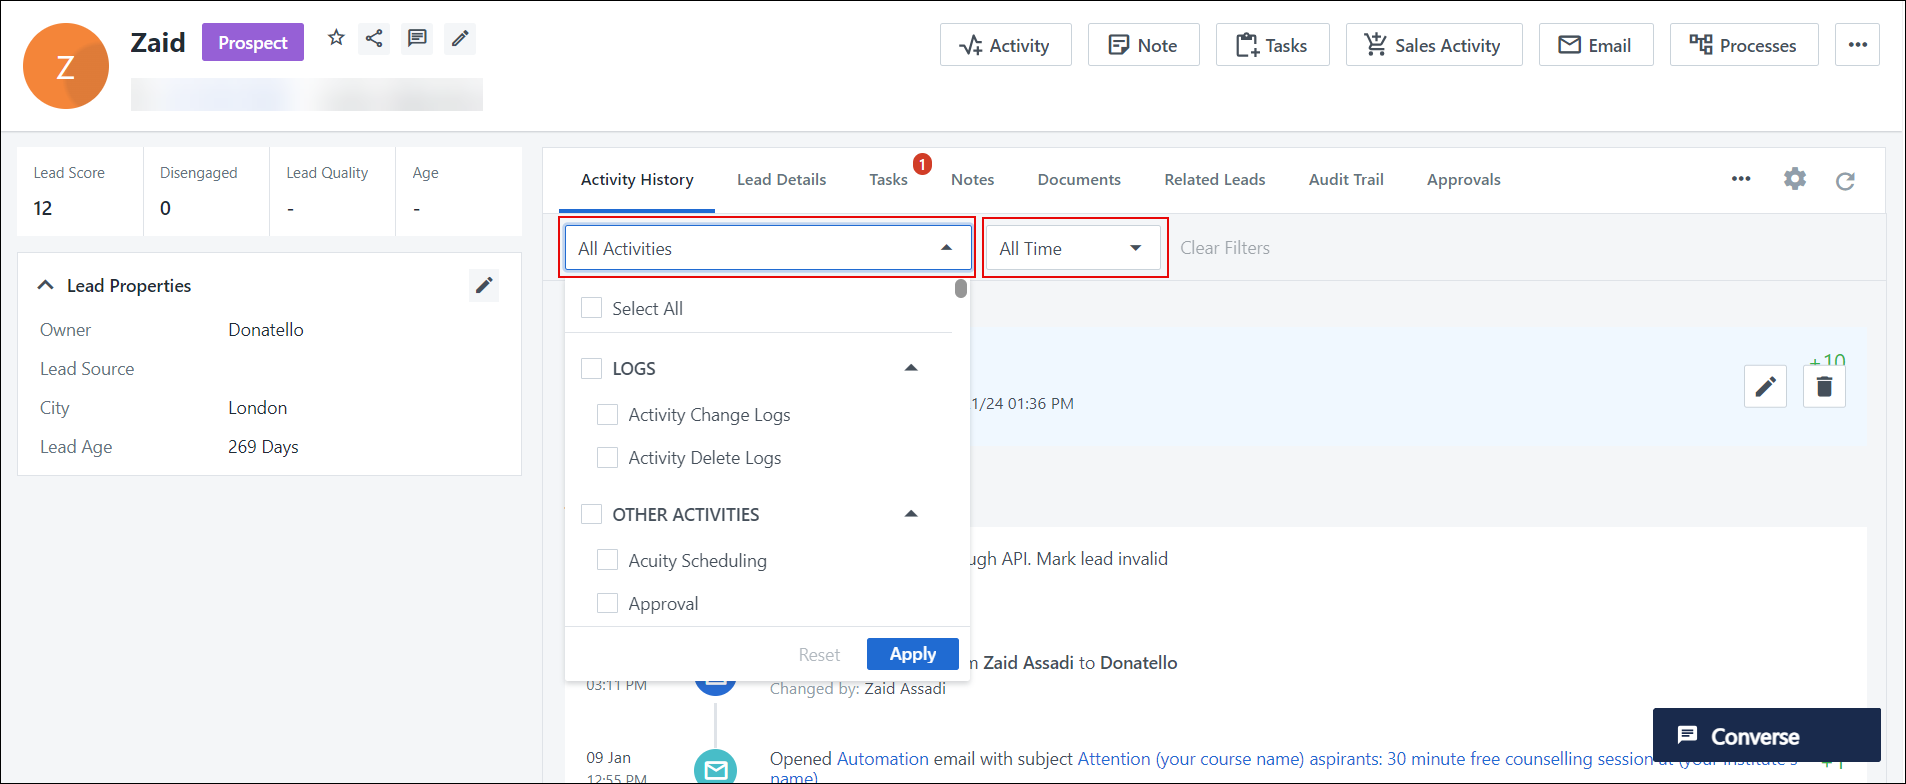
Select an Activity Type
This drop-down allows you to select the specific activity types you want to display under Activity History. Select the required activity type from the drop-down list and the display pane is filtered based on the selected activity type. You can also select the time frame for the select activity type from the Time drop-down list.
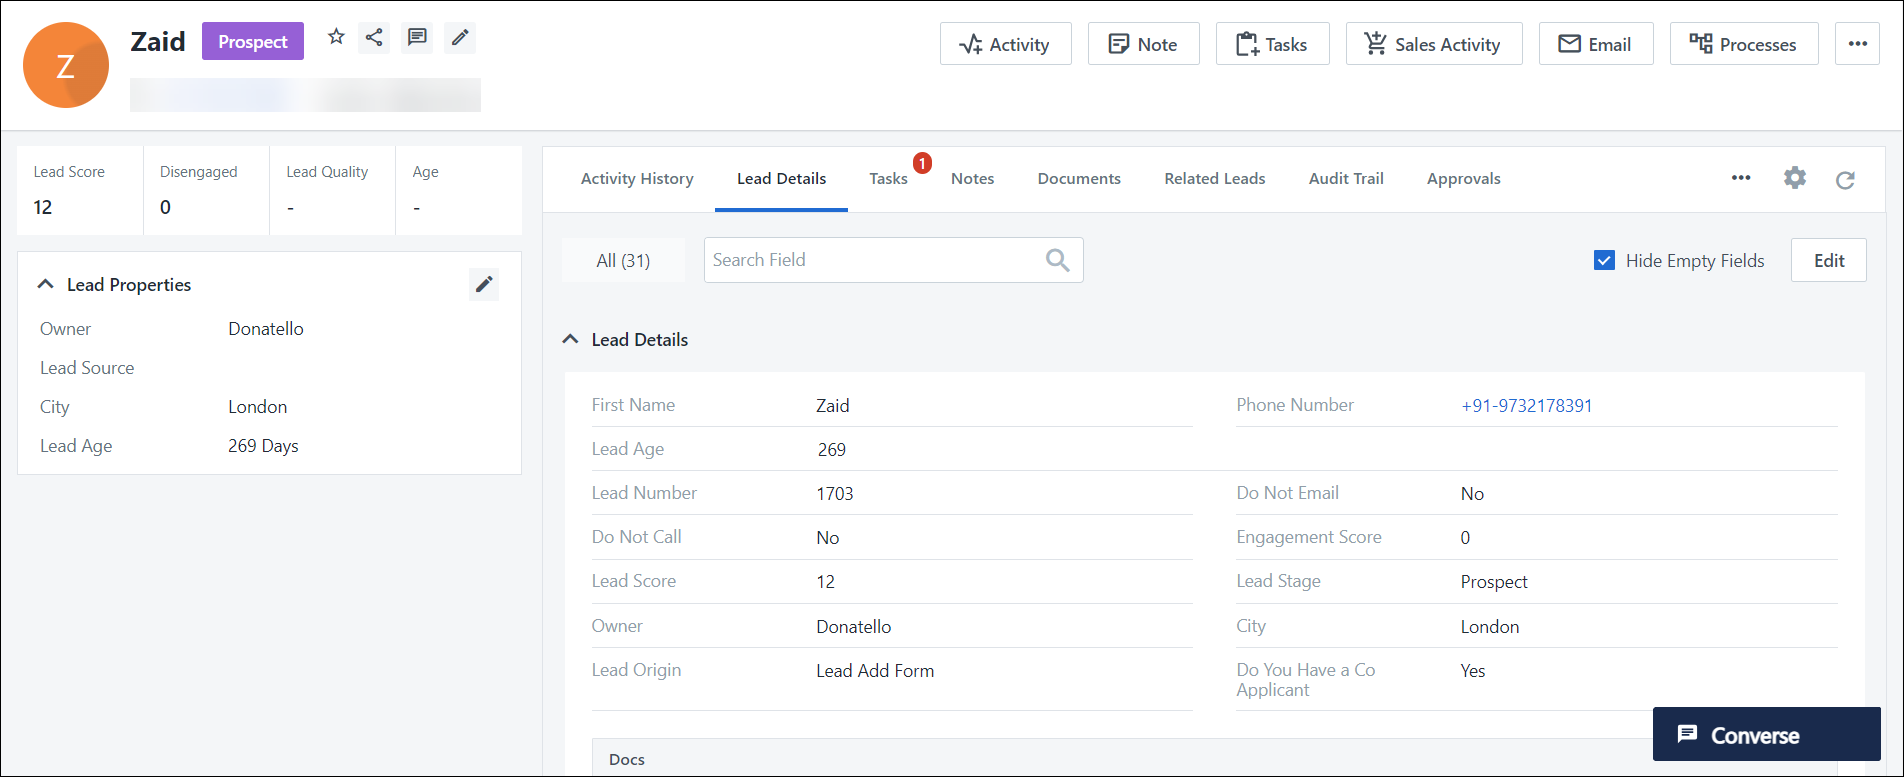
5.2 Lead Details
Lead details
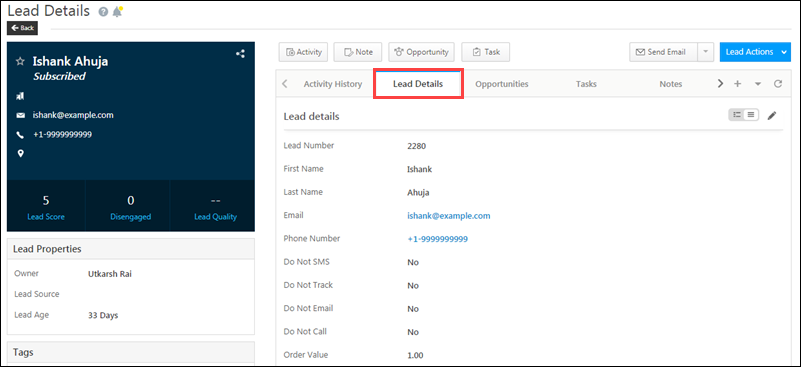
You can view the lead’s information, such as the lead’s first name, last name job title, phone number, email and so on. To edit the Lead details, click the ![]() icon. Once you’re done, click Save.
icon. Once you’re done, click Save.
Additional Information
You can view the details of –
- Who created the lead
- The prospect creation and lead creation date
- Who modified the lead details
- The date on which the lead details were modified
To edit the Additional Information, click the ![]() icon. Once you’re done, click Save.
icon. Once you’re done, click Save.

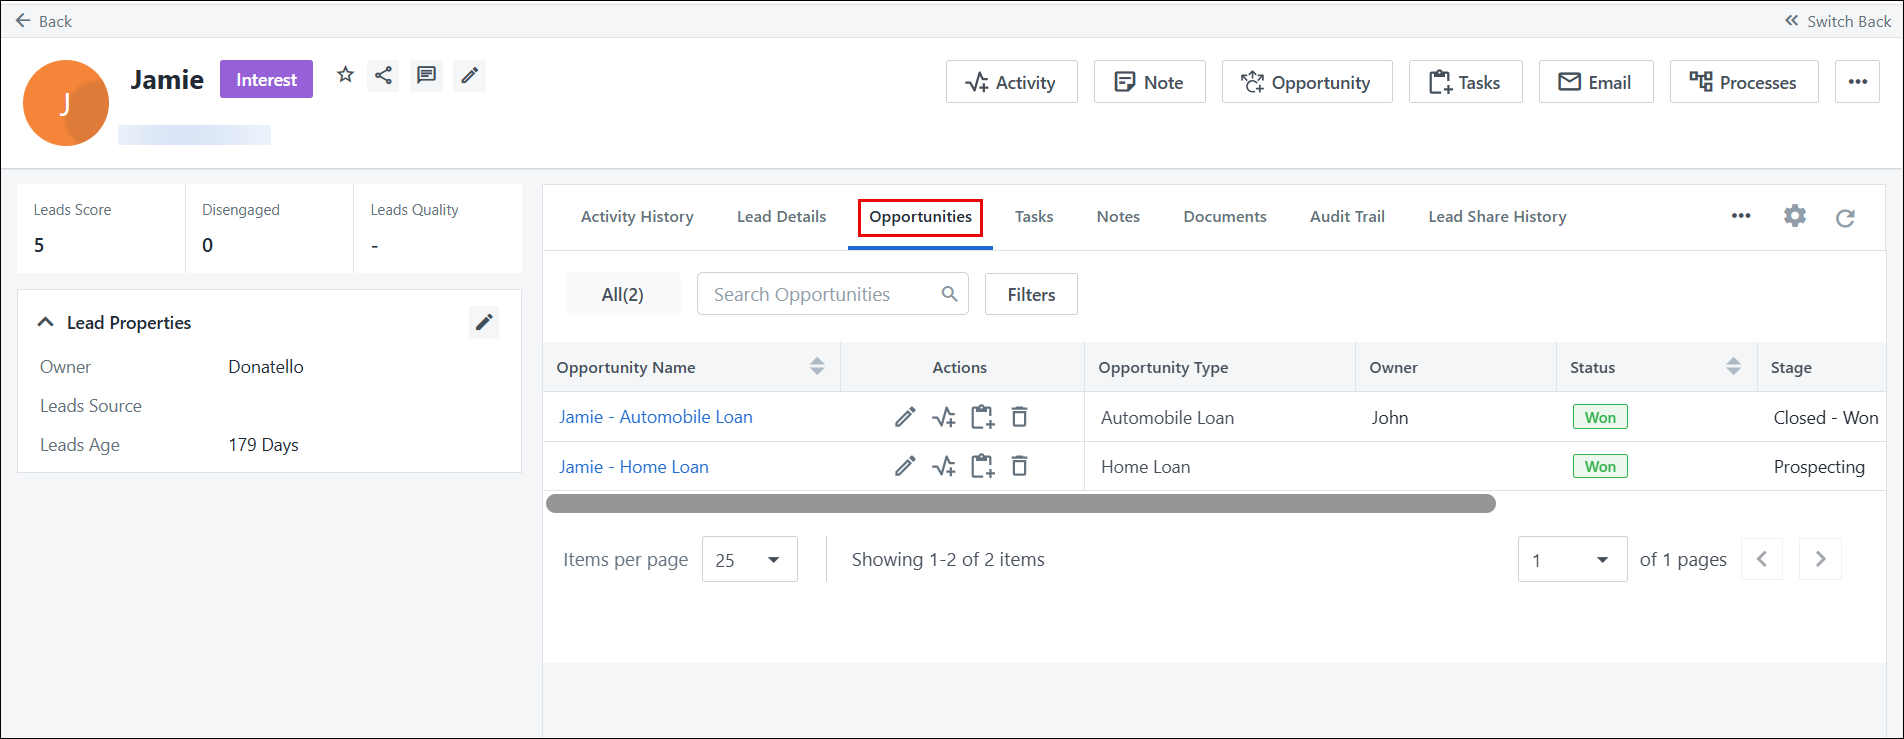
5.3 Opportunities
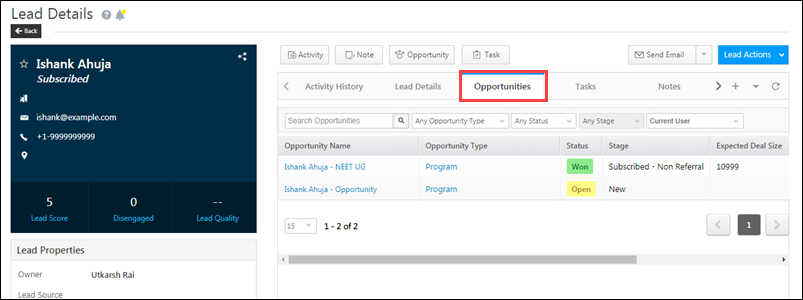
From the Opportunities tab, you can view the opportunity details of the product or service the lead has shown interest in. If a lead has multiple opportunities (inquires, applications, etc.) you can also view them here. You can view the –
- Opportunity Name
- Opportunity Type
- Opportunity Status
- Opportunity Stage
- Expected Deal Size
To view additional opportunity fields under the Opportunities tab –
- Click the
 icon on the right in the Opportunities tab.
 - On the popup, click Show:All.
- From the list, check the boxes alongside the relevant fields and click Show Selected.

To know more about Opportunities in LeadSquared, please refer to Opportunity Management – Feature Guide.
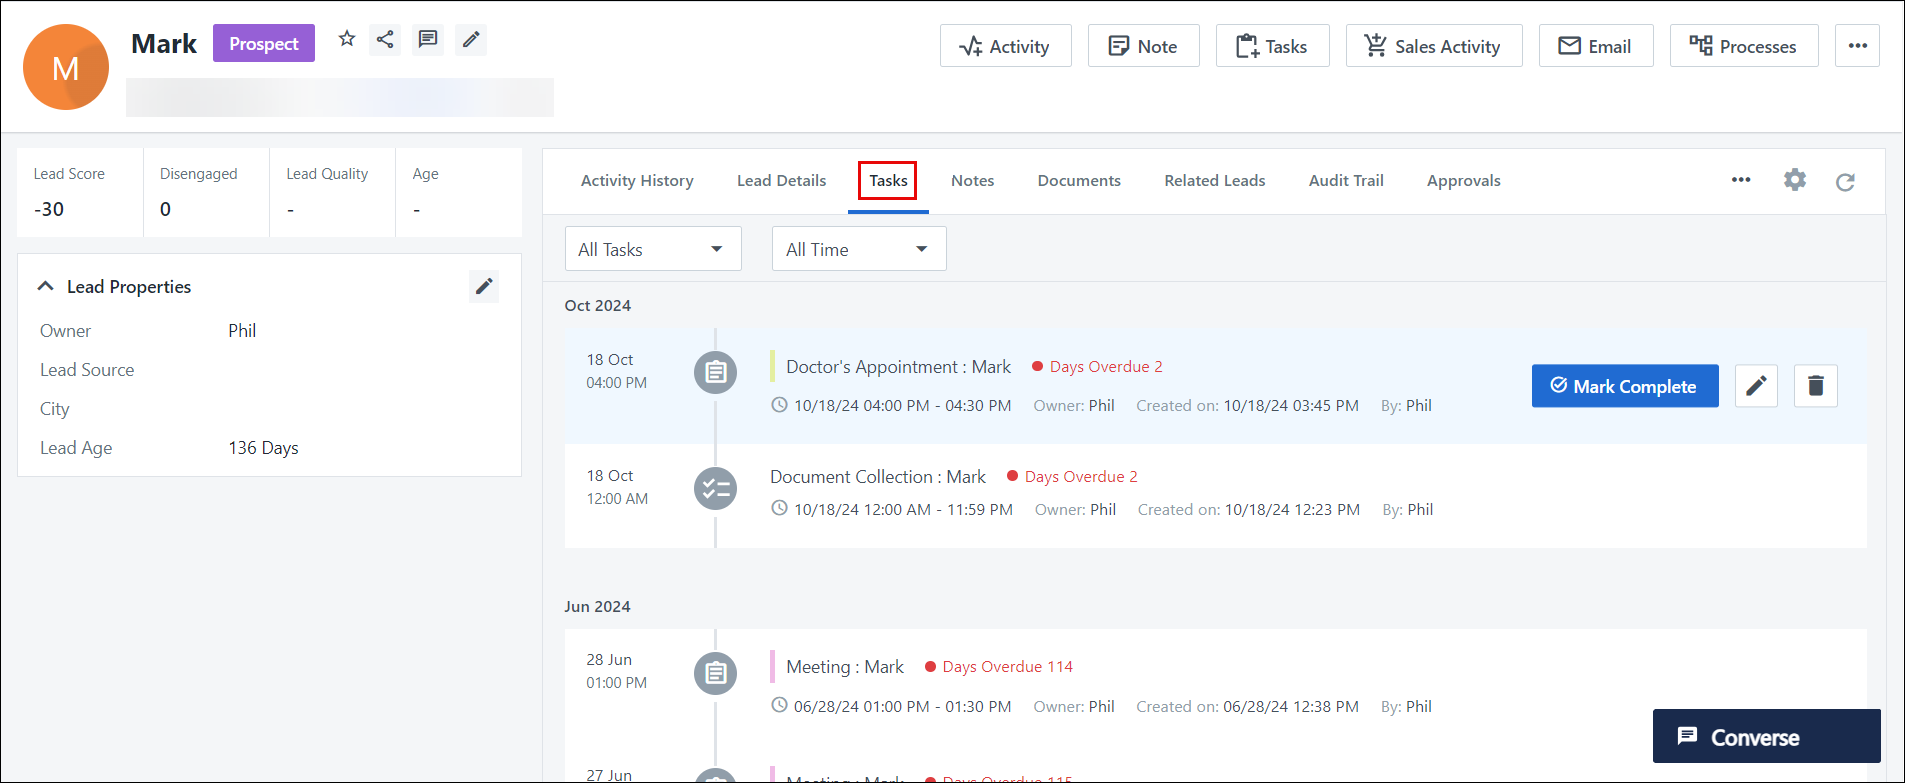
5.4 Tasks
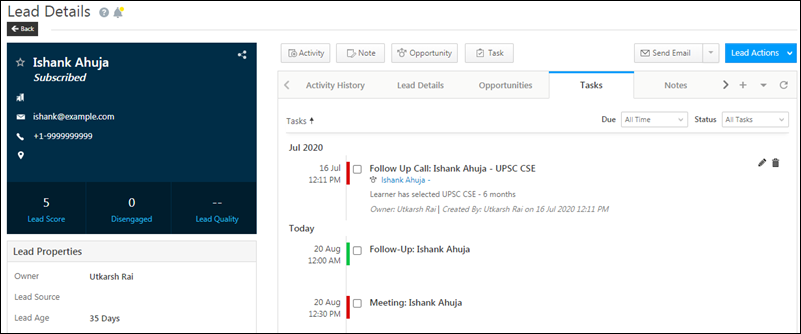
Under this tab, you can view and modify the tasks related to the lead as well as to an opportunity. You can view who created the task, the lead owner, opportunity owner, and the task details. You can filter tasks by –
- Due – The date on which the task was due (yesterday, last 7 days, custom date, etc.).
- Status – The current status of the task (Completed, Overdue, Pending and All Tasks).
You can perform the following actions –
- Edit – To edit a task, hover your cursor over the task, and click the
 icon. Once you’re done, click Save.
 - Delete – To delete a task, hover your cursor over the task, and click the
 icon. On the pop-up, click Confirm.
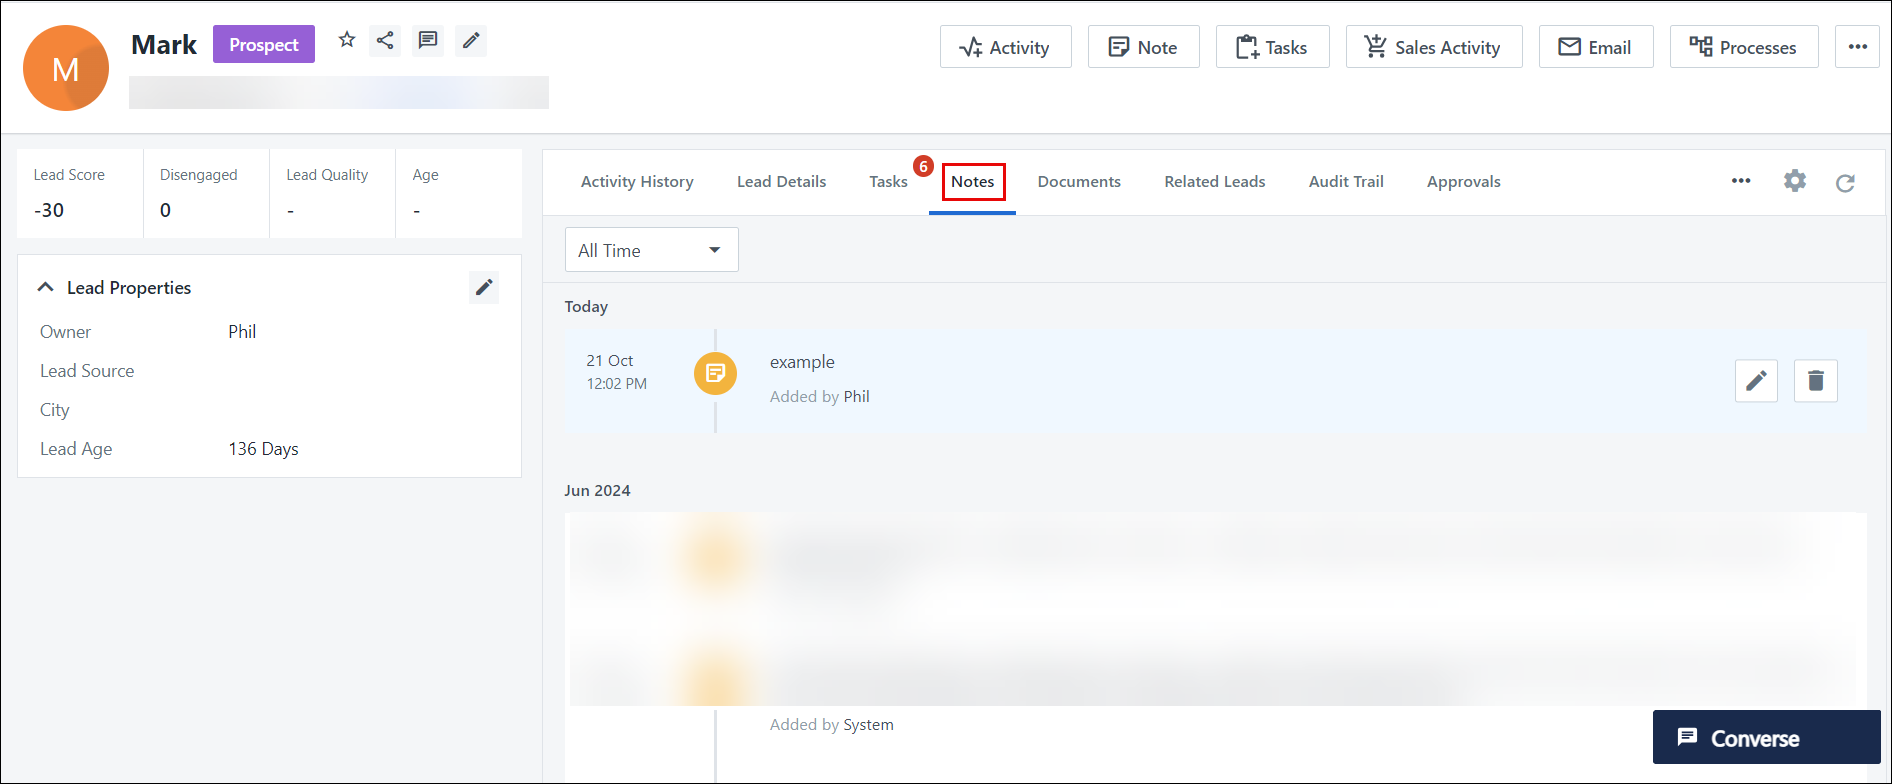
5.5 Notes
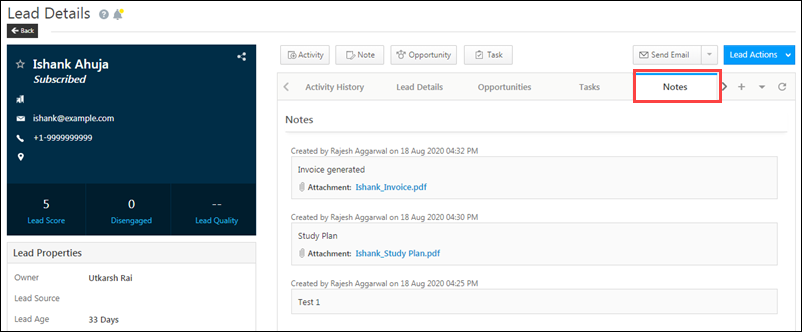
You can view and modify notes related to the lead. You can perform the following actions –
- Edit – To edit a note, hover your cursor over the note, and click the
 icon. Once you’re done, click Save.
 - Delete – To delete a note, hover your cursor over the note, and click the
 icon. On the pop-up, click Confirm.
5.6 Documents
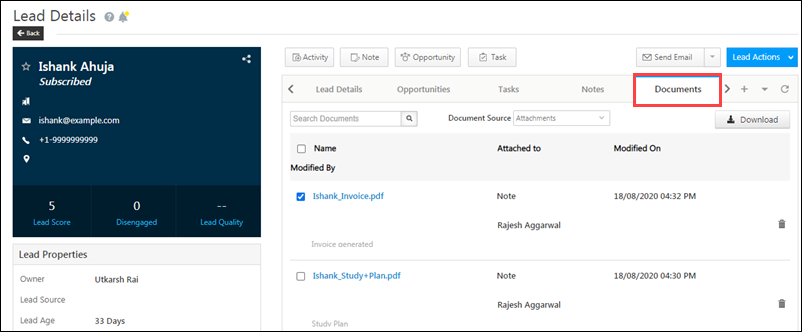
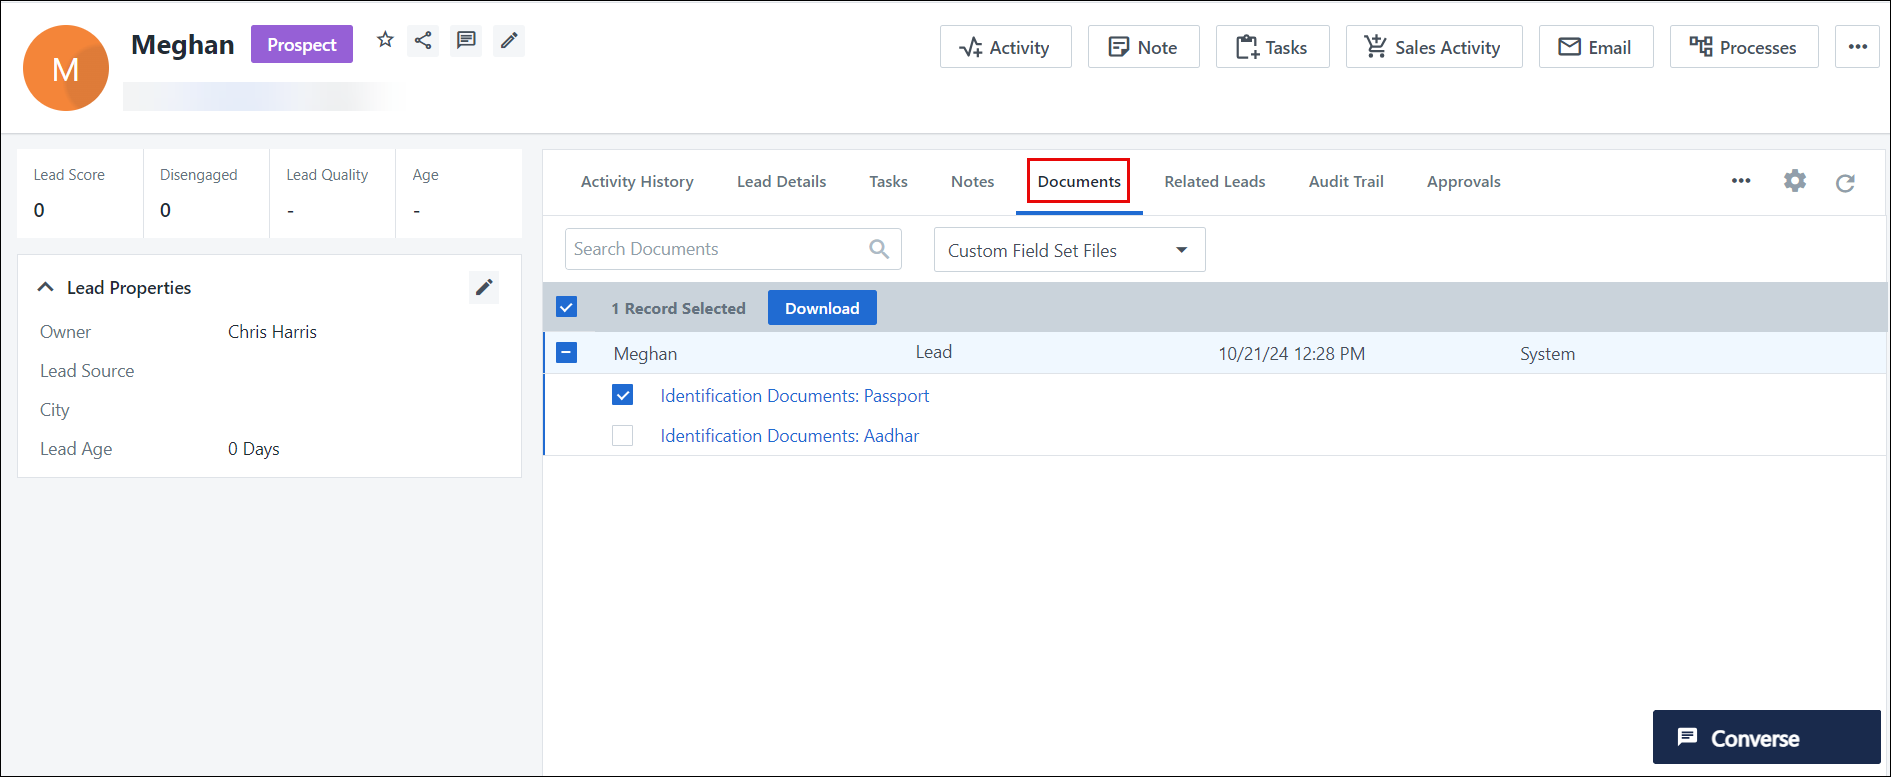
You can view all the documents that were uploaded to the lead. You can also perform the following actions –
- Download – Click the
 checkbox against the documents you want to download, and then click Download.
 - Delete – To delete a document that’s uploaded to a lead, against the document you want to delete, click the
 icon.
icon.
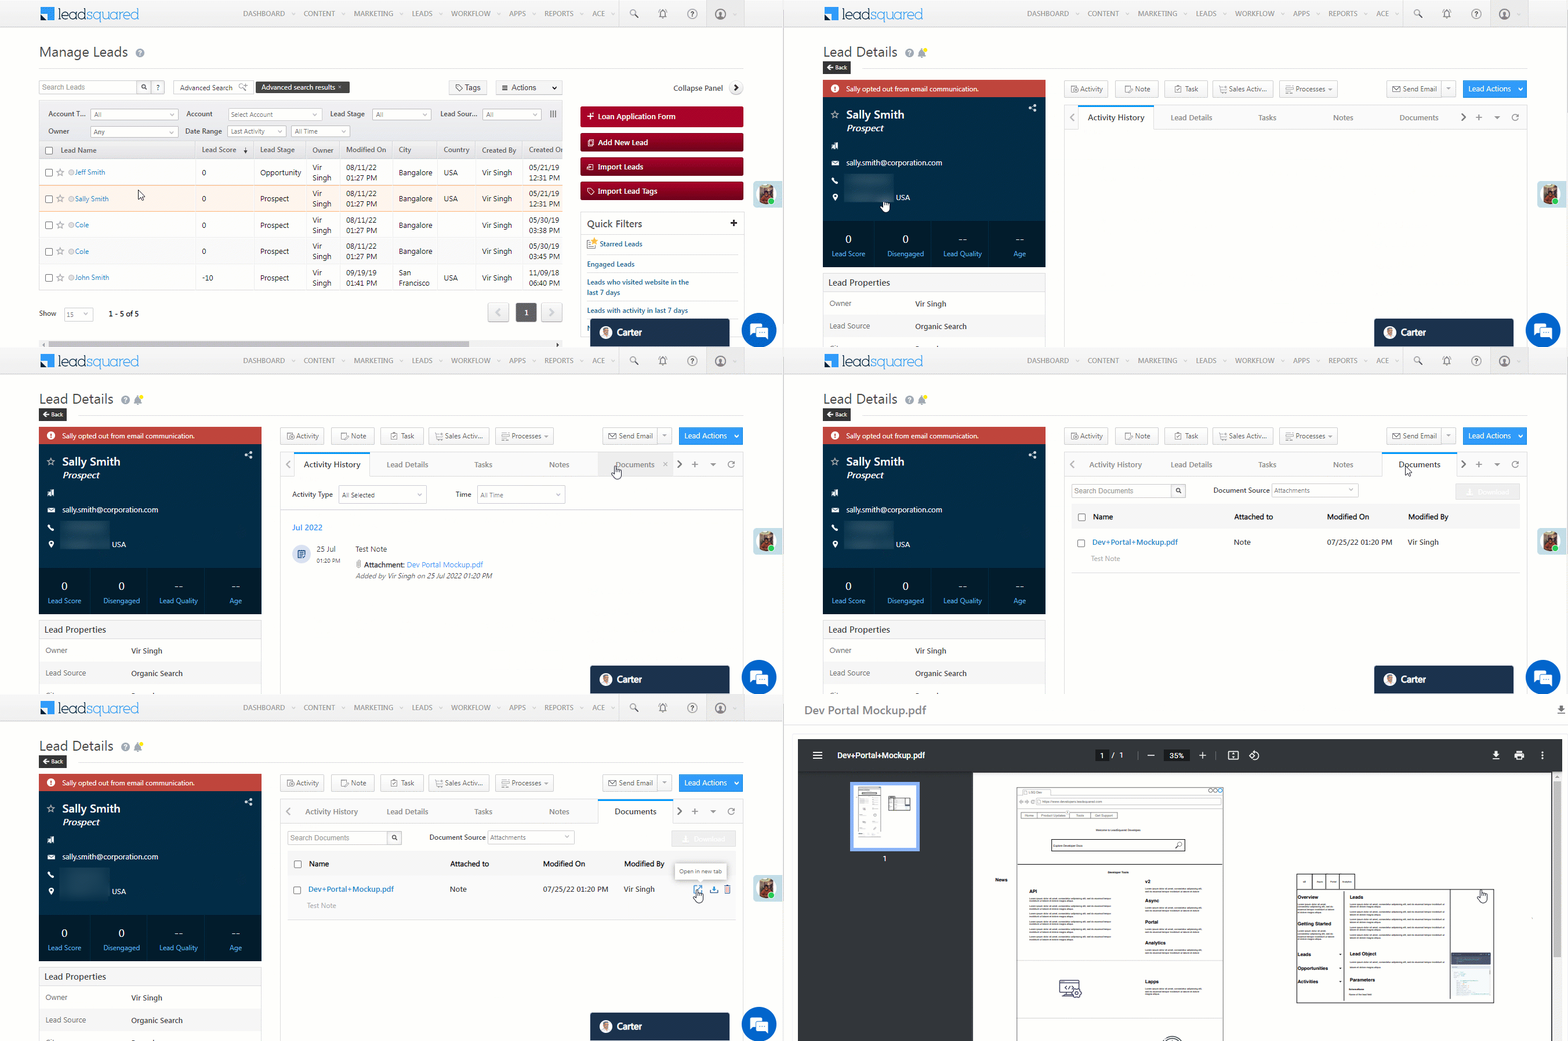
You can open the documents in a new browser tab for quicker verification against the lead’s details. This helps in improving the efficiency of Sales Users who verify large numbers of documents received from leads. This feature is now available by default on the Lead Details page.
5.7 Member of Lists
View all the lists the lead is part of. Clicking on any list redirects you to the List Details window.

5.8 Summary
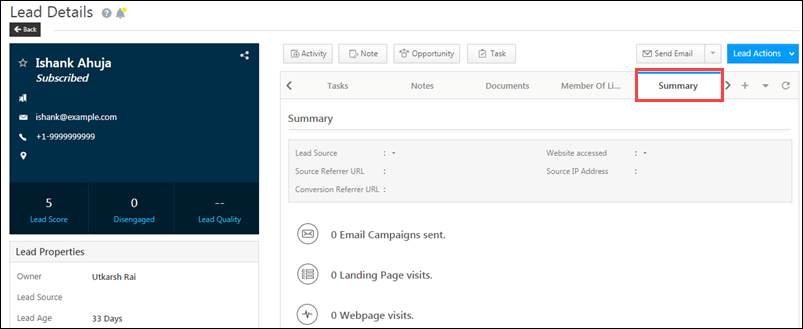
This tab provides an overview of the Lead Details page. Here, you can view the following details, all in one place –
- Lead Source
- Source Referrer URL
- Conversion Referrer URL
- Website accessed
- Source IP Address
5.9 Lead Share History
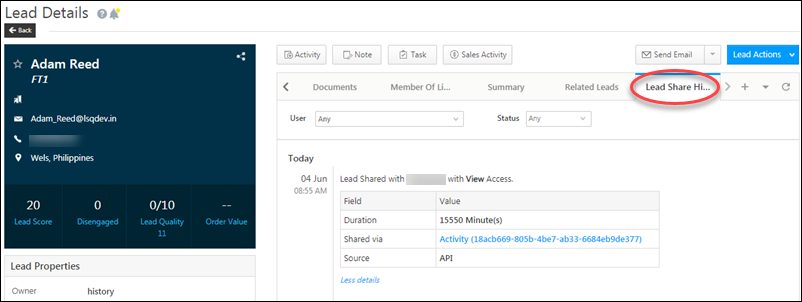
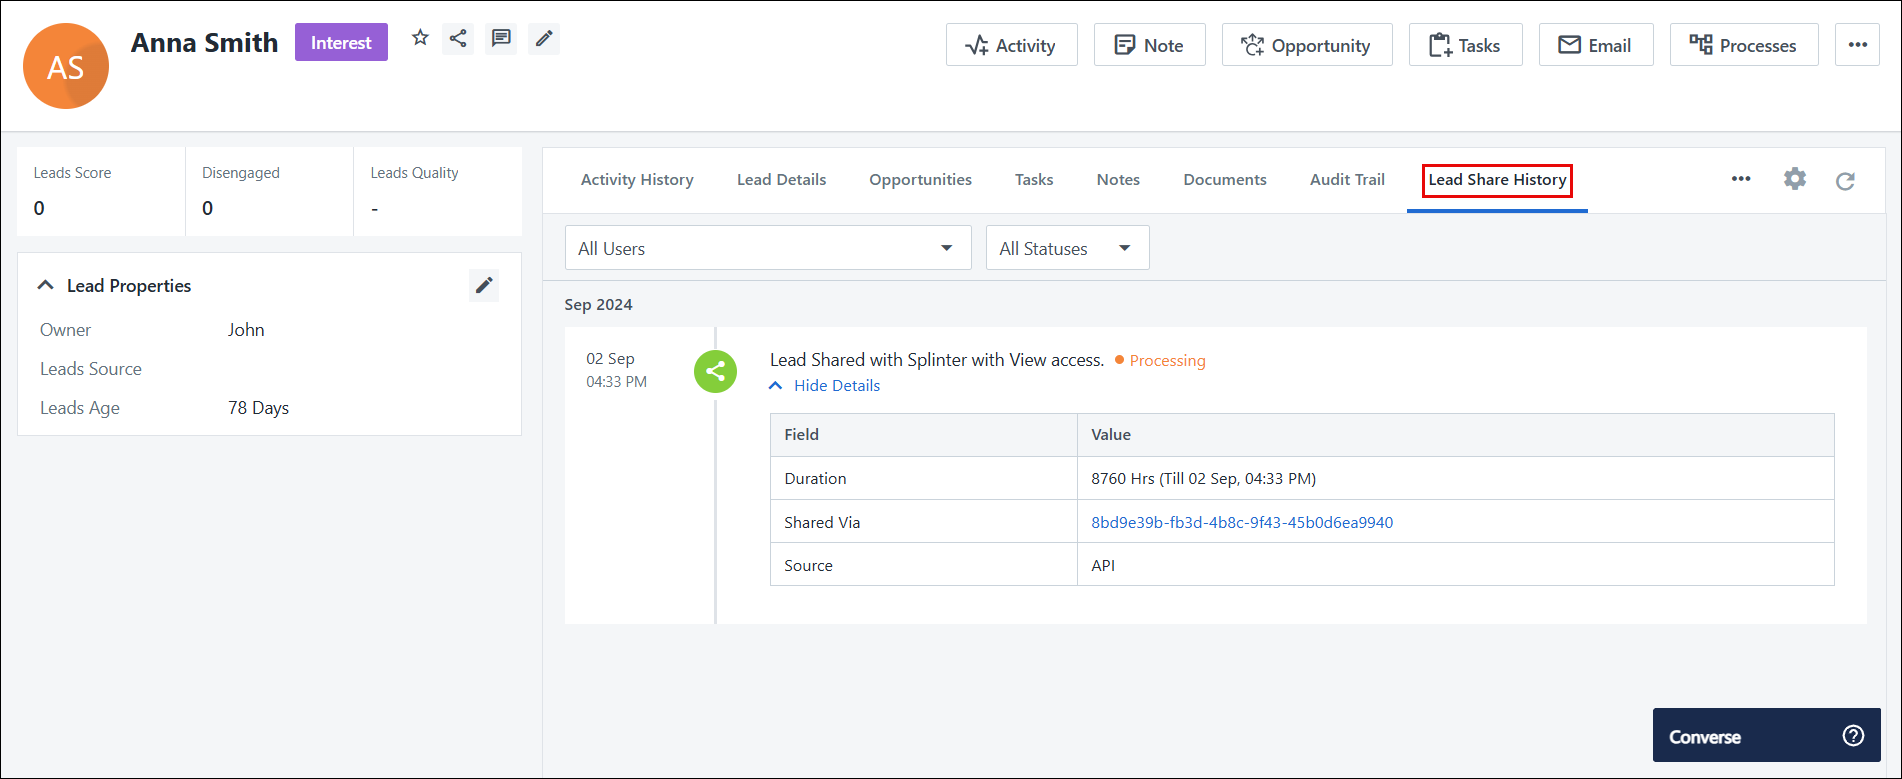
Under the Lead Share History tab, you can view the lead share history for any particular lead, including details such as the activity and duration the lead was shared for, as well as the lead share source (API or Automation). To enable this feature on your account, please write to support@leadsquared.com
5.10 Custom Tabs Connector
Along with the default LeadSquared tabs, you can also create and add your own custom tabs on the Lead Details page. Custom tabs allow you to fetch and display data from external sources and third-party vendors (such as Zendesk, Freshdesk, etc.). To know how to create custom tabs, please refer to Custom Tab Connector.
6. Actions
On the Lead Details page, you can perform the following actions –
6.1 Add Activities
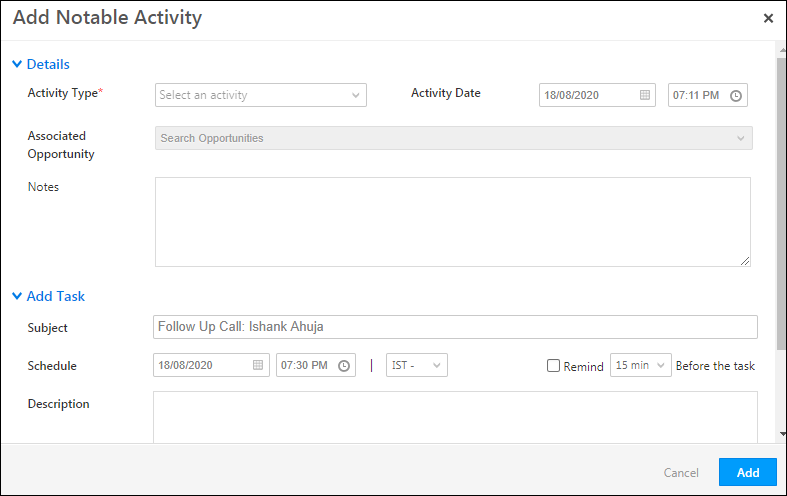
From the Lead Details page, you can add an activity to a lead as well as to an opportunity. To illustrate this, let’s take the example of an insurance seller. The activities that can be added on the lead are “Received Health Insurance Premium – First Installment”, “Sent Health Insurance Scheme Documents”, and so on. The activities that can be added to the opportunity are “Set Up Phone Call for Vehicle Insurance”, and so on.
To add an activity –
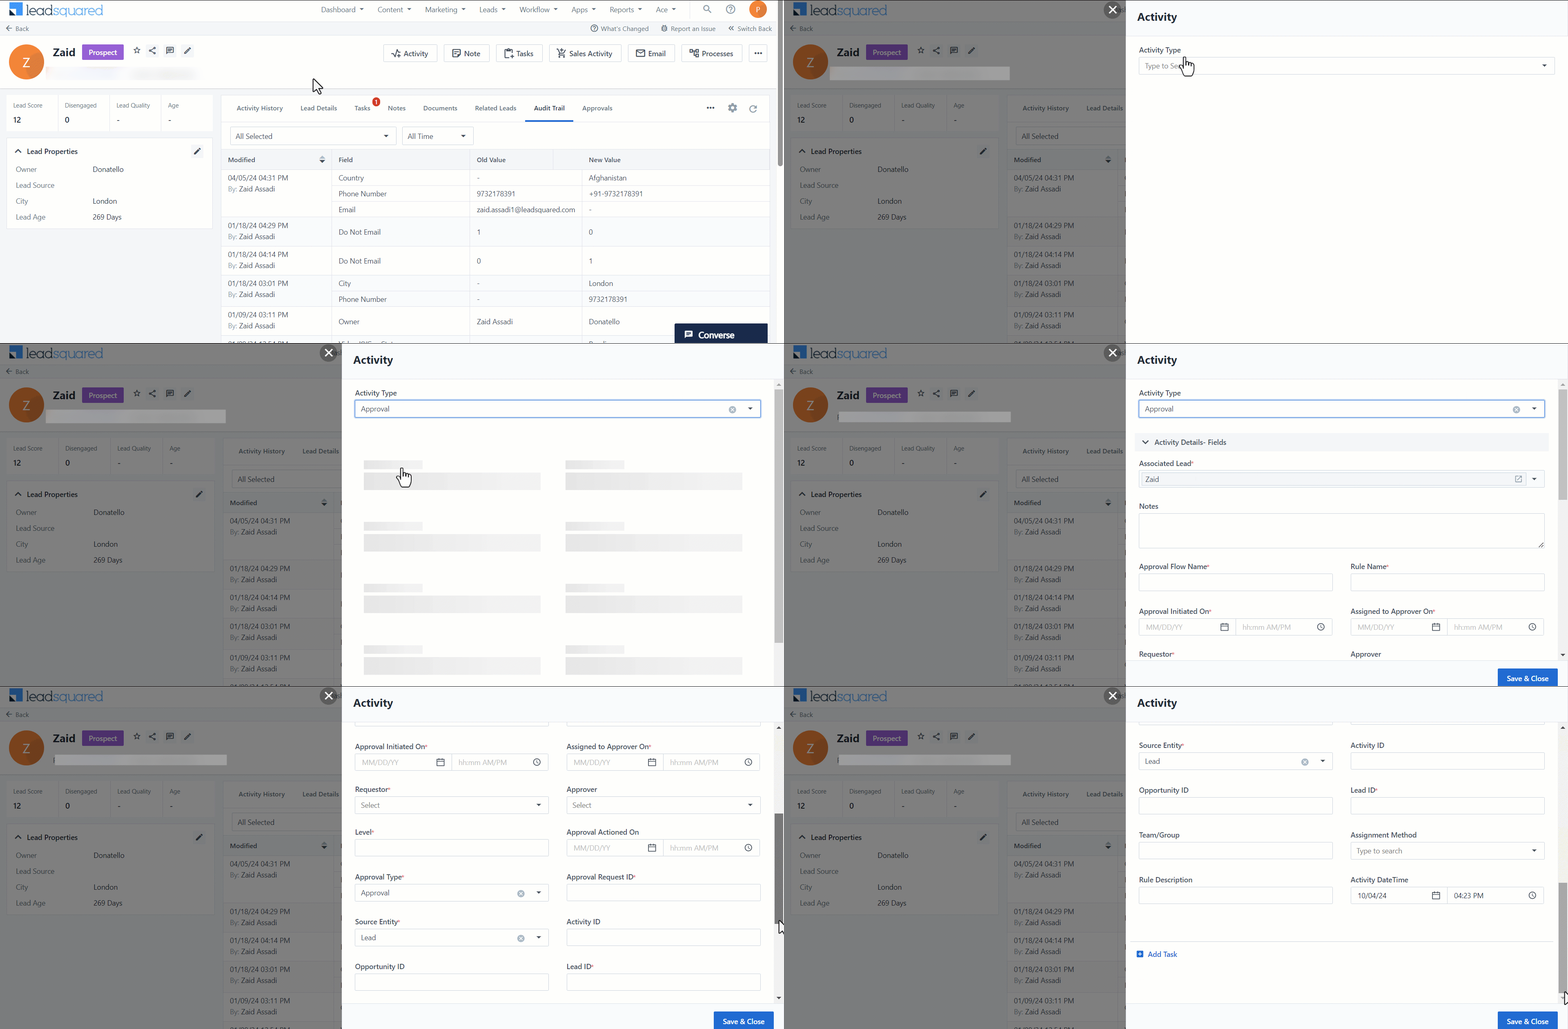
- Click the
 button. This will open the Add Notable Activity pop-up.
 - Select the desired activity from the Activity Type drop-down list.
- Enter the Activity Date and Notes if required.
- If required, you can also add opportunities and tasks to the lead.
- Once you’re done entering the details, click Add. You will get a confirmation once the activity is successfully added.
For more information, refer to How to add Activity to Lead(s), and the Activities section on Opportunity Details.
6.2 Add Notes
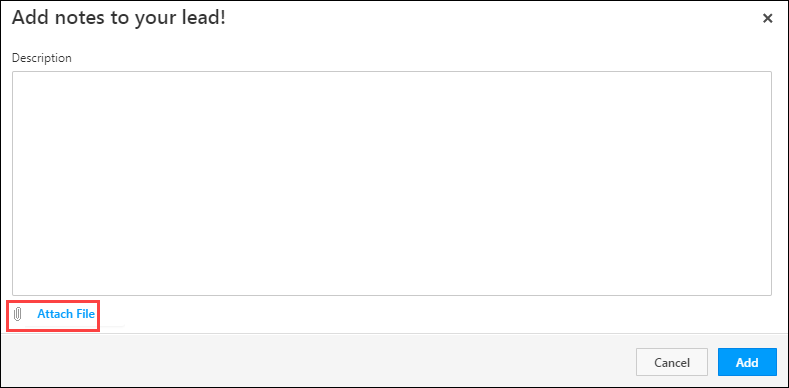
Adding notes to your lead will ensure that all the stakeholders are always up-to-date on the lead’s life-cycle. To add notes –
- Click the
 button.
 - On the pop-up, under Description, you can add notes.
- To attach documents to your notes, click Attach File. The maximum file size that can be uploaded is 10 MB.
- Once you’re done, click Add. You will get a confirmation once the note is successfully added.
6.3 Add Opportunities
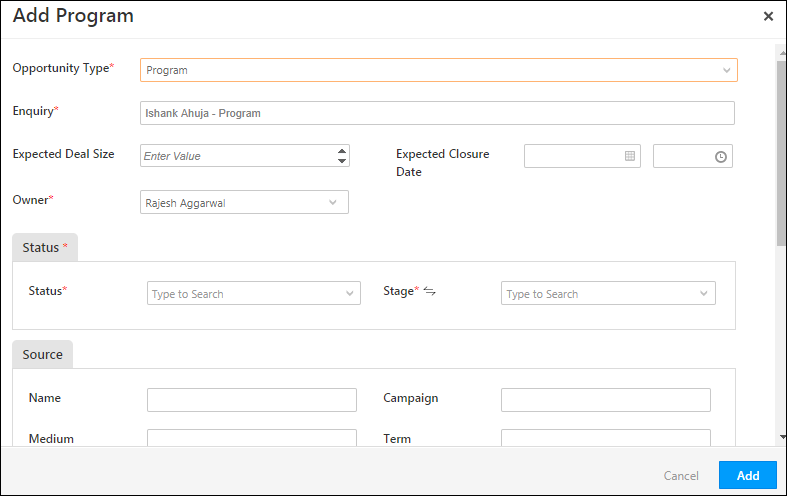
Opportunities in LeadSquared represent potential future deals from existing leads. To add an opportunity –
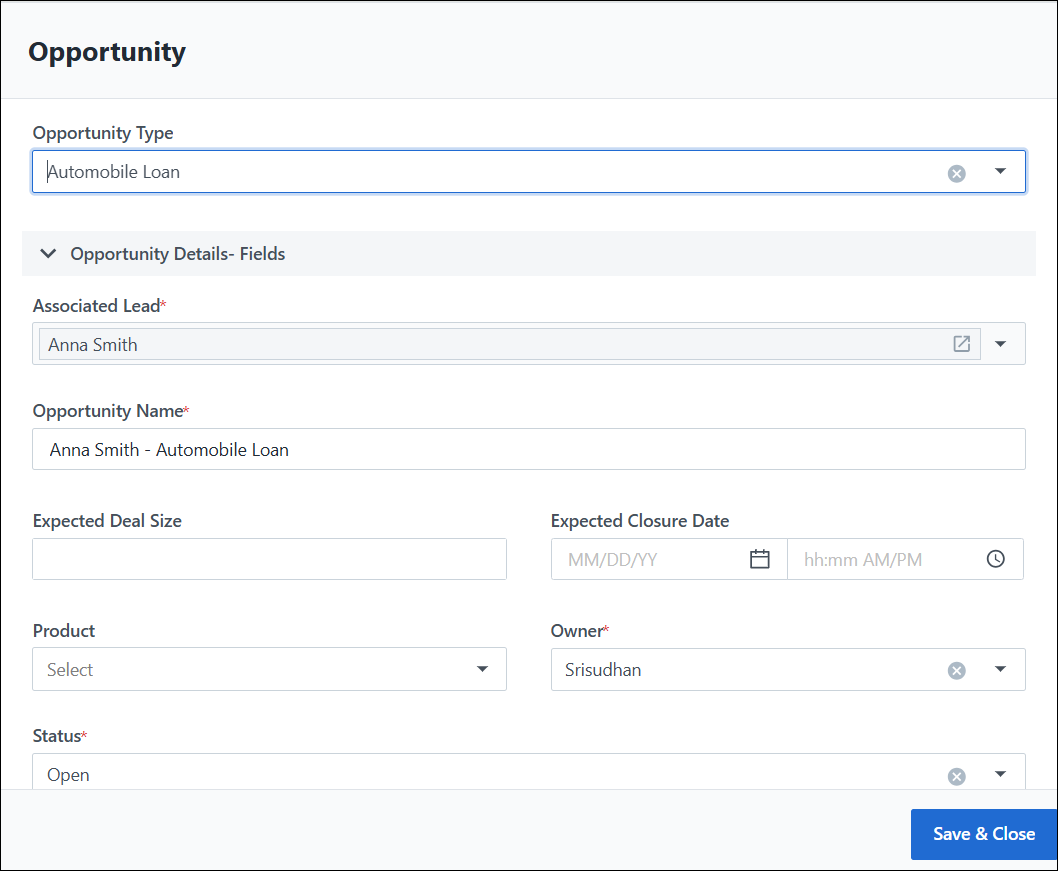
- Click the
 button.
 - On the Add Opportunity pop-up, select the Opportunity Type you want to add.
- Enter all the required details on the Add Opportunity form.
- Once you’re done, click Add. You will get a confirmation once the opportunity is successfully added.
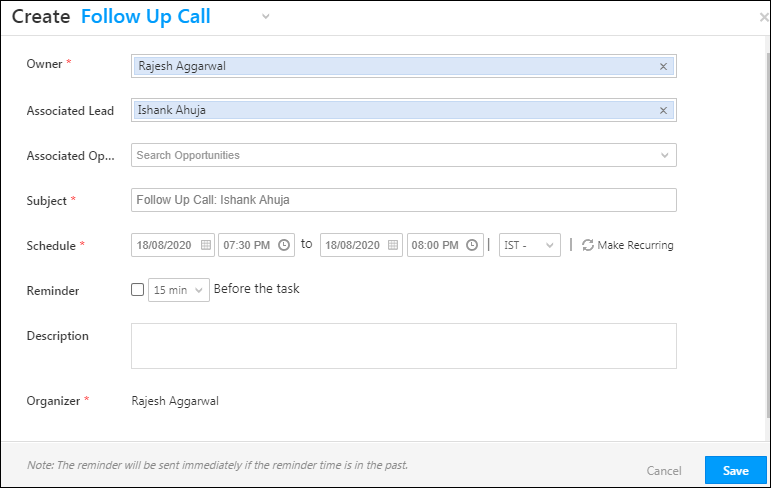
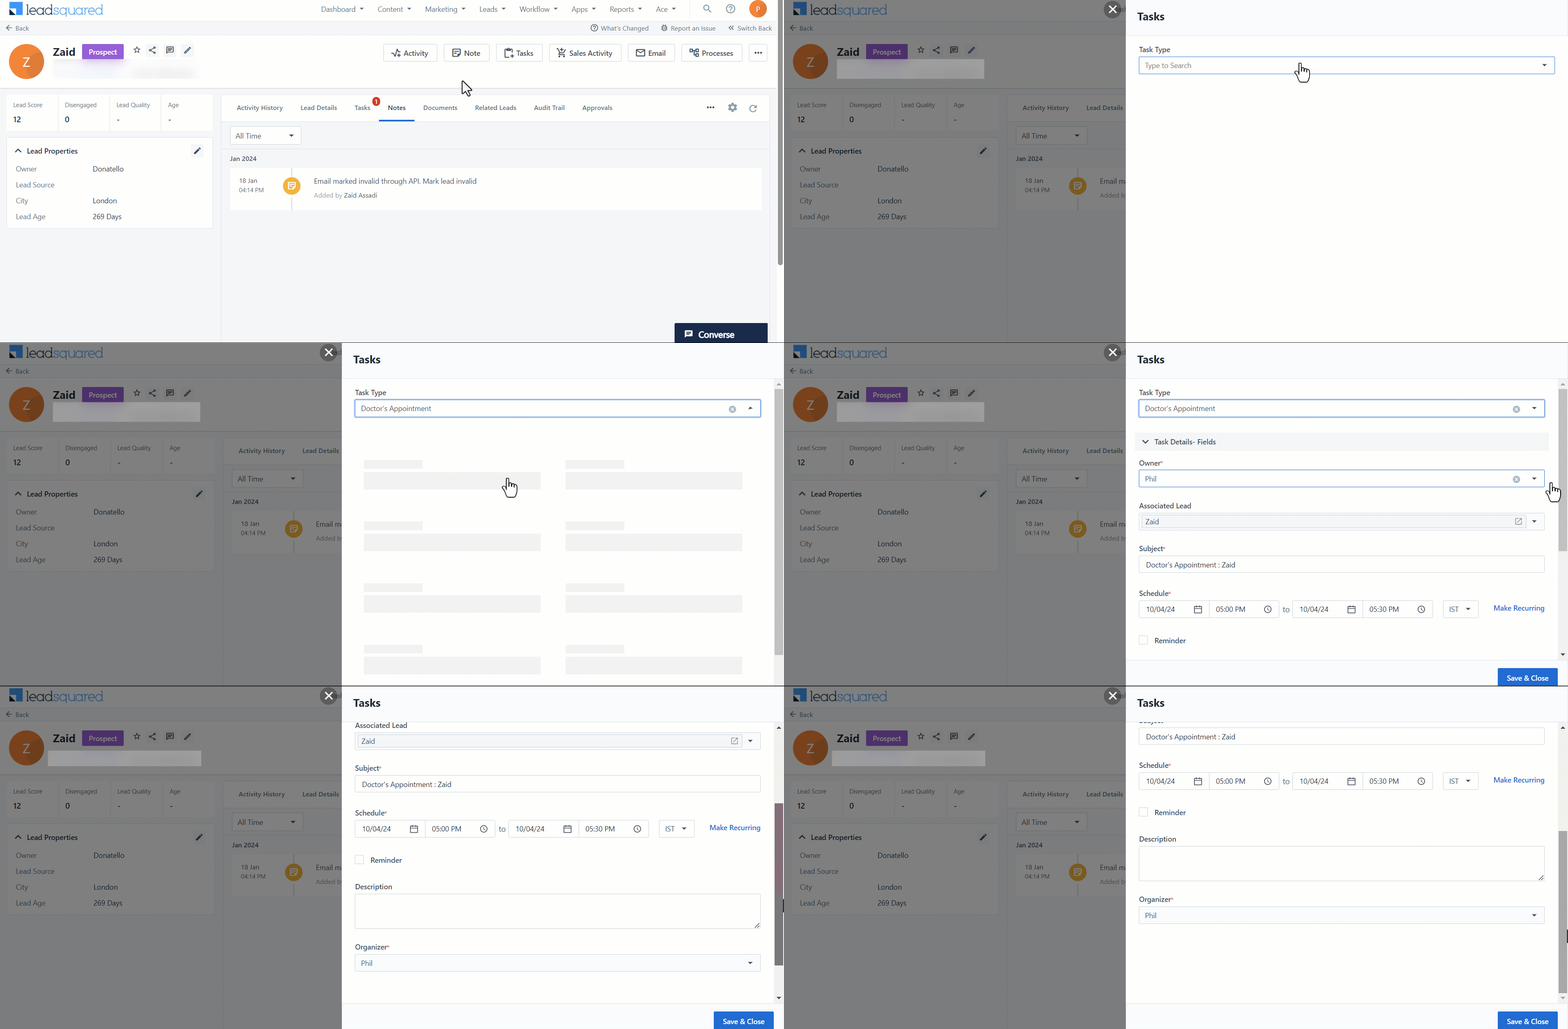
6.4 Add Tasks
Create different tasks, specific to your business requirements, to take your lead’s journey to completion. From the Lead Details page, you can add a task to a lead as well as to an opportunity. To illustrate this, let’s take the example of an insurance seller. The tasks that can be added on the lead are “Mail Health Insurance Policy Documents”, “Visit Lead to Conduct Health Check-Up”, and so on. The tasks that can be added to the opportunity are “Inspect Lead’s Vehicle for Motor Insurance”, and so on.
- Hover your cursor over the
 button.
 - From the list of tasks, select the task you want to create.
- On the Create Task pop-up, enter the required details.
- Once you’re done, click Add. You will get a confirmation once the task is successfully added.
For more information on this, refer to How to create Tasks and schedule Reminders?
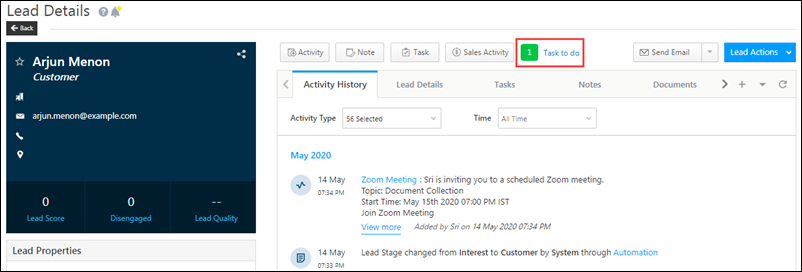
6.5 Tasks to do
You can view the pending tasks on this lead, in the Tasks to-do bubble. To enable this feature, please write to support@leadsquared.com.
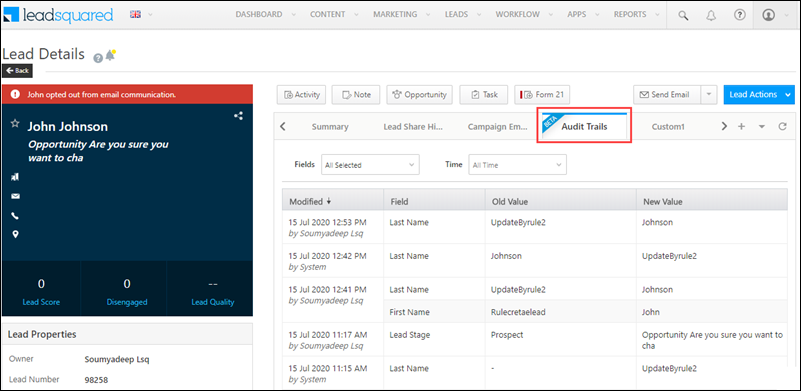
6.6 Audit Trail
The Lead Field Audit helps you keep track of all the changes that have been made to your lead, by your users or by the system (Automation, Rules, etc.). When enabled, you can view an Audit Trails tab on the lead details page where you can view the particular lead fields that have been changed along with the time stamp and user/system that made the change. To know more, refer to Lead Field Audit. To enable this feature on your account, please write to support@leadsquared.com
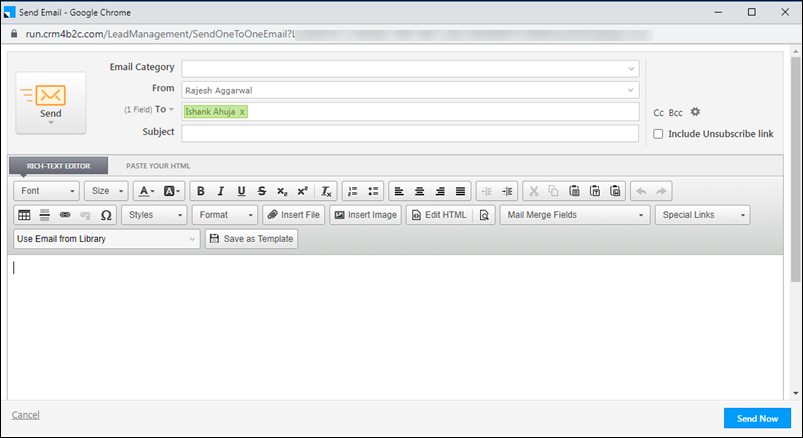
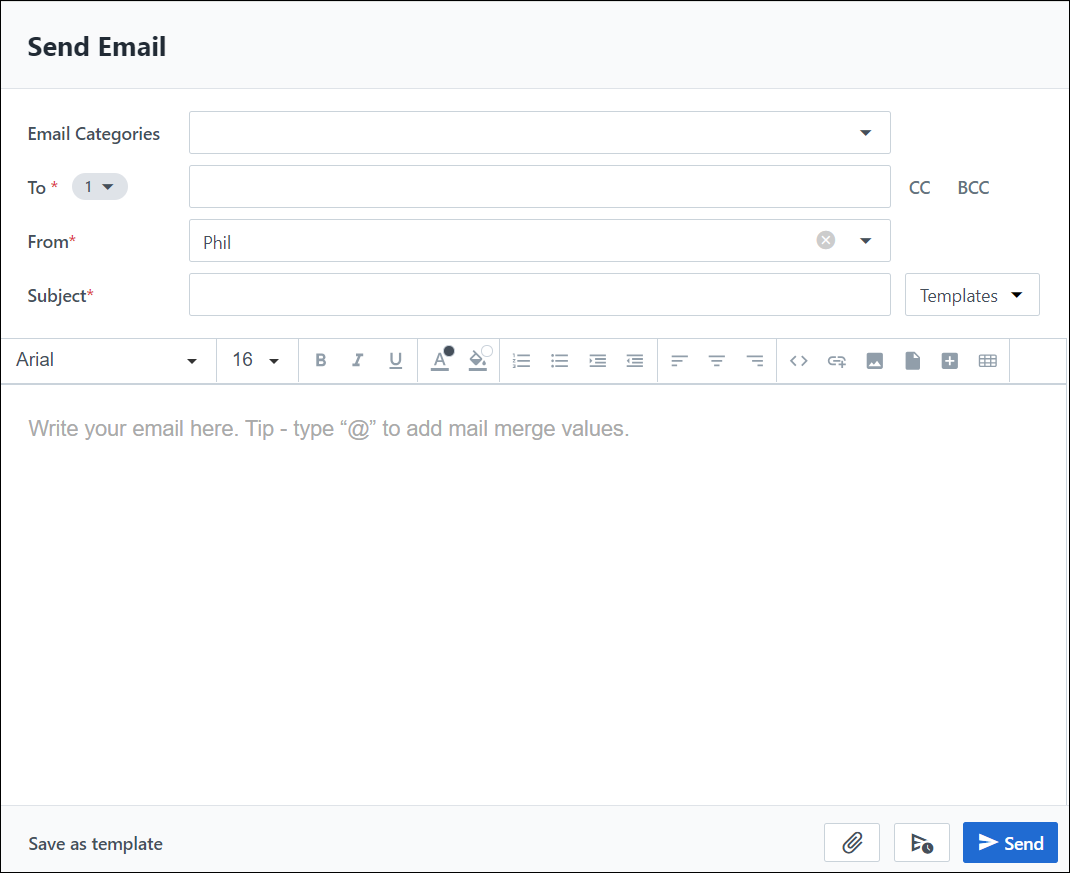
6.7 Send Email
The Send Email button allows you to send one-to-one emails to your lead. Click the button, and the email editor pop-up box appears. Once you’re done creating the email, click Send Now.
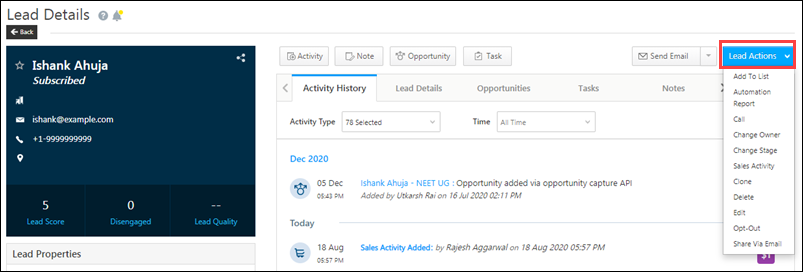
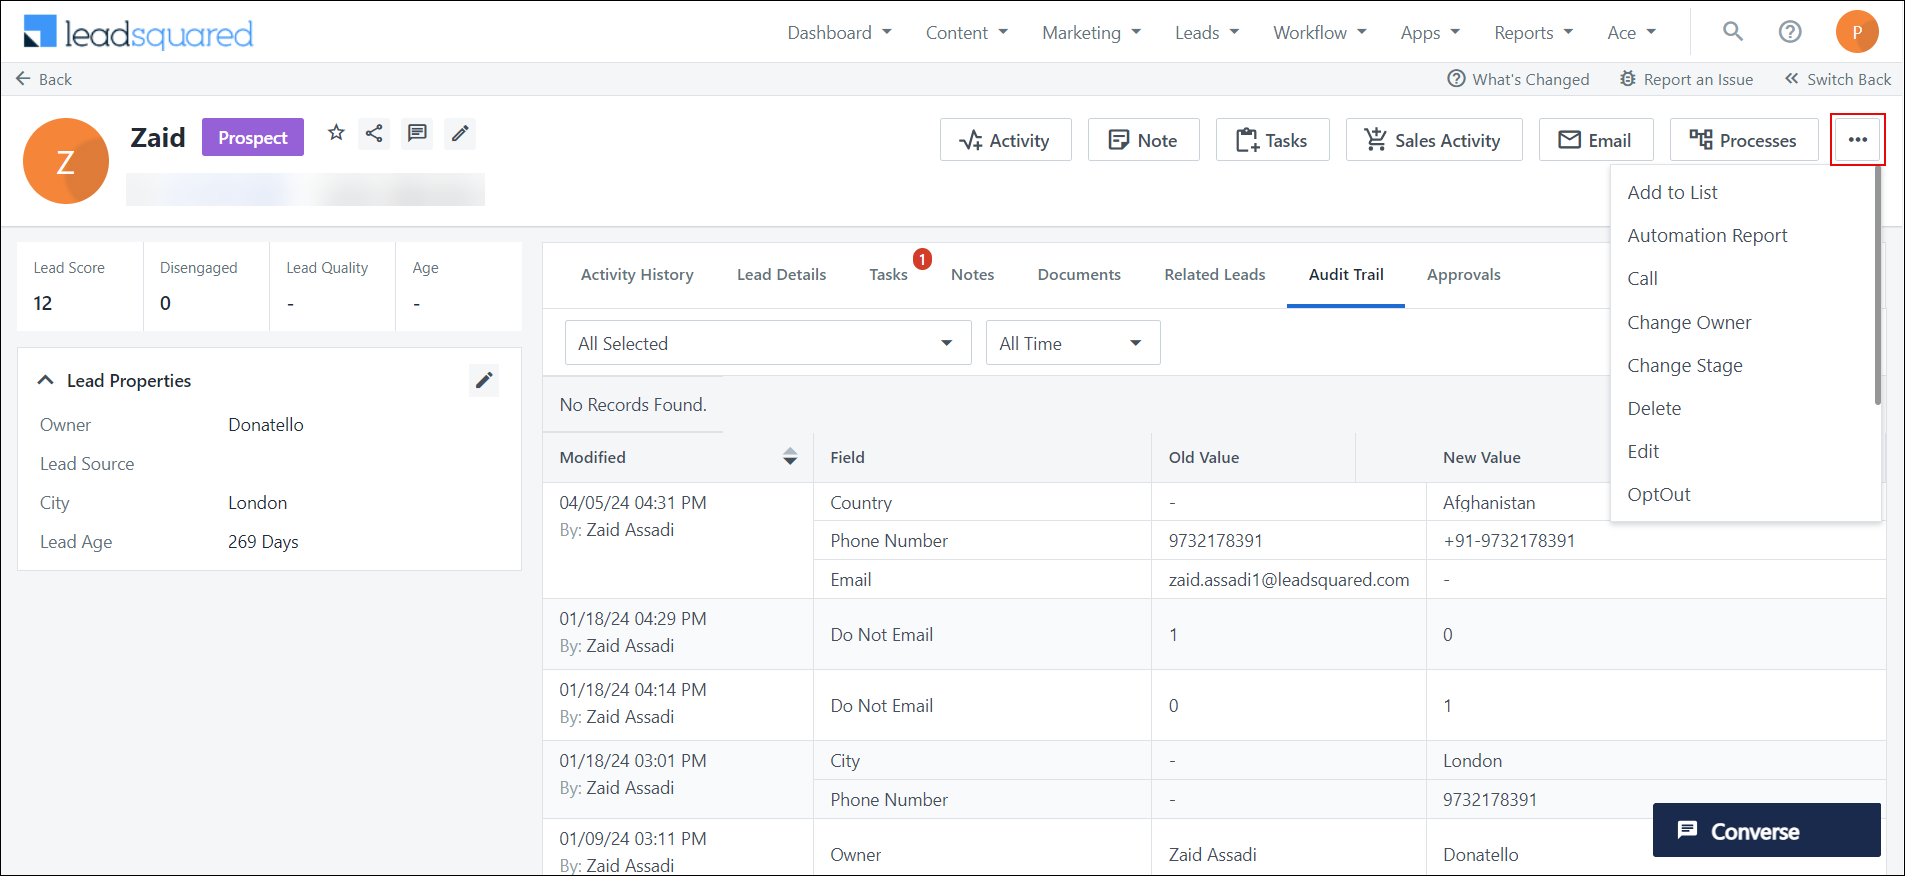
6.8 Lead Actions
You can hover on the lead actions button and choose any of the actions you can perform on the lead. The actions include Add to List, Automation Report, Change Owner, Change Stage, Clone, Delete, Edit, Opt-Out, Send Email, Share and Send SMS. For information, refer to Leads – Manage Leads.
FAQs
Character Limit Error in Lead Notes or Lead Activity Stream
- Issue – A Character Limit Exceeded error appears even when the character count is within the allowed limit.
- Cause – Pasting text from Word (.docx) or .aspx files may include hidden HTML formatting (fonts, styles) that inflates the actual character count beyond what is displayed.
- Solution –
- Method 1: Paste as Plain Text. If using Chrome, accept the popup to remove formatting when pasting.
- Method 2: Clear Formatting Manually. Right-click the text inside the Notes field and select “Clear Formatting” before saving.
Why do activity times appear differently in the Activity History?
Activity History displays two different timestamps because we maintain two separate fields for Activities:
- Created On Time – This is the system-generated timestamp recorded when the activity is created. It always reflects the current time at the moment of creation. This is the time displayed on the left side of the activity entry.
- Activity Date Time – This is a user-defined timestamp available in the activity form and can be populated while creating activities. It appears below the activity in the history and can reflect either the current time or a past time, depending on how it was recorded.
This distinction helps differentiate when an activity was logged versus when it actually took place.
Any Questions?
Did you find this article helpful? Please let us know any feedback you may have in the comments section below. We’d love to hear from you and help you out!







what does the score mean on Lead Score?
Hi, Savannah.
The lead score is the sum of all the activity points throughout the lead’s history that tells you how active/engaged your leads are. To know more about lead scores, refer to How does Lead Scoring work?
Hi how can I hide lead age for sales users?
Hi Vignesh,
There are 2 ways you can do this –
1. Create a Permission Template to hide/mask the lead age field. Then apply the template to the set of sales users you want to hide the field from.
2. Create a customized view of the lead details page and assign the view to teams in your LeadSquared account.
Hope this helps!
Hi Team,
Thanks for the reply. I appreciate.
But lead age is not reflecting in the field. PFA.
Hi, Vignesh. Sorry, we realised that since Lead Age is a calculated field, it cannot be masked using Permission Templates. Instead, you can hide the Lead Age from the Lead vCard form. To do this, navigate to My Profile>Leads>Lead Forms, from the dropdown, select the Lead vCard form, and under Lead Properties, drag the Lead Age field to the Hidden Field section, present on the right. After you Save the form, the Lead Age field will be hidden on the Lead Details page..png)
How to Find Lead Account No.
Hi, Sujith. Thank you for your question. Are you trying to find your LeadSquared account number? If yes, please refer to https://help.leadsquared.com/how-do-i-find-my-leadsquared-account-number/
Instead, if you’re trying to find the Lead Number, then navigate to the Manage Leads page, and click the Select Column/Column Customization icon (it’s the three vertical-lines icon alongside the filters). On the Select Lead Fields to view in grid pop-up, search for and select Lead Number. The Lead Number will now be displayed along with your Leads, on the Manage Leads page.