


Get Started

Sales Suite
Field Ops
Marketing
Service CRM
Integrations & Apps
FloStack
LinkedIn Ads Lead Sync Connector

1. Feature Overview
The LinkedIn Ads Lead Sync Connector captures lead data from LinkedIn Lead Gen Forms configured in your LinkedIn account and uses it to create new leads in your LeadSquared account. This helps you capture leads automatically and follow up with them faster to improve conversion rates.
2. Prerequisites
- To enable this connector on your account, contact your account manager, or write to support@leadsquared.com.
- You must be an Admin user to install and configure this connector.
3. How it Works
- Install the connector and configure the user roles that can access it.
- Sync your LinkedIn business account with LeadSquared.
- Once the account is linked, enable data capture on the connector.
- Then, contact your account manager or write to support@leadsquared.com to let them know sync is enabled. This step is mandatory and is required to complete the backend configuration in LeadSquared.
- Once LeadSquared completes the configuration, you’ll be notified. After that, leads captured from LinkedIn are created in your LeadSquared account.
4. Install the Connector
On your LeadSquared account –
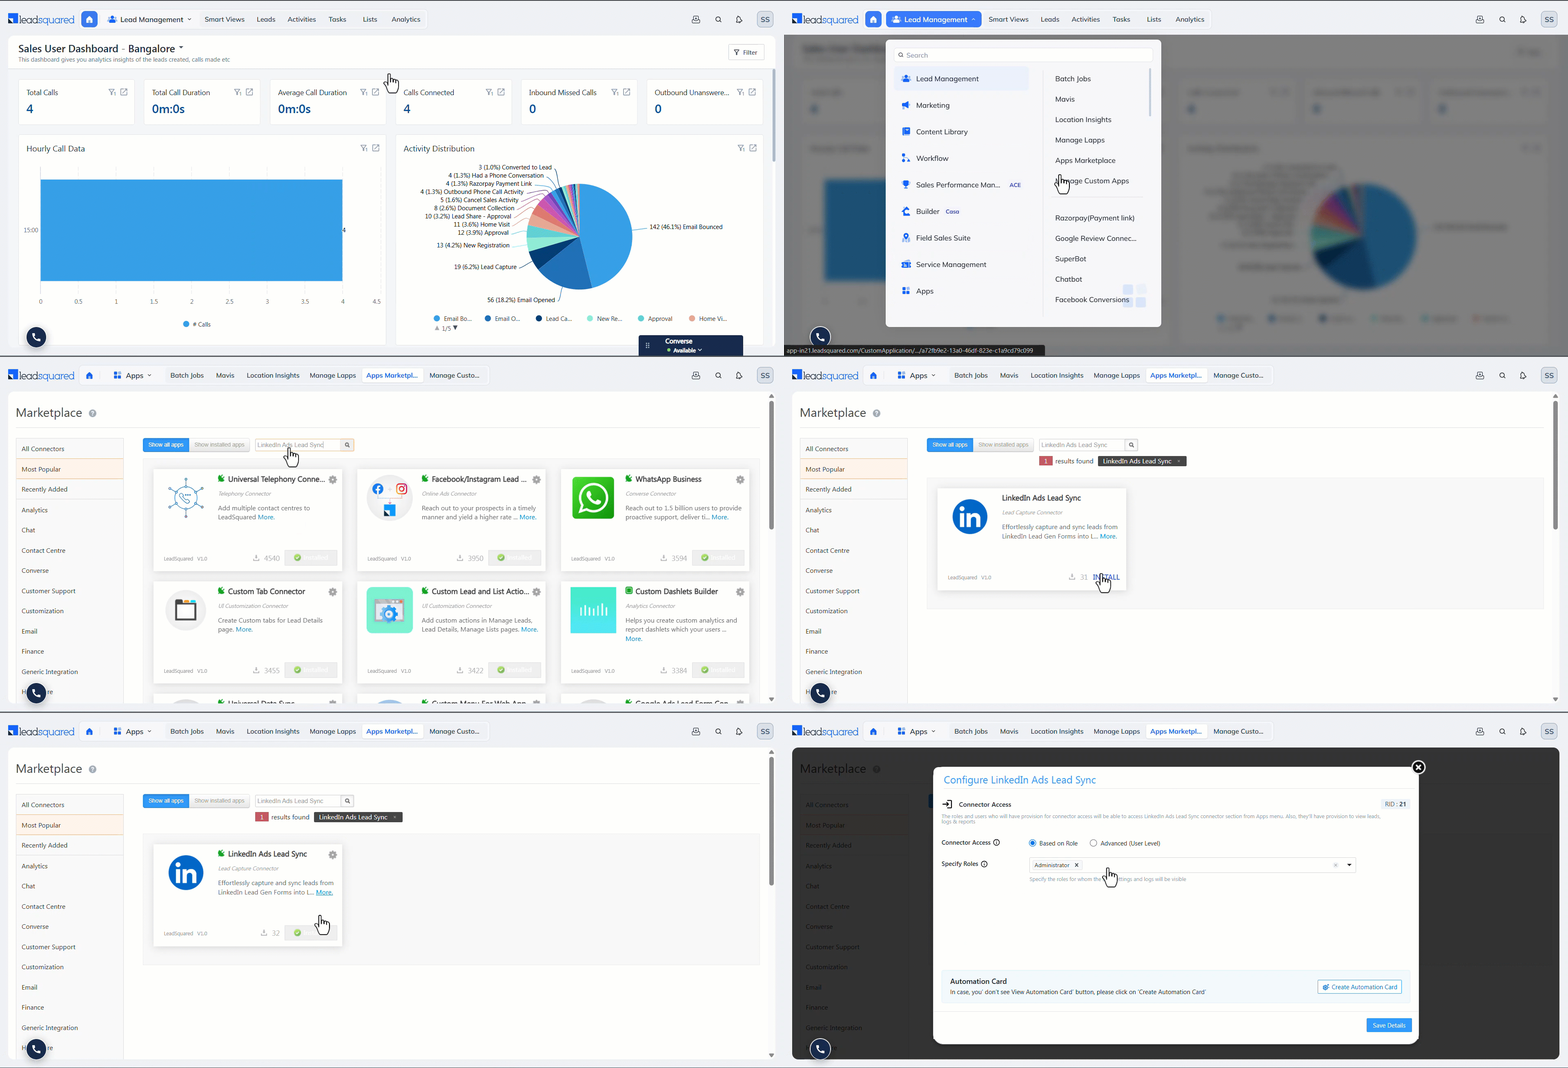
- Navigate to Apps>Apps Marketplace, search for LinkedIn Ads Lead Sync.
- Alternatively, on the Apps Marketplace, the connector is listed under the Lead Capture menu.
- Alongside the connector, click Install.
- Then, hover your cursor on the settings icon, and click Configure.
5. Configure the LinkedIn Connector
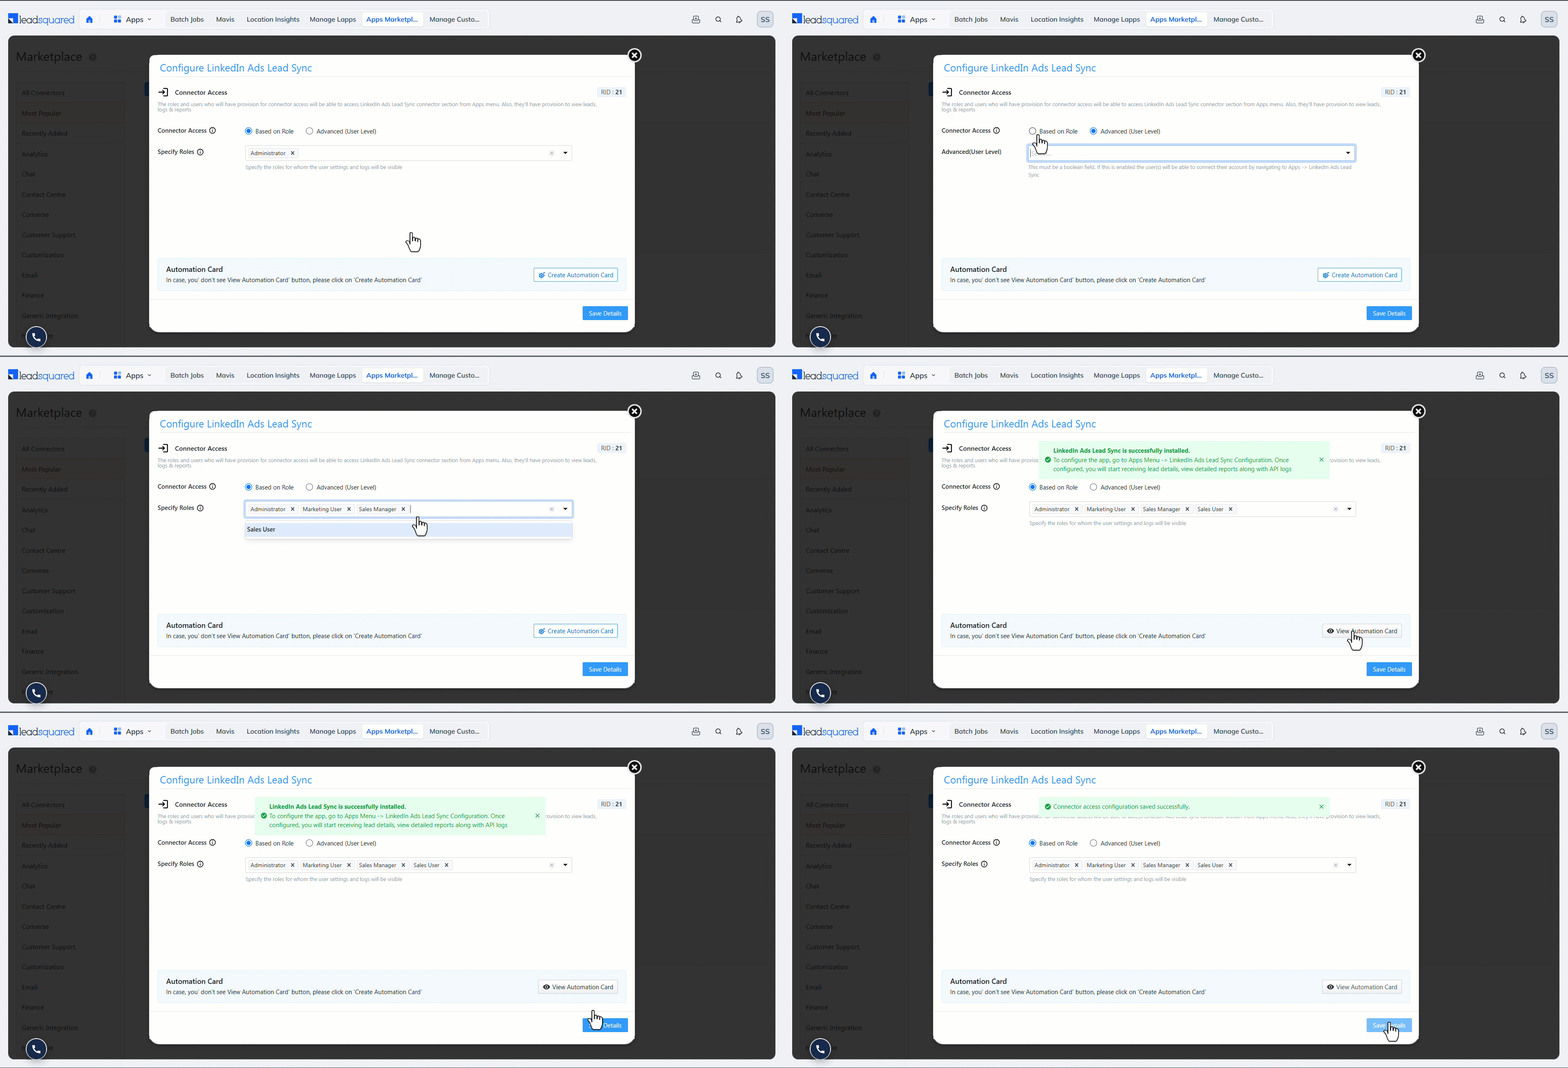
After you install the connector, configure the user roles that can access it. Only users with access can view and modify the connector under the Apps main menu.
- Select if you want to grant Connector Access based on a user’s role, or based on values present in a user field.
- Based on Role – From the Specify Roles dropdown, select the LeadSquared user roles that can access the connector.
- Advanced (User Level) – From the Advanced (User Level) dropdown, select a user boolean field. Based on the value in the selected boolean field, the user can access the connector. For example, for the user Sam, if the “Is Employee” boolean user field contains the value “Yes”, then this user can access the connector.
- Click the Create Automation Card button. This creates a LeadSquared automation card, titled “LinkedIn Ads Lead Sync” for the connector, which you can use to build automations. For example, you can create an automation that runs whenever the connector creates a lead, to automatically add these leads to a list named “LinkedIn Leads”.
- Once you’re done, click Save Details. To continue the configuration, refer to the sections below.
6. Link LinkedIn with LeadSquared
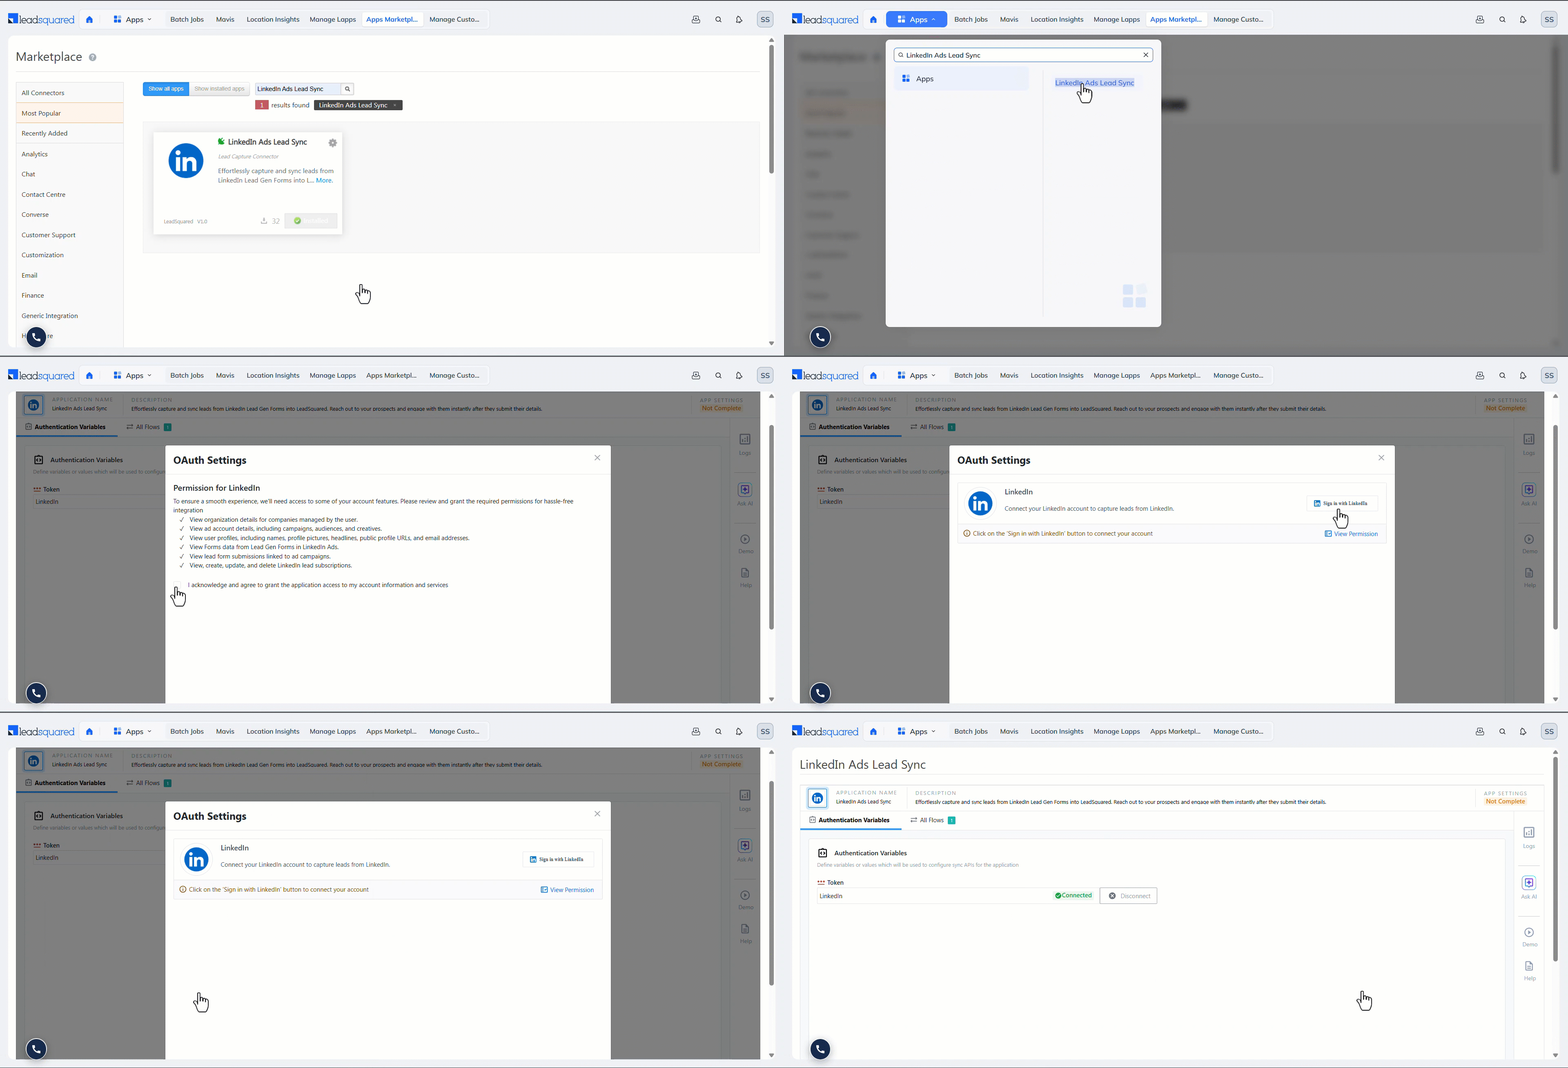
Once the connector settings are configured, sync your LinkedIn business account with LeadSquared. To do this –
- Navigate to Apps>LinkedIn Ads Lead Sync.
- On the Authentication Variables tab, click the Configure button.
- On the OAuth Settings pop-up, enable the checkbox to grant the required permissions, then click Save & Next.
- On the LinkedIn tab, click Sign In with LinkedIn, then allow the required permissions.
- Once the accounts are successfully linked, click Close.
7. Enable Lead Data Flow
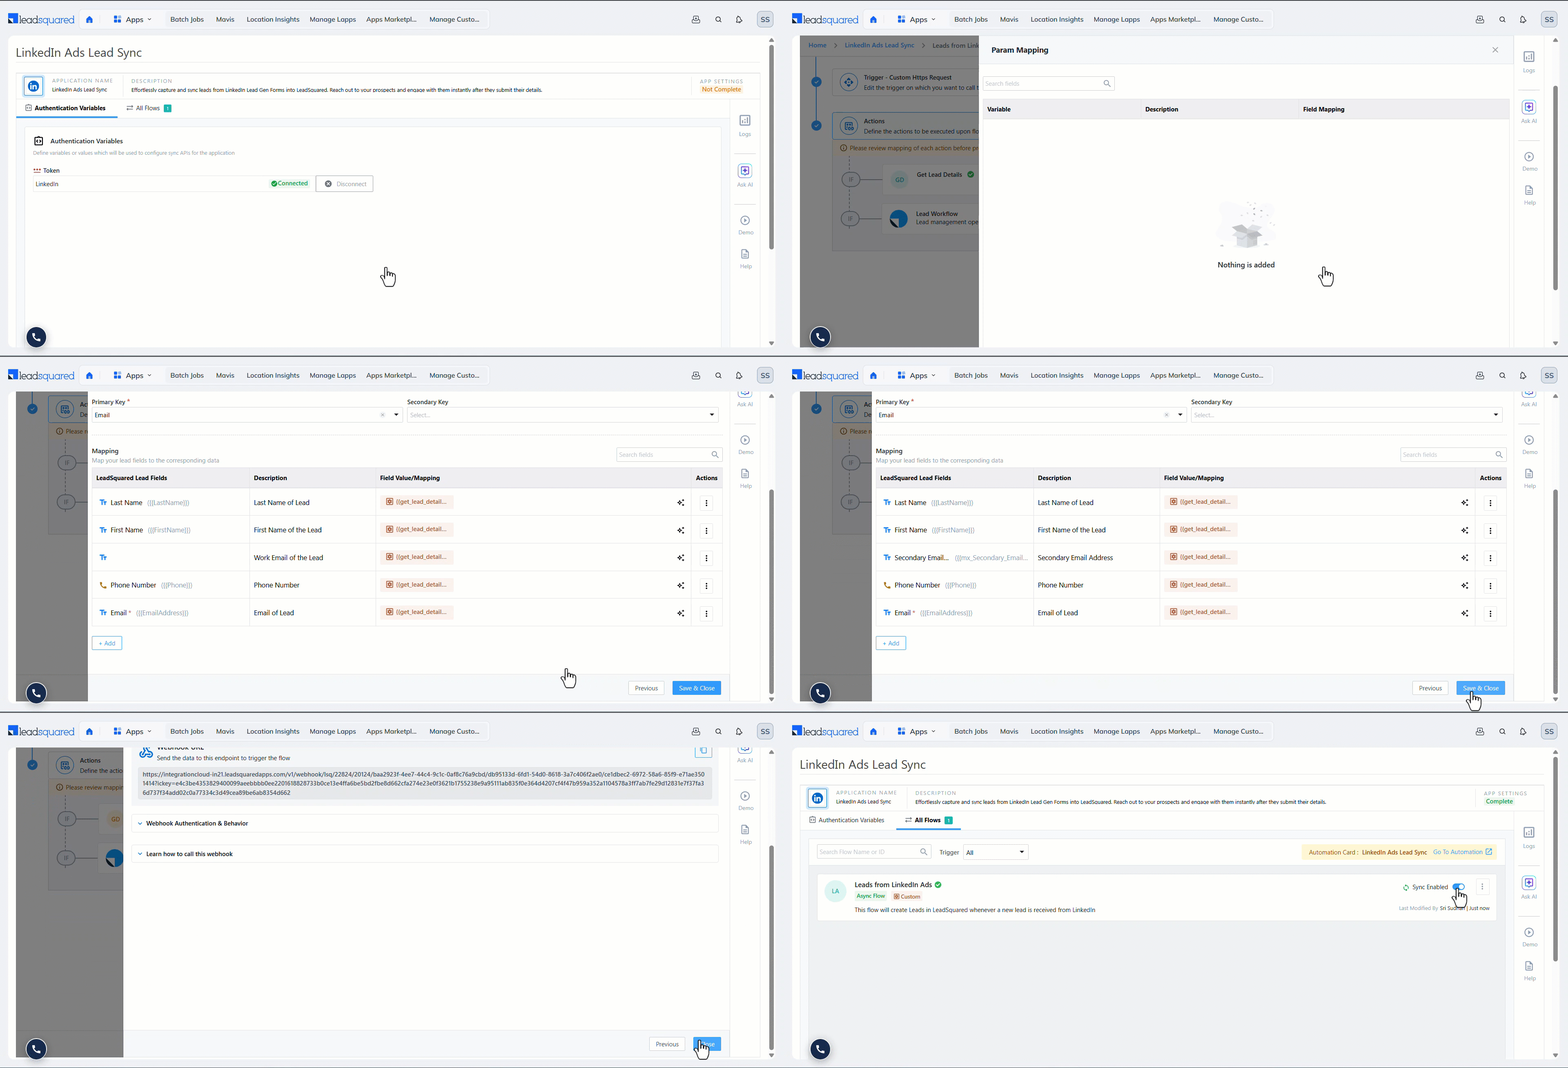
Once the accounts are linked, enable data capture on the connector. After you enable the sync, the connector setup is complete from your end. To do this, on the Leads from LinkedIn Ads screen –
- On the All Flows tab, click Leads from LinkedIn Ads.
- Alongside Trigger – Custom Https Request, click Edit Trigger.
- On the Trigger Selection tab, click Next. On the Setup Instructions tab, click Close.
- No further action is required on the Trigger – Custom HTTPS Request screen.
- Under Actions, click Get Lead Details, and on the Param Mapping screen, click Close.
- No further action is required on this screen.
- On the Leads from LinkedIn Ads screen, under Actions, click Lead Workflow.
- On the Select tab, click Save & Next.
- On the Configure tab, map the Work Email ID field from LinkedIn to an email-type lead field in LeadSquared to capture the lead’s work email address.
- Once you’re done, click Save & Close.
- Then, alongside Sync Disabled, enable the slider. This completes the set-up and configuration process from your end.
Note: Once you enable sync, contact your account manager or write to support@leadsquared.com to let them know that it’s enabled. This allows them to complete the remaining setup on their end, after which LeadSquared starts capturing leads from your LinkedIn account. This step is mandatory.
8. Other Actions
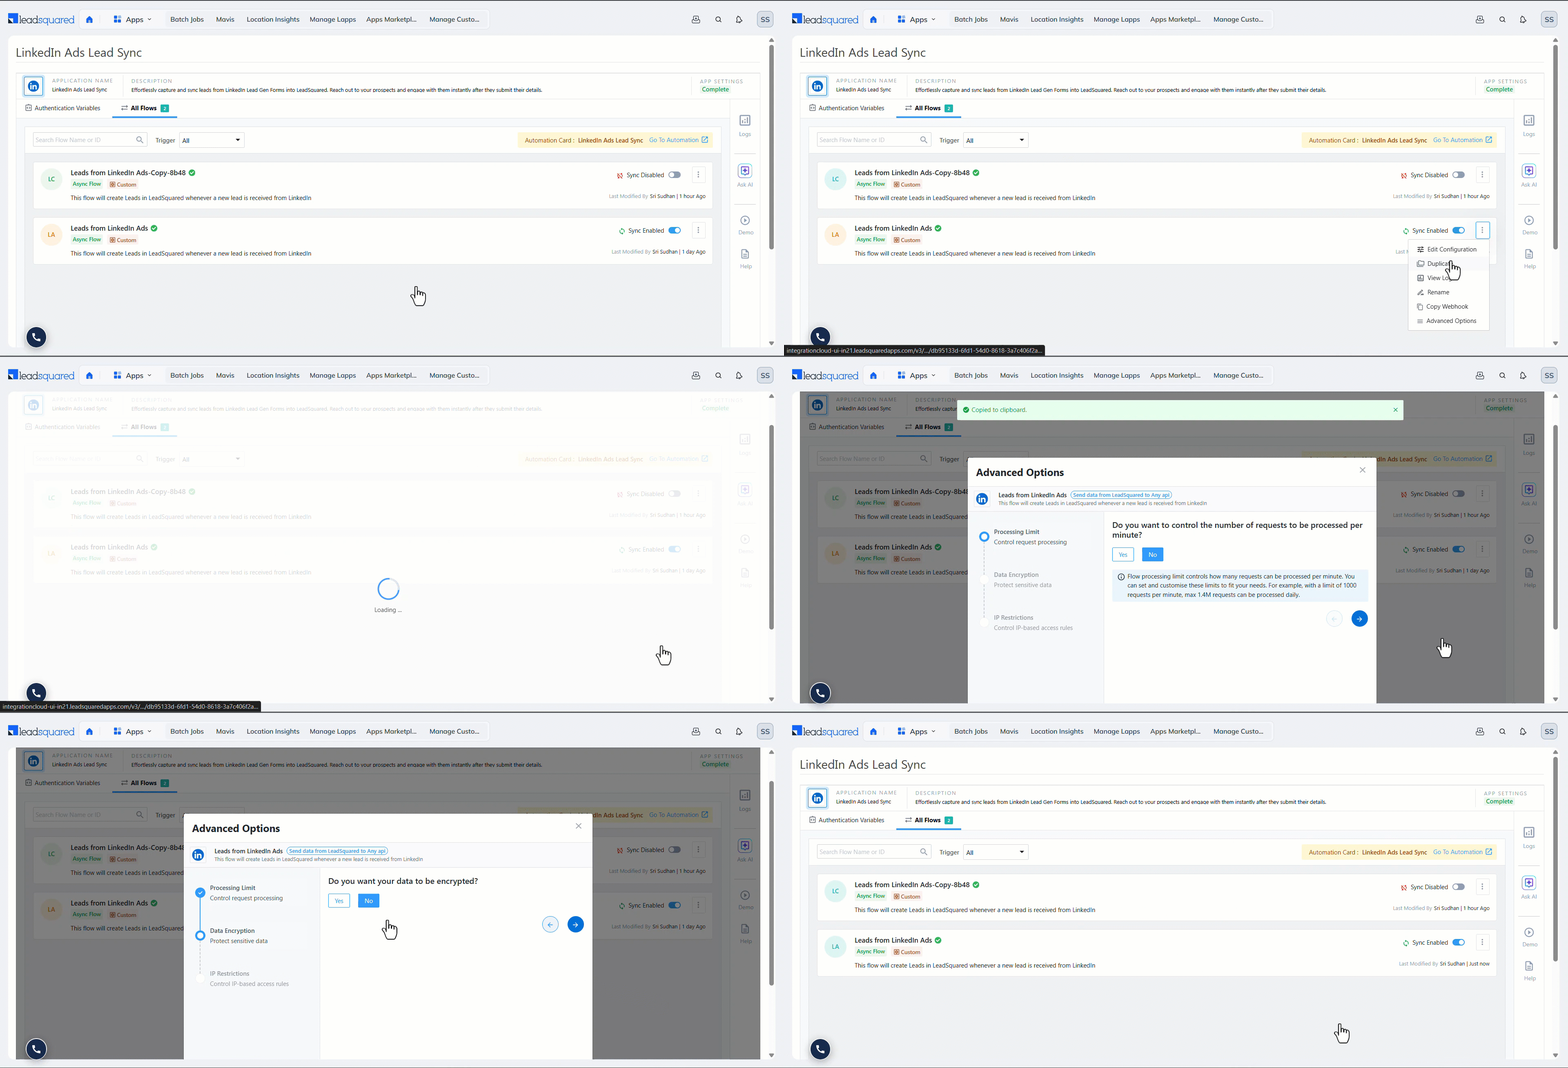
Once the connector is live, you can perform the following actions on the All Flows screen –
- Edit Configuration – Lets you update the settings configured on an existing lead capture flow.
- Duplicate – Duplicates an existing lead capture flow and retains all the settings configured.
- View Logs – Displays logs of all lead data captured through the connector. This includes –
- Total Events – The total number of requests sent and received through the connector.
- Queued – The total requests in the queue. queued for capture.
- Successful – The total number of requests successfully captured or intentionally skipped based on configured conditions.
- Errors – The total number of requests that encountered errors during.
- Rename – Lets you rename the lead capture flow.
- Copy Webhook – Copies the webhook URL.
- Advanced Options – Lets you configure the following advanced settings –
- Processing Limit – When enabled, this lets you configure the number of requests sent between LinkedIn and LeadSquared every minute.
- Data Encryption – When enabled, the requests sent between LinkedIn and LeadSquared are encrypted.
- IP Restrictions – When enabled, you can whitelist IP addresses that trigger the webhook and blacklist IP addresses that the webhook blocks. This helps prevent leads from being captured from within your organisation.
- Once you’ve configured these settings, click Save & Close.
Note: Once you enable Data Encryption, it is permanent and cannot be disabled.
Any Questions?
Did you find this article helpful? Please let us know any feedback you may have in the comments section below. We’d love to hear from you and help you out.