1. Feature Overview
The Manage Subscriptions UI allows you to efficiently view and manage all aspects of your LeadSquared subscription. Access detailed information about your current active plan, including licenses, utilization, and any add-ons associated with your subscription. Additionally, you can review and pay invoices related to your LeadSquared licenses, ensuring your account remains up-to-date. The UI also provides a convenient way to directly purchase add-on licenses along with your subscription. Furthermore, you can view your company’s profile and billing details, as well as LeadSquared’s registration and banking information, all in one place.
2. Prerequisites
Manage Subscriptions must be enabled on your account. Reach out to support@leadsquared.com.
Note: Manage Subscriptions option will not be visible in the user account menu for non-billing users.
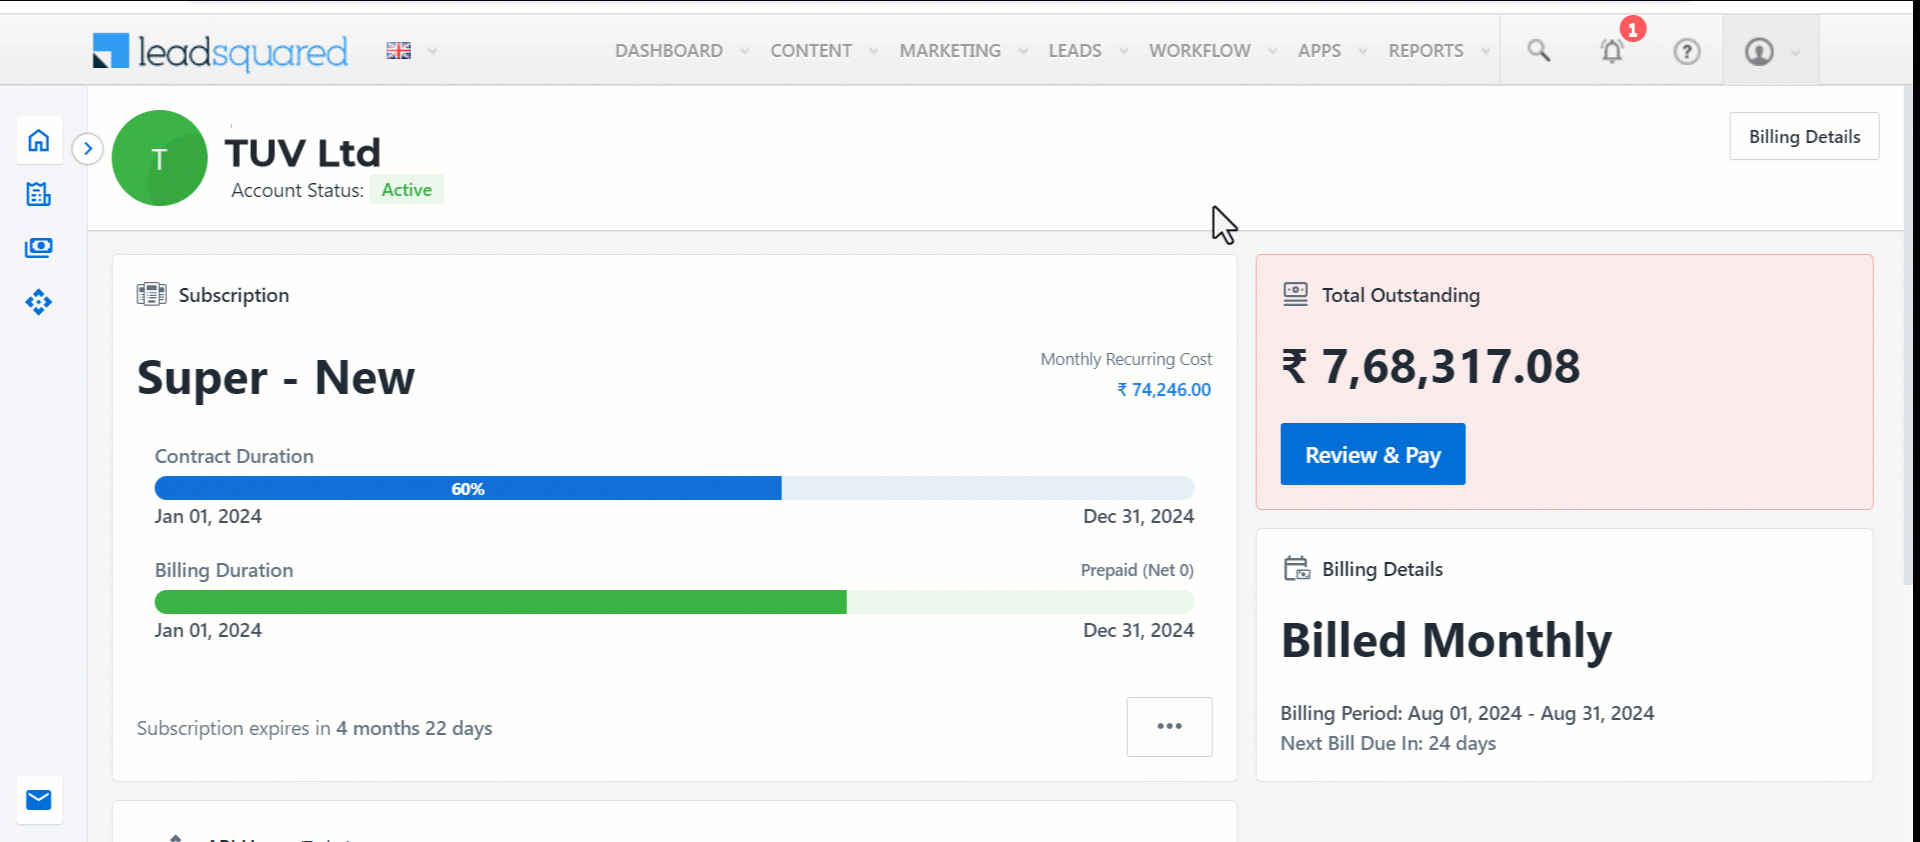
3. Home Page
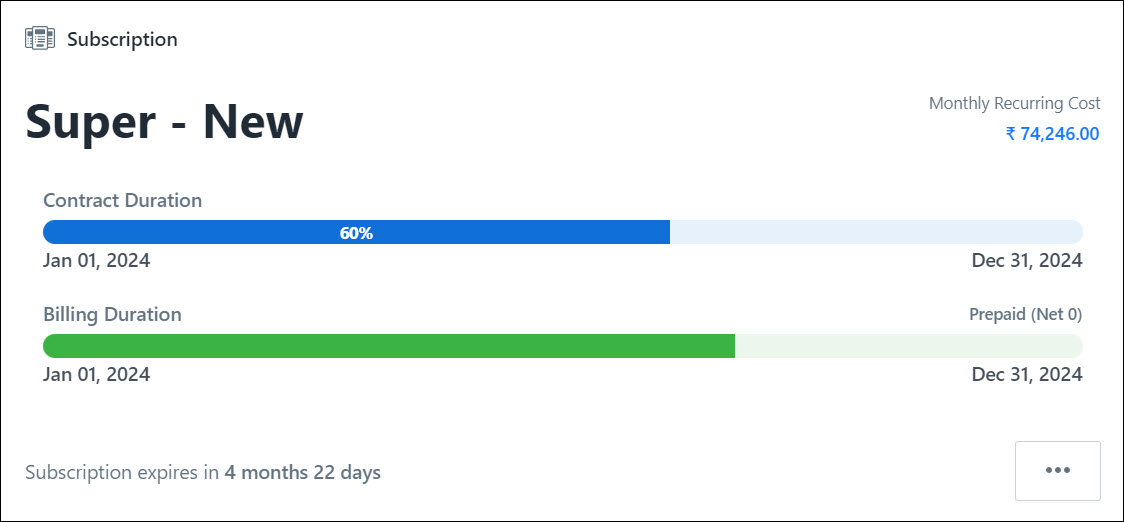
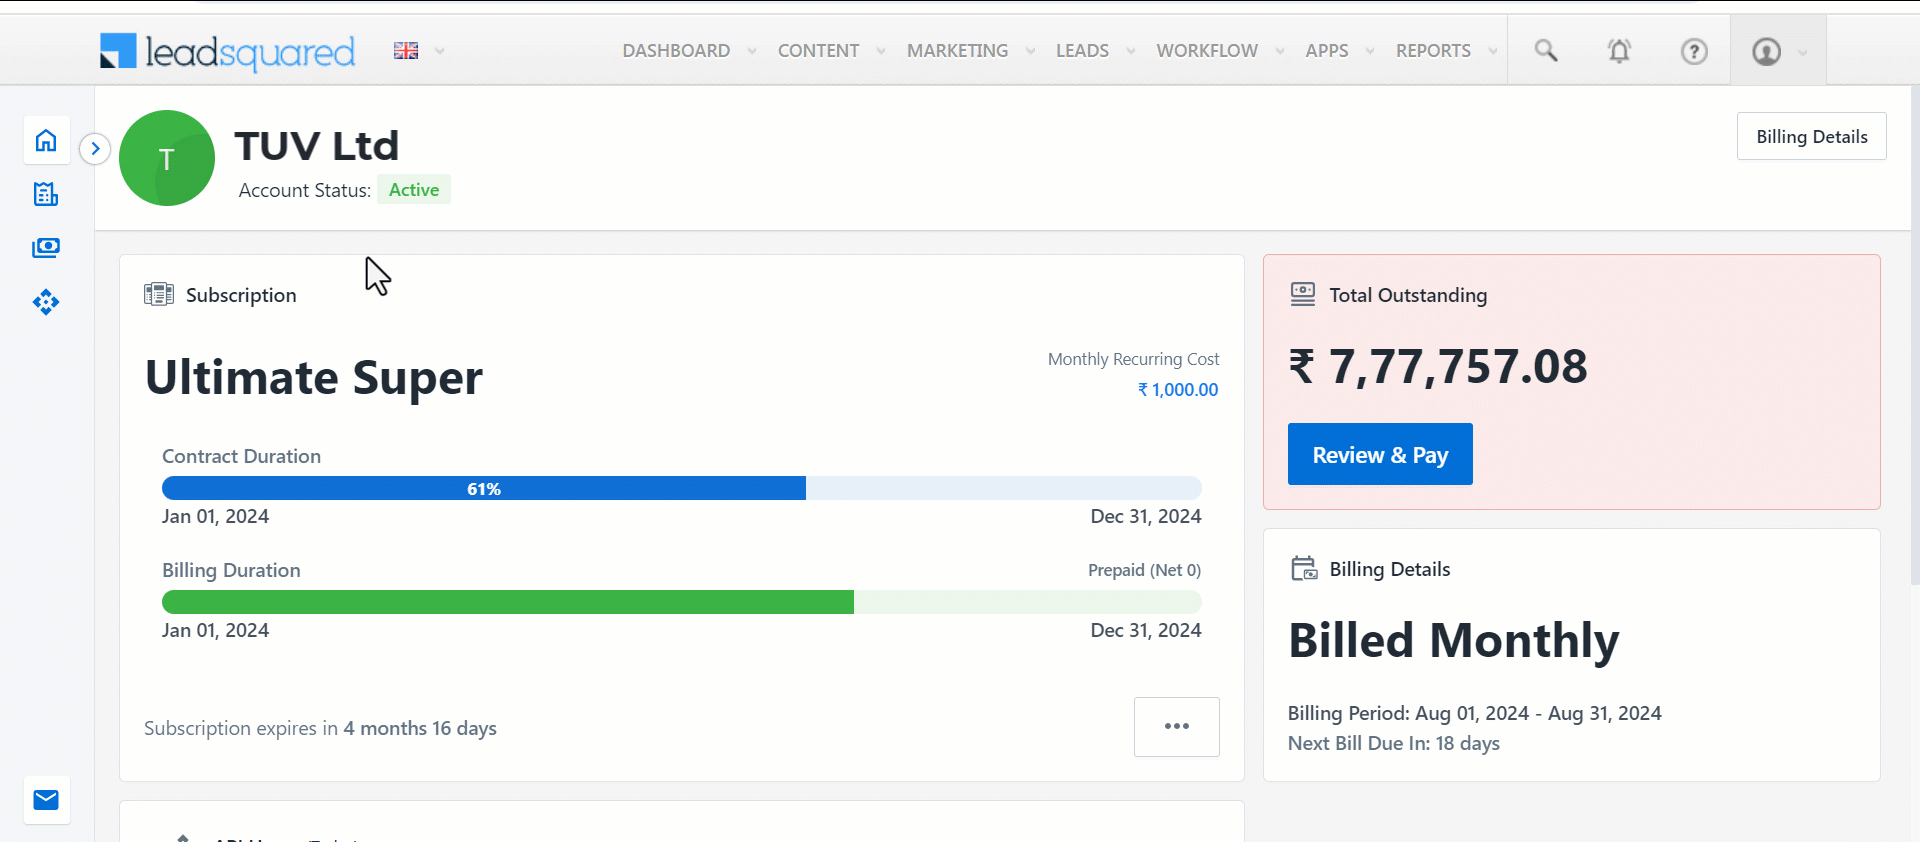
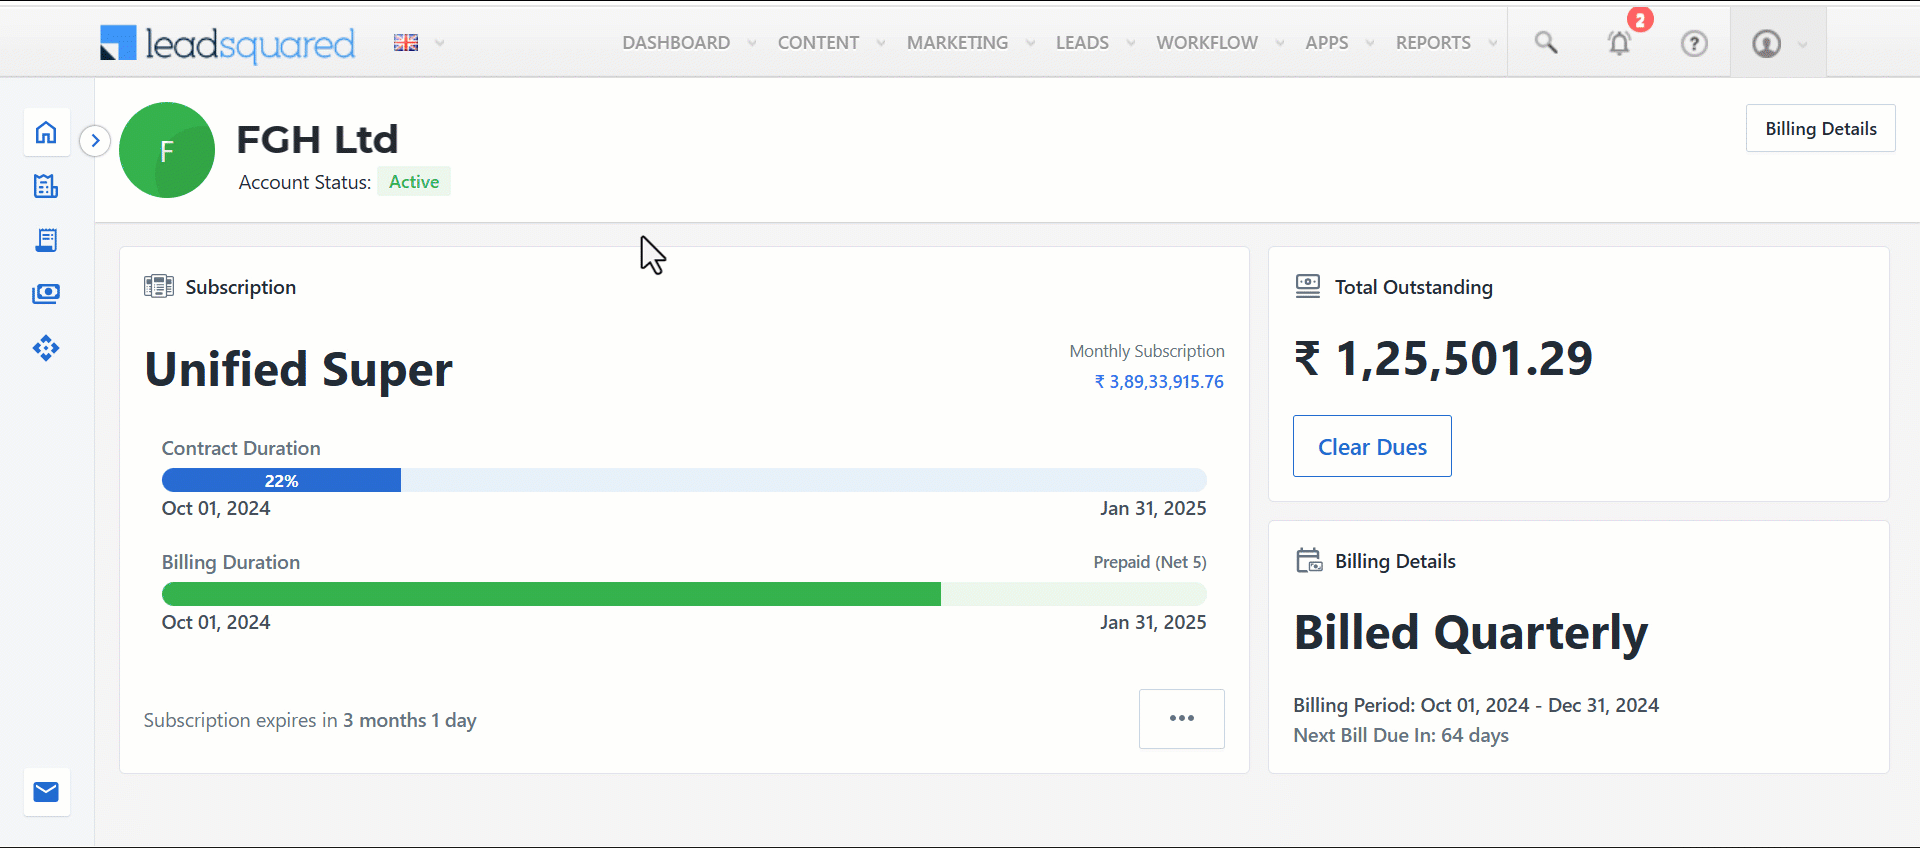
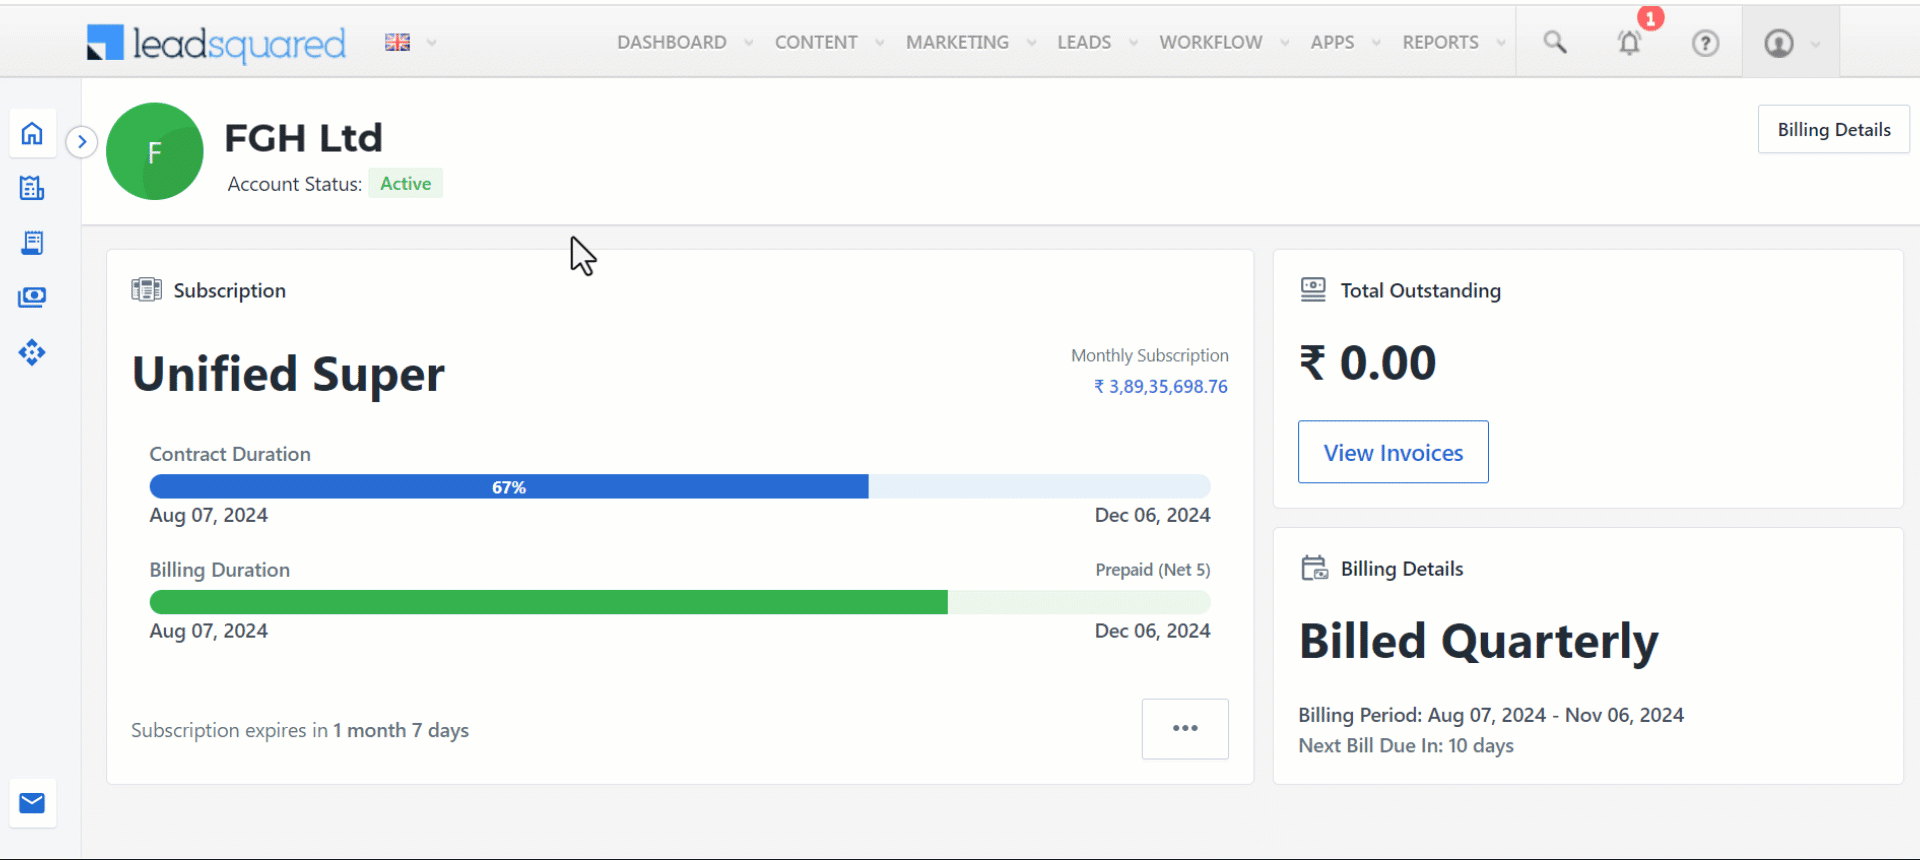
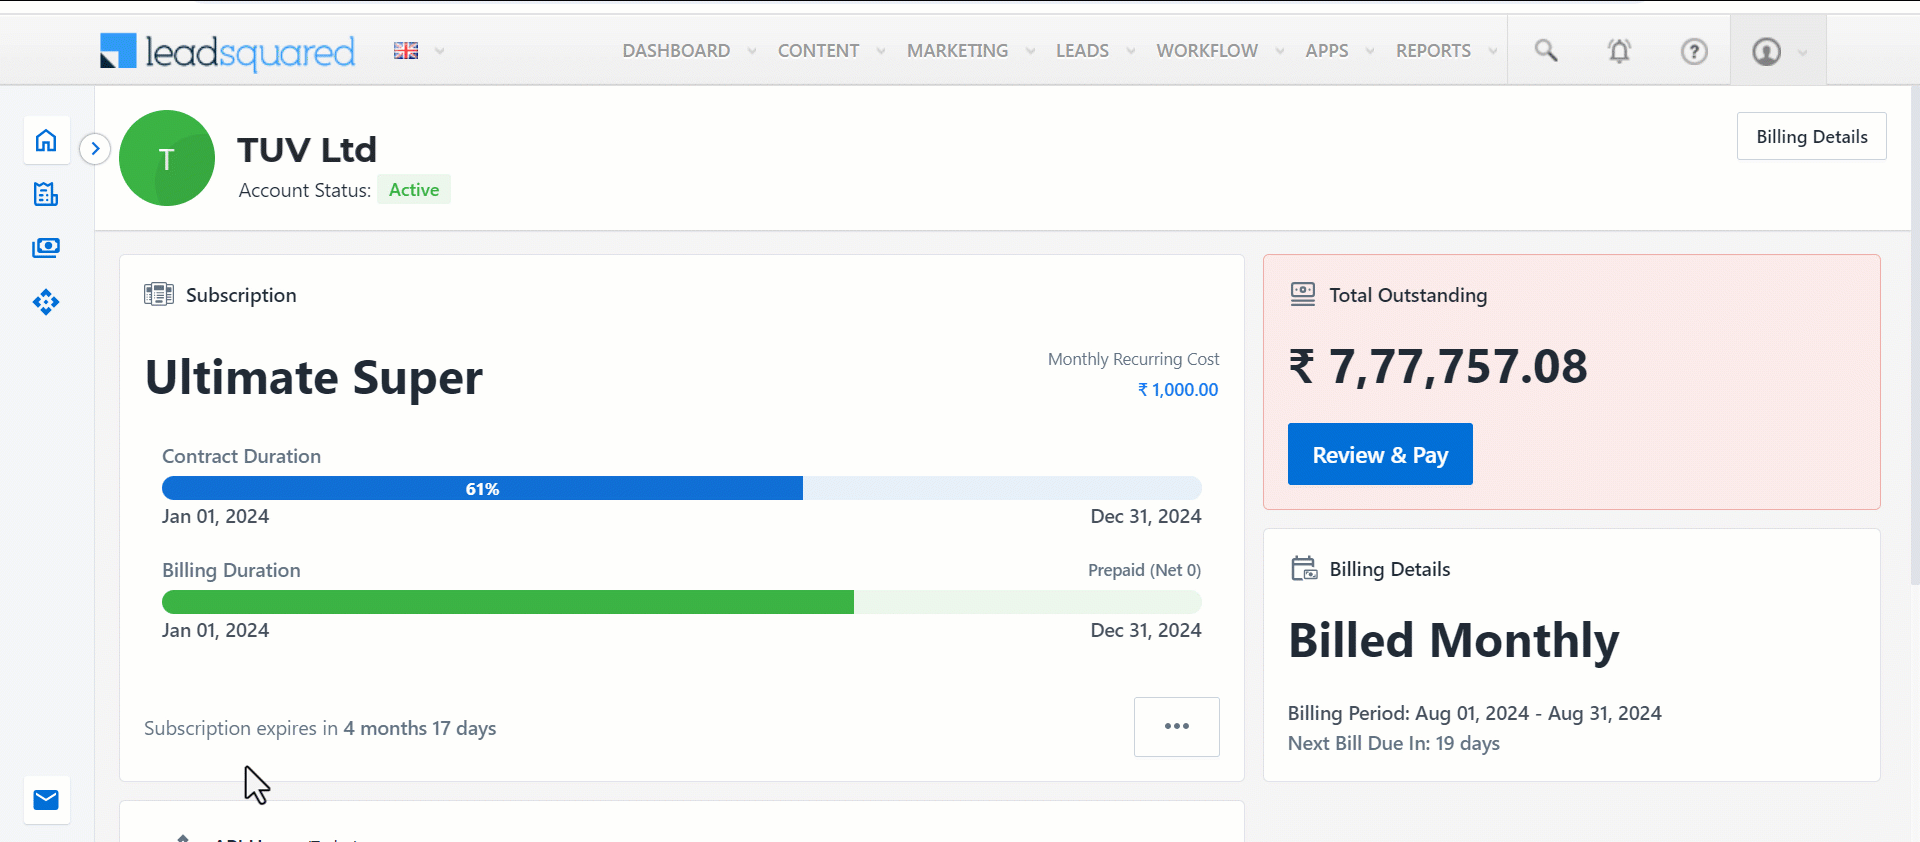
3.1 Plan Details
The Subscription card on the homepage provides an overview of your plan. It displays the name of your current plan along with visual representations of both the contract duration and billing duration.
The Contract Duration bar represents the start date, end date, and total duration of your LeadSquared contract. The duration of the subscription is represented in percentage. By hovering over the percentage displayed on the bar, you can see how many days of the subscription have passed.
The Billing Duration bar represents the billing period for your LeadSquared subscription. The bar displays the billing start date, billing end date and total billing duration of the plan. Payments can be made on a monthly, quarterly, half-yearly or yearly basis. Hover over the green bar to view the current billing period. The bar’s progression increases as billing cycle invoices are raised for each billing period.
For example, in the screenshot below the progress bar is green till the end of August 2024, as the billing cycle invoices are raised till that date.
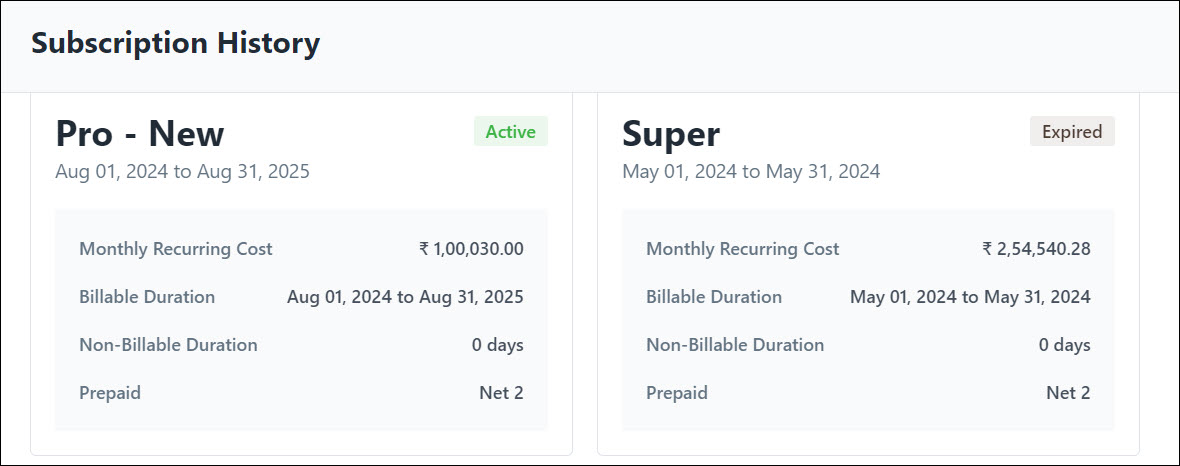
3.2 Subscription History
Click  and navigate to Show History on the Subscription card to view the Subscription History popup. Here, you can view your past and current subscriptions with their details including the plan name, contract duration, billable duration, and payment mode with the statuses of the subscribed plans –
- Active – current plan of your LeadSquared subscription
- Expired – previous plan of your LeadSquared subscription
3.3 Monthly Subscription
Click on the amount shown under Monthly Subscription on the Manage Subscriptions homepage to see a detailed breakdown of your subscription which includes your plan and add-on (recurring and one-time) details.
Plan Bundle is the default set of licenses procured, that consists of base and contractual adjustments.

Recurring Add-ons are additional licenses purchased apart from the ones included in your plan bundle. They come with a monthly value based on the number of units purchased.
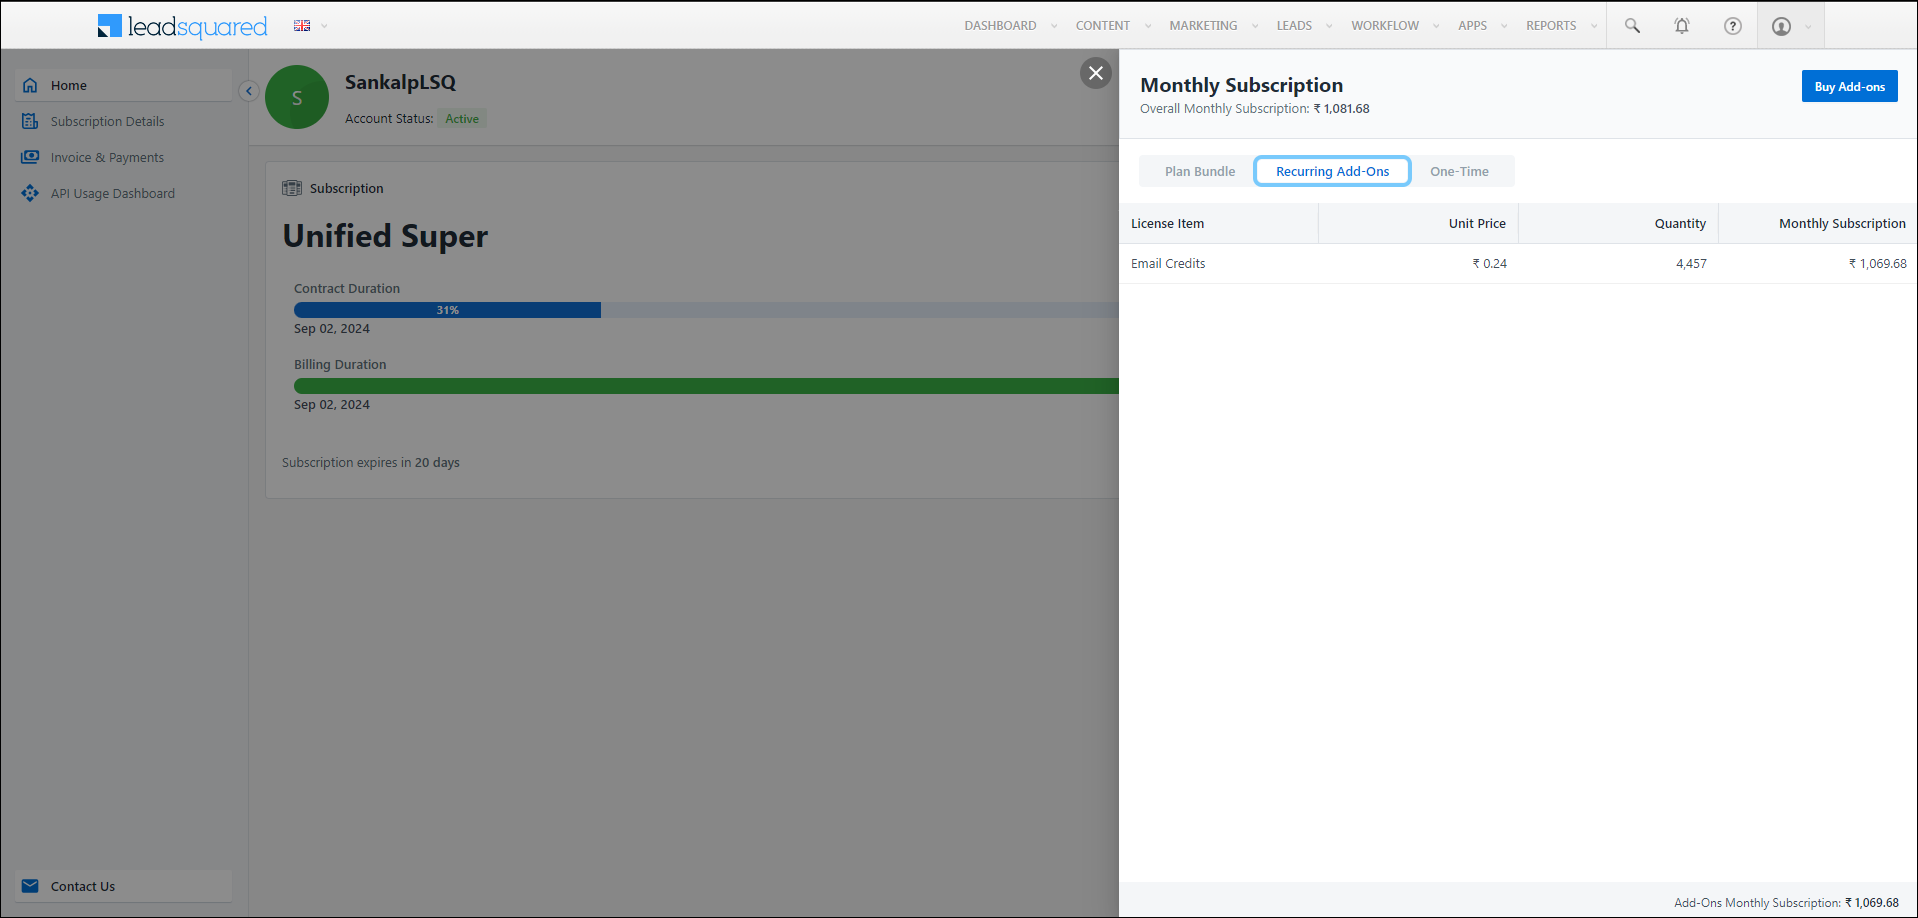
One-Time Add-ons are additional licenses purchased separately from the plan bundle and are charged only once.

Note:
- Even if your billing frequency is quarterly or half-yearly or yearly, the payment amount is automatically divided and calculated as a monthly subscription by default.
- You can buy add-on licenses in addition to the licenses available by default with their plan by clicking on Buy Add-ons.
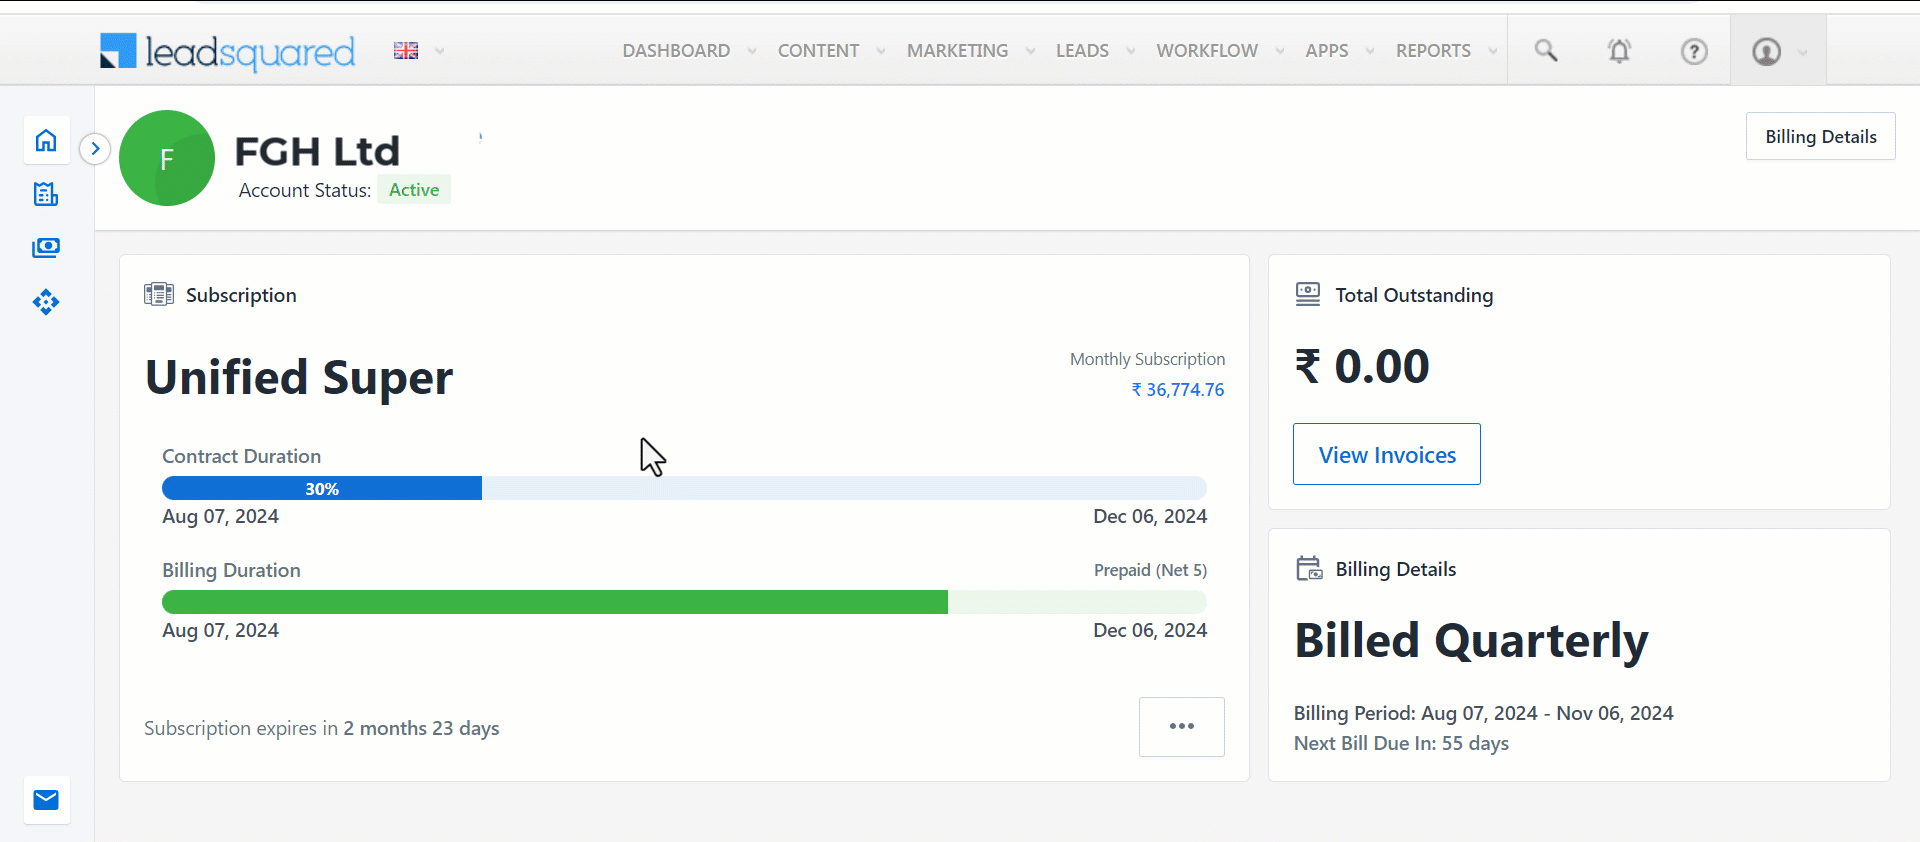
3.4 Total Outstanding
The Total Outstanding card on the homepage shows the total amount that must be paid. This includes both due and overdue invoices. Click Review & Pay to see a detailed list of all your invoices on the Invoice & Payments page. Here, your pending invoices will be selected by default to proceed with the payment.

3.5 Billing Frequency
The Billing Details card displays your billing frequency, billing period and next bill due date.

Your billing frequency could be –
| Monthly |
Payment must be made every month |
| Quarterly |
Payment must be made every 3 months |
| Half-Yearly |
Payment must be made every 6 months |
| Yearly |
Payment must be made every 12 months |
3.6 Billing Details
The Billing Details button on the top right of your Manage Subscription homepage opens a popup with –
- Customer Information – Your company details based on your country (refer table below). Here you can add email IDs of upto 20 Billing Recipients and Billing Escalation Recipients to notify the users about invoice release and updates. All the other details are non-editable. To edit these details, reach out your account owner or billing.ops@leadsquared.com.
- About LeadSquared – LeadSquared company details including the Legal Entity Name, address, registration details and bank details.
The following table displays the Customer Information displayed based on different geographical settings –
| Country / Legal Entity |
Registration Details |
Bank Details |
| India |
|
- Payee Name
- Bank Name
- Virtual Account Number
- Bank Code
- Branch
|
| US |
- EIN
- Sales Tax Registration
- TRC
|
- Payee Name
- Bank Name
- Account Number
- SWIFT Code
- Branch
- Fed ABA Number
- CHIPS ABA Number
- ACH Routing Number
|
| Australia |
|
- Payee Name
- Bank Name
- Account Number
- SWIFT Code
- Branch
|
| Singapore |
|
- Payee Name
- Bank Name
- Account Number
- SWIFT Code
- Branch
|
| Africa |
|
- Payee Name
- Bank Name
- Account Number
- SWIFT Code
- Branch
|
4. Subscription Details Page
The Subscription Details page offers an overview of all the licenses purchased and their limits. Here, you can make additional license purchases by clicking Buy Add-ons. You can also toggle between License Usage and Metered Usage, and search for a particular license using the search tab.
4.1 License Usage
The License Usage page under Subscription Details displays the usage of all the licenses in your account. Here, you can view license details including –
| License Name |
Name of the license |
| Maximum Limit |
Total limit available for the customer to use |
| Utilization |
Total limit used by the customer in percentage |
| Remaining Limit |
Limits available for consumption after current usage |
Hover over the number displayed under maximum limit of a particular license to see the breakdown of the license allocated within your plan which includes the base limit, contractual adjustments, purchased as recurring add-ons or one-time add-ons. A pop-up displays the Limit Bifurcation of each license.

4.2 Metered Usage
The Metered Usage page displays the usage of all licenses that are metered in nature. This includes licenses that can be consumed in specific transactions like API calls/messages/emails/conversations/automation executions, etc. You can monitor the usage at any point of time. On this page, you can view license details including –
| License Name |
Name of the license |
| Allowed Limits |
Daily/Monthly/Yearly limit as defined in the plan |
| Unit |
The basis on which the license is measured (e.g., Calls, Counts) |
| Usage |
Actual usage of the units as of the previous day |
| Remaining Limits |
Limits remaining after usage |
| Additional Usage |
Usage exceeding the limit (Usage – Limit = Additional Usage) |
| Rate |
Charge for additional consumption (per unit) |
| Additional Bill Amount |
Calculated based on the additional usage and rate which is prorated as per the end date of the current billing cycle
(Additional Usage x Rate) |
Note: Each license has a set limit. If you go over that limit, you can continue using the feature up till 125%, but you’ll be billed for additional usage at the applicable rate. On crossing the 125% limit, the service will stop, and you won’t be able to use it until you purchase additional limits. Monitor your usage and buy more add-ons to avoid service interruption.
| License Name |
Limit |
| API Calls |
Daily Limit |
| Executions |
Yearly Limit |
| Email |
Monthly Limit |
| Landing Page Submissions |
Monthly Limit |
| Widgets Submissions |
Monthly Limit |
| Conversations |
Monthly Limit |
| Email Parser |
Monthly Limit |
| Storage – Active Data |
For Entire Plan Duration |
| File Storage |
For Entire Plan Duration |
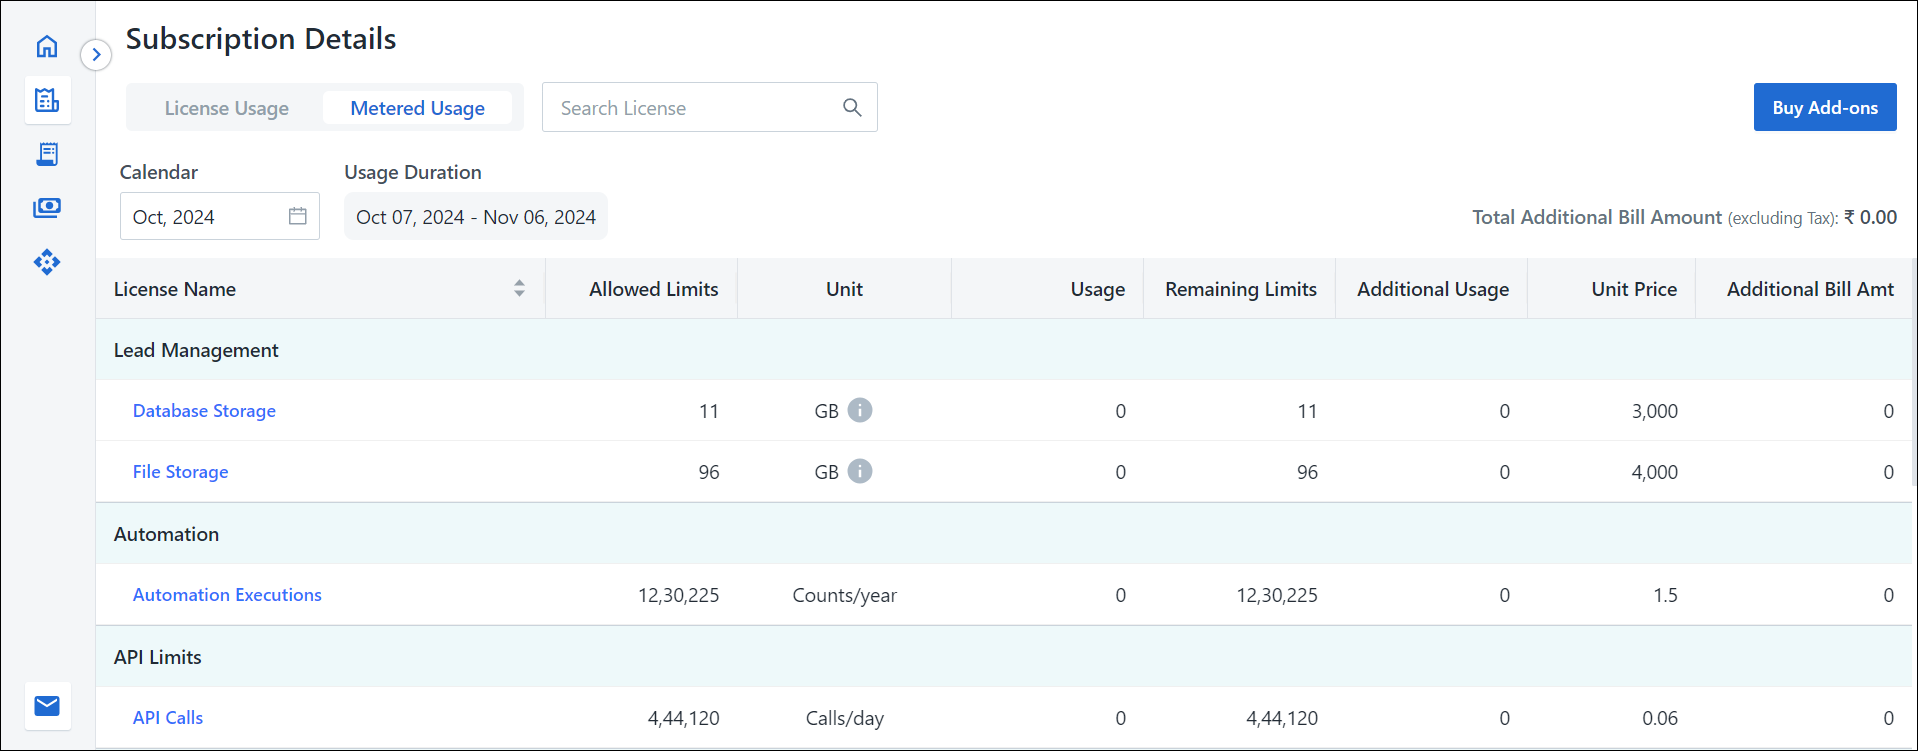
You can see the Metered Usage of a particular month by clicking the box under Calendar and selecting the relevant month from the pop-up.

4.3 Monitoring Metered Usage
While using licenses that are metered in nature, there is a possibility that you exceed your limits. To drill down to a monthly/daily view of your metered usage –
- Click the relevant license on the Metered Usage page.
- A pop-up displays the details about the usage of the license including the usage of the month, the allocated limit, the usage, the additional usage, billed usage, rate and additional bill amount.
- Click
 alongside the month column to view a day-wise breakdown of the usage.
4.3 Refresh Metered Usage
On the Subscription Details page, get the latest usage of your metered license by hovering over the Usage number alongside the relevant license. Click  to refresh. This will display the most recent usage count.

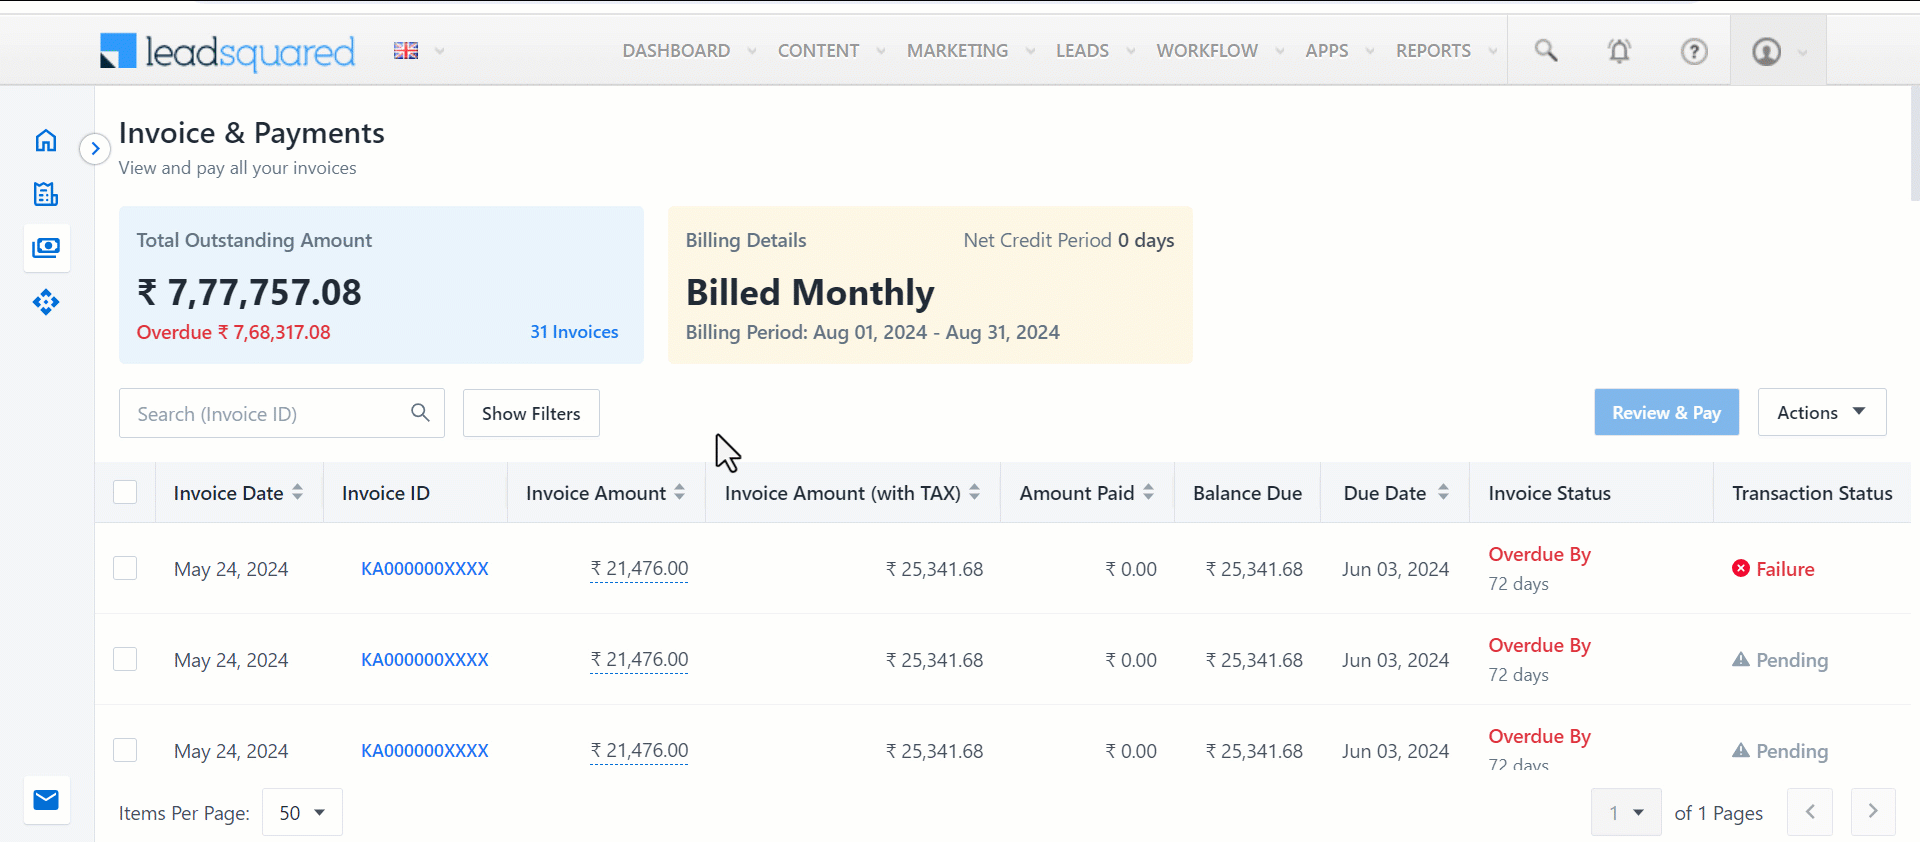
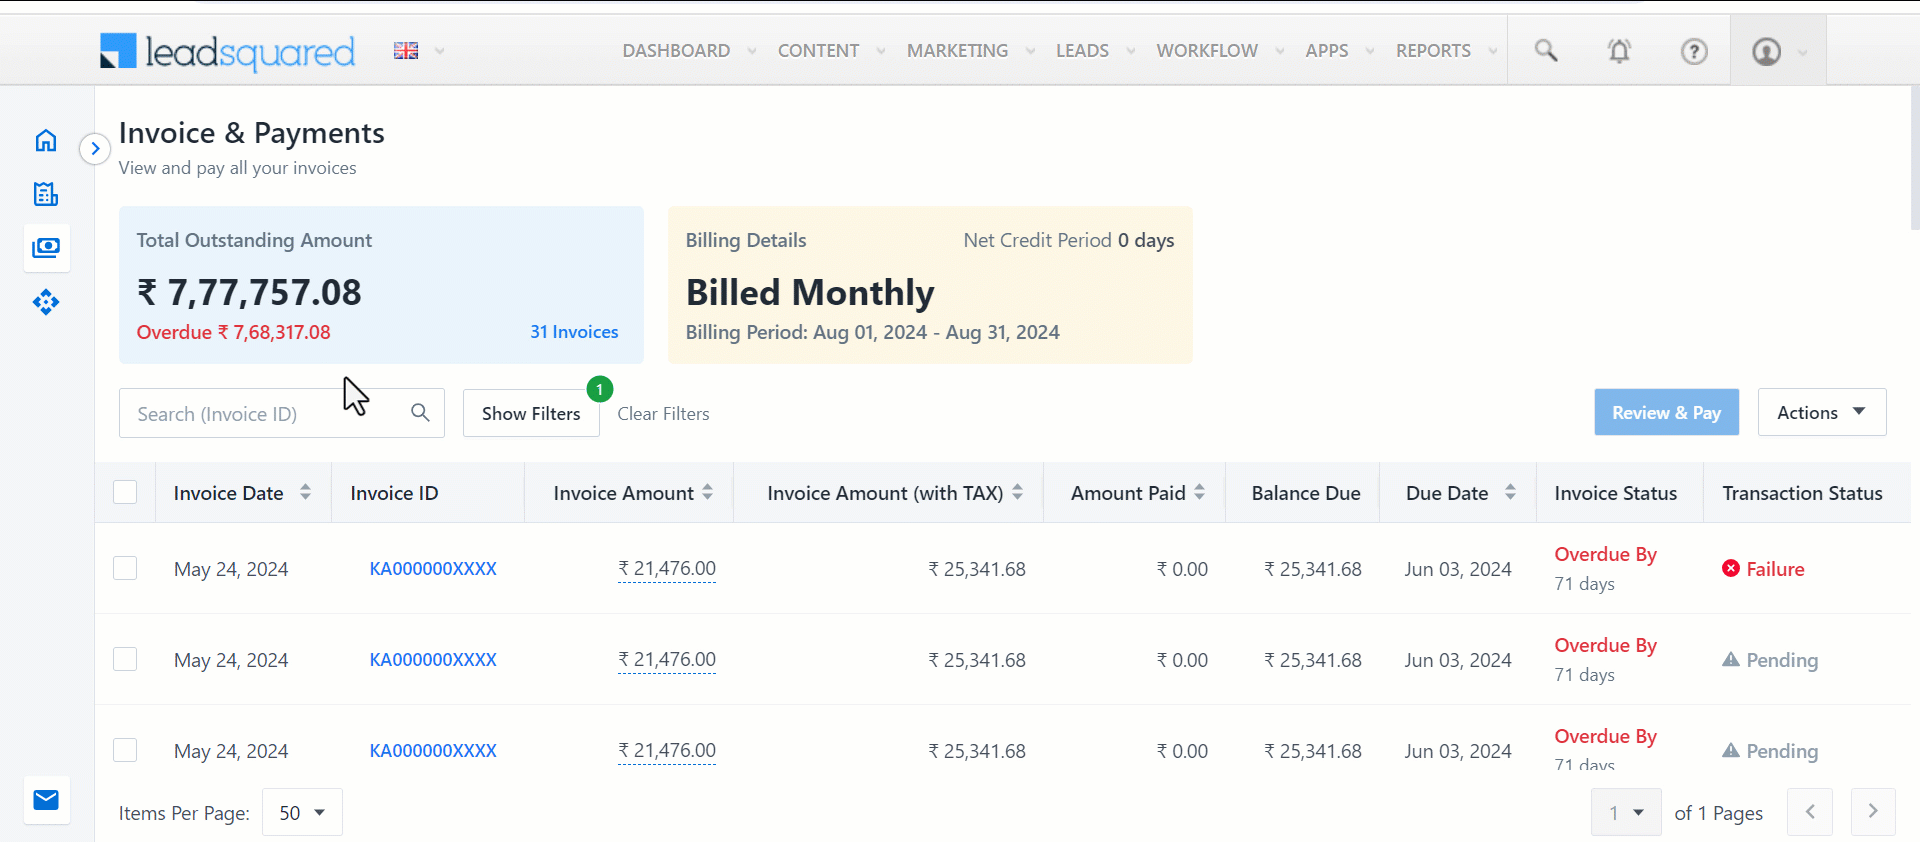
5. Invoices & Payments Page
On the Invoice & Payments page, you can view, download and pay all your LeadSquared subscription invoices.
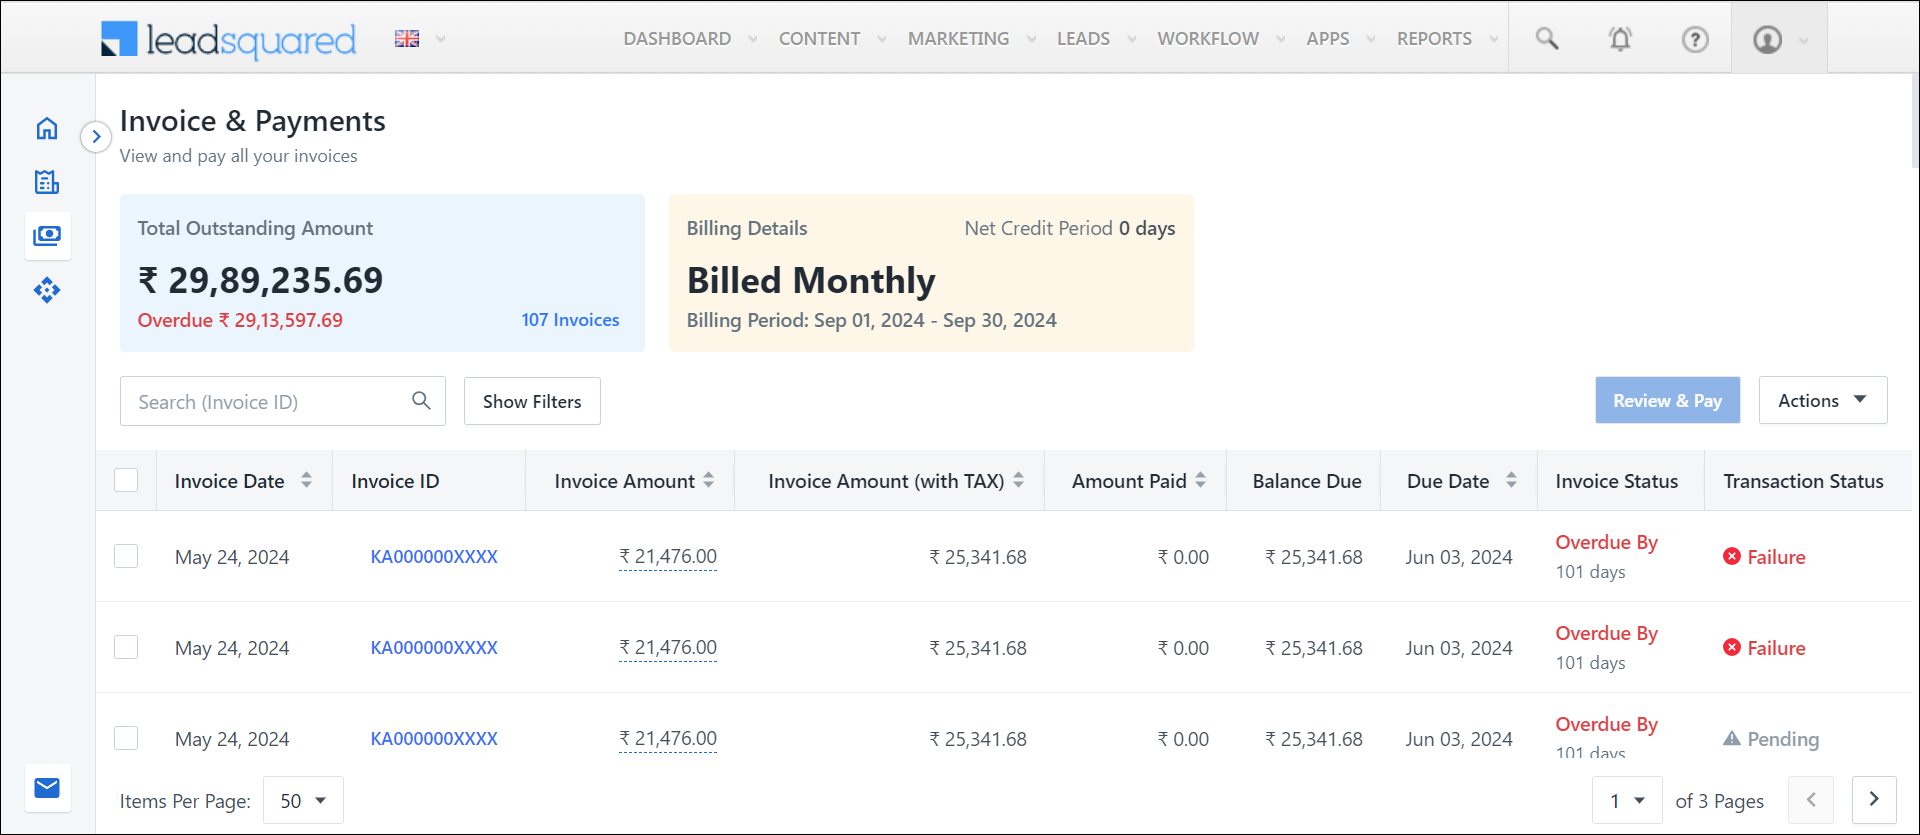
The page displays details of invoices including –
| Invoice Date |
The date on which the invoice was raised |
| Invoice ID |
Tax Invoice Number |
| Invoice Amount |
The invoice amount |
| Invoice Amount (with TAX) |
The total amount including taxes |
| Amount Paid |
The amount that has been paid by the customer |
| Balance Due |
The remaining amount to be paid if any partial payment has been made previously
(Invoice Amount (including taxes) – Partial Payment = Balance Due) |
| Due Date |
The date by when the invoice must be paid |
| Invoice Status |
If your invoice is issued on August 1, 2024, and the payment is due by August 15, 2024 –
- From August 1 to August 14, 2024, the invoice is due. On August 2, it’s due in 13 days, on August 3, it’s due in 12 days and so on.
- On August 15, 2024, the invoice is Due. This is the last day to make the payment on time.
- After August 15, 2024, if the payment hasn’t been made, the invoice becomes Overdue.
- All your overdue and due invoices are considered to be Outstanding.
- If the invoice is paid and reconciled successfully any time, it’s marked Paid.
- If the invoice is paid, but reconciliation is pending, it’s marked Paid-Clearing Pending. This usually occurs when partial payments are made through bank transfer.
|
| Transaction Status |
The status of the transaction as shown on the payment gateway:
- Success
- Failure
- Processing
- Pending (Payment not initiated yet)
|
5.1 Search & Filter Invoices
To search for a particular invoice based on the Invoice ID –
- Click Search.
- Enter the relevant Tax Invoice Number and click
 .
.
To Filter and view relevant invoices –
- Click Show Filters.
- You can filter invoices based on the Invoice Date, Invoice Status and Transaction Status. Select the relevant filter from the dropdowns.

5.2 Pay Outstanding Invoices
The outstanding LeadSquared subscription invoices can be paid by selecting either single or multiple invoices.
To pay a single or selected number of invoices –
- Navigate to Manage Subscriptions>Invoice & Payments.
- Click the check box alongside the relevant invoice or invoices.
- Click Review & Pay. The popup displays the breakdown of your subscription –
- India – number of invoices you are paying for, amount before tax, TDS percentage, TDS amount, amount after tax and the Net Payable amount.
- The US and other countries – number of invoices you are paying for, amount before tax, amount after tax and the Net Payable amount.
Click Pay on the bottom of the screen. You will be redirected to the payment gateway.
To pay all outstanding invoices –
- On the Invoices & Payments page, click the number of invoices on the Total Outstanding Amount card. All the unpaid invoices will be selected.
- Click Review & Pay. A popup displays the breakdown of your payment with details.
- Click Pay and you will be directed to the payment gateway.
Note: The maximum single payment limit on Razorpay is ₹1 lakh. For Stripe, the limit depends on your bank’s restrictions. If you try to make a payment exceeding these limits, you will encounter an error.
5.3 Download Invoices
You can download your LeadSquared subscription invoices in single or bulk from the Invoice & Payments page.
To download a single invoice –
- Navigate to Manage Subscriptions>Invoice & Payments.
- Click the Invoice ID of the relevant invoice. The invoice will be downloaded.
To download multiple invoices –
- Click the check box alongside all the relevant invoices.
- Click Actions and select Download Invoice. All the selected invoices will be downloaded.
To download all your outstanding invoices –
- Click on the number of invoices mentioned in the Total Outstanding Amount card. All the outstanding invoices will be selected.
- Click Actions and select Download Invoice.
Note: A maximum of 20 invoices can be selected and downloaded in one go. If you attempt to download more than the limit, you will receive the following error message on top of your screen: “Max 20 invoices can be downloaded at once”.
6. Buy Add-ons
You can increase the limits of your recurring or one-time licenses using the Buy Add-ons page on the Manage Subscriptions UI.
You can access Buy Add-ons from the following pages –
- Navigate to the Subscription Details page on Manage Subscriptions UI.
- On the top right, click Buy Add-ons.
Alternatively, you can access the Buy Add-ons page –
- On your Manage Subscriptions homepage, click the amount displayed below the Monthly Subscription.
- On the Monthly Subscription popup, click Buy Add-ons. You will be redirected to the Manage Subscriptions page where you can purchase the add-ons.
You can also access the Buy Add-ons page –
- Navigate to Purchase History page on Manage Subscriptions UI.
- On the top right, click Buy Add-ons.

6.1 Buy Recurring Add-ons
The Recurring add-ons page displays details including –
| License Name |
Name of the license |
| Recurring Quantity |
The allocated license limit on monthly recurring basis |
| Specify Bundle |
Enter the quantity of bundles that you wish to purchase |
| Effective Quantity |
Total quantity after including add-ons |
| Bundle Price |
Price per bundle |
| Monthly Subscription |
The amount to be paid for the specified quantity for an entire billing month |
| Billing Amount |
Prorated amount calculated till the end of the billing cycle
Billing Amount = (Number of days remaining in the billing cycle / Total days in the billing cycle) x (Monthly Subscription x Number of months in the billing cycle)
For Instance, let’s take
- Billing Cycle – 1st January – 31st March (90 days)
- Date of Add-on Purchase – 1st March
- Number of days remaining in the billing cycle – 31 Days
- Monthly Subscription – 3,000/-
- Total cost for the billing duration – 3,000 x 3 = 9,000/-
- Billing Amount – (31 / 90) x 9,000 = 3,100/-
|
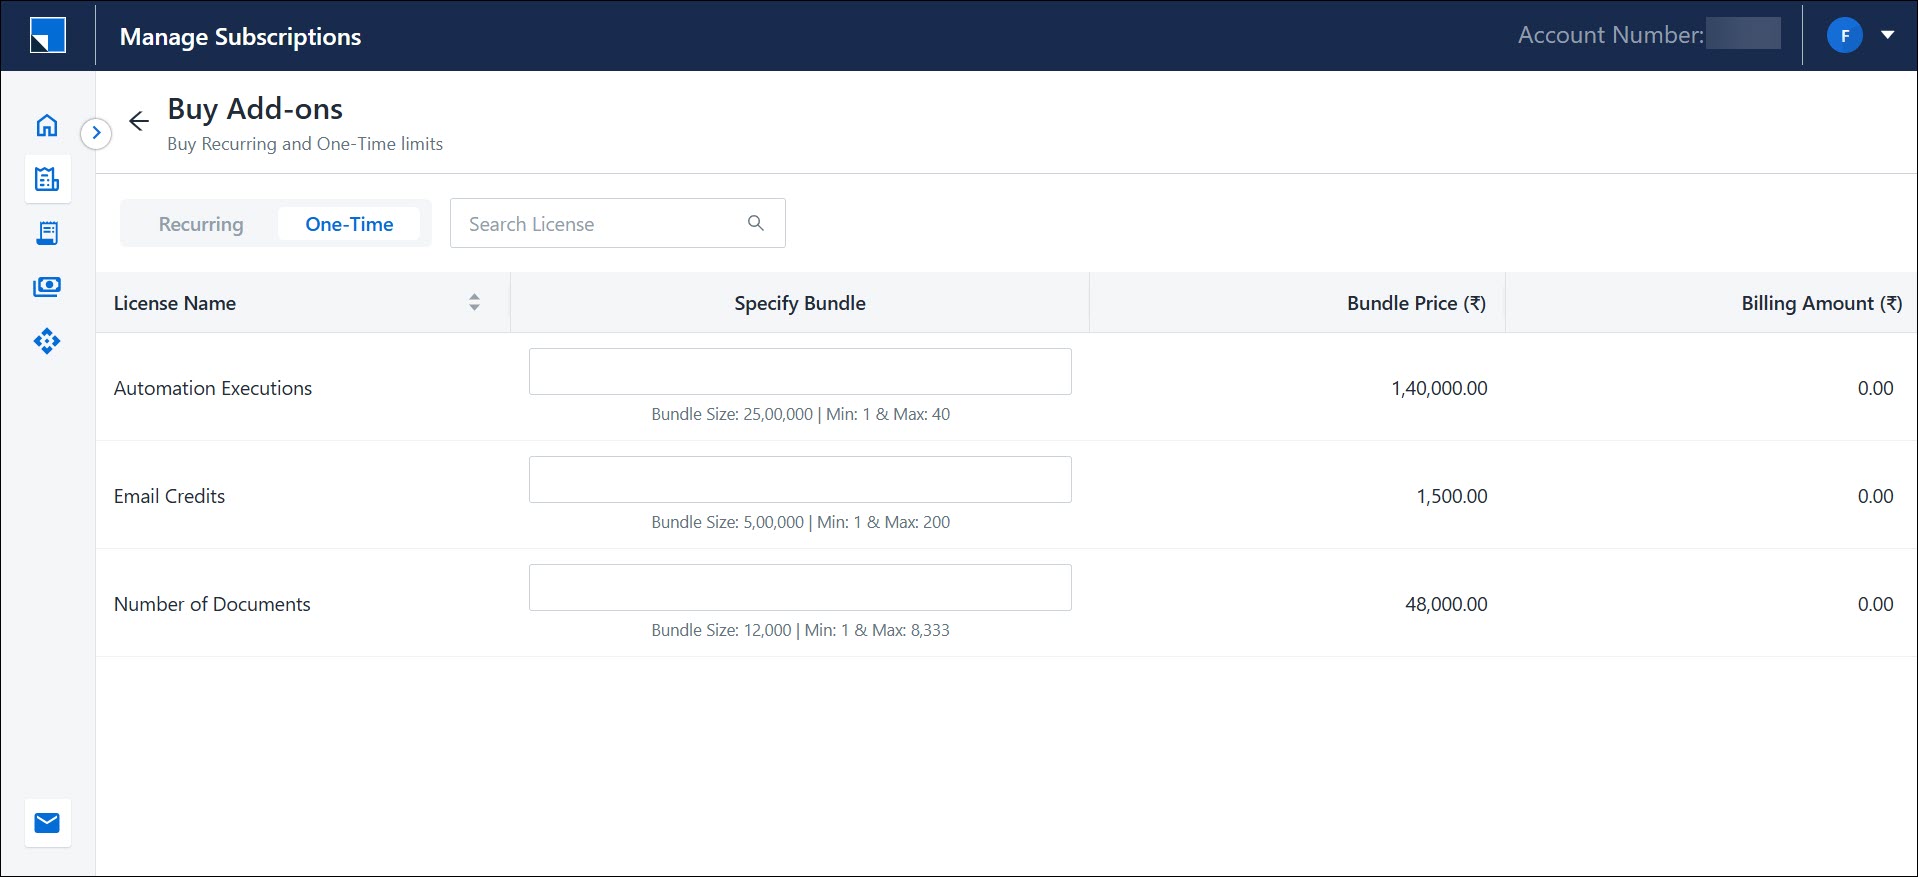
Note: In the Specify Quantity column, the number alongside Bundle Size denotes the number of units per bundle. The numbers alongside Min and Max denote the minimum number of bundles and maximum number of bundles that can be purchased, respectively.
6.2 Buy One-Time Add-ons
The Onetime add-ons page displays details including –
| License Name |
Name of the license |
| Specify Bundle |
Enter the quantity of bundles that you wish to purchase |
| Bundle Price |
Price per bundle |
| Billing Amount |
The amount to be paid for the specified quantity |
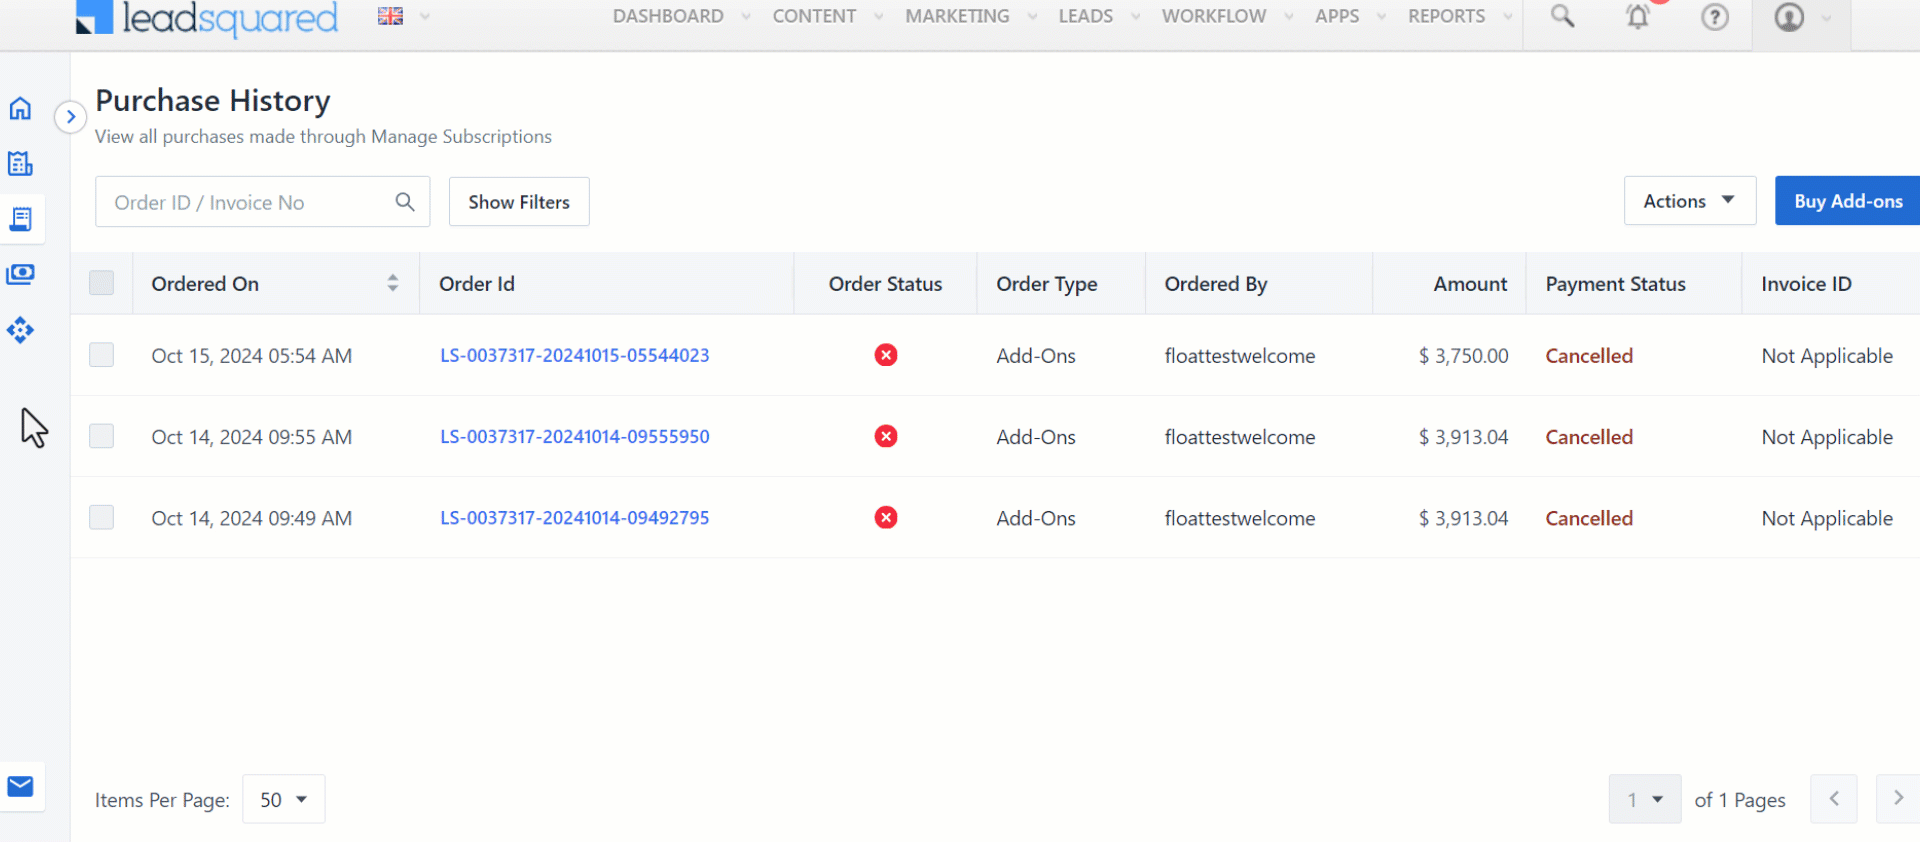
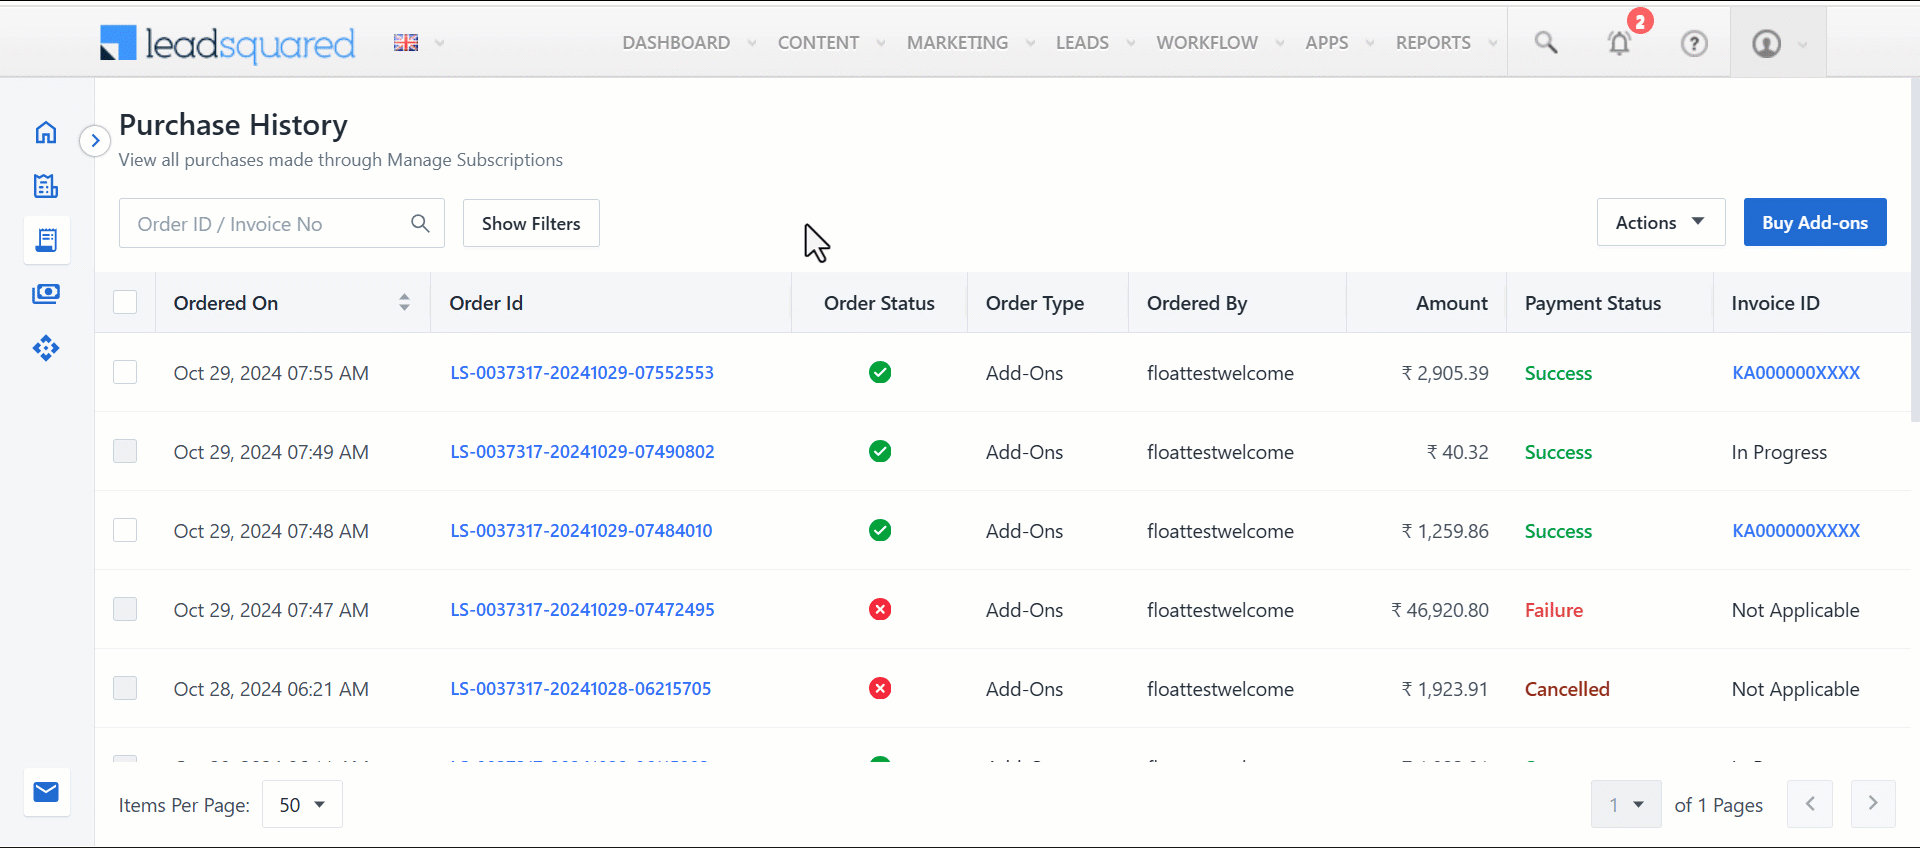
7. Purchase History Page
Purchase History page provides a comprehensive view of all add-on orders placed through the Manage Subscriptions UI. To navigate to the Purchase History page, from the left side menu on the Manage Subscriptions UI, click  .
.
This page displays details including –
| Ordered On |
Date and time of order as per the user’s time zone |
| Order ID |
Generated order ID
(Clicking on the Order ID will open a pop-up with the order details) |
| Order Status |
Indicates whether the order is –
- Success – order placed successfully and paid
- Pending – order not completely placed by the user
- In-progress – order placed but not processed yet
- Failed – order failed
|
| Order Type |
Indicates the type of order
(Currently, only add-ons are available) |
| Ordered By |
Displays the user who placed the order |
| Amount |
Indicates the order amount |
| Payment Status |
Indicates if the payment was successfully completed or not |
| Invoice ID |
Shows the invoice number
(Orders with failed payment status will not have an Invoice ID) |
7.1 Search & Filter Orders
On the Purchase History page, you can search for specific orders by using the search tab or filters.
To search for a particular order based on the Invoice ID or Order ID-
- Click the Search Tab.
- Enter the relevant Order ID or Invoice ID and click .
To Filter and view relevant invoices –
- Click Show Filters.
- You can filter invoices based on the Transaction Date, Order Status and Order Type. Select the relevant filter from the dropdowns.
7.2 Download Invoices
To download a single invoice, click the Invoice ID of the relevant invoice. The invoice will be downloaded.

To download multiple invoices –
- Click the check box alongside all the relevant invoices.
- Click Actions and select Download Invoice. All the selected invoices will be downloaded.
Click  to find email IDs of your Finance Owners, Account Owners and Customer Support on your Manage Subscriptions homepage. You can reach out to the relevant personnel to upgrade, downgrade or switch plans, or if you face any issues with your invoice payment. You can send emails to them individually or in bulk. You can also copy these emails to add them to your own directories.
To send an email to a single specific point of contact, click on their email address. This will open a draft in your default email application, allowing you to compose and send your mail.
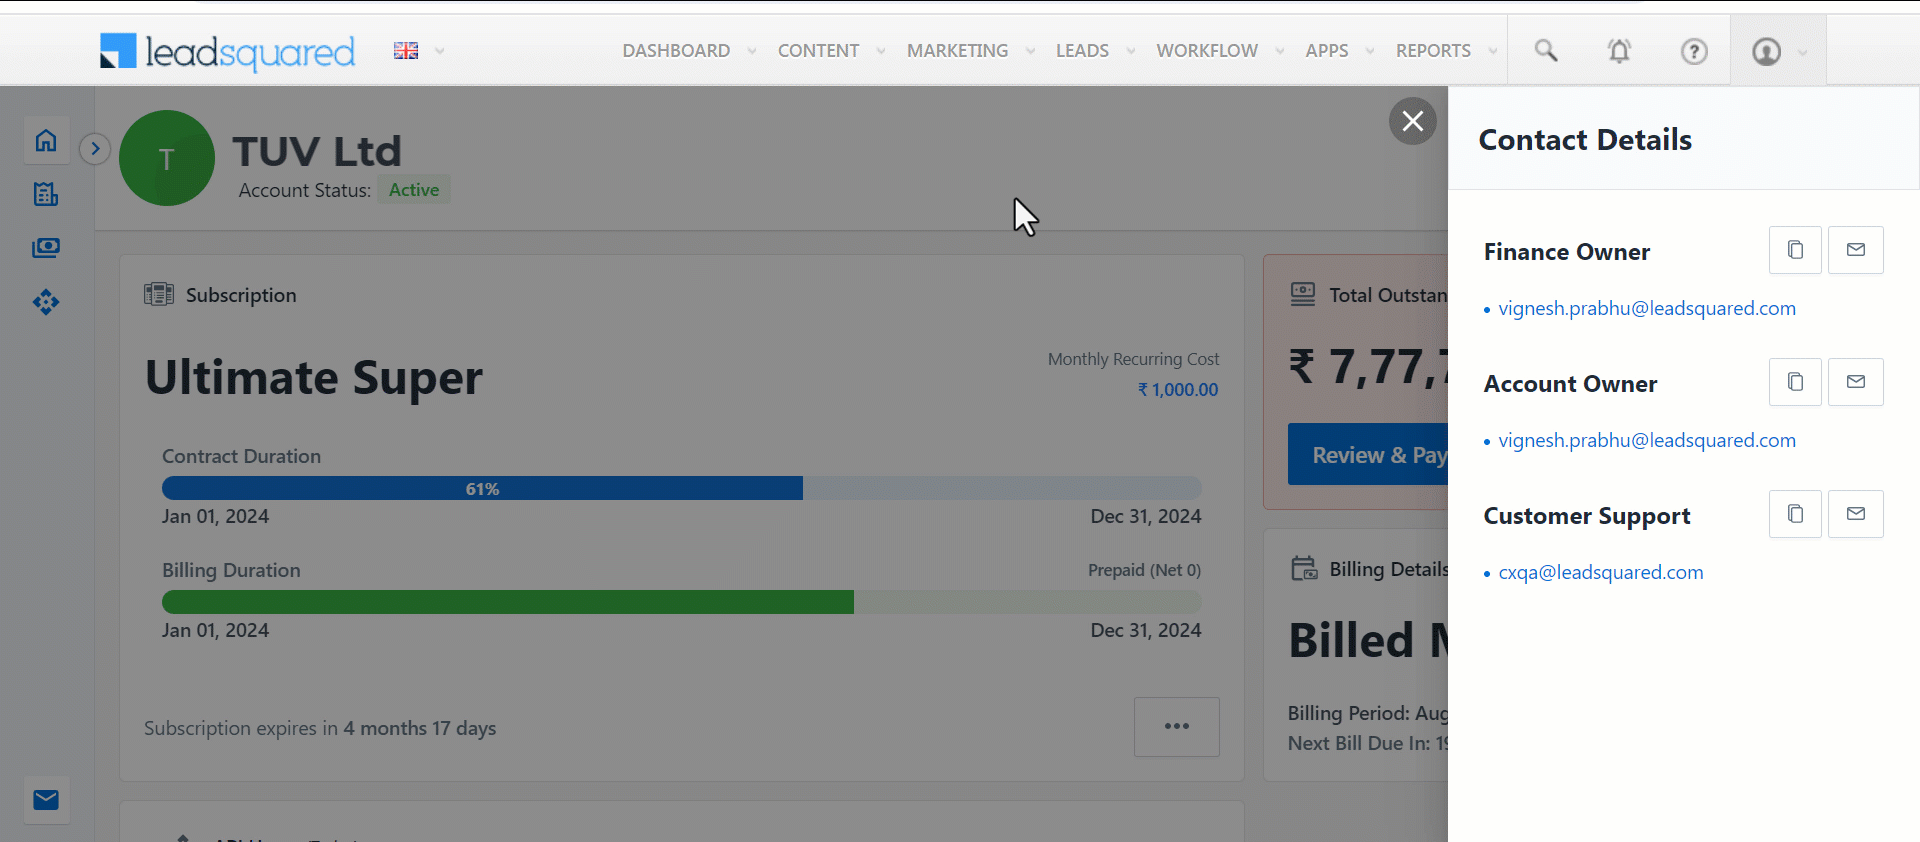
To send an email to multiple points of contact, click  . This will open a draft in your default email application, allowing you to compose and send mails to all the relevant POCs.
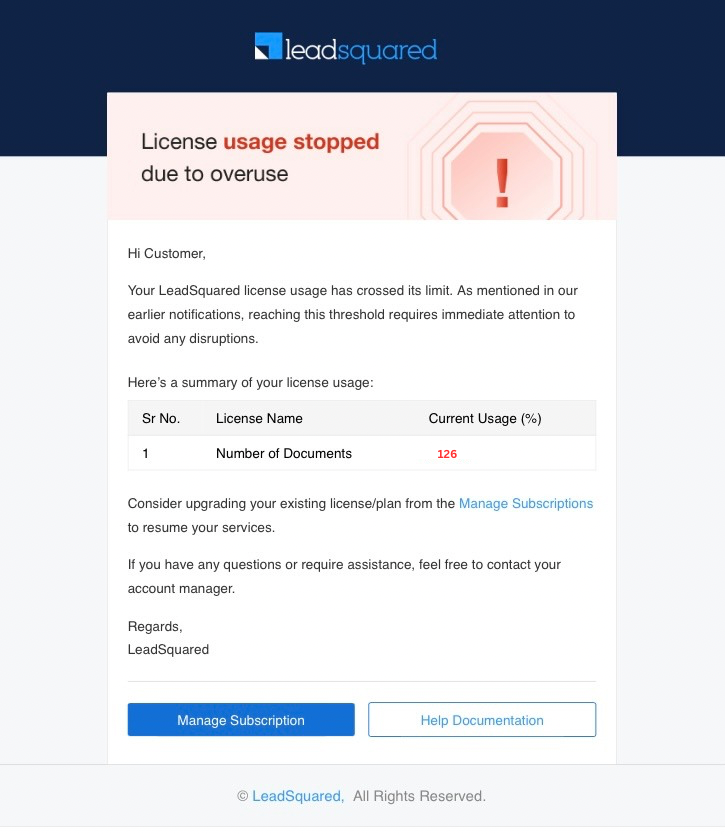
9. Usage Notifications
All admin users will receive email notifications for reaching certain limits of license usage. By clicking on the Manage Subscriptions button, they can access the Manage Subscriptions portal to review their plan and licenses.
Email Notifications will be sent when your License –
- Usage reaches Critical Levels (Below 100%)
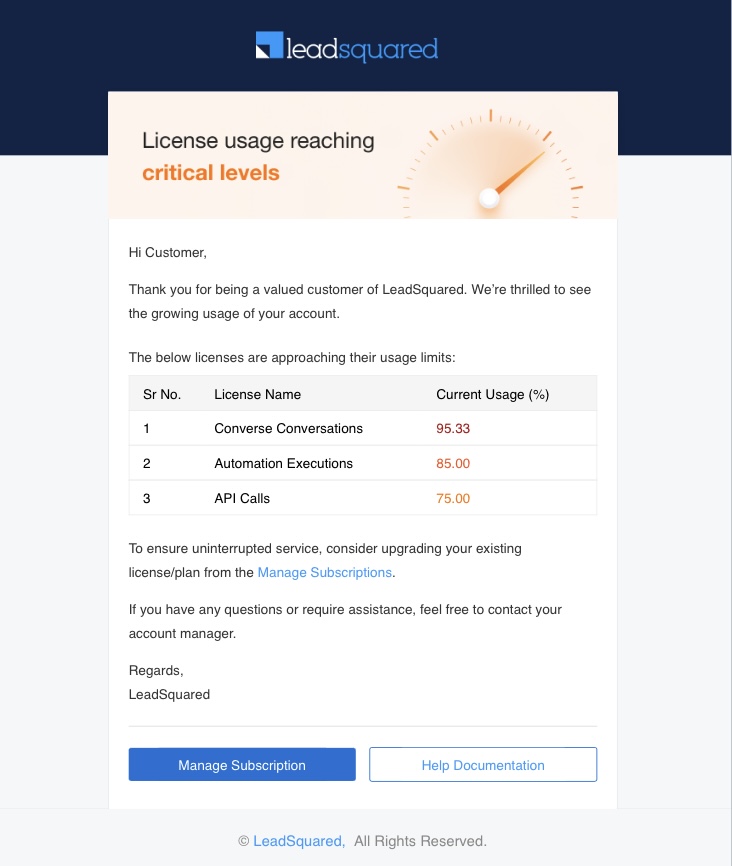
- Capacity is Fully Utilized (Over 100%)
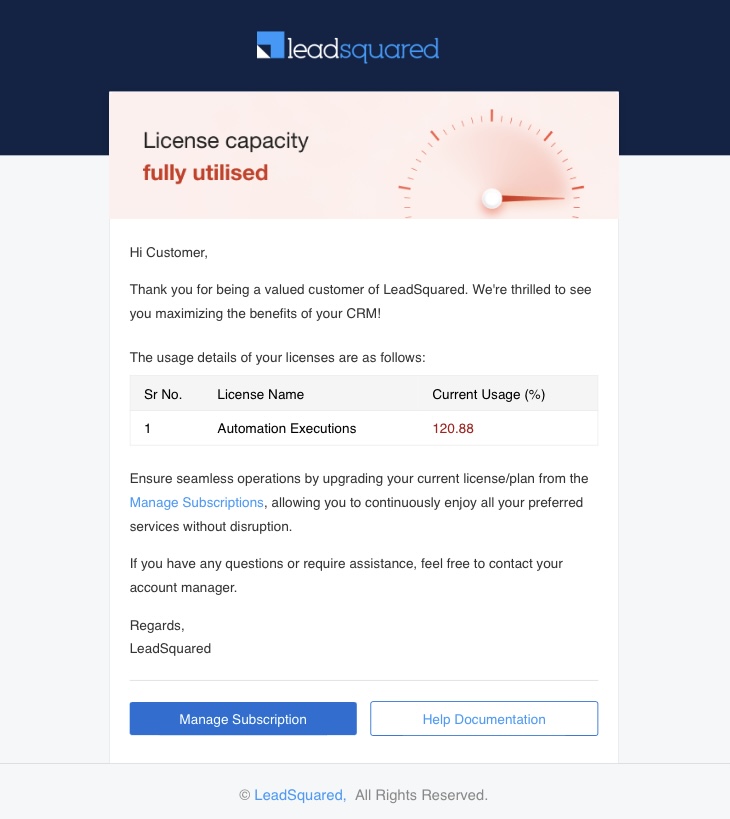
- Usage stops due to Overuse (Over 125%)
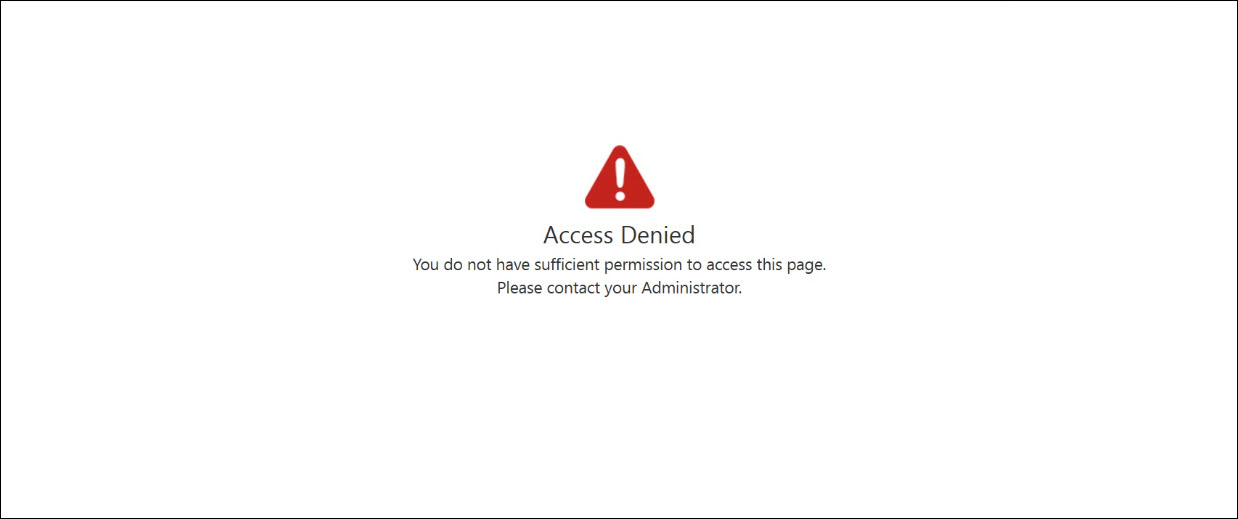
10. Error
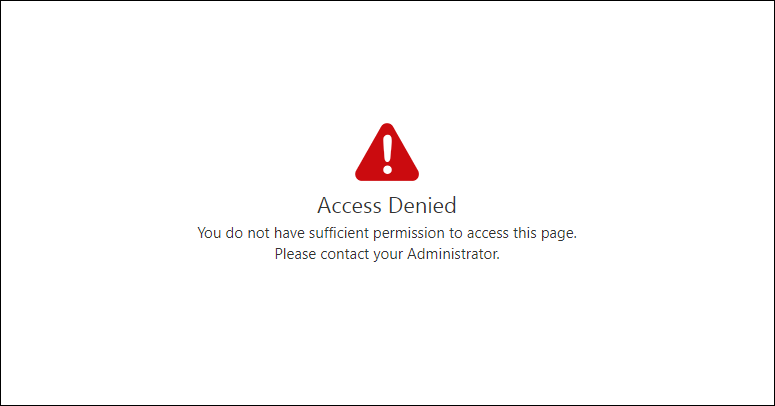
If you face the error saying “Access Denied! You do not have sufficient permission to access this page.”, it could be because
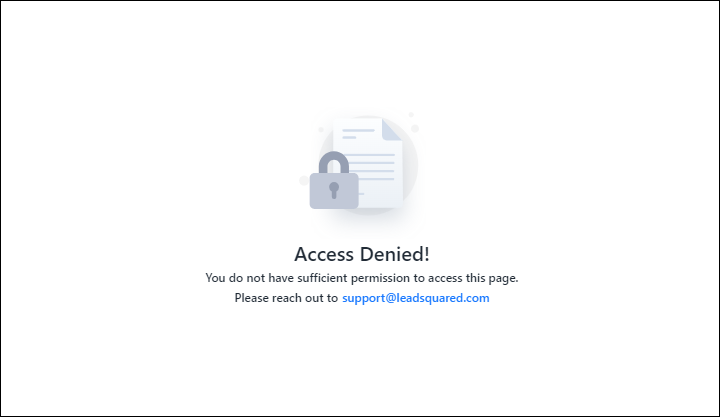
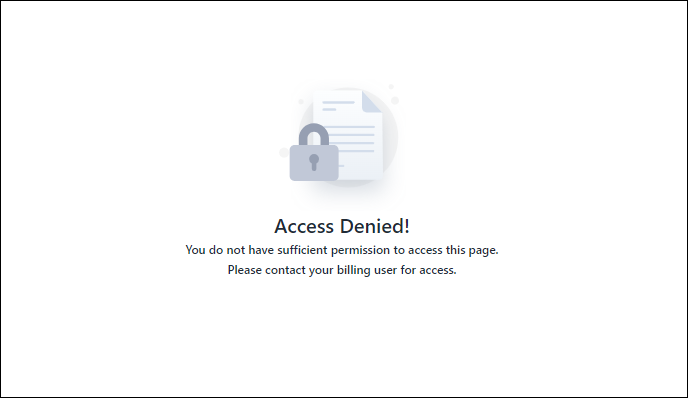
- You are not an administrator user.
11. FAQ
1. What licenses are included in my current plan and how can I add more?
To see the licenses included in your current plan, click the amount shown on the Subscription Details page. You can toggle between Metered Usage and License Usage to view the relevant licenses. You can purchase additional licenses through Manage Subscriptions. To add more licenses to your base plan, click Buy Add-ons from your Subscription Details page. You can only buy those add-ons that are available with your plan.
2. How can I upgrade, downgrade or switch my subscription plan?
Click the email icon in the bottom left corner of the Manage Subscriptions page and contact the finance or account owner to request a change.
3. How to change the Billing User?
There can only be one billing user at any given time. To set another Administrator as the billing user –
- Navigate to Settings>Users and Permissions>Users.
- Along the row of the Administrator you want to set as the billing user, hover your cursor over
 and select Set Billing User.
- On the Set Billing User pop-up, click Yes.
4. How do I track my usage of metered licenses (API calls, emails, automation executions, etc.)?
To view your usage of metered licenses –
- Navigate to Manage Subscriptions>Subscription Details.
- Click the Metered Usage tab.
- Click the relevant license from the list of metered licenses.
- A popup comprehensively displays the month-wise and day-wise breakdown of the limits, usage, additional usage, billed usage, rate and additional bill amount of the particular license.
5. What are the limits for my Metered Licenses?
The limits for your Metered Licenses are based on your plan. However, you are free to use more than the given limit at a defined rate, by incurring an additional cost.
6. How can I monitor my License Usage to avoid exceeding limits?
The Subscription Details page displays all the licenses you have purchased along with their maximum limit, your utilization, remaining limit and a bar visually representing your usage. Hover over the number displayed under maximum limit of a particular license to view a pop-up displaying the Limit Bifurcation of the license. This pop-up displays the limit of the license available –
- With your Base Plan
- under Contractual Adjustments
- As Recurring Add-on
- As One-Time Add-on
7. How is my billing calculated?
Your bill is based on your Monthly Subscription, which includes your base plan (or Plan Bundle) and any recurring add-ons. One-time licenses involve a single payment. If you exceed your plan’s limits through metered usage, additional charges will apply. When you choose to pay quarterly, half-yearly, or yearly, the Monthly Subscription rate is multiplied by the number of months in that period—three months for quarterly, six months for semi-annual, and twelve months for annual payments. Additionally, all add-ons are billed on a pro rata basis, depending on the end date of your respective billing cycles.
8. Can I view and download my invoices?
You can view and download your invoices, either individually or in bulk, from the Invoice & Payments page on Manage Subscriptions.
9. How do I update my Billing Details?
You can access your company profile and LeadSquared’s billing details on clicking the Billing Details button on the Manage Subscription homepage. You cannot edit your company’s information by yourself. Reach out to your Account Owner to change these details.
10. What happens if I exceed my usage limits? Are there any overage charges (additional billing/costs)?
You will receive email notifications about your license usage limits periodically (at 75%, 85%, 95%,100% and 125%). You will be billed additionally for extra usage and you can continue using the license. However, on crossing the 125% limit, the service will stop, and you won’t be able to use it until you purchase additional limits. Monitor your usage and buy more add-ons to avoid service interruption.
11. How quickly will new licenses be activated after purchase?
The new licenses that you purchase will be activated immediately.
12. Can I get a refund for unused licenses if I downgrade or cancel my plan?
Refund is not applicable on the licenses procured.
Any Questions?
Do you have questions or issues with the content in this article? Let us know in the comments section below. We’ll get back to you asap!

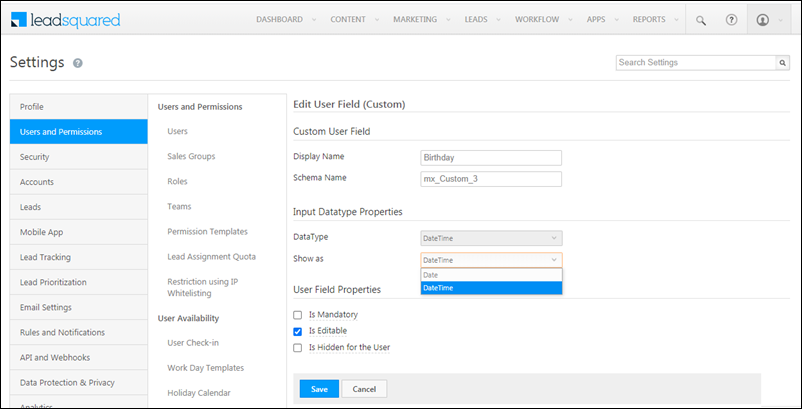
 wheel that appears alongside and type in the dropdown options. Click the delete
  icon if you wish to remove the custom field.
 and delete