1. Feature Overview
The WhatsApp Messaging Connector enables you to integrate your WhatsApp business account with LeadSquared. Once integrated, you’ll be able to –
- Convert more leads through WhatsApp messaging
- Add multiple WhatsApp numbers
- Engage in real-time conversations through LeadSquared Converse
- Set up Automations to send notifications and reminders
- Send personalized messages based on a lead’s preferences
- Send marketing campaigns (bulk messages) to multiple leads, or lead lists
- Track delivery and reads to re-engage leads and close opportunities
For frequently asked questions, see WhatsApp Business FAQs.
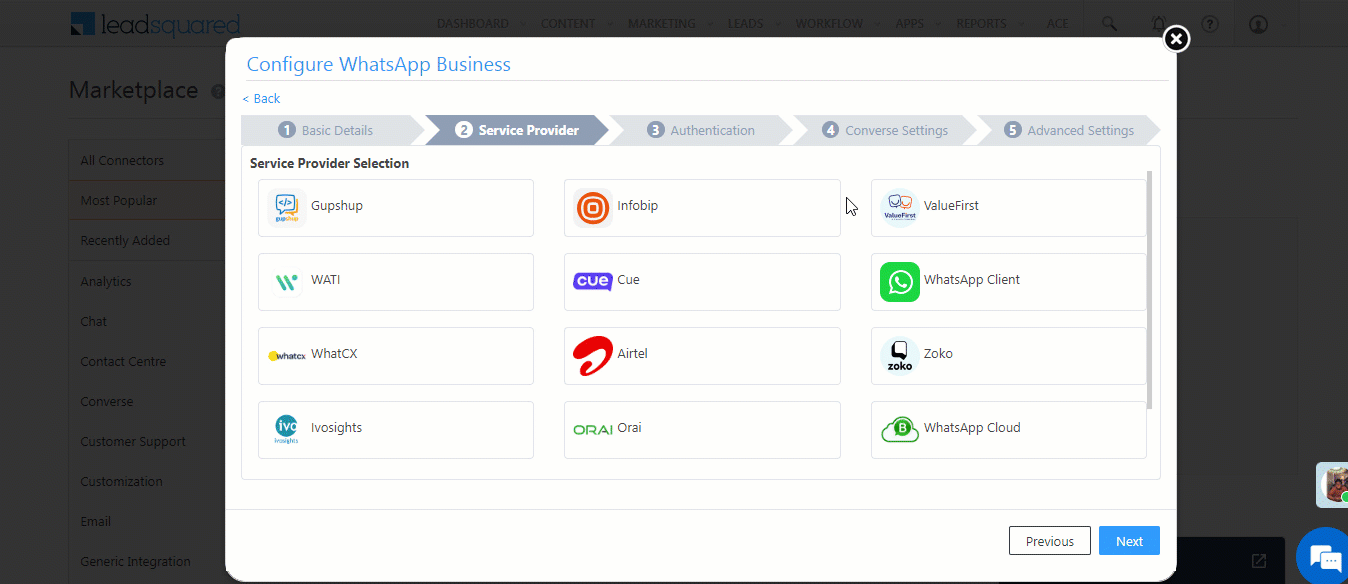
The following WhatsApp service providers are supported in LeadSquared –
2. Prerequisites
You must meet the following prerequisites before installing and configuring the WhatsApp Messaging Connector –
- Get approved WhatsApp Business numbers and accounts
- Submit Message Templates for approval
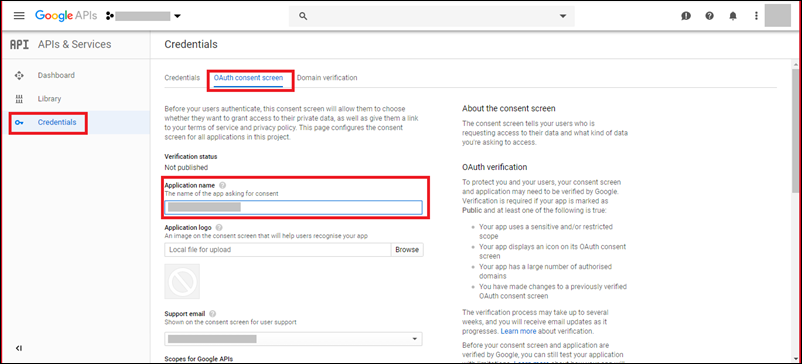
2.1 Get an Approved WhatsApp Business Number and Account
Approach a WhatsApp solution provider like Infobip, Kaleyra, Zoko, Wati, Gupshup or any other provider that’s supported by LeadSquared, to get your business number and account created. In case you already have an approved WhatsApp business profile with any of the solution providers we support, you can directly pass your credentials to the WhatsApp Messaging Connector.
2.2 Submit Message Templates for Approval
Message templates will be used to send notifications, alerts, updates, etc., to your leads. These will allow you to send only the template identifier along with the appropriate parameters instead of the full message content.
You must submit the templates for approval to your existing solution provider. The templates will be reviewed by WhatsApp to ensure that they don’t violate any of their policies. The approval process may take around 24-48 hours.
Once your templates are approved, add them to your LeadSquared account (on the Apps>WhatsApp Templates screen). If you face any difficulties when adding these templates, contact your account manager, or write to us at support@leadsquared.com.
Here are some guidelines you should follow while creating templates –
- The message template name can only contain lowercase alphanumeric characters and underscores ( _ ). No other characters or white space are allowed.
- The message content should be a string of no more than 1024 characters, with no newlines, tabs, or more than 4 consecutive spaces and variables indicated with {{#}} where the number represents the variable index. Variables must begin counting at {{1}}.
Examples
Common template categories include Account Update, Alert Update, Appointment Update, Issue Resolution, Payment Update, Personal Finance Update, etc.
Here’s what a welcome message may look like –
“Welcome {{1}}. We look forward to serving you on WhatsApp.”
And here’s a sample order confirmation message (order_confirmation can be the message name) –
“Your order {{1}} for a total of {{2}} is confirmed. The expected delivery is {{3}}.”
Note:
- Variables (e.g., {{1}}, {{2}}) can later be replaced using Leadsquared mail merge fields like lead’s first name, lead’s course interest, lead’s product interest, etc.
- If a lead sends you a message first, you have a 24-hour customer care window to reply. Messages sent within customer care window don’t need to follow a template. The 24-hour customer window restarts each time the lead sends a new inbound message.
3. Opt-In & Opt-Out Guidelines
You must receive an explicit opt-in before sending messages to your leads. Users must explicitly sign up to receive messages from your business by a user action, such as entering a phone number or checking a box to indicate consent. Users must be made aware of the type(s) of messaging they are signing up for.
We recommend keeping a record of customer opt-ins within CRM. Users can provide consent via any channel your business uses for communication such as Web Form, App, Email, SMS, etc. The partner and WhatsApp will monitor if the Opt-in rules are violated and will ask you to demonstrate proof of opt-in based on quality signals.
For more information, see How to Get Opt-In for WhatsApp.
4. Rate Limits and Quality Monitoring
Approved WhatsApp users are initially limited to 1,000 unique message recipients a day. Customers intending to message with more than 1,000 unique leads should gradually roll out their WhatsApp launch over the course of time.
For more information, see WhatsApp Rate Limiting.
Quality ratings show how messages have been received by your leads. To maintain high quality, follow these best practices –
- Make sure messages follow the WhatsApp Business Policy.
- Only send messages to customers who have opted-in to receiving messages from your business.
- Make the messages highly personalized and useful to customers.
- Be mindful of messaging frequency; avoid sending customers too many messages a day.
WhatsApp can increase your WhatsApp message limits based on your engagement quality and levels with your leads. When this occurs, contact your account manager and provide them with Support Access to update the new message limit on the WhatsApp Connector.
Once your account manager has access, they’ll –
- Navigate to Apps>Apps Marketplace, and search for the WhatsApp Business connector.
- Hover your cursor over
 , and click Configure.
- Select the WhatsApp account for which the rate limit needs to be changed.
- Alongside Message Limit, click
 , and from the Update Messaging Limit dropdown, select the updated limits.
- Once you select the updated limits, click
 . This is mandatory.
- Once done, click Save. This will update the message limit.
Note:
- The Message Limit can only be updated through Support Access.
- The above steps need not be carried out by you. They are mentioned for both your and LeadSquared’s internal reference.
- Only standard WhatsApp limits can be set. Custom limits are not allowed. To know more, refer to Facebook Messaging Limits.
5. Pricing and Availability
WhatsApp Business is available globally. Set-up fees & per-message costs vary from country to country and also depend on the type of message. Get in touch with us at sales@leadsquared.com or contact your LeadSquared account representative for more information.
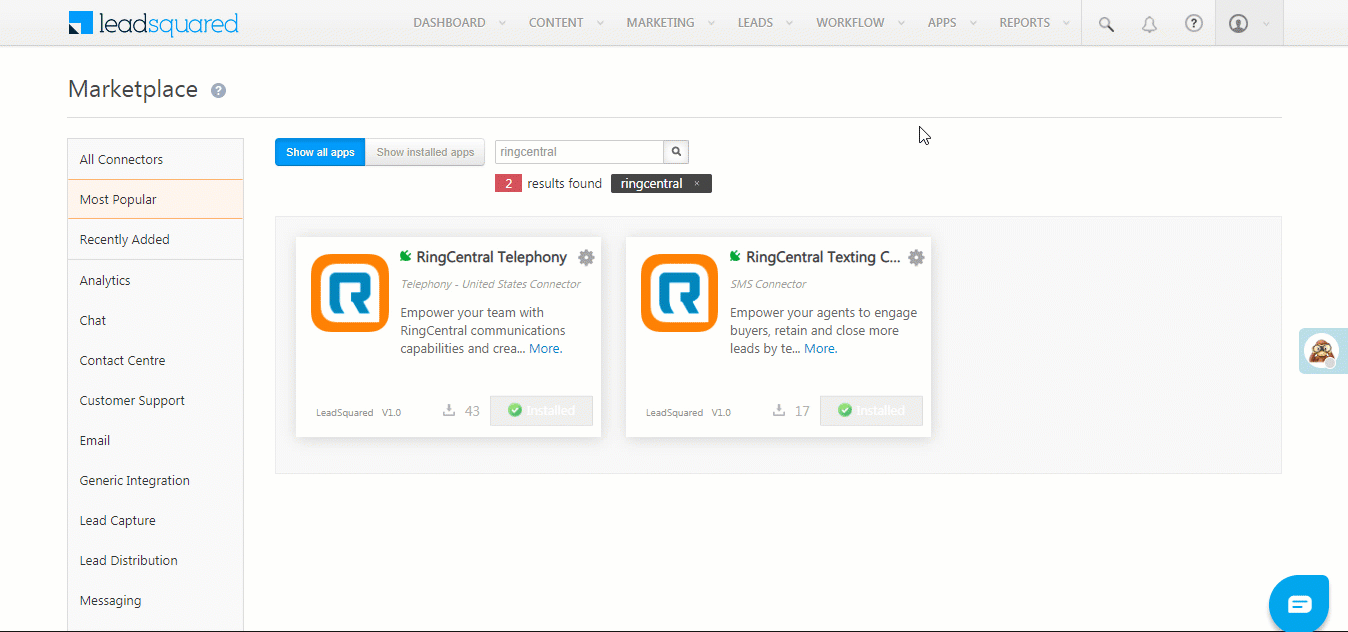
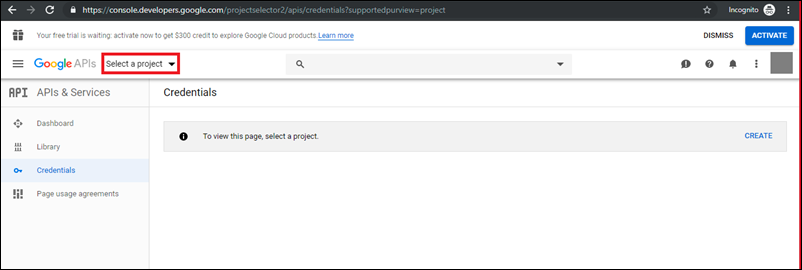
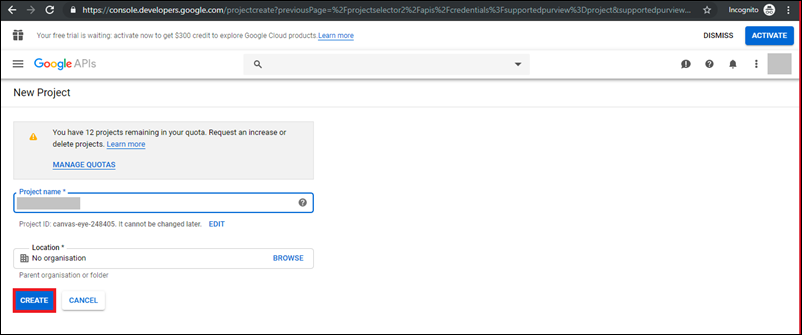
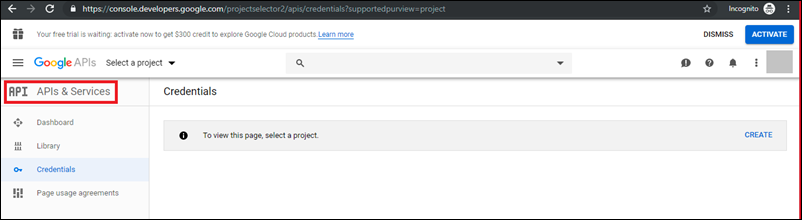
6. Installation
To install the WhatsApp Messaging Connector –
- From the main menu, navigate to Apps>Apps Marketplace.
- Search for WhatsApp Business, and click Install.
- Alternatively, you’ll find the connector listed under the Messaging tab.
- Once installed, hover your cursor over
 and click Configure.
- On the Configure WhatsApp Business pop-up, click Add Number.
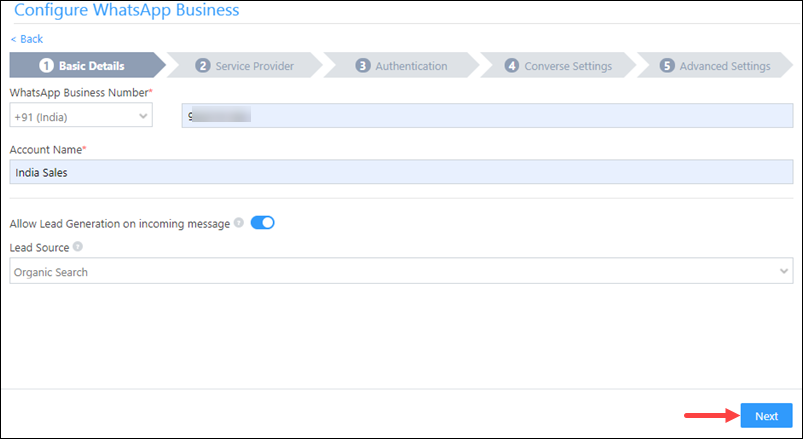
7. Configuration
Once the connector is installed, add and configure your WhatsApp phone numbers to the connector. To do this, enter –
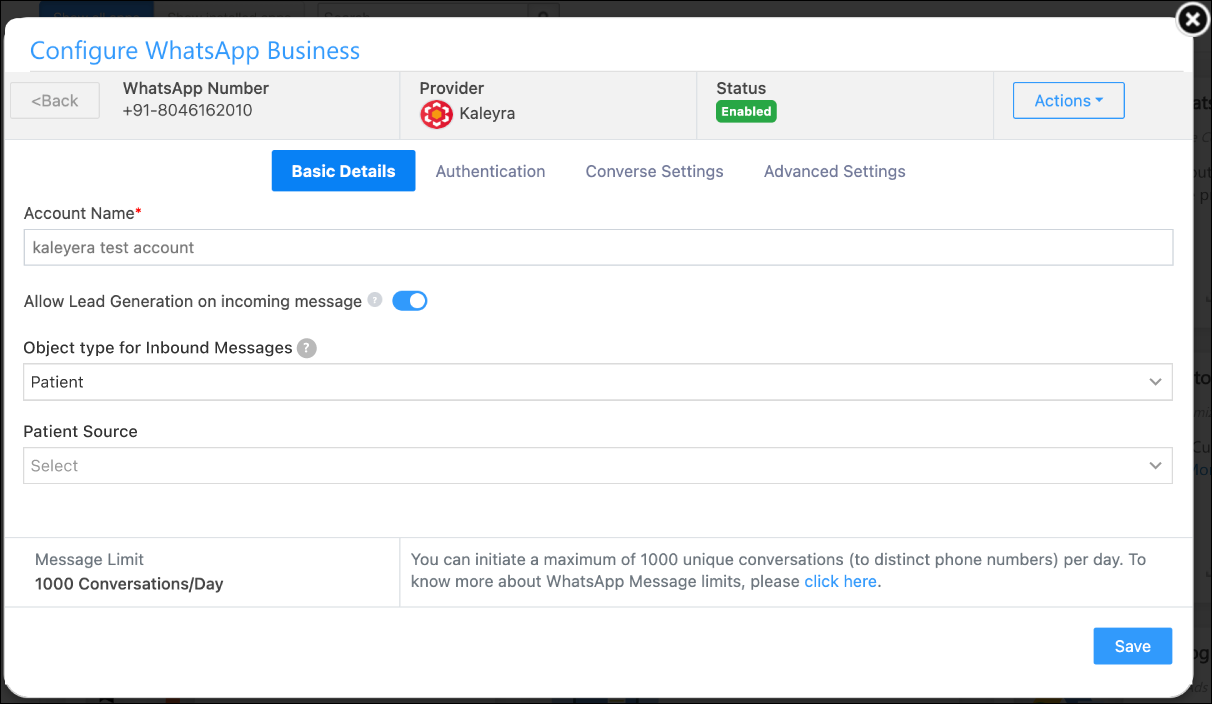
7.1 Basic Details
| Field |
Description |
| WhatsApp Business Number |
Select the country code, and provide your WhatsApp business number. This field is mandatory. |
| Account Name |
Provide a relevant name for your connector. This field is mandatory. |
| Allow Lead Generation on incoming message |
Click  to allow automatic lead creation when you receive messages from unknown mobile numbers. to allow automatic lead creation when you receive messages from unknown mobile numbers. |
| Lead Source |
From the dropdown, select a lead source for your leads. |
Once you’re done, click Next.
7.2 Service Provider
From the available options, choose a service provider –
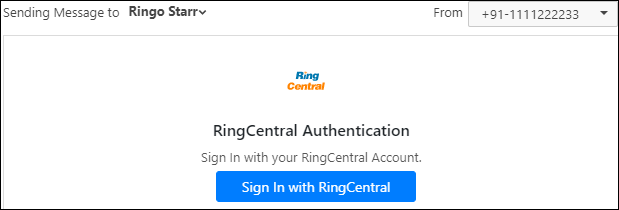
WhatsApp Client
Authentication Set-up
Instead of directly exposing a public REST API, WhatsApp requires deploying a WhatsApp API Client. This enables end-to-end encryption, media storage and permanent connection to the WhatsApp network. When connecting WhatsApp to LeadSquared you can leverage our WhatsApp API Client hosting solution or your own hosted client for connection.
- To get access to the WhatsApp API client hosted by LeadSquared, please contact us at sales@leadsquared.com.
- If you already have your own hosted WhatsApp API client, enter the following details –
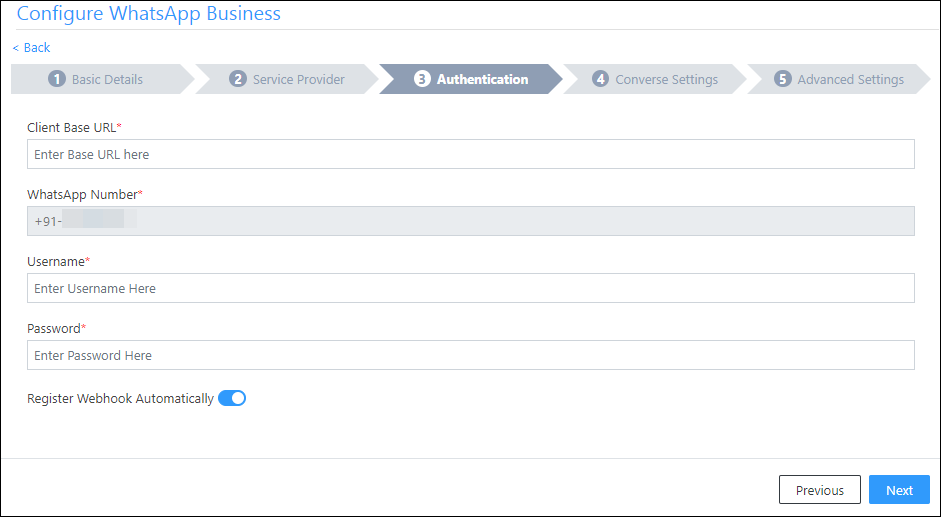
| Field |
Description |
| Client Base URL |
The base URL for the API client. If you’re using the LeadSquared hosted API enter the URL provided to you. |
| WhatsApp Number |
Your WhatsApp business number. |
| Username |
Your WhatsApp business account username. |
| Password |
Your WhatsApp business account password. |
| Register Webhook Automatically |
This setting is enabled by default.
If your provider does not support automatic webhook registration, disable this setting. You can then copy the webhook, and manually configure it in your provider’s portal. |
Once you’re done entering all the details, click Next.
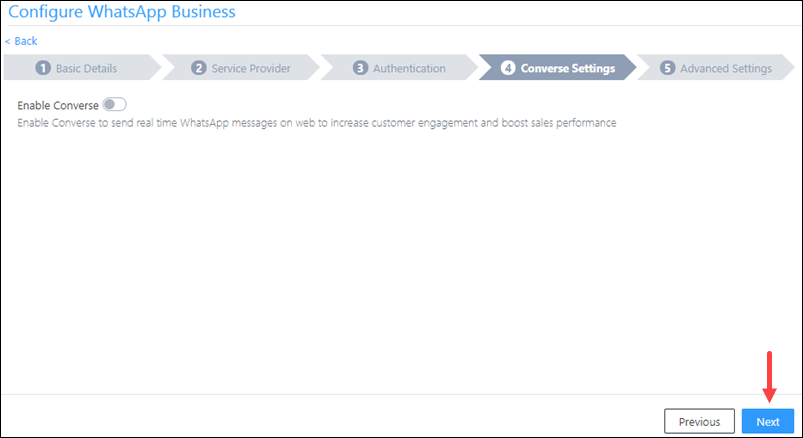
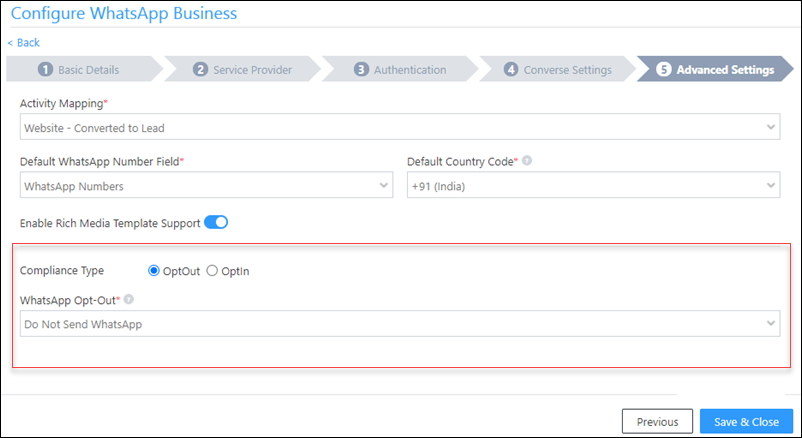
Converse Settings
Advanced Settings
In this screen, you must map –
- Activity Mapping – A LeadSquared activity field to your WhatsApp messages. This is the activity that will be posted every time a WhatsApp message is sent or received.
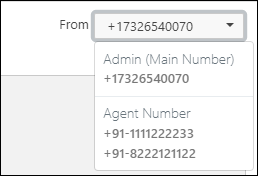
- Default WhatsApp Number Fields – The number you set as the default phone number will be automatically selected when you’re sending a WhatsApp message to a lead. You can also select other numbers that are available from the Add Another Number dropdown.
- Default Country Code – The default country code will be used to send messages to a phone number that’s stored in a custom field, if no country code is listed.
- Compliance Type – Here, you can select the compliance type for the WhatsApp template, by choosing either WhatsApp Opt-out or Opt-in.
- Opt-Out Lead Field – From the dropdown, select a lead field for the WhatsApp opt-out functionality. When selected, your leads will not receive outbound WhatsApp messages.
- Opt-In Lead Field – From the dropdown, select a lead field for the WhatsApp opt-in functionality. When selected, your leads will receive outbound WhatsApp messages.
- Blacklist Incoming Messages – If required, you can enable this option to blacklist incoming messages from specific numbers. This is useful when you want to block numbers that send inappropriate messages to your users. Once enabled, enter the phone numbers in the text box available on the right side of your screen. You can add phone numbers with 7-12 digits (excluding the country code). This option is available only when the Allow Lead Generation on incoming messages setting is enabled.
- Show URL Preview in Custom Messages – When enabled, if the template contains a URL, a URL preview will be added as part of the message.
- Enable Rich Media Template Support – If you want to include media files in your WhatsApp message, you must enable the slider.
- Enable HSM – Enable this setting ONLY if your provider expects text templates in the HSM format.
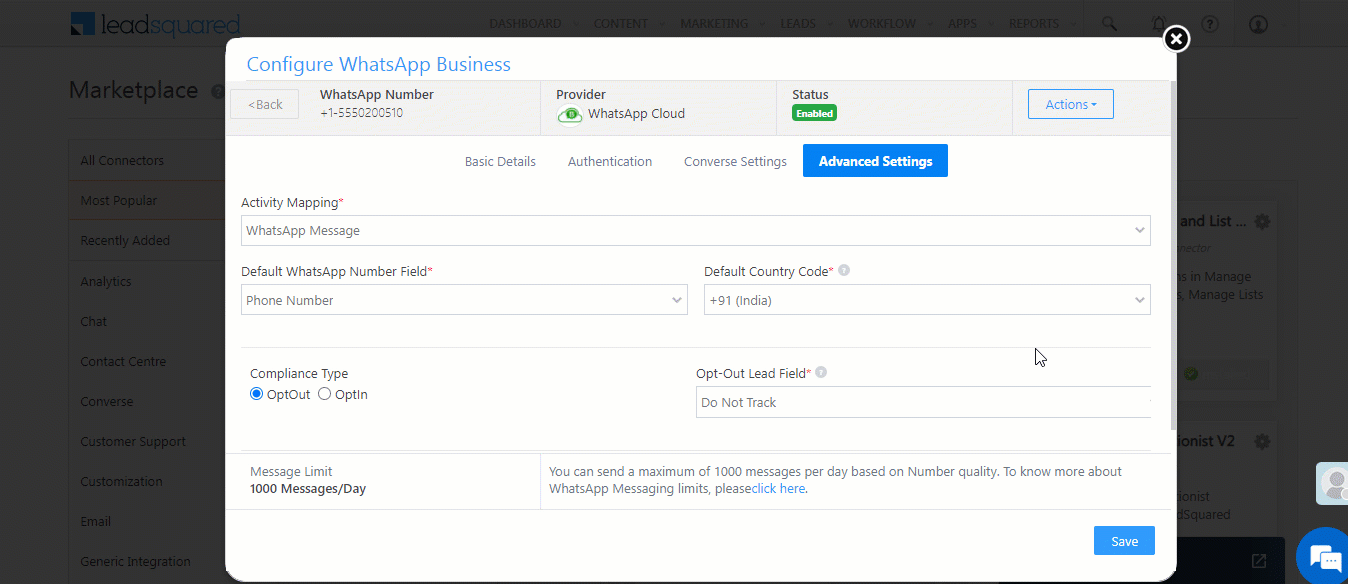
Once you’re done entering the required details, click Save & Close.
Infobip
Infobip is a cloud communication solution that helps business manage all their communication channels through a single platform. LeadSquared offers easy WhatsApp integration through Infobip. For integration details, see LeadSquared WhatsApp Integration with Infobip.
Gupshup
Gupshup enables businesses to build engaging conversational experiences seamlessly across 30+ messaging channels using a single API. LeadSquared offers easy WhatsApp integration through Gupshup. For integration details, see LeadSquared WhatsApp Integration with Gupshup.
Kaleyra
To integrate Kaleyra with LeadSquared, refer to How to integrate Kalyera with LeadSquared.
Zoko
Zoko’s WhatsApp self-serve solution helps you engage your customers in a simple, secure and reliable way. Zoko facilitates customer support and other marketing efforts through WhatsApp. To know more, refer to LeadSquared WhatsApp Integration with Zoko.
Wati
Wati’s WhatsApp self-serve solution helps you engage your customers in a simple, secure and reliable way. Wati drive sales, support & marketing conversations through WhatsApp. To know more, refer to LeadSquared WhatsApp Integration with Wati.
Ivosights
Ivosights facilitates customer support and other marketing efforts through WhatsApp. To know more, refer to LeadSquared WhatsApp Integration with Ivosights.
WhatsApp Cloud API
To use the WhatsApp Cloud API, refer to LeadSquared WhatsApp Integration with WhatsApp Cloud API.
Airtel
Airel facilitates customer support and other marketing efforts through WhatsApp. To know more, refer to LeadSquared WhatsApp Integration with Airtel.
DoubleTick
To integrate DoubleTick with LeadSquared, refer to LeadSquared WhatsApp Integration with DoubleTick.
AiSensy
To integrate AiSensy with LeadSquared, refer to Integrate LeadSquared with WhatsApp via AiSensy.
Interakt
To integrate Interakt with LeadSquared, refer to LeadSquared WhatsApp Integration with Interakt.
Cue
To integrate Cue with LeadSquared, refer to the WhatsApp Client section that’s listed above. You can get your username and password by reaching out to the Cue support team.
Tata Tele Business Services
To integrate Tata Tele Business Services with LeadSquared, refer to LeadSquared WhatsApp Integration with Tata Tele Business Services.
Chatbot.team
To integrate Chabot.team with LeadSquared, refer to LeadSquared WhatsApp Integration with Chatbot.team.
7.3 Object Types Integration with WhatsApp
Along with leads, you can send messages to LeadSquared Object Types configured on your account. The steps remain the same as those listed in this section above, with the only difference being selecting the relevant object type from the Object Type for Inbound Messages dropdown. Once you’re done, create WhatsApp templates with object types.
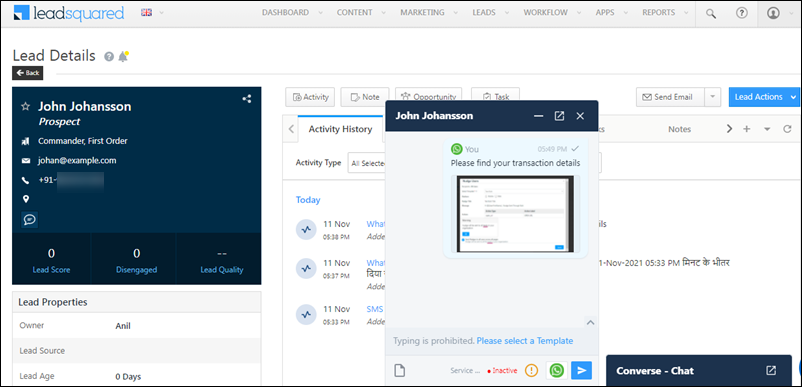
8. Integrate LeadSquared Converse with WhatsApp
LeadSquared Converse is an instant messaging feature that allows you to have real-time conversations with your leads via WhatsApp. To integrate LeadSquared Converse with WhatsApp, refer to LeadSquared Converse.
Note: Templates with interactive buttons are not supported in Converse.
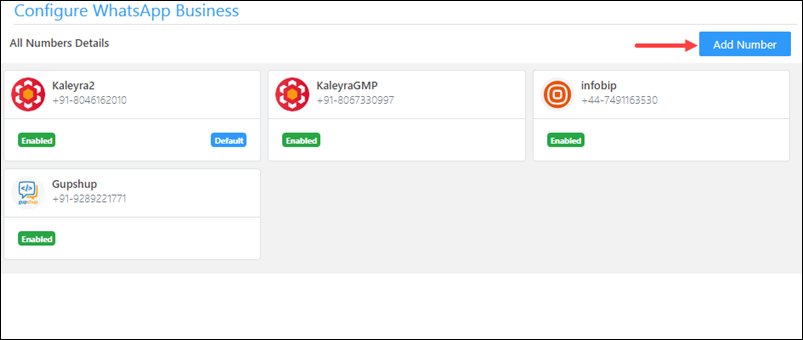
9. Add Multiple WhatsApp Numbers
You can add multiple WhatsApp numbers, through which you can send messages. These numbers can be configured across different service providers. To add multiple numbers, on the Configure WhatsApp Business pop-up, click the Add Number button. The steps to add a number are the same as ones listed in the previous section.
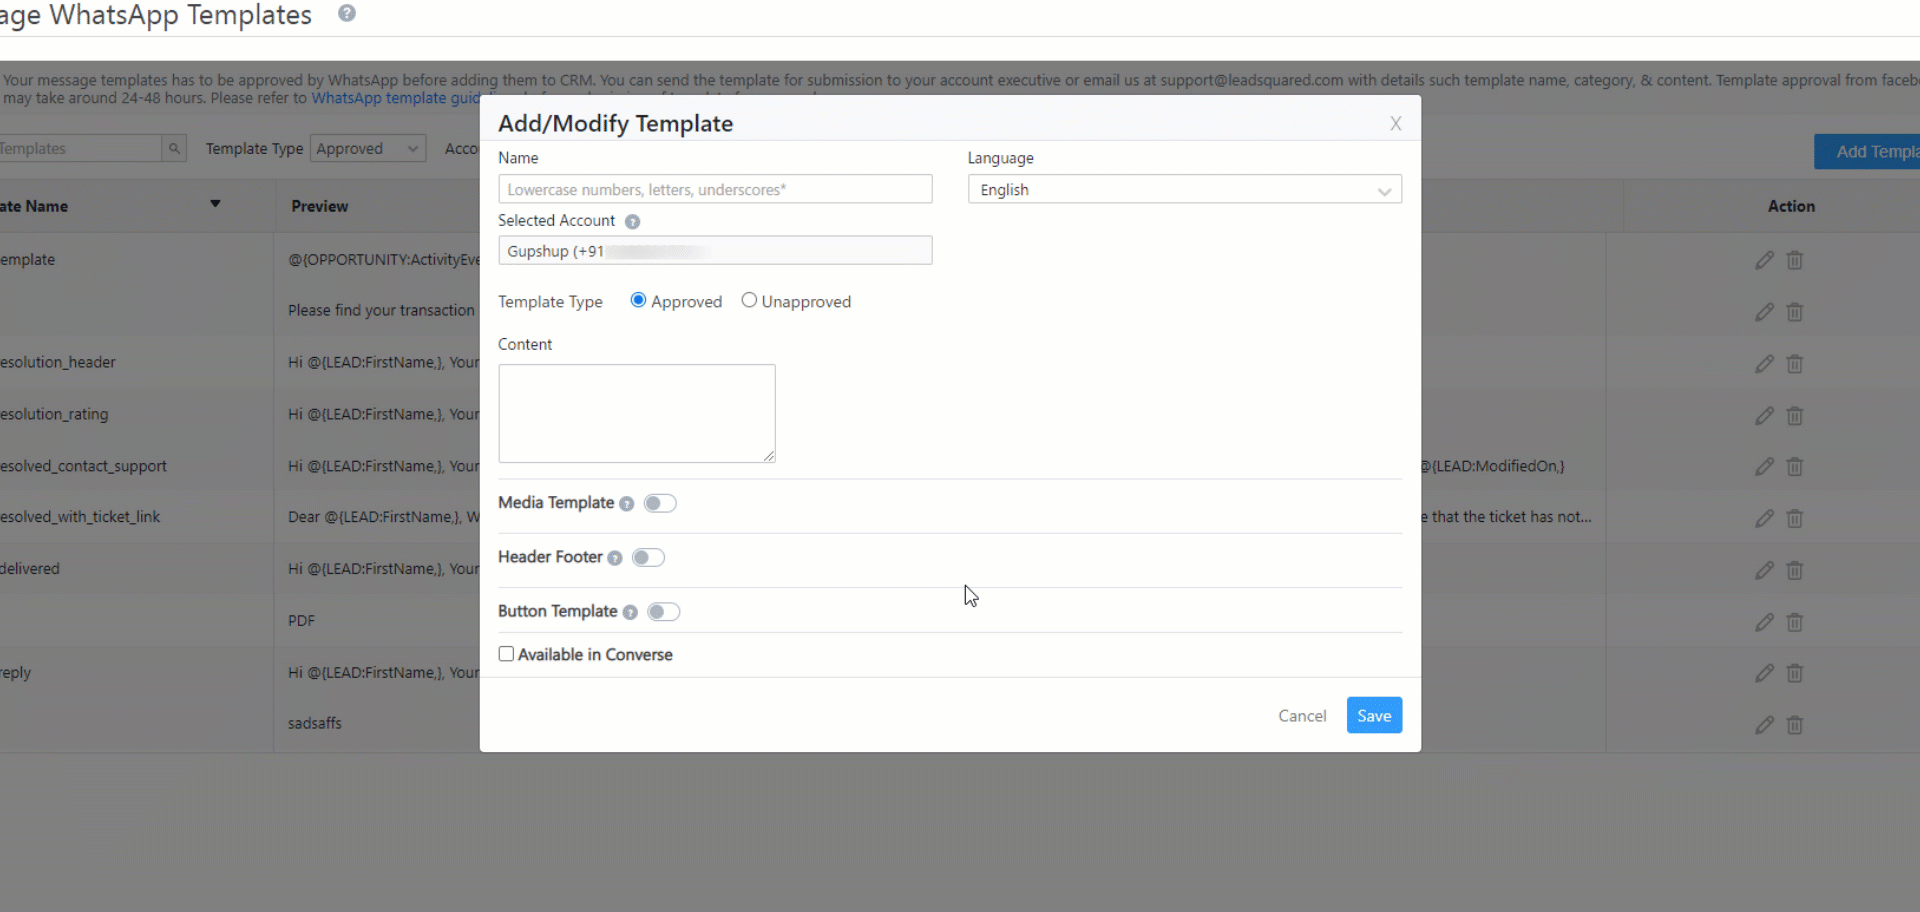
10. Adding WhatsApp Templates to LeadSquared
Once your templates have been approved (see Submit Message Templates for Approval), you can add them to your LeadSquared account.
- On your main menu, navigate to Apps>WhatsApp Templates.*
- Click Add Template.
- Enter the Name, Namespace#, and Content of your message template.
- Click Save.
Note:
- *If the option doesn’t show up on the menu, you may have to re-install the WhatsApp Connector.
- Be sure to enter the exact template content that was approved. Characters are case-sensitive.
- To enable link tracking for messages that contain URLs, refer to WhatsApp Link Tracking in LeadSquared.
- #The Namespace is optional. If you don’t have a namespace value, please leave this field empty. However, if you choose to include a namespace value (or if the messages to your leads are failing due to missing namespace value), ensure that it is accurate. An incorrect value will cause the template to fail, and the message will not be sent to your leads..
10.1 Adding Media to WhatsApp Templates
You can add media to your WhatsApp templates.
Note:
- If you add Media to your template, you’ll not be able to add a Header to the same template.
- All attachment URLs must be public.
- Templates with interactive buttons are not supported.
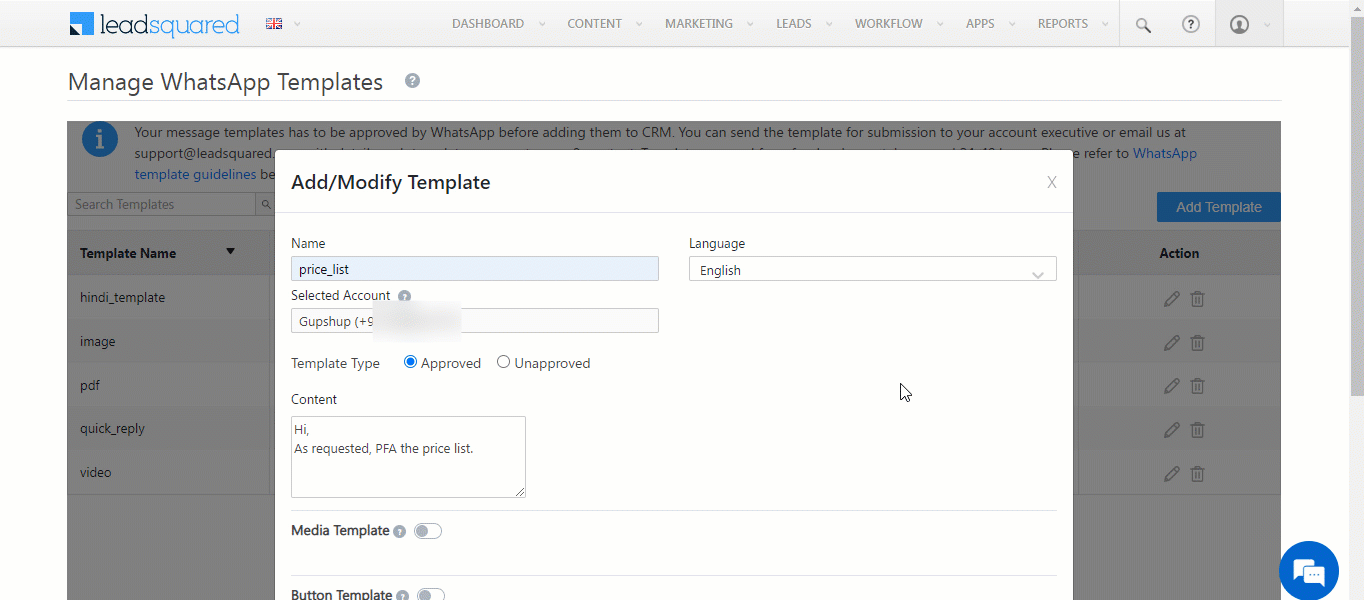
- On the WhatsApp Templates screen, click the Add Template button.
- To add the media file against an existing template, click the
 icon.
icon.
- On the Add/Modify Template pop-up, against Media Attachments, toggle the slider.
- To attach an image, click Image. To attach a document file, click Document. To attach a video file, click Video.
- Alongside Select Attachment Type, select Static.
- You can insert the file into the template by entering the file URL in the Details field. Alternatively, you can attach the file from your desktop by clicking the
 icon , to upload it.
- To use this template in your LeadSquared Converse, enable the
 alongside Available in Converse. This ensures the template is displayed in the Converse chat window.
- Once you’re done, click Save. Once the file is successfully saved, you will get a message denoting the same on the bottom-left corner.
The media file types that are supported are –
| Service Providers |
Image File |
Video File |
Document File |
Text Header and Footer |
Button Templates |
| Kaleyra |
Supported |
Supported |
Supported |
Supported |
Supported |
| Infobip |
Supported |
Supported |
Supported |
Supported |
Supported |
| WhatsApp Client |
Supported |
Supported |
Supported |
Supported |
Supported |
| Gupshup |
Supported |
Supported |
Supported |
Supported |
Supported |
The media file type formats are –
| File Type |
Format |
Size |
| Images |
image/jpeg, image/png |
5 MB |
| Videos |
video/mp4, video/3gpp |
16 MB |
| Documents |
PDFs |
100 MB |
| Text Header and Footer |
Header, text content, and footer |
— |
To know more about how to attach media to your WhatsApp templates, please refer to WhatsApp Media.
10.2 Sending Media Dynamically through Automation
You can send media attachments dynamically in WhatsApp messages to your leads, using automation. Examples of this feature in action are –
- Travel websites that send you PDF files of your tickets when you’ve made a flight booking.
- Insurance companies that send you PDFs with the details of your newly purchased insurance package.
- Colleges/schools dynamically sending report cards to each student.
- Invoices sent as attachments to customers after purchases, on renewal dates, etc.
First, you’ll need to decide where you want to store the documents/images (invoices, tickets, student reports, etc.). They can be stored in either a lead or activity field of text type. To learn how to create new custom fields for leads, see How to Create Custom Lead Fields, for activities, see How to Create Custom Activity Types.
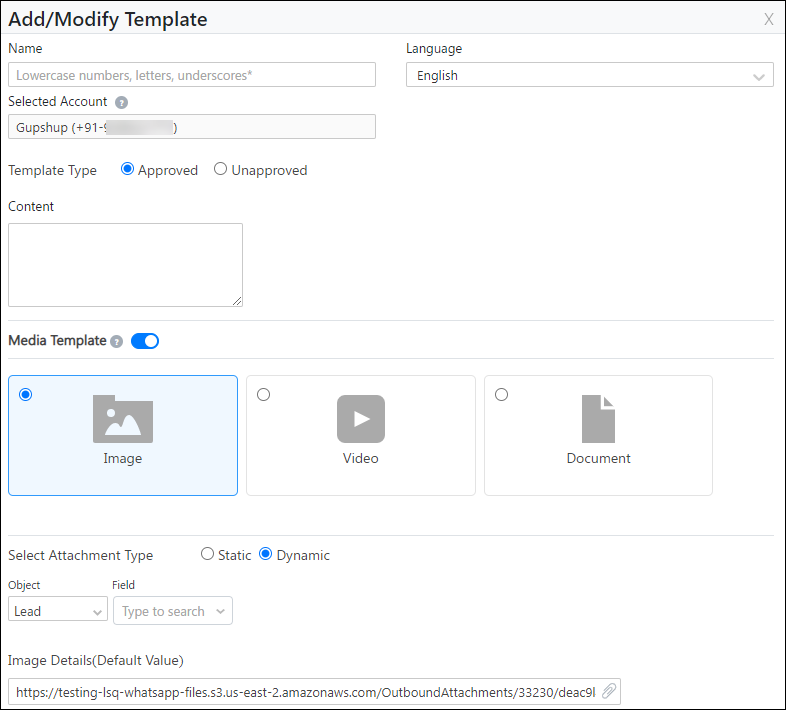
Next, while creating a WhatsApp template, click the Dynamic radio button highlighted below and enter the following details.
- Default File Name (only applicable to document type template) – The default file name of the attachment. For example, Invoice, Ticket, etc.
- Object – Specify the object where the attachment URL is being stored. As mentioned above this could be either Lead or Activity.
- Field – Specify the field in which the attachment is being stored.
- Document Details (Default Value) – Specify a URL, or upload an attachment by clicking and choosing a file. If the field you specify is null (if there is no URL contained in the specified field), this attachment will be sent in the WhatsApp message.
Click Save when you’re done.
Note: There is no validation on the URL. You must ensure that the URL contains the correct attachment type (for example, if you specify ‘image’ in the template, ensure that the URL contains an image file and not a document).
Once your template is ready, you must configure an automation to send the WhatsApp messages. Dynamic attachments cannot be sent through the regular Send Message action on the Lead Details or Manage Leads pages. After setting up the automation and selecting Messaging>WhatsApp, select the correct template configured above and you’re done (For more details see section 8.5 Automation).
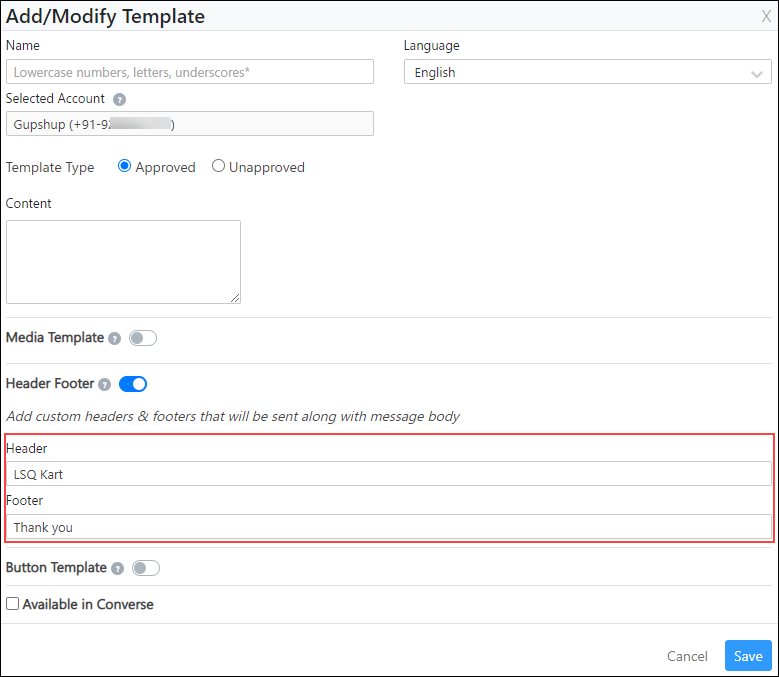
10.3 Header and Footer
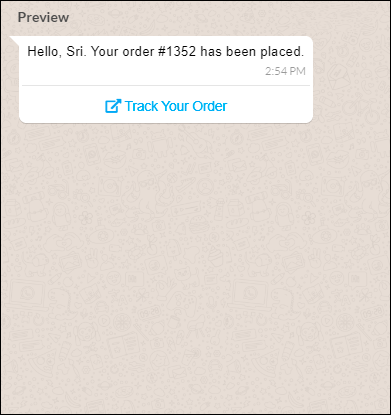
You can include additional text information in your message templates by enabling the Header Footer option. Text present on the top of the message template are Headers (“LSQ Kart” in the below image), and text present on the bottom of the message are Footers (“Thank you” in the below image).
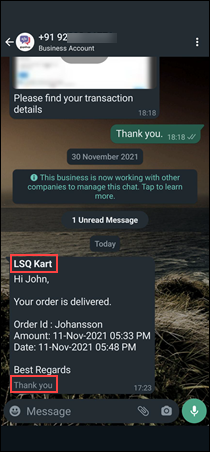
Alongside Header Footer, enable the slider, and add relevant text under Header and Footer. Note that the maximum character limit for each Header and Footer is 200 characters. Once you’re done, click Save.
10.4 Adding Button Templates
Buttons are interactive templates that enable your leads to send Quick Replies and perform Call To Actions (such as Call Phone Number and Visit Website).
Note: If you enable Button Templates, you’ll not be able to enable the Available in Converse option for the selected template.
If you created a template to perform Visit Website (that enables a lead to visit your website), you can either select a Static Button Type (for a static URL) or a Dynamic Button Type (for a dynamic URL). Templates that contain Quick Reply buttons will be considered as Static Button Types.
The Static Button will remain the same for all your leads, and no further action is required within LeadSquared. If you choose a Dynamic Button, you must configure the button, to fetch data from the relevant LeadSquared field. To enable and configure a Dynamic Button –
- On the Add/Modify Template pop-up, against Button Template, enable the slider.
- Against Select Button Type, select Dynamic.
- Under Variable Mapping, select the Object,(Lead or Activity).
- From the Field dropdown, select the Lead/Activity field that contains the URL. This URL value will dynamically be added for all the messages that will be sent to your leads through automations and bulk messages.
- In the Default Value box, enter the default URL value. This URL value will be added by default for all the instances where a value is missing in the Lead/Activity field you selected in the previous step. The default value will be added by default to all one-on-one WhatsApp messages you send to your leads.
- Once you’re done, click Save.
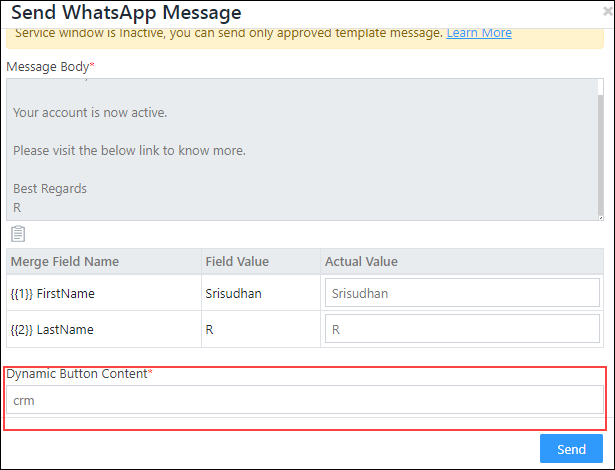
If required, you can change the default value when sending a one-on-one message to a lead. To do this –
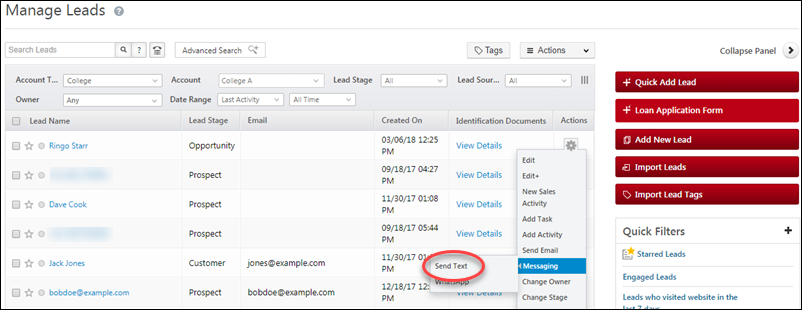
- Navigate to the Manage Leads page, and against the lead to whom you want to send a one-on-one message, select Messaging>WhatsApp.
- On the Send WhatsApp Message pop-up, select the Dynamic Button template that you created.
- Then, scroll down to the Dynamic Button Content Below section.
- In the URL field, update the default field value to the new field value.
- Once you’re done, click Send. The message to this specific lead will be sent with the updated URL value.
10.5 Adding Object Types to Templates
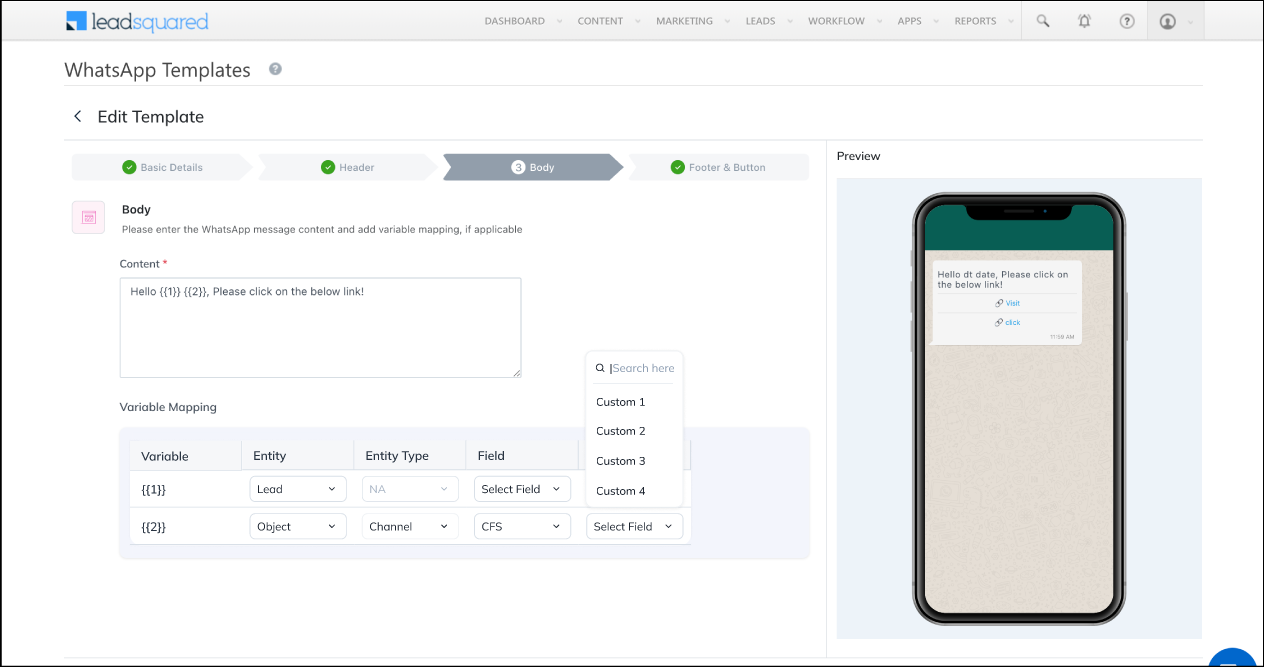
Once you integrate Object Types with the connector, create templates that support Object Types. The steps remain the same as those in this section, with the only change on the Body tab. Enter the message body, and from the Entity dropdown, select Object and the object type fields you want to display in your message body.
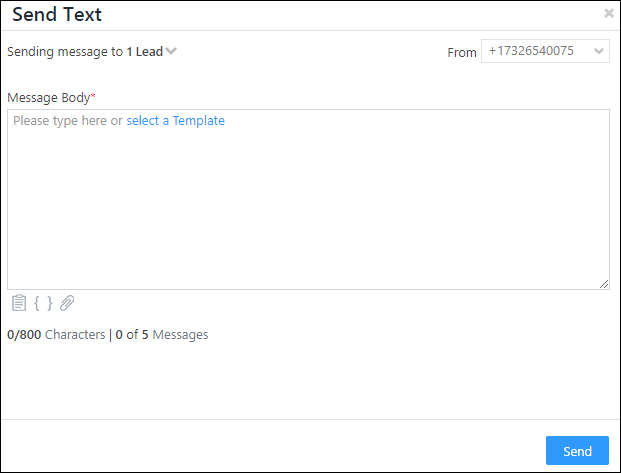
11. Sending WhatsApp Messages to Leads
You can send one-to-one as well as bulk messages to your leads from the Manage Leads and Lead Details pages. Additionally, you can also set up an Automation to send messages to your leads.
11.1 Prerequisites
11.2 Manage Leads Page
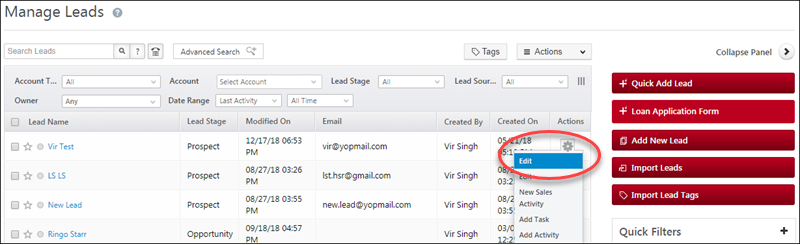
To send a WhatsApp message to a single lead,
- Navigate to Leads>Manage Leads.
- Hover your cursor over the settings
 wheel, then click WhatsApp (if you have multiple messaging connectors installed, the WhatsApp option will appear when you hover over Messaging).
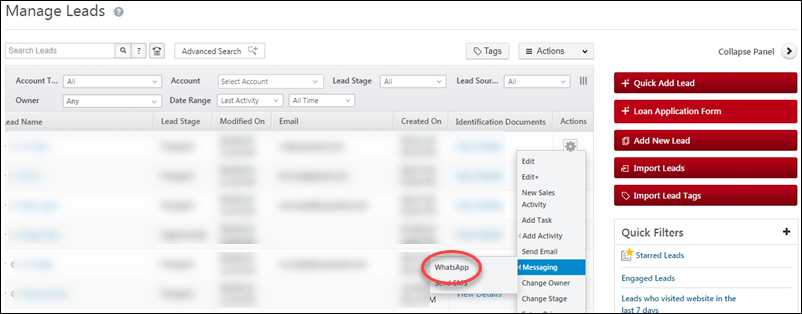
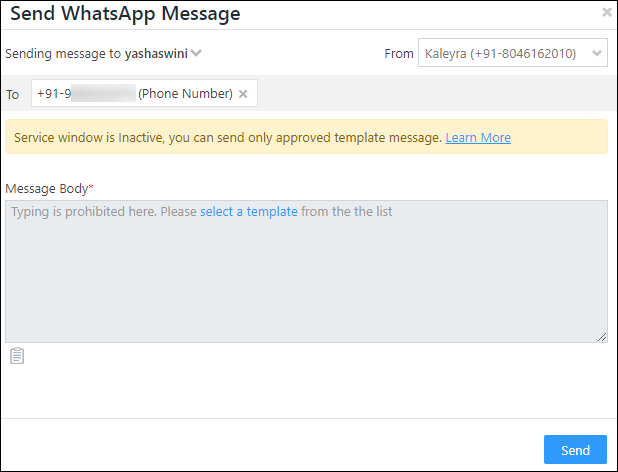
On the Send WhatsApp Message pop-up, select a template and click Send.
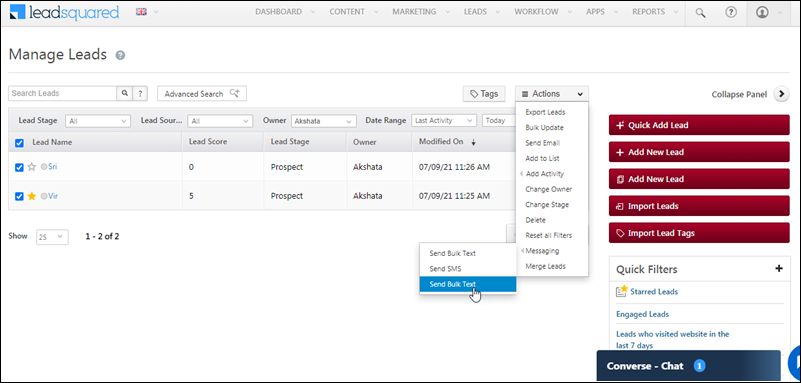
To send WhatsApp messages in bulk (to multiple leads),
- Select the leads on the Manage Leads page.
- Hover your cursor over the Actions menu, hover over Messaging, then click WhatsApp.
- Select a template and click Send.
11.3 Manage Lists
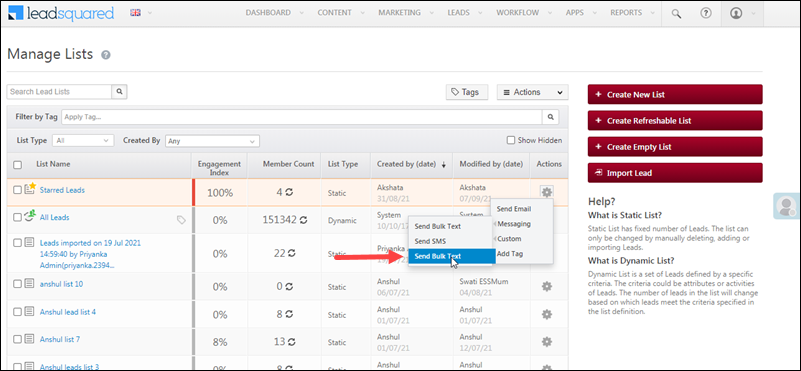
You can also send messages to lists from the Manage Lists page,
- Navigate to Leads>Manage Lists.
- Alongside a list, under the Actions column, hover your cursor over the settings wheel, under Messaging, select WhatsApp.
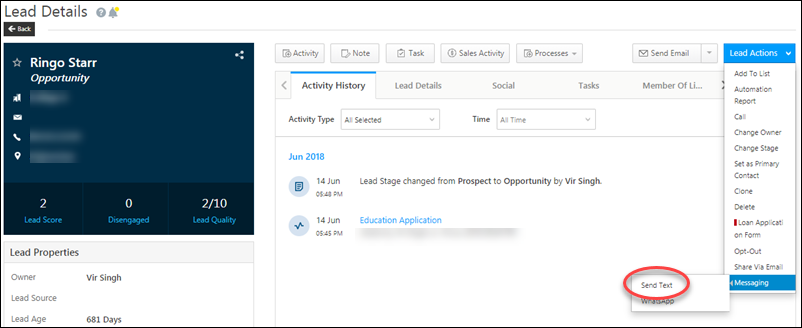
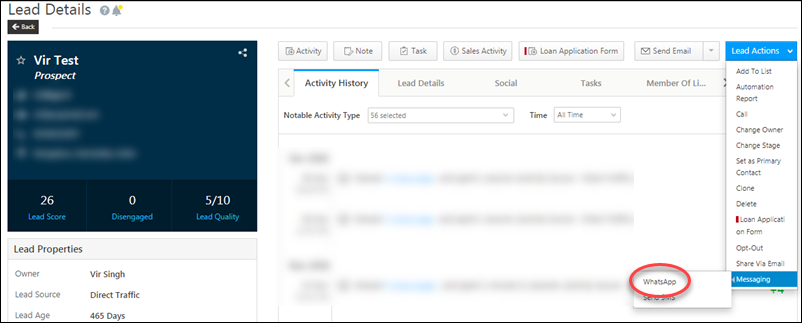
11.4 Lead Details Page
Click on a lead on the Manage Leads page to navigate to the Lead Details page. Hover your cursor over the Lead Actions menu, then click the WhatsApp option (if you have multiple messaging connectors installed, the WhatsApp option will appear when you hover over Messaging).
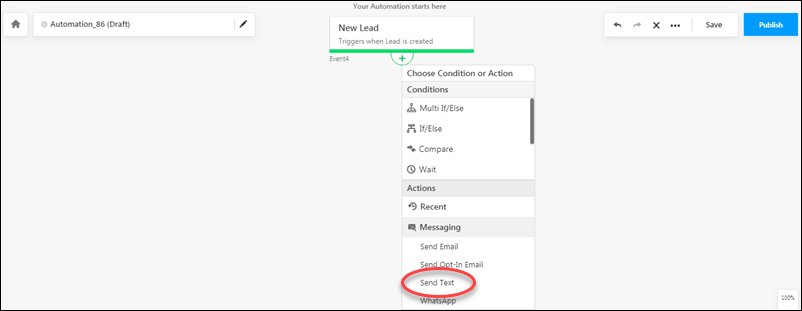
11.5 Automation
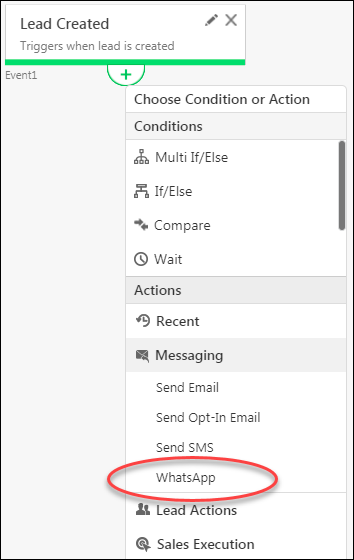
You can set up automations to send messages to your leads when certain triggers and conditions are executed.
- Navigate to Workflow>Automation.
- Click Create Automation.
- Choose an automation template or build one from scratch.
- Select a trigger*.
- Click the
 icon under the trigger, under Actions, click Messaging, then click WhatsApp.
- Choose a template, then click Save.
- When you’re done, click Publish to set the automation live.
* The WhatsApp messaging option appears on Lead, Opportunity, Activity, and Task triggers.
11.6 Service Window
On the Send WhatsApp Message pop-up, you will find the Service Window. While using this window, you should remember the following –
- The first message you send to a lead on WhatsApp can only be a template message. Navigate to Apps>WhatsApp Templates to add or edit a template.
- You cannot edit the template message in the Send WhatsApp Message pop-up.
- If a lead replies to your first message, Inactive will change to Active for a 24-hours.
- During this 24-hour window, you can send multiple customized messages, along with template messages.
- This window will get reset every time the lead replies to a message.
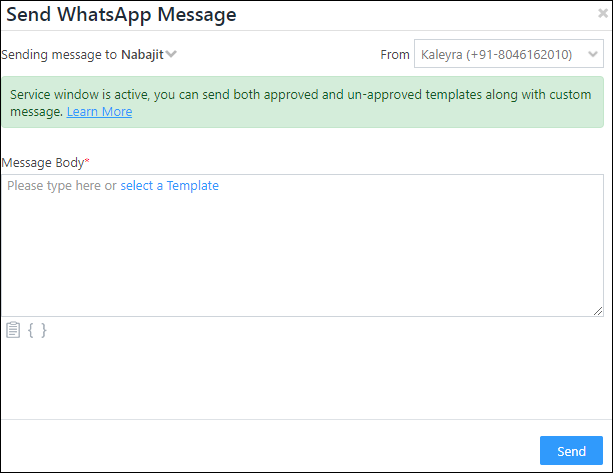
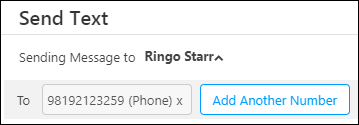
Note: If you Add Another Number, you cannot send a custom reply, and the service window on the top-right corner of the pop-up will show N/A (not applicable).
12. Sending WhatsApp Messages to Opportunities
You can send one-to-one as well as bulk messages to your leads from the Manage Opportunities and Opportunity Details pages.
Use Case
In instances when multiple opportunities are created on the same lead, and when different WhatsApp messages are sent to the lead as well as the opportunities, the reply from the lead is posted as an activity against the last message sent to the lead/opportunity.
For e.g., on a lead called Aaron, two different opportunities are created – Home Loan and Automobile Loan. The following WhatsApp messages are sent –
| Entity |
Message |
Time |
| Aaron (the lead) |
“Welcome to ABC Bank. We’re glad to serve you…” |
Message sent at 5 PM |
| Home Loan – Aaron |
“Thank you for showing an interest in obtaining a loan for your dream home…” |
Message sent at 5:15 PM |
| Automobile Loan – Aaron |
“Give wheels to your dream by taking an automobile loan at attractive interest rates…” |
Message sent at 5:30 PM |
If Aaron responds at 5:35 PM, then irrespective of the message he chooses to reply to, the reply message activity is posted against the Automobile Loan – Aaron message that was sent at 5:30 PM. Similarly, if Aaron replied to the “Welcome…” message at 5:20 PM, the reply activity is posted against the “Thank you…” message that was sent at 5:15 PM.
12.1 Prerequisites
- Opportunities must be enabled on your account.
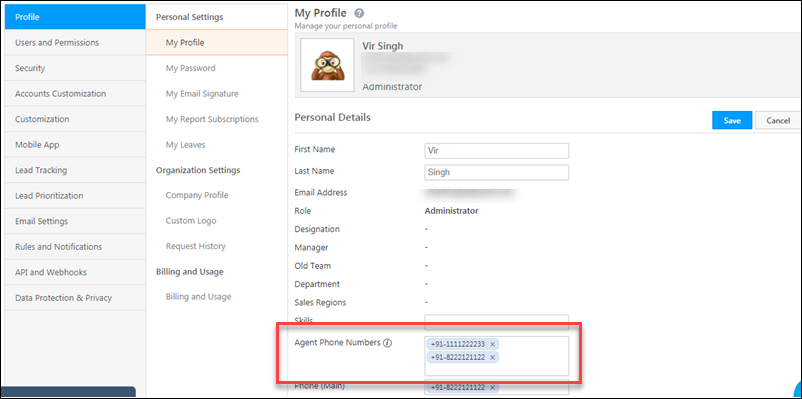
- The lead associated with the opportunity you’re messaging must have a valid WhatsApp enabled number in the Phone Number lead field.
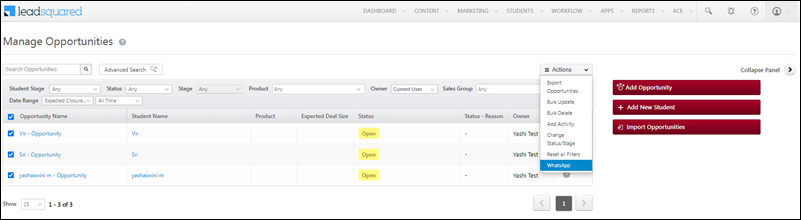
12.2 Manage Opportunities Page
To send a WhatsApp message to a single opportunity –
- Navigate to Leads>Manage Opportunities.
- Alongside the opportunity you want to message, hover your cursor over the settingswheel.
- From the list of available options, hover your cursor over Messaging, and click WhatsApp.
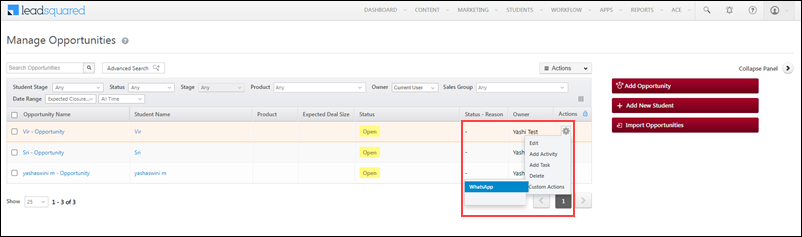
On the Send WhatsApp Message pop-up, select a template and click Send.
To send WhatsApp messages in bulk (to multiple opportunities),
- Select the leads on the Manage Opportunities page.
- Hover your cursor over the Actions menu, and click WhatsApp Bulk.
- Select a template and click Send.
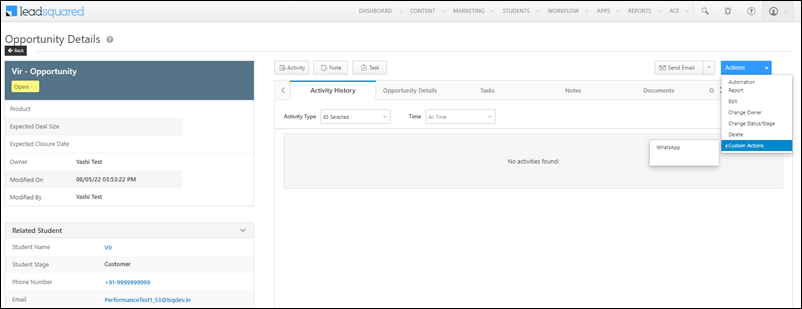
12.3 Opportunity Details Page
- Click on an opportunity on the Manage Opportunities page.
- On the Opportunity Details page, hover your cursor over the Actions menu.
- Click the WhatsApp option.
- Select a template and click Send.
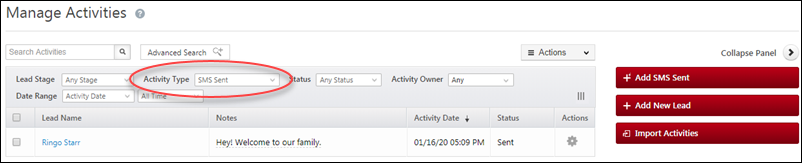
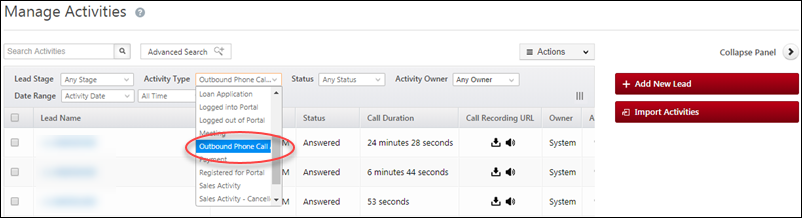
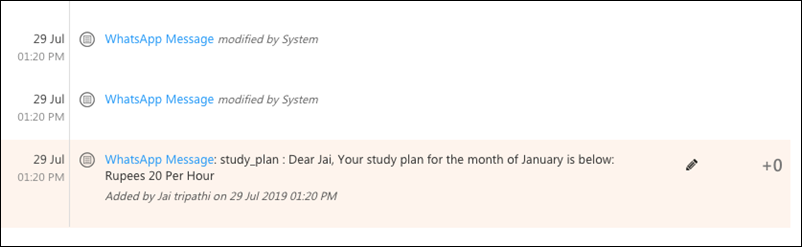
13. WhatsApp Message Activities
When a WhatsApp message is triggered through automation or the manage leads page, an activity of type WhatsApp Message is created against each corresponding lead.
Note: The activity type that gets posted is configurable from the WhatsApp Messaging Connector configurations (See Installation and Configuration above).
The WhatsApp Message activity has the following parameters –
| Parameter |
Description |
| Status |
Sent |
Message sent by you was received by the server. |
| Delivered |
Message sent by you was delivered to lead’s device. |
| Read |
Message sent by you was read by the lead. |
| Failed |
Message sent by your business failed to send. For more information, see Whatsapp API Error Messages. |
| Deleted |
Messages sent were deleted by the lead (ideally, you should ensure that the message is deleted from your system if it was downloaded from the server). |
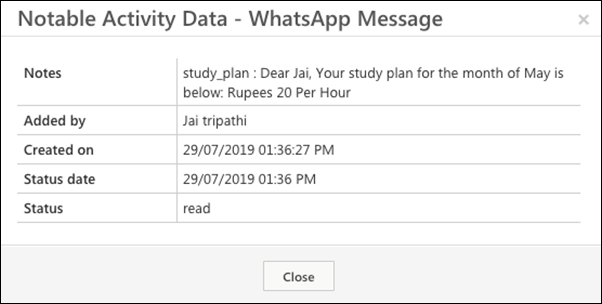
| Notes |
Notes in the activity will contain the template name along with the actual text that was sent to the lead. |
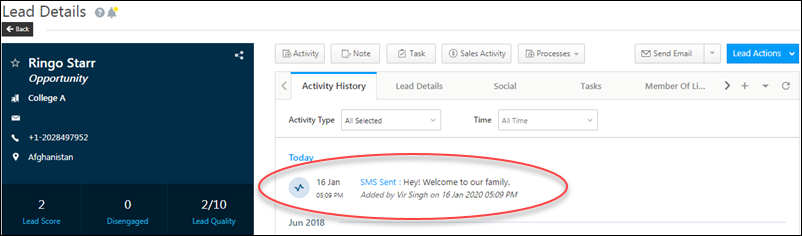
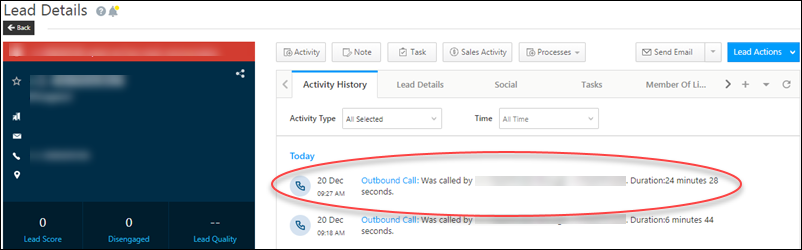
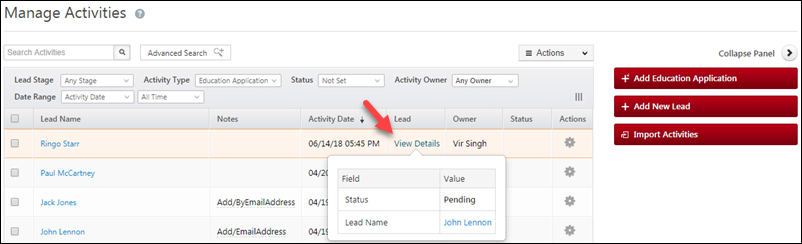
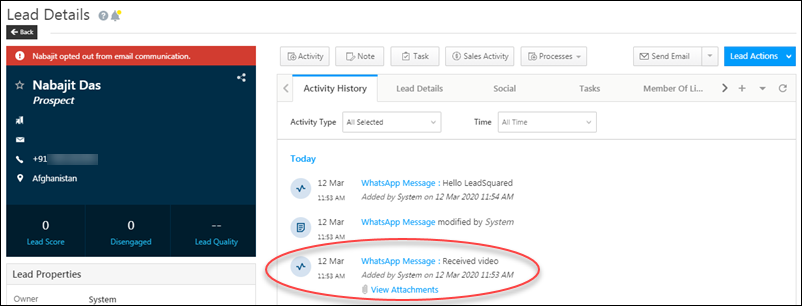
You can view WhatsApp Message activities on the corresponding lead’s details page, in the activity stream –
A WhatsApp message activity update notification will be posted once the delivery receipt or read receipts are received for a particular message –
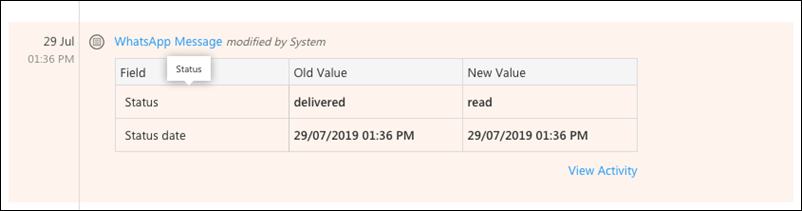
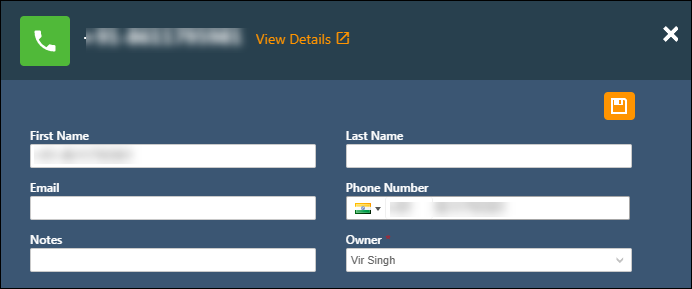
Click the View Activity link shown in the screenshot above to view more details –
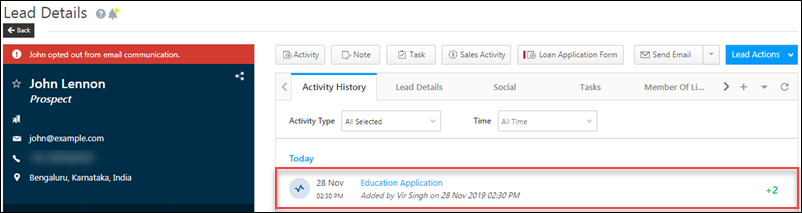
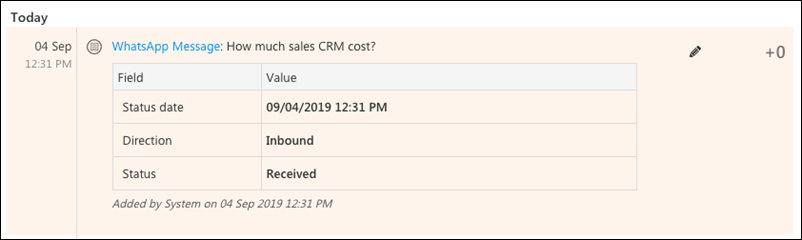
When a lead responds to a WhatsApp message, you’ll see an inbound activity posted on the lead details page –
14. Receiving Inbound Attachments
We support incoming attachments for integrations configured through Kaleyra and Infobip.
| No. |
Media Type |
Media Format |
Kaleyra |
Infobip |
| 1 |
Text |
Character Count |
4096 characters supported |
2000 characters supported |
| 2 |
Images |
JPG/JPEG |
Supported |
Supported |
| PNG |
Supported |
Supported |
| GIF |
Converted to Video |
Converted to Video |
| 3 |
Audio |
AAC |
Supported |
Supported |
| MP3 |
Supported |
Supported |
| AMR |
Kaleyra account URL is displayed and file gets downloaded |
Need to login to Infobip portal to play audio |
| M4A |
Supported |
Supported |
| OGG |
Supported |
Supported |
| WAV |
Supported |
Supported |
| OPUS |
Supported |
Supported |
| 12 |
Video |
MP4 |
Supported |
Supported |
| AVI |
Supported but Kaleyra account URL is displayed |
Need to login to Infobip portal to view video |
| 3GP |
Not Supported by WhatsApp |
Not Supported by WhatsApp |
| 15 |
Documents |
PDF |
Supported |
Supported |
| PPT(X) |
Supported |
Supported |
| DOC(X) |
Supported |
Supported |
| XLS(X) |
Supported |
Supported |
| TXT |
Supported |
Supported |
| 20 |
Location |
Current Location |
Supported |
Supported |
| Live Location |
Not Supported |
Not Supported |
| Google Maps |
Supported |
Supported |
| 23 |
Contact |
Contact |
Only First Name, Last Name, Contact number, Phone Type are supported. |
Only First Name, Last Name, Contact number, Phone Type are supported. |
These attachments can be viewed from the Activity History tab on the Lead Details page.
Here’s a sample inbound message with a location attachment. A View Attachments link will appear if an inbound file has been received in (document, video, audio, or image). Clicking the link will open the following pop-up.
Click the link to view the attachment.

Here’s a sample message with a location attachment. Clicking the link will direct you to the location on google maps.

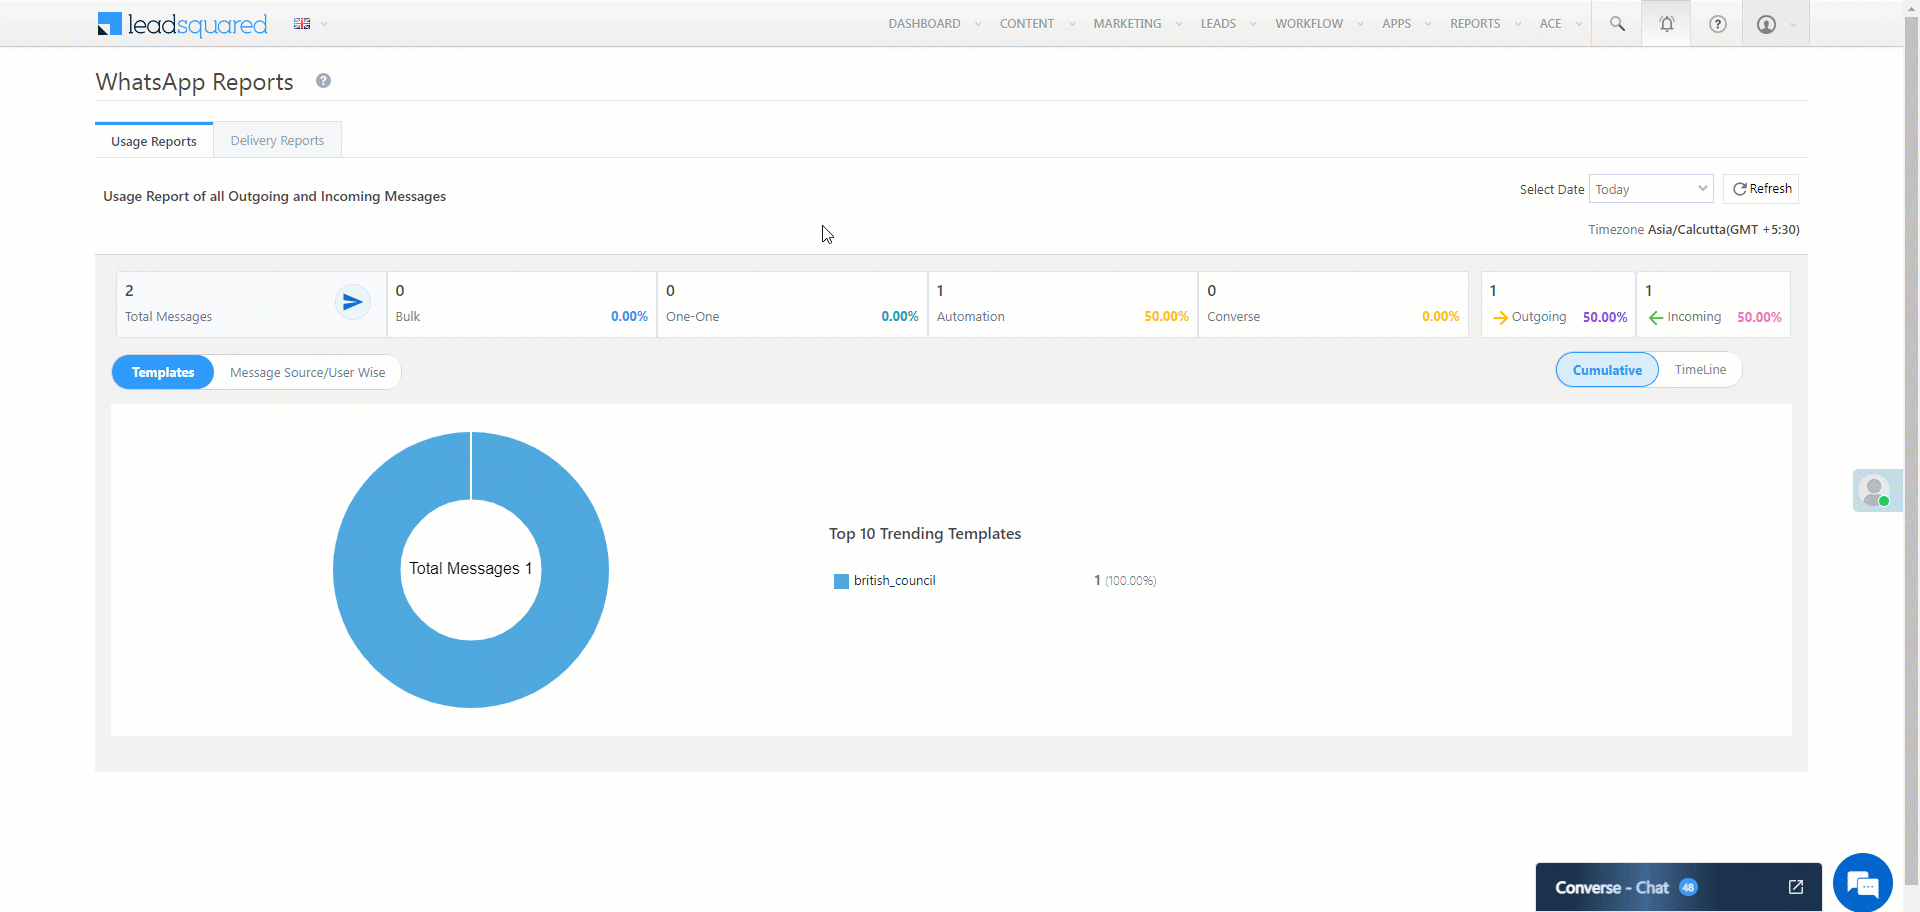
15. WhatsApp Reports
These reports show the level of engagement between your business and your leads through WhatsApp. To know how to view these reports in detail, read WhatsApp Reports.
FAQs and Troubleshooting
Why did the WhatsApp campaign fail with a ‘TO’ number empty error?
This error occurs when the recipient’s phone number is not correctly mapped. To resolve this:
- Open the lead record to which the message was triggered.
- Check if the phone number is stored in the Phone Number or Mobile Number lead field.
- Go to the WhatsApp connector settings and verify the Default WhatsApp Number Field mapping.
- While sending the campaign, ensure the ‘TO’ field is mapped to the correct lead field configured in the WhatsApp connector.
WhatsApp Message Error: “Error occurred. Please contact support.”
This error may occur when clicking the Send WhatsApp Message button, and no template selection appears.
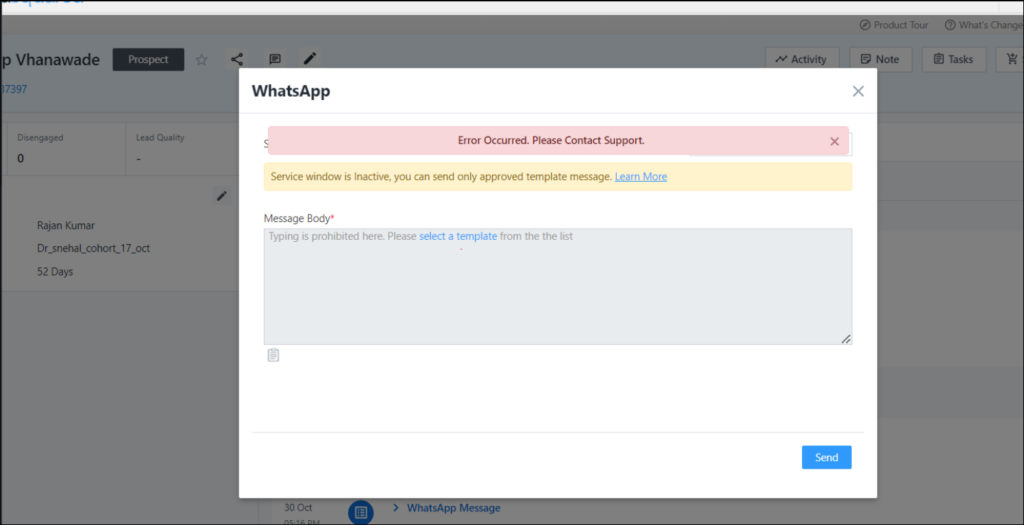
Possible Causes & Solutions:
- Configuration Fetch Failure –
- This happens when the system fails to fetch the required settings.
- Solution: Contact support@leadsquared.com for assistance.
- V2 API Failures (UserDetails, MetaData, LeadPhoneFieldsAndNumbers, etc.)
- This could be due to temporary API issues affecting lead, user, or opportunity details.
- Solution: Retry after some time. API failures are temporary and cannot be fixed manually.
- Lead Owner Inactive or Disabled
- The system checks for an active Lead Owner to mail merge certain parameters.
- Solution: Reactivate the Lead Owner or Bulk Update leads with a new Lead Owner.
Error – Your message couldn’t be sent. Failed to Opt-in WhatsApp number.
You may be seeing this error because the lead has opted out of receiving your WhatsApp messages.
While configuring the Compliance Type for the connector, you selected a boolean field to opt-in/opt-out leads from WhatsApp communication. Check the value of this field for that particular lead on the lead details page.
If that didn’t solve the problem, the error may be caused by an issue on the service provider’s end. Contact us at support@leadsquared.com if that’s the case.
Why do I see “OptIn failed error [106]” when sending WhatsApp messages?
A: This error typically occurs if your WhatsApp connector has incorrect username or password. Go to the connector settings, re-enter the correct credentials, and save.
Why does my WhatsApp message fail with “OptinFailed: non 200 response code”?
A: This also indicates an authentication issue. Verify the WhatsApp connector credentials with your provider. If needed, reconnect with the correct username and password.
Any Questions?
Was this article helpful? If you still have doubts, check out the WhatsApp Connector FAQs. Also, feel free to leave us a comment below.


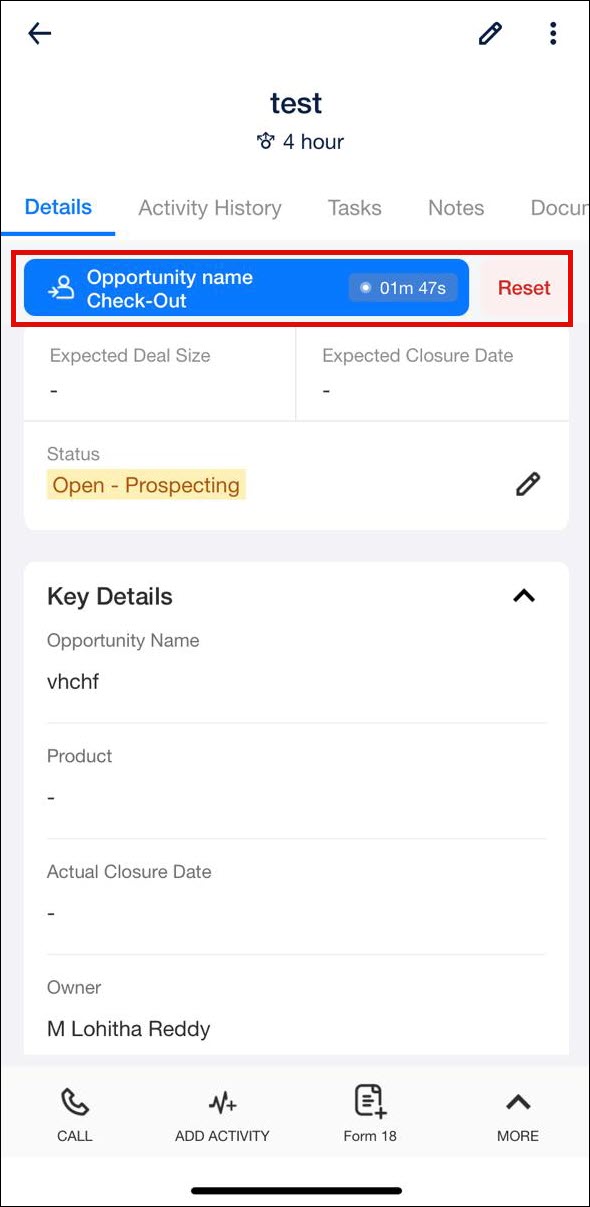
 option. This feature will only work if you’ve configured the Check-in/Check-Out functionality.