1. Feature Overview
Users are the employees of your organization who have active accounts in LeadSquared (like Sales Representatives, Sales Managers, etc.). You can create users, assign them permissions, set user hierarchy based on your organization’s departmental structure, and more. This article lists the various features users can access to streamline their management process.
2. User Roles
You can control access to different features and data by assigning roles to users. Usually, one of these four roles can be assigned to a user – Admin User, Marketing User, Sales Manager, and Sales User. If required, we also support a Super Administrator user role that can control permissions given to Admin users. To know more about user roles, refer to User Roles and Access Rights.
3. User Fields
When you create users, there are a number of system fields available (such as first name, last name, etc.) to store their information. You can also create custom user fields (like their work anniversaries, gender, marital status, etc.). You can choose the data types you want the fields to accept and customize them according to your preferences. To know more, refer to Manage User Custom Fields.
4. Create and Update Users
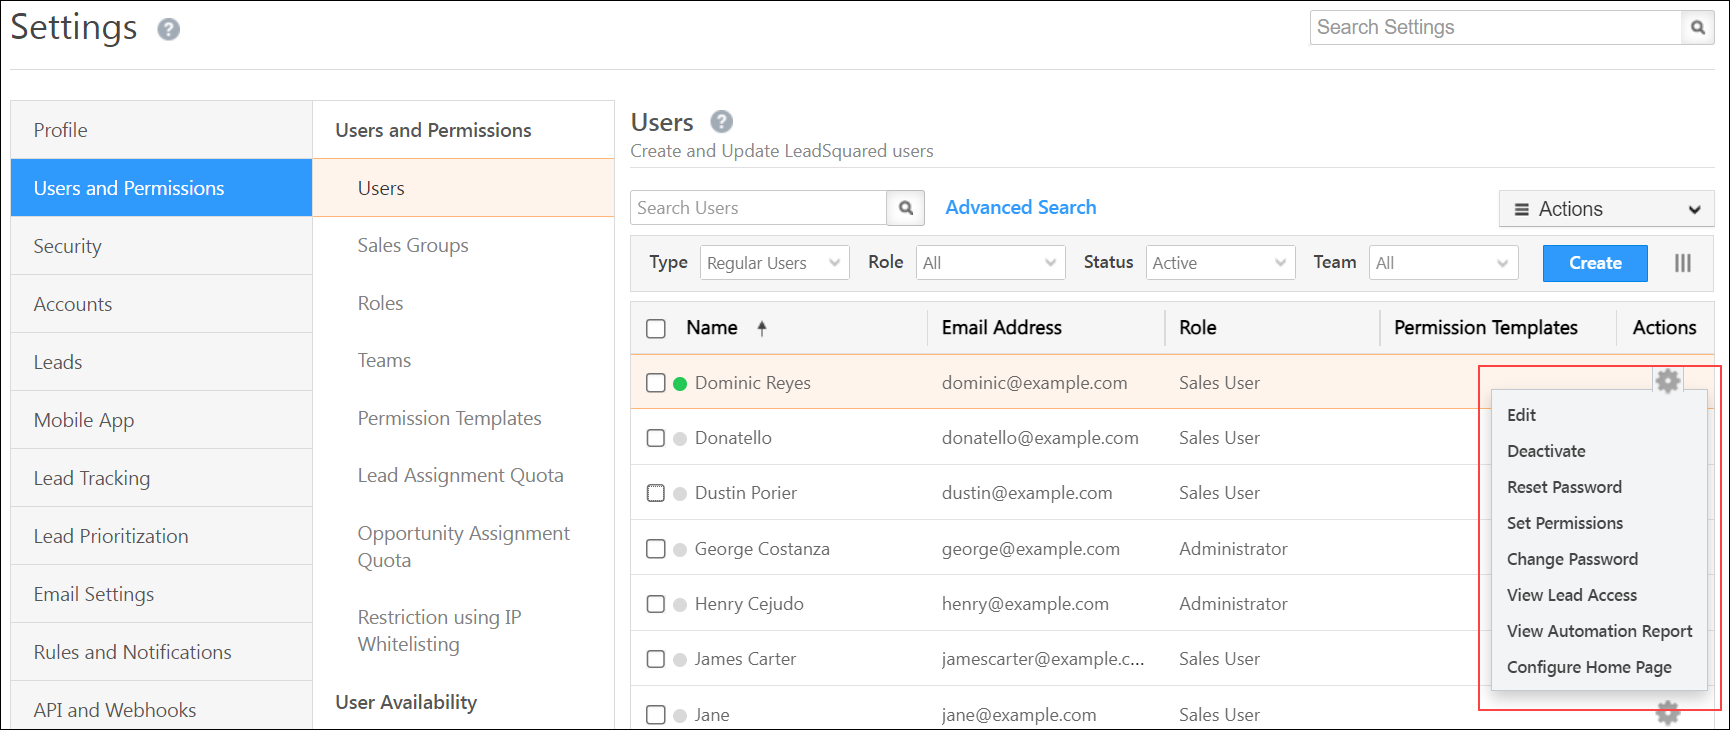
You can create, edit and perform a range of actions on your users like –
| Action | Description |
| Deactivate users | Although it is not possible to delete a user, Admins can deactivate them. The deactivated user will no longer be able to log into LeadSquared. |
| Reset Password | You can send password reset requests to users up to a maximum of 5 times a day. |
| Set Permissions | Apply Permission Templates on users to restrict their access to sensitive data. |
| Change Password | Admin users can change any user’s password. This is helpful when users are required to reset their passwords but haven’t received the password reset email yet. |
| View Lead Access | You can view the lead access permissions of a user based on the Sales Groups they are part of. You can also view other details of the group like its members, group managers, etc., here. |
| View Automation Report | If you’ve created user automations, this report shows you the path the user has taken through the automated workflow. |
| Configure Homepage | You can select either Dashboard or Smart Views as the homepage for the user. |

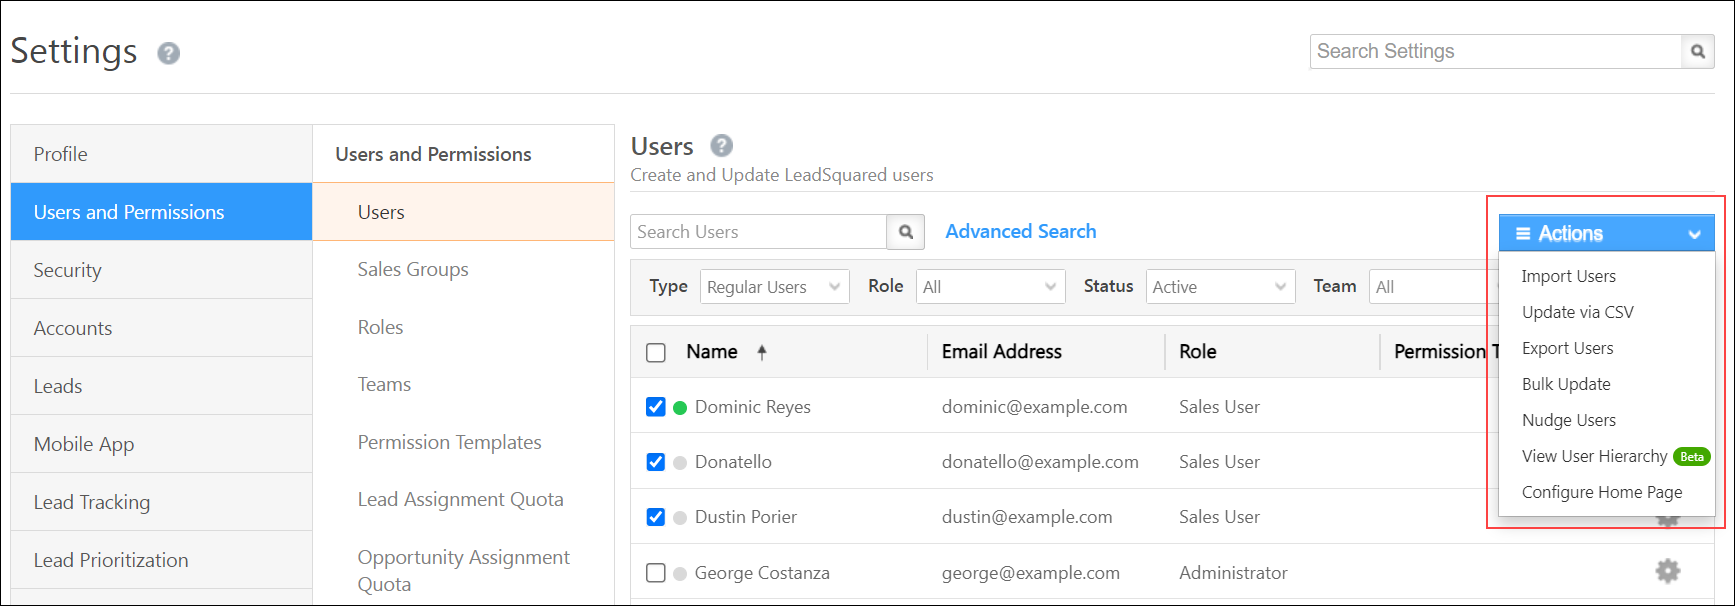
You can also perform the following bulk actions on users –
| Action | Description |
| Import Users | You can import a list of users through CSV. |
| Update via CSV | You can update a large number of users in one go. For example, you can update the status fields to activate or deactivate users who join or leave your organization, or apply workday templates to a group of users. |
| Export Users | You can export the list of users in your account in CSV format. |
| Bulk Update | Unlike the update via CSV option, bulk update lets you change only a single user field. |
| Nudge Users | You can send push notifications to your users’ desktop and mobile devices for various events (For example, Lead Creation, Upcoming Tasks, Opportunity Creation, Activity Completion, etc.) using the LeadSquared Nudges Connector. You can also create custom templates and add images to them, for custom events such as policy update announcements, upcoming holidays, etc. |
| View User Hierarchy | You can view the hierarchy of your users based on the ‘Reporting to’ field. To know more about setting up user hierarchy, refer to How to Set Up User/Organization Hierarchy. |

To know more about creating and managing your users, refer to Manage Users.
5. Create Sales Groups
Manage your sales users by organizing them into different groups based on location, business unit or any other categorization of your choice. For example, you can organise your sales users into different sales groups based on their location and assign them leads that are in the same location. You can also assign a group manager to a sales group and set specific permissions for the data they can access.
Sales users in a group can be given –
- Lead Based Access – Sales users can have access permissions defined only on leads within the group.
- Account Based Access – Sales users can have access permissions defined over a combination of accounts & leads within the group.
To know more about Sales Groups, refer to Managing Lead and Account Access for Sales Users – Sales Groups.
6. Create Teams
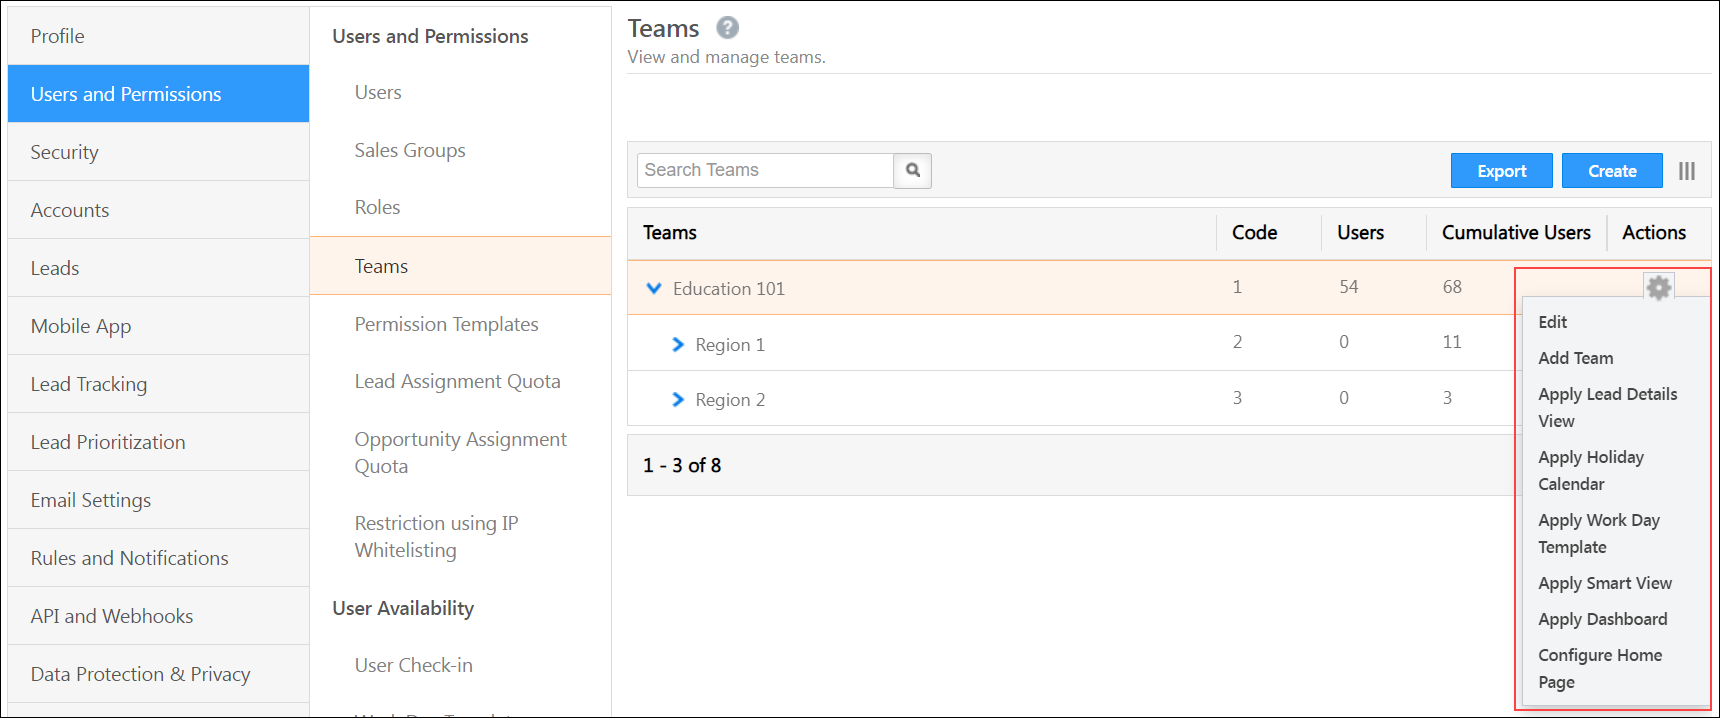
Teams reflect the structure of different departments in your organisation. With Teams, you can assign key user management and lead management features to all users in your account. Once you create teams in your LeadSquared account, you can assign them the following features –
- Lead Details Customisation View – Based on each Team’s requirements, Admin users can customise the Tabs, Actions, Buttons and Lead vCard on the Lead Details page.
- Work Day Templates – These templates let you define the schedule and working hours of your organization so you can automatically check-in your users.
- Holiday Calendar – You can create your organisation’s holiday schedule and apply them to different teams across different regions.
- Smart Views – You can create a specific Smart Views page for your team.
- Configure Homepage – You can select either Dashboard or Smart Views to be the homepage of the team.
- Custom Dashboards – You can create customized dashboards to track and analyze key performance metrics across teams within the organization.

To know more, refer to Teams.
7. Permission Templates
Permission templates let you configure access rights for your users. They let you control who sees what and which users can edit, delete, export or import your data. For example, you can create permission templates to mask sensitive data (like phone numbers, email IDs, etc.), or prevent users from exporting or deleting data. To know more about creating a Permission Template, refer to Create Permission Templates. To know more about applying these templates on your users, refer to Apply Permission Templates to LeadSquared Users, Roles or Groups.
8. Lead Assignment Quota
You can set limits on the number of leads that can be assigned to users based on quotas defined at the user role level (such as Sales User, etc.), or individual user level. You can configure lead assignment quotas for daily, weekly and monthly cycles. To know more, refer to Limit the Number of Leads Assigned to a User – Lead Assignment Quotas.
9. Opportunity Management Quota
You can set limits on the number of opportunities that can be assigned to users based on quotas defined through opportunity distribution automations. You can configure opportunity assignment quotas for daily, weekly and monthly cycles. To know more, refer to Opportunity Assignment Quotas.
10. Support Access
When users raise a ticket to LeadSquared, our support team may request temporary access to your account. You can set the time period for when the account can be accessed by the support team and our team will not be able to export any leads from the account. To know more, refer to LeadSquared Support Access.
11. Organisation Switch
You can set up multiple organizations in LeadSquared and seamlessly switch between them (Agency Switch). While setting up, it’s imperative to designate one organization as the master and the others (client organizations) as children. If you have multiple organizations you’d like to create LeadSquared accounts for, reach out to support@leadsquared.com. To know more, refer to How to Manage Organization (Agency) Switch.
12. Leave Tracker
Users can apply for their own leaves while Admins can add leaves for all users. You can also use this feature to keep track of all your leaves. To know more, refer to Leave Tracker.
13. User Check-in and Check-out
The check-in/check-out feature lets you manage your users’ attendance and view user availability while assigning leads. You can auto check-in your users across both web and mobile platforms through lead distribution automations. You can also restrict users from checking-in and checking-out from the mobile app based on location and time preferences. To know more about setting up these restrictions, refer to
Some features in LeadSquared require users to check in regularly. For example –
- Distance Travelled Report – You can track and monitor the distance travelled by your field sales users on any particular day. The distance travelled is calculated based on the check-in/check-out activities and location coordinates identified by the LeadSquared Mobile App.
- Location History Tracker Report – You can view a comprehensive trail of your users’ location coordinates received via the LeadSquared Mobile App throughout the day starting from the user’s check-in location.
- Field Sales Territories – You can auto-distribute leads that are in close proximity to your users by creating territories and assigning them to a group of users. All leads inside or near the created territory will be evenly distributed among the assigned users.
14. Reports
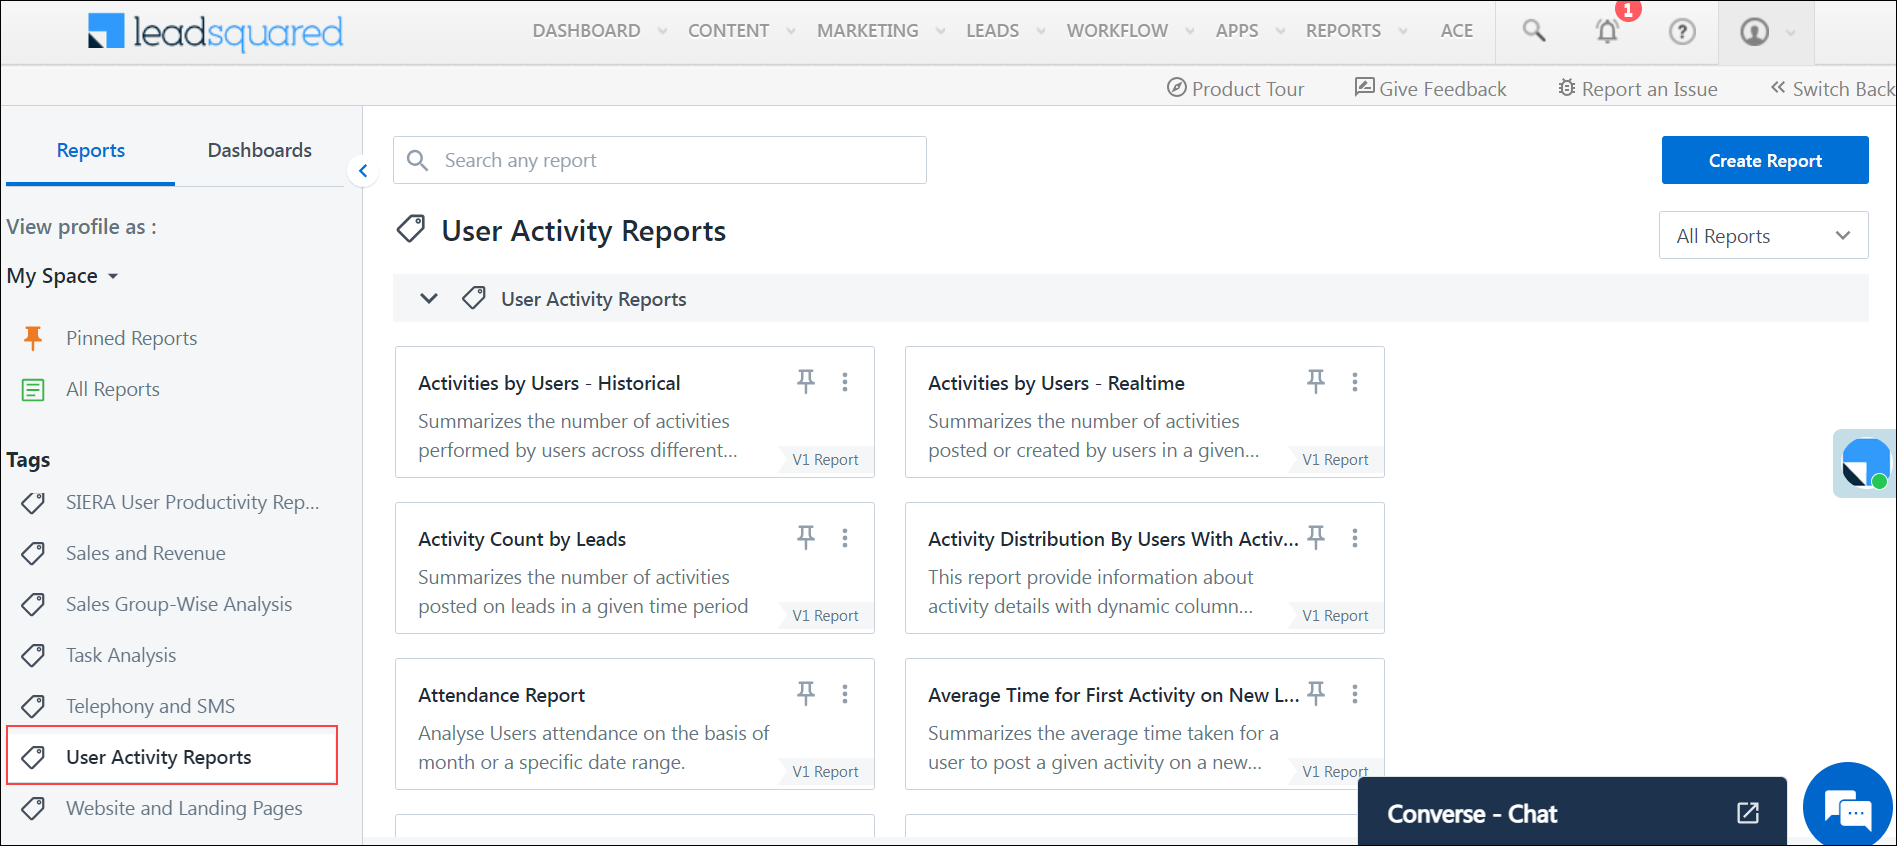
You can access lead and user analysis reports (e.g., Check-in/Check-out History Report, Automation Audit Logs, etc.) on the Reports homepage. To know more about LeadSquared Reports, refer to Report Management. You can also use LeadSquared’s SIERA feature, a new-gen self-service reporting tool, to track leads, opportunities, organization revenue, user performance, and more.

15. Security
- You can customize the password policy of your LeadSquared account (For example, minimum password length allowed, minimum special characters allowed, etc.) to comply with your organization’s policies. You can also force reset your users’ passwords to ensure they change (reset) it regularly. To know more, refer to LeadSquared Security Settings.
- You can regulate and limit LeadSquared product and LeadSquared APIs access only to trusted users by whitelisting user IP addresses. With this feature, you’ll be creating a list of trusted and secure IP addresses from which your users will be able to access their LeadSquared accounts. To know more, refer to
16. Other Features
- You can perform advanced search on users to filter them based on multiple criteria. To know more, refer to User Advanced Search.
- Group managers can create lead automations for the users in their sales group. To know more, refer to Group Level Automation.
Any Questions?
Did you find this article helpful? Please let us know any feedback you may have in the comments section below. We’d love to hear from you and help you out!


