Automations Associated with Email Templates in Email Library

1. Feature Overview

Email templates created via the Email Library can be used in Automations. In certain cases, you will be making minor edits to these email templates. These minor changes could be the date of a webinar, names of speakers, etc. In such situations, updates made to an email template do not automatically synchronize with the associated automations. To address this issue, the Manage Associated Automations feature allows users to easily locate the specific automation and email card linked to a particular template. Users are then directed to access the automation to manually make required edits to the template.

Note: The edits made on an email template via the Email Library will not automatically reflect in the automation. You must make the changes manually.


2. Prerequisites

You must be the Admin or a marketing user to get access to the Manage Associated Automations popup. Sales users may or may not have access to edit automations depending on the access for group-level automation.


3. How it Works

Once this feature is enabled,

  1. For new automations, email templates used in the Send Email card will be linked and available to view in the Manage Associated Automations popup.
  2. For existing automations, users must perform a one-time reselection activity by editing the email card in the automation, selecting the relevant email template from the list, and saving it. The automation will now be linked and visible under the Manage Associated Automations popup.

Note: If an email template associated with an automation is unpublished on the Email Library, the previously linked automation will still be displayed under Manage Associated Automations.


3. View Associated Automations

All the automations associated with an email template are displayed in a popup box. To view them –

  1. Navigate to Content>Email Library
  2. Click seria sales user dashboard actions alongside the relevant email template.
  3. Click Manage Associated Automation. A popup of the list of automations and email cards in which that email template was used will be displayed.
  4. When you click on the relevant Automation Name, the automation will open in a separate tab. When you click on the relevant Email Card Name, the Email card will be highlighted.

Note: If there are no automations associated with the email template, a popup message that says, “No Automations and Email Cards are associated with the email template” will be displayed.

Leadsquared - Email Library Automation


4. Edit Email Template

You can make changes to an email template that is associated with an automation. To edit and save an email template –

  1. Navigate to Manage Associate Automation popup and click on the relevant Email Card Name.
  2. On the Email card, click LeadSquared Service CRM to make the required changes in the email template.
  3. Click Done to save and sync the edited email template with the associated automation.

LeadSquared - Email Library Automation


5. Edit Automation From Email Template Editors

An informational banner will be accessible in all Email Template editors, containing a link to view associated automations. Click the link to open a popup box displaying a list of automations associated with that specific template.

Leadsquared - Email Library Automation


6. Unpublished Automations

Under Unpublish Automation, if you select Completely stop automation for all leads within the workflow, the link between the automation and the email template breaks. The Manage Associated Automations popup of that email template will not display the automation. However, if you select Stop new leads from entering the automation, it remains visible as linked to the email template.

Note:

  • Only the published as well as unpublished automations that are still processing existing Leads will be displayed in the Manage Associated Automations popup.
  • If the completely unpublished automation is republished, then it will be displayed in the Manage Associated Automations popup of the previously linked email templates.

Leadsquared - Email Library Automation


7. Troubleshooting

Error: “You don’t have sufficient permissions to access Automations. Please contact Administrator.”

If you encounter this error message, it means you need to contact your LeadSquared administrator for assistance in obtaining the necessary access rights. Admins and marketing users can view linked automations in the Manage Associated Automations popup. Sales users may or may not have access to edit automations depending on the access for group-level automation.

LeadSquared - Email Library Automations


Any Questions?

We’d love to answer your questions or hear your own unique use cases. Feel free to share your experiences in the comments section below.

The Advanced Search ‘And’ Condition Is Displaying Incorrect Results for Leads – Opportunity Type Conditions

Consider the following example –

There are 2 opportunities (Automobile Loans) posted on a lead (Ankur Singh) –

  • Opportunity 1 – Status: Open, Owner: George
  • Opportunity 2 – Status: Won, Owner: John

LeadSquared Opportunity Management

On the Manage Leads Page, we’ll run an advanced search to find all leads with opportunities (of type Automobile Loan) where the Status is Open And the Owner is John

LeadSquared Opportunity Management

The result returns one lead – Ankur Singh.

LeadSquared Opportunity Management

This is the expected behaviour –

  1. The advanced search checks the first condition (Opportunity Type is Automobile loan and Status is Open) and finds the lead – Ankur Singh.
    AND
  2. The advanced search then checks the second condition (Opportunity Type is Automobile loan and Owner is John) and returns the lead – Ankur Singh.

Although there is no single Opportunity under the lead that meets both conditions (Status is Open and Owner is John), the lead Ankur Singh has 2 opportunities that satisfy the conditions individually.

Opportunity 1 (Status: Open, Owner: John) satisfies condition 1 (Status is Open) and Opportunity 2 (Status: Won, Owner: John) satisfies condition 2 (Owner is John). Therefore the lead Ankur Singh is returned as a result.

Note: It may be expected that lead no lead is returned here, because no single opportunity meets both conditions, however, the lead advanced search –

  1. Returns results satisfying the first condition
  2. Then returns results satisfying the second condition
  3. And finally, takes the intersection of the results of both conditions. In our example, Ankur Singh satisfies these conditions.

Alternatively, if the OR condition was used instead, many leads would be returned. All leads with opportunities with Status Open will be returned, and all leads  with opportunities owned by John will also be returned.

LeadSquared Opportunity Management

For more information on Advanced Search, see How to Use Advanced Search.

Mobile Cloud Calling Set Up for Knowlarity

1. Overview

This article will help you set up Knowlarity with LeadSquared Cloud Calling.


2. Set up Knowlarity

To configure Knowlarity as the telephony provider, please refer to Knowlarity Set-up.

Build Portals and Landing Pages Pro in Minutes

1. Feature Overview

With the enhanced Portals and Landing Pages Pro (LPP) designer, you can now create professional, responsive pages much faster. The new designer includes ready-made and reusable sections and design elements, so you spend less time designing from scratch and more time focusing on content and conversions.


2. Prerequisite


3. Ready-Made Templates

Reduce turnaround time by starting with a pre-built design instead of building from scratch. Choose from a wide range of industry-specific templates and pre-designed sections (hero banners, testimonials, forms, sliders, etc.).

On the designer, you can –

  1. Click the add section icon icon to add a section.
  2. Select a pre-built template.
  3. Customize if required.

And, the Mobile editor lets you design for desktop and mobile independently, ensuring an optimized experience across devices.

creating portals in minutes


4. Save and Reuse Sections

You can now save any section or element you create (e.g., a testimonial block, a call-to-action banner, or a lead capture form) and reuse it across any Portals and Landing Pages Pro.

  • Build once and reuse across projects.
  • Access saved sections from the “Saved Sections” panel in the designer.
  • Maintain brand consistency while saving effort on repetitive design work.

Example

If you’ve created a custom header with your brand’s logo and navigation, select that element and click on the save section icon icon to Save Section. Now, you can apply it to all future pages from the Saved Sections panel in the designer.

portals save sections


Any Questions?

Did you find this article helpful? Please let us know any feedback you may have in the comments section below. We’d love to hear from you and help you out!

Email Parser (AI Powered) Connector

1. Feature Overview

The Email Parser connector extracts personally identifiable information (PII) of potential leads from inbound emails, and creates them as leads in your LeadSquared account. You can capture emails from Gmail, Outlook and other email providers. This connector streamlines processes, reduces manual data entry, prevents errors in lead creation, and improves efficiency.

  • AI-Powered Content Parser – Leverages advanced artificial intelligence (AI) algorithms to capture lead data, ensuring precise parsing of PII information.
  • Capture Leads in Real-Time – Capture information from emails as leads in LeadSquared using AI.
  • Capture Attachments – Capture and store email attachments in the Lead/Activity CFS field.


2. Prerequisites

  • You must be the Administrator of your LeadSquared account.
  • This is a paid connector. To enable it, reach out to your account manager, or write to support@leadsquared.com.


3. How it Works

This connector parses information from inbound emails and uses this to create new leads in your LeadSquared account.

  1. Install and configure the Email Parser (AI Powered) connector
    Install the connector on your account, and add relevant details to configure it.
  2. Enter the Prompt
    When configuring the connector, provide a prompt to identify and parse lead data from your inbound emails. LeadSquared runs this text prompt and uses advanced AI capabilities to capture data from these emails. Some example prompts are listed below.
  3. Share webhook
    Once you’ve entered the prompt and approved the lead mapping, a webhook URL is generated. Share this URL with your account manager, or send it to us at support@leadsquared.com.
  4. Set up auto-forwarding in your email client
    Once we receive the webhook URL, we’ll share an email ID with you. Set up an auto-forwarding rule on your email client to forward inbound emails to this email ID. We will then parse details from these emails to create new leads in your LeadSquared account.


4. Install the Connector

  1. Navigate to Apps>Apps Marketplace.
  2. Search for Email Parser(AI Powered), and click Install.
    • Alternatively, you can find the connector on the left panel, under Email.
  3. Once installed, hover your cursor over , and click Configure.

LeadSquared Email Parser


5. Configure the Connector

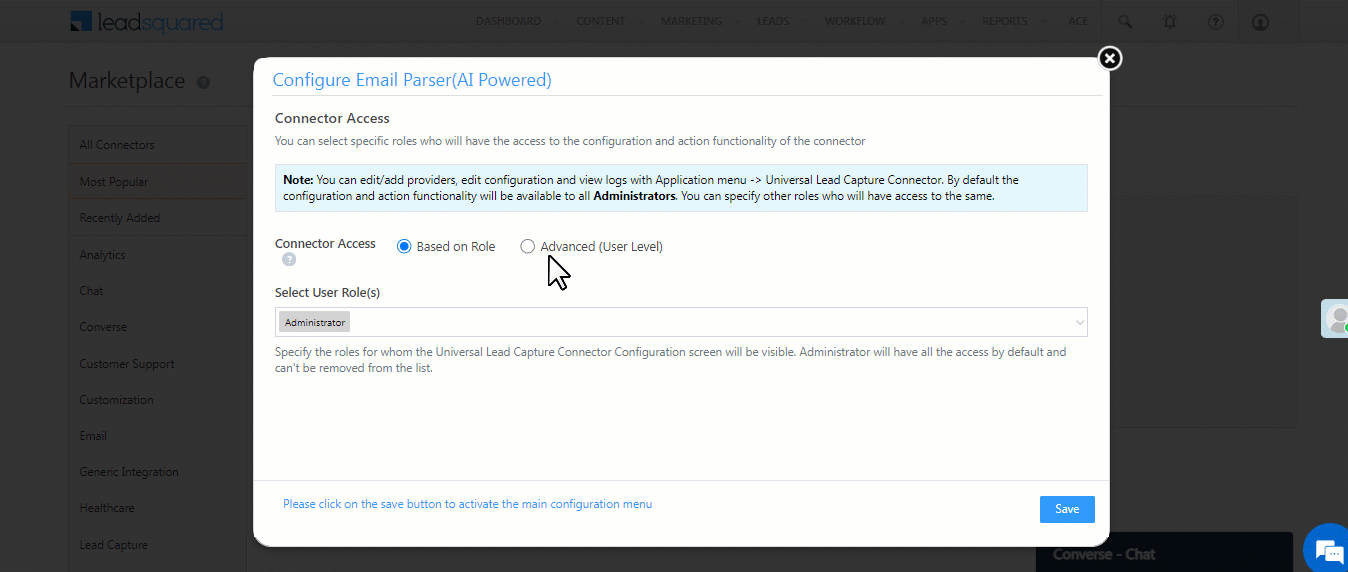
After installing the connector, configure access for non-Admin users in your account through the Configure Email Parser (AI Powered) pop-up. Only users with granted access can view and access the connector under the Apps menu.

  1. Select if you want to grant Connector Access that’s Based on Role or Advanced (User Level).
    • Based on Role – From the Specify Roles dropdown, select the LeadSquared user roles that can access the connector.
    • Advanced (User Level) – From the Advanced (User Level) dropdown, select a user boolean field. Based on the value in the selected boolean field, the user can access the connector. For example, for the user Sam, if the “Is Employee” boolean user field contains the value “Yes”, then this user can access the connector.
  2. Once you’re done, click Save Details. To continue the configuration, refer to the below sections.
Note: By default, all Admin users will have access to the connector.

LeadSquared Email Parser


6. Create the Prompt

To capture lead details from inbound emails, create a prompt, and pass it in LeadSquared. We pass this prompt and use AI to parse information from the email. This information is sent back to LeadSquared and is used to create a new lead.

Below are sample inbound emails, the details we want to capture from these emails, and the corresponding prompts. Use these examples as a guide to create your own prompts, which you’ll add to LeadSquared (as shown in the next section).

Email Sample What We Want to Capture Prompt
“Hello, Ali,

A customer just tried to reach you through the LeadSquared number, but you missed their call. Here are their details for you to follow up:

Date: April 13, 2024
Time: 10:25:30 PM
Caller Number: +91 9876543210

Remember, good follow-up makes for a memorable customer experience and will likely help you close better.

Good luck,

-The LeadSquared Team”

Here, this email is sent to the lead owner, Ali. Ali is listed in the ‘To’ section, and the company’s support email ID is in the ‘CC’ section. The lead’s phone number is mentioned in the email body. We want to parse the –

  • Lead’s phone number
extract valid NAME in JSON from text, don’t create your own data. Give data in Lead key only, if available.:
“Hello, Matthew

Shyam is interested in speaking to you about your property listed on your platform.

Ref No: S-PA01–DIP-VD2-5BR1
Name: Shyam
Telephone: 9879879870
Email: sam@example.com
Message: Hi! I saw your ad with property reference number S-PA01–DIP-VD2-5BR1 on LeadSquared. When is it available for viewing? Thanks.”

Here, this email is sent to the lead owner, Matthew. The lead’s name, email, phone number and property reference are mentioned in the email body. We want to parse the –

  • Lead’s name
  • Lead’s phone number
  • Lead’s email
  • Property reference ID
extract valid NAME, EMAIL, PHONE and REFERENCE ID in JSON from text, don’t create your own data. Give data in Lead key only, if available.:
“Dear Team,

Greetings.

Please find the attached RX DETAILS of the below-mentioned patient:
Patient Name: ANEESHA GHOSH
Age / Gender: 32 YEARS / FEMALE
Health Problem: Nodular lesion in right eye with minimal asymmetry of pituitary.
City: Kolkata
State: West Bengal
Country: India
Aadhaar Number: 111122223333
Phone: 9988776655
Phone: 9922334411
Address: 27B, Camac Street, 700016

Kindly suggest the cost estimation and the Ophthalmologist’s opinion. URGENT!

Best Wishes,
Kapil Munjal
Health Insurance Corp.”

Here, this email is sent to the support team by the insurer. We want to parse the –

  • Patient Name
  • Age
  • Aadhaar
  • Address
  • Multiple Phone Numbers

We DON’T WANT to parse –

  • Attendant
  • State
  • Country
  • City
extract valid details like NAME, AADHAAR, AGE, DOB, EMAIL, multiple PHONE and ADDRESS without STATE and COUNTRY in JSON from text for patient and attendant, don’t create your own data.:


7. Admin Configurations

After creating the email prompt, to continue the connector configuration, navigate to Apps>Email Parser(AI Powered).

7.1 Basic Details

Enter the following details –

LeadSquared Email Parser

Property Description
Prompt
Pass the prompt you’ve created.
Lead Source Enter the lead source through which the leads were captured (e.g., email parser, email campaign, etc.). This detail will be displayed on the Lead Details page, under Lead Source.
Default Country Code If the lead’s mobile number is captured without a country code, the default country code selected from the dropdown will be automatically added to the lead’s mobile number.
Select Time Zone The time zone followed in your account.
Lead Capture Search By Criteria To avoid creating duplicate leads, select one unique lead field (e.g., email ID, mobile number, PAN number) as the search key.

To know how to mark a LeadSquared lead field as unique, please refer to How to Make a Custom Field Unique.

Lead Capture Secondary Search By Criteria If lead identification and capture through the primary Search By Criteria fail, it will be re-attempted using the secondary Search By Criteria.
Select User to Notify on Failure Choose a user from the list of all users available in your LeadSquared account. If there’s an error in fetching leads, the user selected here will receive a failure message via email.

To know more about the type of errors, please refer to Error Notifications.

Enable Notification To ensure notification emails are sent to the selected user when there’s a failed query, enable the Checkbox checkbox.

Once you’re done entering all the details, click Save & Next.
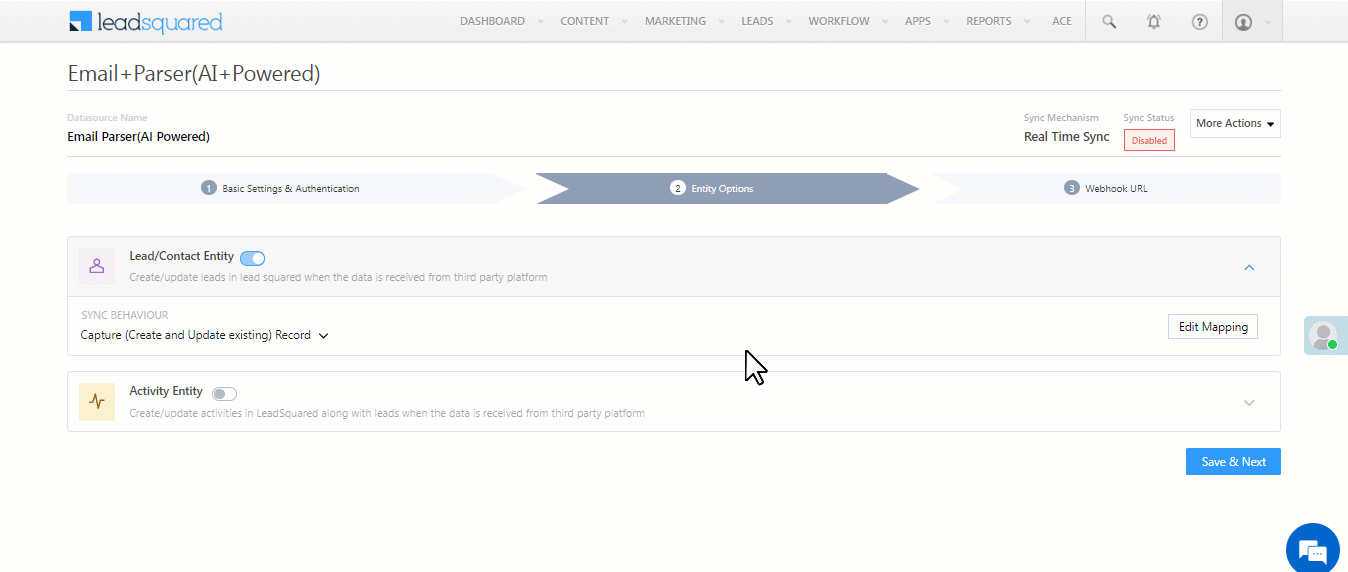
 

7.2 Entity Options

Once you’re adding the basic details and email prompt, click Entity Options. By default, the following email fields are mapped to the corresponding LeadSquared lead fields –

  • Lead Name
  • Email
  • Phone Number
  • Lead Owner Email Address

The Lead Sync Behaviour is set to Capture (Create and Update existing) Record by default. It is recommended you DO NOT change this.

It is mandatory to click Edit Mapping under Lead entities, and on the Default Mapping pop-up, click Save & Close. This step must be completed even if you don’t update any of the lead mappings.

However, if you choose to capture more lead details from the email, or if you want to create a new activity using the content from the email, under Lead/Contact Entity or Activity Entity, click Edit Mapping. On the Default Mapping pop-up, you can edit the existing mapping or add custom lead/activity mapping. To know how to do this, refer to How to Map Entity Options for Lead Capture.

Once you’re done, click Save & Next.
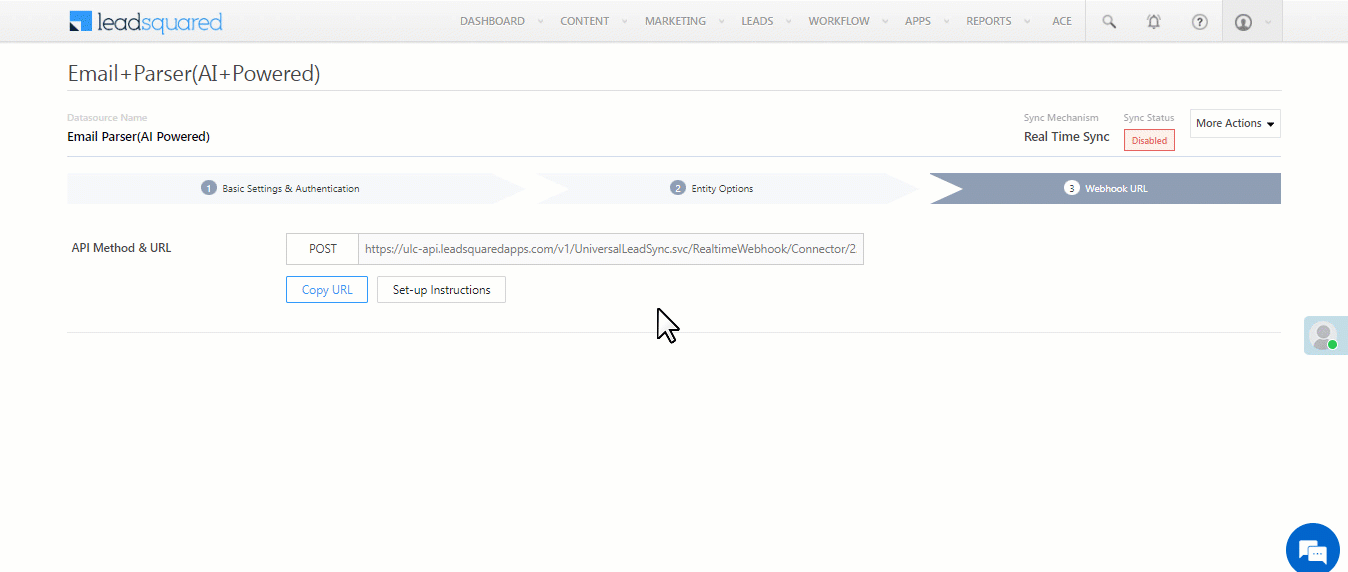
LeadSquared Email Parser


7.3 Webhook URL

After you provide basic details and finish field mapping, click More Actions, and enable the sync job. A custom webhook URL is generated. Share this webhook with your LeadSquared account manager, or mail us at support@leadsquared.com. Once we receive it, we’ll share an email ID with you. Use that to set up the auto-forwarding rule in the next section.

LeadSquared Email Parser


8. Set up Auto-forwarding

Your LeadSquared account manager will share an email ID with you. In your email client (Gmail, Outlook, etc.), set up an auto-forwarding rule that sends all inbound emails to this ID. Based on the prompt you provided, we’ll use AI to parse details from these emails and create new leads in your LeadSquared account.


9. View Logs

Here, you can view logs of all the sync jobs that have taken place. View New Events (New Leads), Updated Events (Updated Leads), and Errors (when capturing leads).

  1. Navigate to Apps>Email Parser(AI+Powered).
  2. From the More Actions dropdown, click View Logs.
  3. You can filter the logs by selecting a date range (Today, Last 7 Days, This Month, and Last Month), by selecting the Job Status (“All”, “Success” and “Failure”), and by selecting the Sync Status (All, Error, and Success).
  4. You can view the sync status of the following events –
    • New Events – List of all the new leads that have been created in LeadSquared during the selected date range.
    • Updated Events – A list of all the –
      • Duplicate leads that were created with the same Search by Criteria value (e.g., with the same Email Id, Mobile Number, etc.).
      • Leads that previously contained errors, which were fixed and synced successfully.
    • Failed – The list of leads that have not been captured due to mapping errors (e.g., when a boolean field is mapped to an integer field, etc.).
  5. To view the Sync Response details, under Request ID/Sync Job ID, click the Id.
    • Under the right panel, you can view the response status, the API URL, the request, and the response.
    • The responses that are successful will contain the details of the leads that have been pushed from your email client.
    • To view the lead capture response under Sync API Response, Leads Updated and Errors in Leads, click Information.

Note:

  • For a response that contains an error, the reason for the error is listed in the response. Once you fix it, you can click the Retry button to perform the sync again.
  • The current Lead Sync Behaviour will reflect in the Logs screen. This will help identify the sync that’s used (Capture or Update) for the selected Request/Sync Job Id.

LeadSquared Email Parser


10. Other Actions

You can edit or delete the Email Parser connector instance that you created. To do this –

  1. Navigate to Apps>App Marketplace.
  2. Search for Email Parser(AI+Powered).
  3. Alongside the connector, hover your cursor over .
  4. From the list of options, you can perform the following actions –
    • Edit Configuration
    • Disable Configuration
    • Remove Configuration

LeadSquared Email Parser


Any Questions?

Did you find this article helpful? Please let us know any feedback you may have in the comments section below. We’d love to hear from you and help you out!

Create Custom Columns in SIERA

1. Feature Overview

You can create Custom Columns in the Data Source section of SIERA reports. A custom column lets you build new fields by writing expressions that combine existing columns, apply conditions, or transform values.

This makes your reports more flexible by allowing you to model business-specific logic without altering the underlying data.

Once a custom column is created, it can be applied in multiple areas of your report:

  • Row/Column Grouping → Categorize data by your custom logic.
  • Values → Use them inside other custom measures using Expression Builder.
  • Filters → Apply custom logic to refine report data.
  • Drill-Down → Add as drillable fields for deeper exploration.
  • List Report Fields → Display custom fields directly in list-style reports.


2. Prerequisites


3. Example Use Cases

Here are a few example use cases for custom columns in SIERA –

  • Create a column that flags leads as High Priority if their Lead Score > 50, otherwise mark them as Low Priority.
  • Combine two numeric fields (e.g., Lead Score and Engagement Score) and display one of them based on a condition.
  • Build a dynamic column that returns Yes/No depending on whether a lead meets specific criteria.


4. Creating a Custom Column

Follow these steps to create custom columns –

  1. In the report builder, navigate to the Data Source section.
  2. Select the Custom Columns tab and click + New Column.
  3. Enter a Column Name and build your Expression using the Expression Builder.
  4. Click Save.
  5. The new column will appear under the Custom category in the Additional Panel.

While building the expression, you can reference existing fields, apply conditions (`IF` statements), and use supported functions.

For example:

If('Leads.Lead Score' > 10, 'Yes', 'No')

This expression creates a column that outputs Yes if the Lead Score is greater than 10, otherwise No.

Note:

  • You can create a maximum of 5 custom columns.
  • Permissions applied to source fields are respected.

Create custom columns in SIERA


FAQs

1. Can I use a custom column in multiple places in the same report?
Yes. Once saved, it’s available in grouping, values, filters, drill-downs, and list reports.

2. What happens if I mix data types in my expression?
The output defaults to String unless all outputs are consistently numeric or date-time.

3. Are custom columns available in sub-queries?
Yes. You can create them inside a query, and they will be available in the main report if included in the query grouping.

4. Do custom columns affect source data?
No. They are report-level transformations and do not alter the underlying database.

What Is the Maximum Character Limit Supported for Activity and Opportunity Fields?

By default, activity or opportunity fields of string (text) type, support a maximum of 200 characters.

To increase this limit you can create a custom field set and associate it with the activity or opportunity. When creating a custom field set, add string fields and click the gear icon alongside the field to increase the limit to 1000 characters or 65,000 characters (by selecting the content option).

LeadSquared Custom Fields Sets

When you associate the CFS with a lead or an opportunity, you can now use the string fields to store data with more 1000 or 65,000 characters (based on your configuration of the CFS string field).

For more information on CFS, see Custom Fields Sets.

Some Activities on a Lead Are Not Visible in the Activity History Page. Why Is This Happening?

This issue might be caused by filters applied on the Activity History page, a delay in syncing, or permissions settings.

Try adding “&showahv1” to the URL. Alternatively, enable all activities from the filter on the Activity History page.

LeadSquared Lead Management

Check the permission templates to ensure activities are not hidden from users.

If you’re still unable to see the activities, contact us at support@leadsquared.com. For more details on activities, see Activity Management – Feature Guide.

Why Am I Getting a “Lead ID Doesn’t Exist” Error When Performing an Action on a Lead?

This error may occur if the lead has been deleted. The lead details page may still be visible but when you try and edit or perform an action on the lead, you encounter the “Lead Id Doesn’t Exist” error. Try waiting for some time and then checking back later. If this doesn’t fix the issue, reach out to us at support@leadsquared.com.

For more information on leads, see Lead Management – Feature Guide.

Why Am I Getting a “List ID Does Not Exist” Error When I Open My Static List?

This error may occur when your static list has more than 400,000 (4 lakh) leads. Reach out to support@leadsquared.com and share the List Id if you encounter this error.

LeadSquared Lead List Management

For more information on lists, see List Management – Feature Guide.

Note: It is recommended to avoid creating lists with more than 400,000 leads.

Smart Views for Administrators

1. Feature Overview

Administrators can create Smart Views and assign them to teams to display relevant records users see in their workspace. By configuring Smart View tabs for entities such as Accounts, Leads, Opportunities, Activities, and Tasks, admins can ensure that each team accesses only the data relevant to their work. Smart Views assigned to teams are available on both web and mobile, making them especially useful for teams that primarily work from the mobile app.

Note: If you’re unfamiliar with the Smart Views feature, see Smart Views – Feature Guide. To learn more about teams, see Teams.

As an admin, you can manage smart views by navigating to My Profile>Settings>Leads>Views>Smart Views.

Leadsquared - Smart Views for Administrators


2. Prerequisites

  • You must be the Admin of your LeadSquared account.
  • You must create Teams in your account.


3. How It Works

Smart Views allow administrators to control which records users see by assigning relevant Smart View tabs to teams.

  • Create Smart View Tabs – Admins create Smart View tabs for leads, opportunities, activities, or tasks, and configure filters, columns, and actions.
  • Assign to Teams – The Smart View tab is assigned to the required team.
  • User Access – Users in that team can access the assigned Smart View on both web and mobile, allowing them to view only the records relevant to their work.

This helps teams focus on the most relevant data and work more efficiently.


4. Create a New Smart View

To create the first Smart View tab –

  1. Navigate to My Profile>Settings>Leads>Views>Smart Views and click Create.
  2. Enter a name for the new smart view tab, then click Create Tabs. You can add Lead, Opportunity, Activity and Task type tabs.
  3. Create the smart view tab and click Save.

The following example shows a new Smart Views tab for ‘Bangalore Leads’ –

Leadsquared - Smart Views for Administrators

Apart from this, a non-admin user can create new Smart View tabs relevant to them from the Smart Views page.

  1. Navigate to Lead Management>Smart Views from your LeadSquared Dashboard.
  2. On the top-right corner of the Smart Views list tab, click the Add New Tab icon.
  3. Enter the relevant details and click Create Tab.

To learn more, see Smart Views – Feature Guide.

Note:

Leadsquared - Smart Views for Administrators

4.1 Configure Quick Actions and Menu Actions

When you create or edit a Smart View tab, you can configure the actions you want a user to take on the particular entity.

  1. On the Smart Views settings page, under the Actions column, click the Configure button.
  2. Now, from the pop-up, select/deselect the Quick Actions and Menu Actions you want to display, then click Save.
  3. The actions will now appear on the Smart Views page.
Note: You can also configure Lead Actions on task tabs. This will help you use task tabs as a single work area.

Leadsquared - Smart Views

4.2 Arrange Columns

You can reorder columns for any tab by clicking the Manage Columns icon on the top-right corner of the grid. Click the checkbox alongside the relevant fields under Select Lead Columns. Then simply drag and rearrange the fields under Reorder Selected Columns in the appropriate place.

Additionally, you can also pin columns. Pinning a column moves it to the front of the grid and freezes it in place. Pinned columns remain visible and do not move or get hidden when scrolling through the grid. You can pin upto four columns, with two primary columns pinned by default. Click the Pin icon alongside the Selected Column, and drag and rearrange the fields as required.

Leadsquared - Smart Views

4.3 Manage Filters 

  1. Navigate to Settings>Leads>Smart Views.
  2. Under Actions, alongside the relevant Smart View, click Edit
  3. Navigate to the tab and click Manage Filters.
  4. Select the required filters and alongside the Enable filter options for mobile users setting, click the checkbox.
  5. Click Save.

Note:

  • A maximum of 5 fields can be selected as filters.
  • The following datatype fields are displayed for lead field and activity field filters –
    • Dropdown
    • Date
    • Date-time

Leadsquared - Smart Views for Administrators


5. Assign a Smart View Tab to a Team

Once you’ve created a smart view tab, you can assign it to a team.

  1. Navigate to My Profile>Settings>Users and Permissions>Teams.
  2. Alongside the team you want to assign the Smart View tab to, click the Actions icon.
  3. Click Apply Smart View.
  4. In the dropdown, alongside the Smart View section, select the smart view you want to assign the team.
    • Click the checkbox alongside Replace Smart View if you wish to replace the previous Smart View that was assigned to the team. This will also replace the Smart View for any children teams that were inheriting the previous Smart View.
  5. Once done, click Save.
Note: The following GIF assumes you’re using the new Teams V2 UI, which makes it easier to assign features (dashboards, workday templates, smart views, etc.,) to teams. You can enable it from Profile>Organization Settings>Advanced Configuration, search for ‘Teams’ and enable Switch to teams UI V2.

Leadsquared - Smart Views for Administrators


6. Set Smart Views as Home Page

In LeadSquared, Dashboards are the default homepage for all users and teams. Administrators can change this by setting Smart Views as the homepage. This allows users to immediately access the records relevant to their work such as Accounts, Leads, Opportunities, Activities, or Tasks when they log in.

Note: A Smart View must first be created and assigned to a team before it can be set as a homepage. For more information, see Assign a Smart View Tab to a Team.

6.1 Set Smart Views as Homepage for Teams

You can assign Smart Views as the homepage for an entire team so that all users in that team see the Smart Views page when they log in.

  1. Navigate to My Profile>Settings>Users and Permissions>Teams.
  2. Hover over the Actions icon next to the relevant team and click Configure Home Page.
  3. In the Configure Home Page pop-up, select Smart Views from the Select Page dropdown and click Save.

Leadsquared - Smart Views As Home Page

6.2 Set Smart Views as Homepage for Individual Users

Administrators can also assign Smart Views as the homepage for specific users.

  1. Navigate to My Profile>Settings>Users and Permissions>Users.
  2. Select the users by clicking the checkbox next to their names.
  3. Click Bulk Actions above the user grid.
  4. Select Configure Home Page.
  5. In the Configure Home Page pop-up, select Smart Views from the Select Page dropdown and click Save.

Leadsquared - Smart Views as Homepage


7. FAQs

1. Why does the tab I created from admin settings reference a different activity after assignment?

This issue may arise when View permissions are applied to that particular entity for the user to whom the tab is assigned. Verify the permission template for View permissions. This is applicable to tasks, opportunities, and accounts as well. 

2. Why aren’t the filters configured in Manage Filters applied to LeadSquared’s platform Smart Views while creating an activity tab from settings?

Manage Filters for activity tabs is exclusively applicable to NextGen UI and Marvin. To customize filters for activity tabs, ensure that the NextGen UI is enabled for the tenant.


Any Questions?

We’d love to answer your questions or hear your own unique use cases. Feel free to share your experiences in the comments section below.

LeadSquared WhatsApp Integration with Tata Tele Business Services

1. Feature Overview

Tata Tele Business Services‘s WhatsApp self-serve solutions help you engage your customers in a simple, secure, and reliable way. Tata Tele Business Services facilitates customer support and other marketing efforts through WhatsApp. To know more, visit Tata Tele Business Services.

LeadSquared offers WhatsApp integration to help users communicate with their leads. Our WhatsApp functionality supports integrations through different solution providers like InfobipKaleyra, WATI, Zoko and Gupshup. This article helps you set up WhatsApp messaging through your LeadSquared account using Tata Tele Business Services as your service provider.


2. Prerequisites

If you’re not familiar with LeadSquared’s WhatsApp integration, see WhatsApp Business Messaging Connector. For frequently asked questions, see WhatsApp Business FAQs.

  1. To enable the Tata Tele Business Services WhatsApp integration on your account, contact your account manager, or write to support@leadsquared.com.
  2. Get an Approved WhatsApp Business Number and Account.
  3. Submit Message Templates for Approval.


3. Installation

To know how to install the WhatsApp Business connector, refer to WhatsApp Business Messaging Connector.


4. Configuration

Once the connector is installed, add and configure your WhatsApp phone numbers to the connector. To do this, enter –

4.1 Basic Details

LeadSquared Gupshup integration

Field Description
WhatsApp Business Number Paste your WhatsApp business number in this field, without including any special characters such as ‘+’, etc. You will have to include the country code of the number though. An example of a number would be “9199010XXXXX”, where 91 is the country code.

Contact your Account Manager from Tata Tele Business Services to get your WhatsApp business number.

Account Name Provide a relevant name for your connector. This field is mandatory.
Allow Lead Generation on incoming message Click Slider to allow automatic lead creation when you receive messages from unknown mobile numbers.
Lead Source From the dropdown, select a lead source for your leads.

Once you’re done, click Next.

4.2 Service Provider

Then, from the available options, select Tata Tele Business Services, and click Next.

LeadSquared Tata Teleservices integration

4.3 Authentication Set-up

On this screen, enter the following details –

LeadSquared Tata Teleservices integration

Field Description
Send Message URL This is a read-only field, and no action is required from your end.
WhatsApp Number The WhatsApp number you entered in the previous section is auto populated here.
Permanent Access Token Paste your Tata Tele Business Services access token. To know how to obtain it, refer to Tata Tele Business Services WhatsApp Details.
Authentication Header Template* In this field, pass the following value – {{Token}}
Get Media URL Paste this URL here –
https://wb.omni.tatatelebusiness.com/whatsapp-cloud/media/download/{{mediaId}}
WhatsApp Business Account ID Enter your WhatsApp Business Account ID here. This is optional.

Once you’re done entering all the details, click Next.

4.4 Converse Settings

LeadSquared Converse is an instant messaging feature that allows you to have real-time conversations with your leads via WhatsApp.

LeadSquared WhatsApp Integration

To integrate LeadSquared Converse with WhatsApp, complete the following steps –

  1. On the Converse Settings tab, toggle the Enable Converse Slider slider.
  2. Under User Access, grant permissions to users who can communicate with leads through the LeadSquared Converse.
    • Based on Role – From the Search and Select Users dropdown, select the LeadSquared user roles that can send messages through LeadSquared Converse.
    • Advanced (User Level) – Based on the value present in the selected user boolean field (e.g., For user Sam, the “Is Employee” field contains “Yes”), the user will be able to send messages through LeadSquared Converse. From the Select User Field dropdown, select a relevant boolean field.
  3. Functionality – The following additional settings must be configured –
    • Approved Templates – Enable this functionality to allow your users to send approved WhatsApp templates to your leads.
    • Unapproved Templates – Enable this functionality to allow your users to send unapproved WhatsApp templates to your leads. These can only be sent if the 24-hours service window is active.
    • Notify Lead Owner* – When enabled, only lead owners will get notifications of the WhatsApp messages a lead sends. When disabled, all logged-in users will receive notifications of these WhatsApp messages.
    • Sending Rich Media – Enable this functionality to allow your users to send media files in their WhatsApp messages.

Note:

  • *Message notifications are only sent to one user, i.e., either the Lead Owner or to the user (other than the Lead Owner) that sent the WhatsApp message to the lead. When the Notify Lead Owner setting is enabled, only the Lead Owner will get notified, while the user who sent the message will not get a notification.
  • If you enable the Send Rich Media option, you must also enable the Approved Templates option. This ensures that you can add your media files to a template when messaging your leads.

LeadSquared Gupshup Integration

4.5 Advanced Settings

In this screen, you must map –

  • Activity Mapping – A LeadSquared activity field to your WhatsApp messages. This is the activity that will be posted every time a WhatsApp message is sent or received.
  • WhatsApp Opt-Out – A LeadSquared lead field to the WhatsApp opt-out functionality. Your leads can opt-in or out of receiving WhatsApp messages on the basis of this field.
  • Default WhatsApp Number Fields – The number you set as the default phone number will be automatically selected when you send a WhatsApp message to a lead. You can also select other available numbers from the “Add Another Number” dropdown.
  • Default Country Code – The default country code will be used to send messages to a phone number that’s stored in a custom field, if no country code is listed.
  • Enable HSM – Disable the Slider slider.
  • Enable Rich Media Template Support – If you want to include media files in your WhatsApp message, you must enable the Slider slider.
  • Show URL Preview in Custom Messages – Enable the sliderSlider to allow for URL previews in non-templatized WhatsApp messages.
  • Compliance Type – Here, you can select the compliance type for the WhatsApp template, by choosing either WhatsApp Opt-out or Opt-in.
  • WhatsApp Opt-out – From the dropdown, select a lead field for the WhatsApp opt-in/opt-out functionality. Your leads can opt-in or out of receiving WhatsApp messages on the basis of this field.
  • Blacklist Incoming Messages – Enable this option to blacklist incoming messages from specific numbers. This is useful when you want to block numbers that send inappropriate messages to your users. Once enabled, enter the phone numbers in the text box available on the right side of your screen. You can add phone numbers with 7-12 digits (excluding the country code). This option is available only when the Allow Lead Generation on incoming messages setting is enabled.
Note: Create a custom lead field of boolean type to map to the WhatsApp opt-out functionality. For example, you may create a custom lead field called “WhatsApp Opt Out”. Leads for whom the field is selected/checked won’t receive WhatsApp messages.

Click Save & Close when you’re done.

  • If your credentials are correct, you’ll see the success message highlighted below.
  • If they were incorrect, the integration will fail.
Note: Once you save the Advanced Settings, a webhook URL is generated. Use this URL to integrate your LeadSquared and Tata Tele Business Services accounts, as shown in the section below.

LeadSquared Tata Teleservices integration


5. Configure the Webhook in Tata Tele Business Services

To receive inbound messages from customers, and to capture delivery status and reports, add the webhook URL (generated in LeadSquared) to your Tata Tele Business Services account. Once the Send Message URL is generated –

  1. On your LeadSquared account, on the Configure WhatsApp Business pop-up, from the Authentication tab, copy the Notifications Webhook URL.
  2. Once you log in to your Tata Tele Business Services account, on the left panel, click Integrations, and then click the Integration tab.
  3. Here, click LeadSquared, and the click Enable.
  4. On the right panel, paste the URL.
  5. Once you’re done, click Save. This completes the integration process.

LeadSquared WhatsApp Tata Teleservices


6. Conversing with Leads via WhatsApp

Integrating Converse with LeadSquared’s WhatsApp connector will enable your users to have real-time conversations with your leads through WhatsApp. Using templatised messages, you’ll be able to attach and send media files (such as images, documents, etc.) in your conversations. To know more, refer to LeadSquared Converse.
LeadSquared WhatsApp Integration


7. Next Steps

Once the connector is successfully installed, you can proceed to add WhatsApp templates and finally message your leads. For details, see Adding WhatsApp Templates to LeadSquared.

Note: To enable link tracking for messages that contain URLs, refer to WhatsApp Link Tracking in LeadSquared.


Any Questions?

Did you find this article helpful? Please let us know any feedback you may have in the comments section below. We’d love to hear from you and help you out!

Mobile App Permissions

The LeadSquared app requests for Location Access, Storage and Calendar access permissions after installation. These permissions only need to be granted once and ensure that the essential features of the app run smoothly and without interruption.

For settings and permissions related to features within the app, see Configure Mobile App Settings from the Web Platform.

Permission Description Why we require it
Location Access Allows the app access to your device’s location services. We require location data permissions to run the following features –

  • Location tracking and Check-in/Check-out allow you to manage your field sales operations by tracking the attendance, location and travel path of your users.
  • The Leads Near Me feature shows you locations and routes to leads in your vicinity, so you can plan and execute your tasks efficiently.
  • In addition, LeadSquared also has a geo-fence feature that prevents users from completing tasks outside a specified perimeter.
Storage Permissions Gives the app access to your device’s storage.


This permission allows the LeadSquared app to store data (pictures, files, app logs, etc.) on your phone.
Calendar Access Allows the apps to access your device’s calendar.


Tasks are synced to your calendar to send you updates and notifications that help you stay on top of your sales.
Camera (Optional) Allows the app to use the camera on the device to take pictures. While creating leads or activities using custom field sets, you can either upload attachments from your device or click a picture of important documents, forms, etc. related to the lead/activity.

Note that this permission can be removed from your app settings with no operational side effects.

Battery Optimization (Android) Manages your device’s apps to conserve battery. Some devices may limit background location updates to save power. Check that the mobile device’s battery optimization settings do not restrict the tracking app’s background activity. 


Convert Speech to Text on the Mobile App

1. Feature Overview

Field Sales Users can add notes on their leads, opportunities, tasks, and activities on the go using the Speech to Text Converter. While adding notes, users can record themselves speaking the relevant content which will be converted to text. This text can then be edited accordingly.


2. Prerequisite

You must have the LeadSquared mobile app installed on your device.


3. Convert Speech to Text on Lead and Opportunity Detail Notes

  1. On the mobile app, navigate to the relevant Lead or Opportunity Details page.
  2. Tap Notes. On the bottom of the page, tap Add Note.
  3. On the Add Note page, tap Mic icon. Now, you can say what you need to record on the Notes. Once you’re done speaking, the speech will be converted to text on this page. You can edit your notes once the conversion is over.
  4. Once you’re done, tap Save.

LeadSquared - Convert Speech to text on Lead Details


4. Convert Speech to Text on Activity and Task Notes

  1. While creating an activity or a task, tap the Notes section.
  2. Now, tap the microphone icon above your keypad. You can now speak and record your speech as text.
  3. Edit your text notes as you wish and submit the form.
Note: You can only add speech to text Notes on Activities and Tasks while creating them.

LeadSquared - Convert Speech to Text on Activities


Any Questions?

Did you find this article helpful? Please let us know any feedback you may have in the comments section below. We’d love to hear from you and help you out!

Why Am I Still Receiving Reminders for a Task Type Even After I Disabled Reminders?

Check when the task was created compared to when you turned off reminders. If the task was created before you turned off reminders, you might still get reminders. But if the task was created after, you shouldn’t get reminders. This helps make sure reminders match your current settings and you don’t get notified for tasks you don’t need reminders for anymore.

For more information, see How to Create Tasks and Schedule Reminders.

What Are the Maximum Number of Leads That Can Be Shared with a User?

Using the lead share feature, you can share a maximum of 2,000 leads with a user.

To know more, see How to Share Leads with Users.

Why Is Lead Source Not Getting Updated with the Lead Capture API?

If the lead was created earlier with a previous call to the Lead Capture API, the source field won’t get updated in subsequent calls. We prevent the source field from being updated to maintain the original lead source.

To learn more, see Capture Leads API.

What Are the Maximum Number of Leads I Can Bulk Update?

You can bulk update a maximum of 25,000 leads at a go. Increasing this limit may cause performance issues, but if you require the functionality, reach out to us at support@leadsquared.com.

For more information on bulk updates, see How to Bulk Update Lead Fields.

What Are the Maximum Number of Leads That Can Be Added to the Static List? Why is the List Details Page Breaking?

A maximum of 400,000 (4 lakh) leads can be added to a static list. If you add more than 400,000 leads to a static list, the list details page may break due to a time-out error while retrieving the list of leads.

To learn more about lists, see List Management – Feature Guide.

Why Is the Sales Group Manager Unable to Edit, Mark Complete, or Delete Tasks Assigned to Members of the Same Group?

By default, even if Sales Group Managers have ‘modify lead’ privileges, they cannot alter any tasks.

If you wish to allow them to update tasks (edit, delete, mark complete) of their group members, reach out to us at support@leadsquared.com and we can enable this functionality through a back-end setting.

To learn more about Sales Groups, see Managing Lead Access through Sales Groups.

Can I use both Reporting Manager and Sales Group Hierarchy Features

No, you can use only one feature. By default, LeadSquared accounts come with the Sales Group feature enabled. If you wish to change this to the Reporting Manager feature, please contact us at support@leadsquared.com.

  • The Sales Groups feature lets you manage your sales users by organizing them into different groups based on location, business unit or any other categorization of your choice. To learn more, see Manage Sales Groups.
  • The Reporting Manager feature lets you create a hierarchy of users to reflect your organization structure. To learn more see, View User Hierarchy.

Journeys Feature Guide

1. Feature Overview

Journeys is a field sales management feature built for the mobile app. It enables all sales users to create a Plan (Beat Plan, PJP etc.) in just two simple steps by defining the plan duration (i.e. Start Date & End Date) and adding the relevant leads/lead templates alongside each date in the plan duration. Users can also send plans for approval to their respective managers if required. Once a plan is published or approved, the configured To-Dos will be created against the added leads. The plan execution can then be tracked by users through My Trips, Tasks, Task Smart Views, etc., on the LeadSquared mobile app.

LeadSquared - Journeys marketing


2. Set Up and Configure Journeys

The Setting up Journeys on the Web App article is mainly for Admins to enable/disable high level configurations for Journeys. This is the first step in using Journeys. Once you’ve configured the Journeys settings for your account, you can start creating and managing Plans.


3. Manage Plans on Web App

Admins and Managers can create, approve, and reject users’ plans on the Manage Plans page. Plans can be created by selecting leads manually or through lead templates. Manage Plans on Journeys for Web Users deals with creating and managing various Plans on the web app.


4. Manage Plans on Mobile App

Manage Plans on the Mobile App deals with creating and managing various Plans on the mobile app. The plan execution can then be tracked through My Trips, Tasks, Task Smart Views, etc., on the LeadSquared mobile app. This allows field sales users to streamline their tasks and plan the best route possible.


5. Manage Lead Templates on Web App

Lead Templates are a logical group of leads created based on similar properties like geographical proximity. Manage Lead Templates on Web App details how you can use lead templates to create plans instead of manually selecting each lead.


Any Questions?

We’d love to answer your questions or hear your own unique use cases. Feel free to share your experiences in the comments section below.

Can I Delete a User?

In order to preserve the integrity of your account history, we don’t allow you to delete users. However, you can deactivate users after which they’ll no longer be able to log into LeadSquared. You can even mark de-activated users obsolete and then re-use their email addresses to create new users.

To learn more, see How to Deactivate Users.

Can I increase the maximum characters for the Notes fields?

No, the maximum limit (2,000 characters) can’t be increased for the Notes Lead field or the Notes Activity field.

For more information see, How to Create a Lead Fields and How to Create an Activity Field.