1. Feature Overview
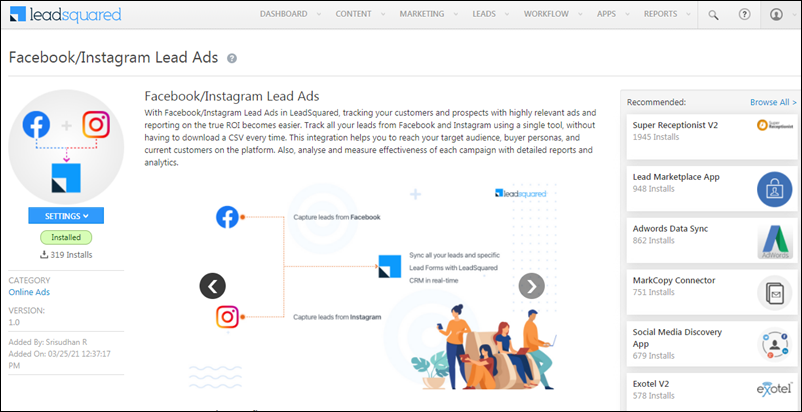
The LeadSquared Facebook/Instagram Lead Ads connector sets up a seamless transfer of your lead data from Facebook Ads and Instagram Ads accounts to your LeadSquared account. It allows you to track all your leads from Facebook in real-time, by syncing your Facebook LeadGen form with LeadSquared. This removes the need to constantly download a CSV file from Facebook, and upload it to LeadSquared.
To know more about the connector, please click here.
Note:
- You must have an active Facebook ads page with a LeadGen form on it. To know more, please refer to Facebook Instant Forms.
- By default, you can sync (add) up to 50 forms from your Facebook Ads account with your LeadSquared account. If you want to increase the limit to more than 50 forms, contact your account manager, or write to support@leadsquared.com.
- To enable lead data transfer between Instagram Ads and LeadSquared, you must link your Instagram Ads account to your Facebook Ads account. To know more, please refer to Add or remove an Instagram account from your Facebook Page and Add an Instagram Account to Your Business Manager.
- Once your accounts are linked, you must select the Instagram account every time you create a new Facebook ad. This ensures that your ad is displayed across Facebook and Instagram, and lead capture takes place in both places.
2. Prerequisites
3. How it Works
To push leads from LeadSquared to your Facebook/Instagram Ads account, using the Facebook/Instagram Lead Ads connector, complete the following steps –
- Install the Facebook/Instagram Lead Ads Connector
- Connect your Facebook and Instagram Ad accounts to LeadSquared
- Connect your Ad Pages to LeadSquared
- Map the default Facebook LeadGen form fields to the corresponding LeadSquared lead fields
- Connect your Facebook LeadGen form to LeadSquared
- Link the custom form fields to the corresponding LeadSquared lead fields
- If required, link the marketing fields to LeadSquared lead fields
- If required, link the form tracking parameter to a LeadSquared lead field
- Create a test lead on Facebook, and ensure the lead data is pushed to LeadSquared
- Activate the LeadGen form to transfer lead data from Facebook to LeadSquared
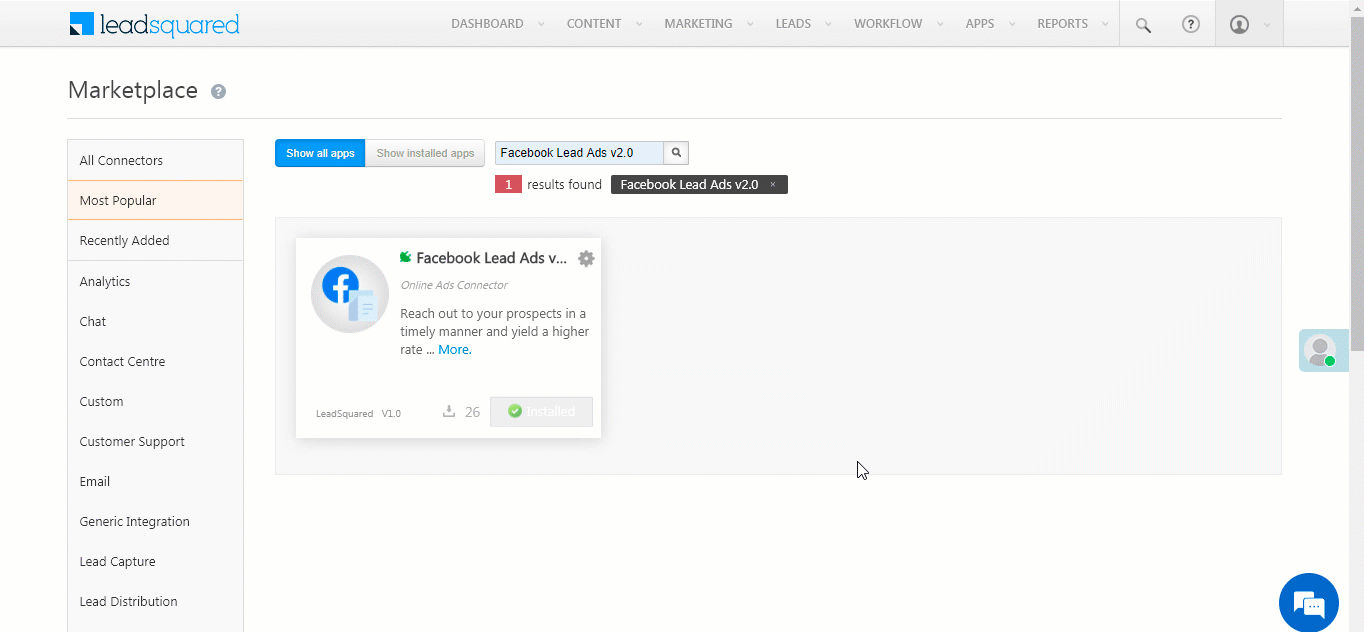
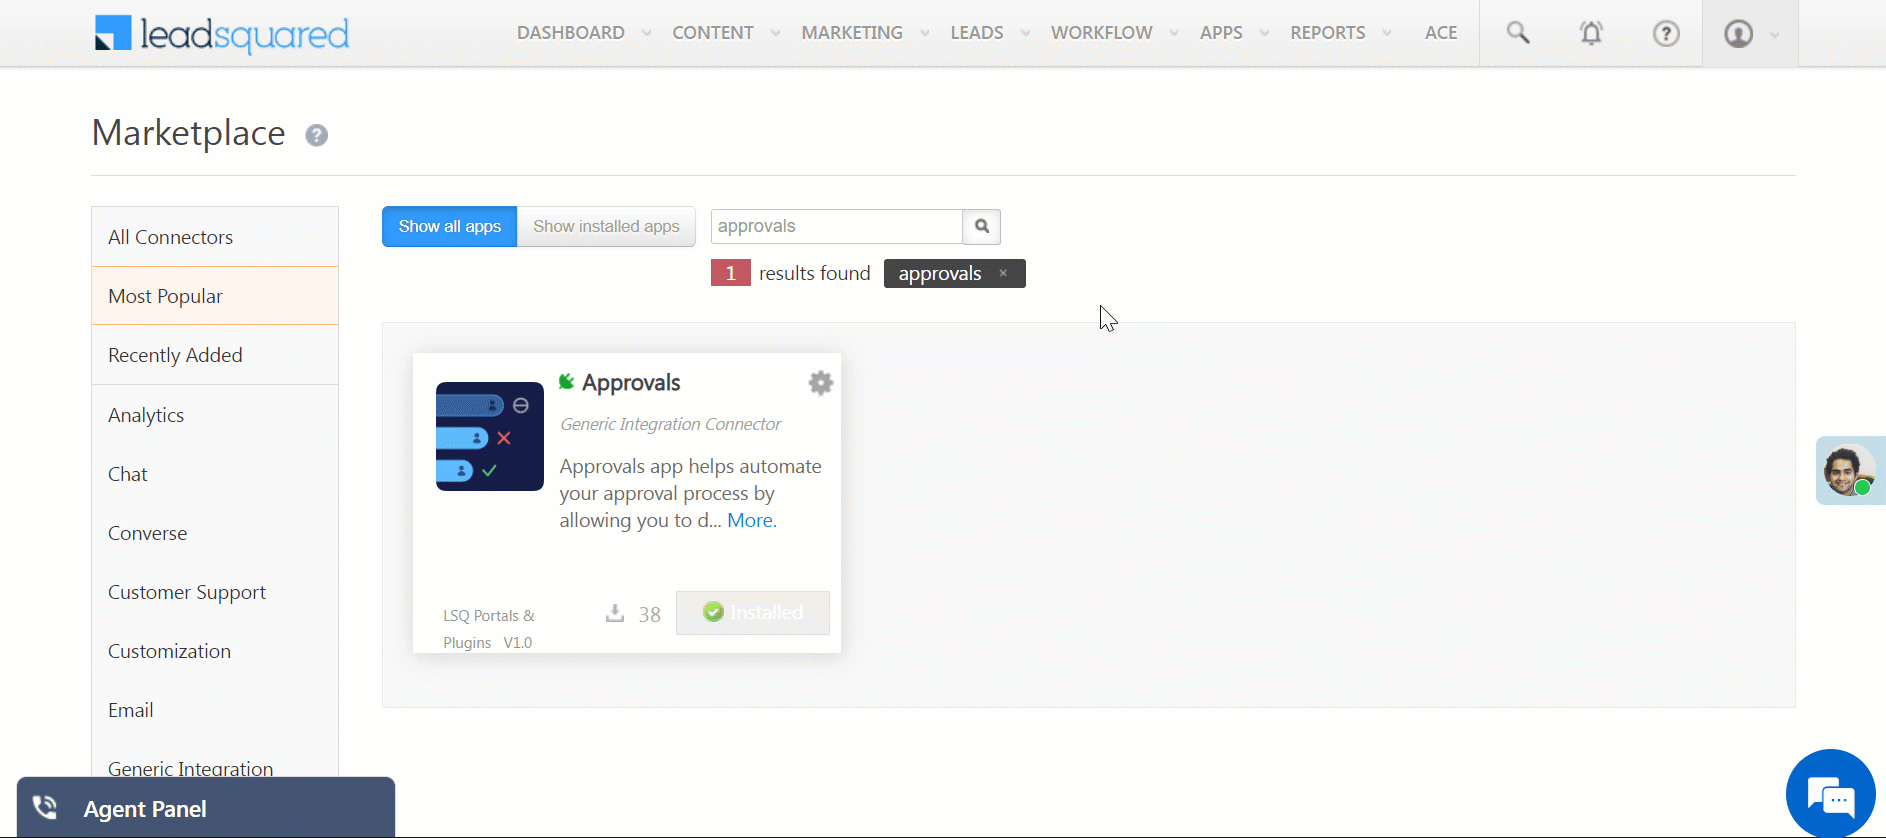
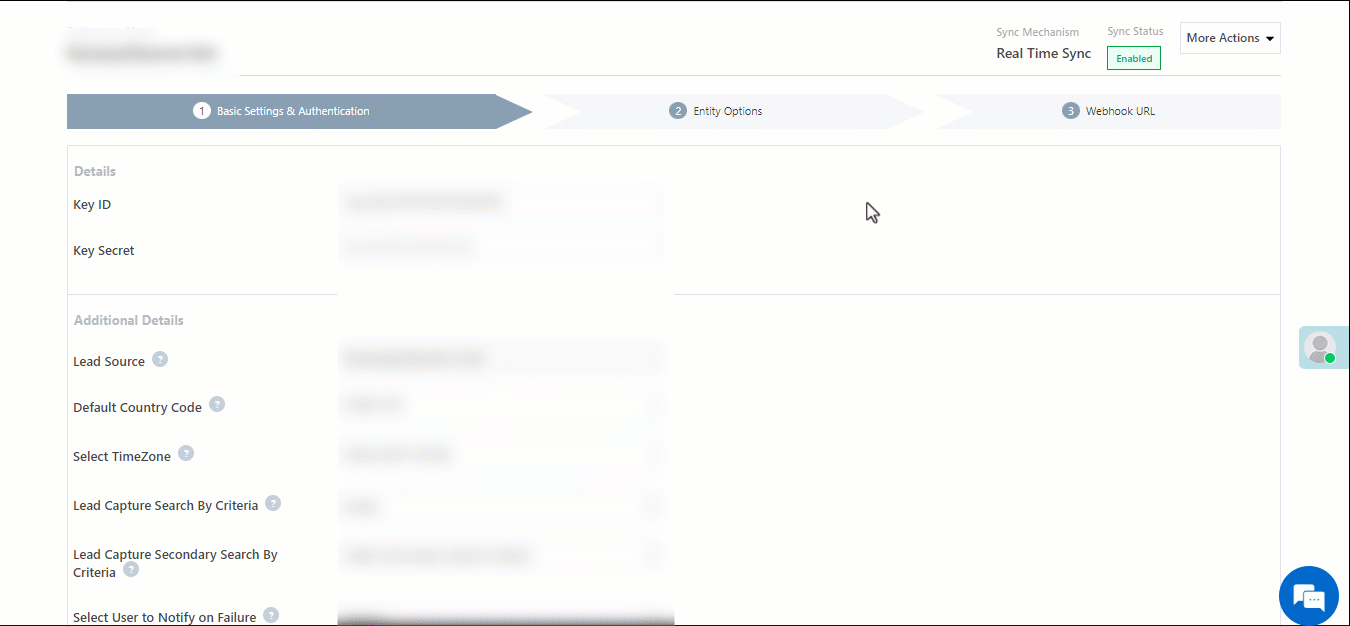
4. Install the Connector
To install the Facebook/Instagram Lead Ads connector on your account –
- From the main menu, navigate to Apps>Apps Marketplace.
- Search for Facebook/Instagram Lead Ads, and click Install.
- Alternatively, you can find the connector on the left panel, under Online Ads.
- Once the connector is installed, hover your cursor over the
 icon, and click Configure.
- On the Configure Facebook/Instagram Lead Ads pop-up, from the Select Role dropdown, choose the user roles for which you want to give connector configuration and actions permission.
- If you choose to not give permissions to other user roles, then skip this step, and directly click Save.
- Once you’re done, click Save. The connector is successfully installed.
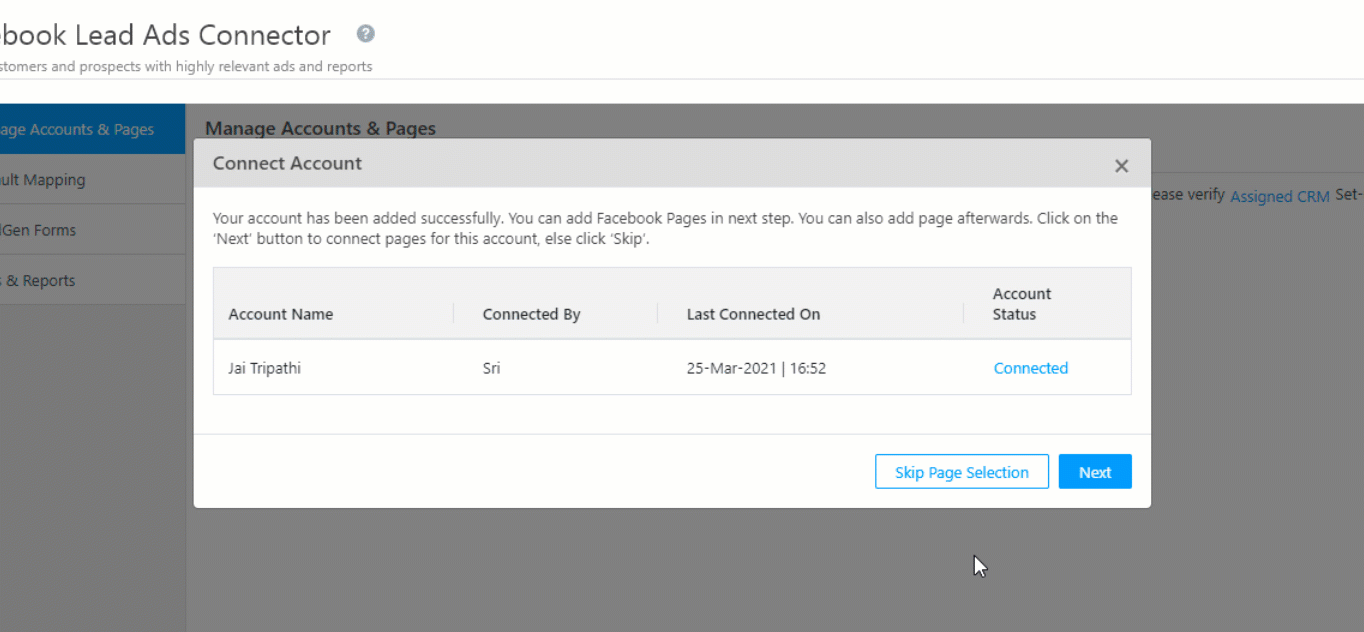
5. Connect Ad Accounts
Once the connector is installed, connect your Facebook Ads account(s) to LeadSquared.
- Navigate to Apps>Facebook/Instagram Lead Ads.
- On the Manage Accounts & Pages tab, click Connect Accounts, and then click Login with Facebook.
- On the pop-up, log in to your Facebook Business account.
- On the pop-up, select all the Facebook ad pages linked to your Facebook Business account, and click Next.
- Ensure all the permissions are granted, and then click Done.
- Then, on the You’ve now linked LSQ Lead Ads Connector to Facebook pop-up, click OK.
- On the Connect Account pop-up, you can see that the Facebook Business Account is now successfully linked to LeadSquared.
Note: You can connect multiple Facebook Business Accounts using the steps given above, by clicking the Connect Accounts button.
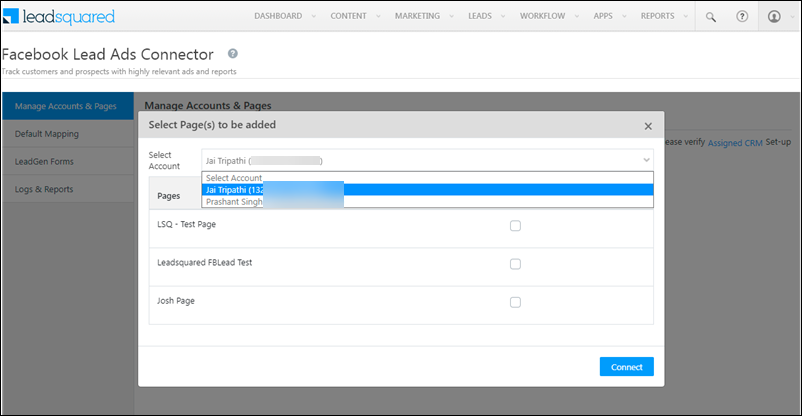
6. Connect Pages
Once you’ve connected the Facebook Business account(s), from the list of Ad Pages, choose the Pages you want to sync with LeadSquared.
- On the Connect Account pop-up, click Next.
- On the Select Page(s) to be added pop-up, against the Ad Page you want to link, check the
 checkbox.
- Then, click Connect.
- To view the page(s) that you have added, click Pages. Here, you can view all the Ad Pages you have connected to LeadSquared.
- Once you have connected the Ad Pages to LeadSquared, click Next.
To connect pages across multiple Facebook Business accounts –
- On the Pages screen, click the Connect Pages button.
- From the Select Account pop-up, select the Facebook Business Account from which you want to connect Ad Pages.
- The other steps remain the same as listed above.
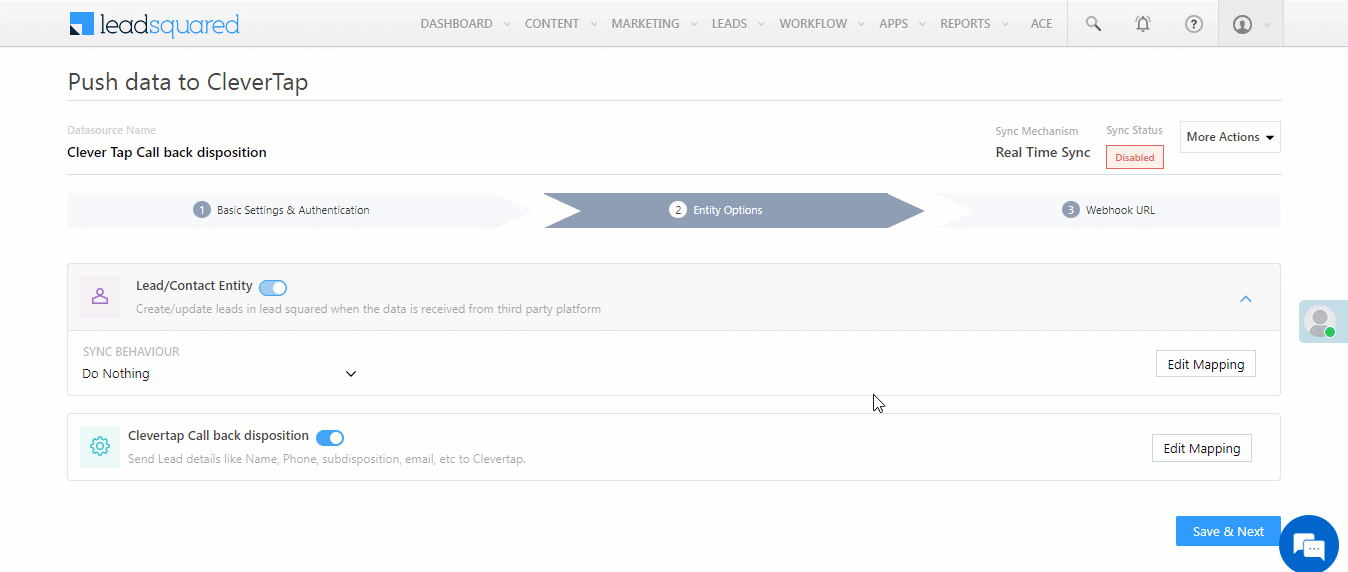
7. Default Field Mapping
After you’ve connected an Ad Page, you must then map the Facebook LeadGen form fields present on that page, to the corresponding LeadSquared lead fields.
Note: To avoid errors, ensure each Facebook form field is uniquely mapped to a corresponding LeadSquared field.
7.1 Marketing Fields
Every Facebook form has custom marketing data (like Form Id, Ad Id, Campaign Id etc.), and this data is present within Marketing Fields. All the marketing details are captured as an activity in LeadSquared, but if you want to store this data on the Lead Details page, then you can map the Facebook form fields to any LeadSquared lead field or custom field. This data can be used to compare two or more forms, see how efficient each form is, and so on.
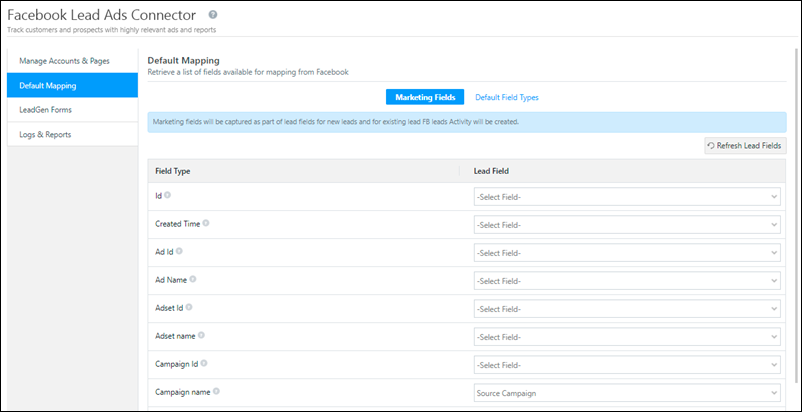
Note: By default, Campaign Name is mapped to the Source Campaign lead field. To map the other fields, please refer to the steps below.
By default, when a Facebook LeadGen form submission takes place (and when a new lead is created or updated in LeadSquared), the marketing fields are captured as an activity and posted on the Lead Details page. The activity is called Facebook Lead Ads Submissions, and it contains the details of all the marketing fields (such as Form ID, Ad Set ID, Campaign ID, etc.).

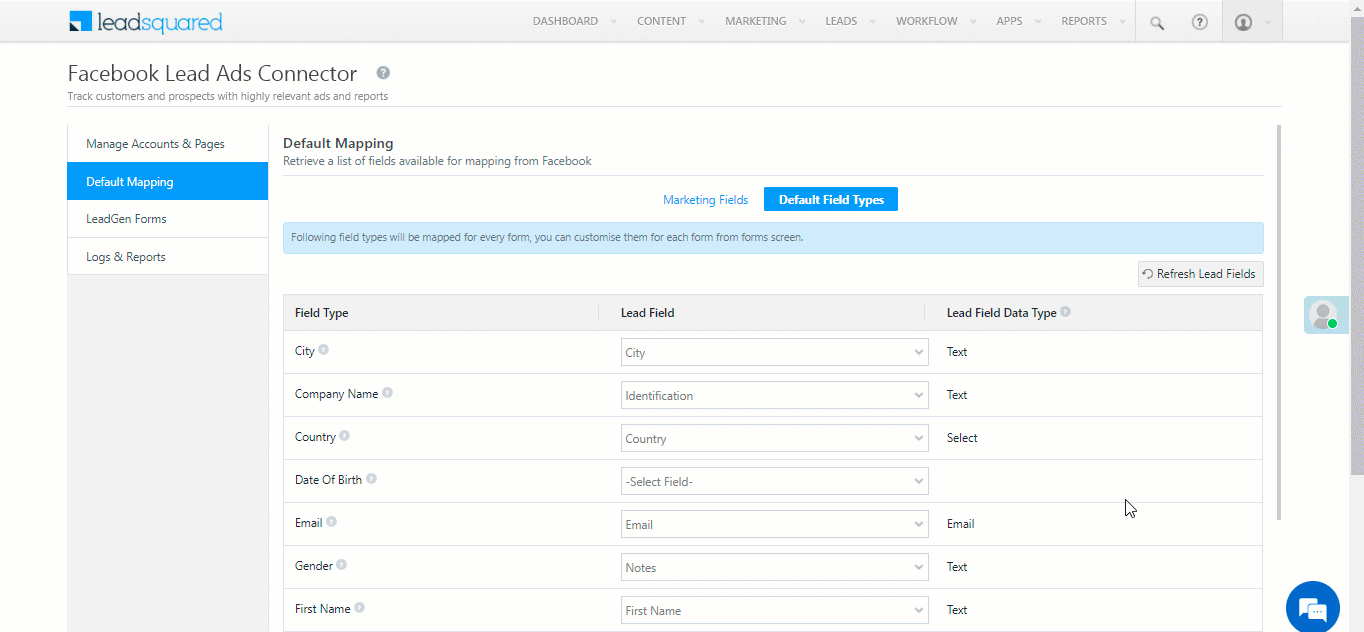
7.2 Default Field Types
Facebook has a set of default lead capture fields, which are common across all their forms. You must map these lead capture fields to the corresponding LeadSquared lead fields. This mapping will reflect across all the Facebook LeadGen forms you connect with LeadSquared.
Note: Only default Facebook fields show up here. If you have created custom fields, it will show up in the next step, under Activate Form.
To map the fields –
- Map each Field Type (Facebook LeadGen Form field) to the relevant LeadSquared lead field, by selecting the field from the Lead Field dropdown options.
- If you choose to not map a particular field, then choose None from the dropdown options.
- Some of the Field Type fields are automatically mapped to a LeadSquared lead field. If the mapping is accurate, then you can let it be as such.
- The data type for the LeadSquared Lead Field that you’ve selected is listed under Lead Field Data Type. This will ensure that you’re mapping the Facebook form field to the correct data type.
- Once you’ve mapped all the fields, click Save and Next.
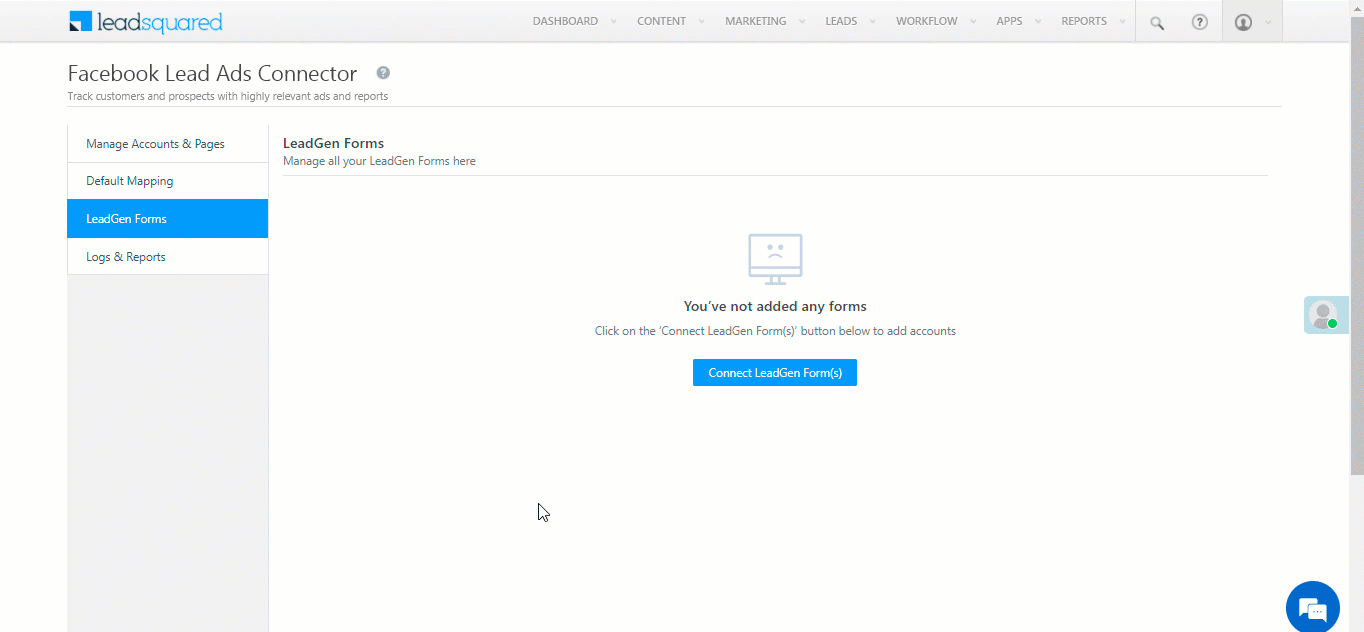
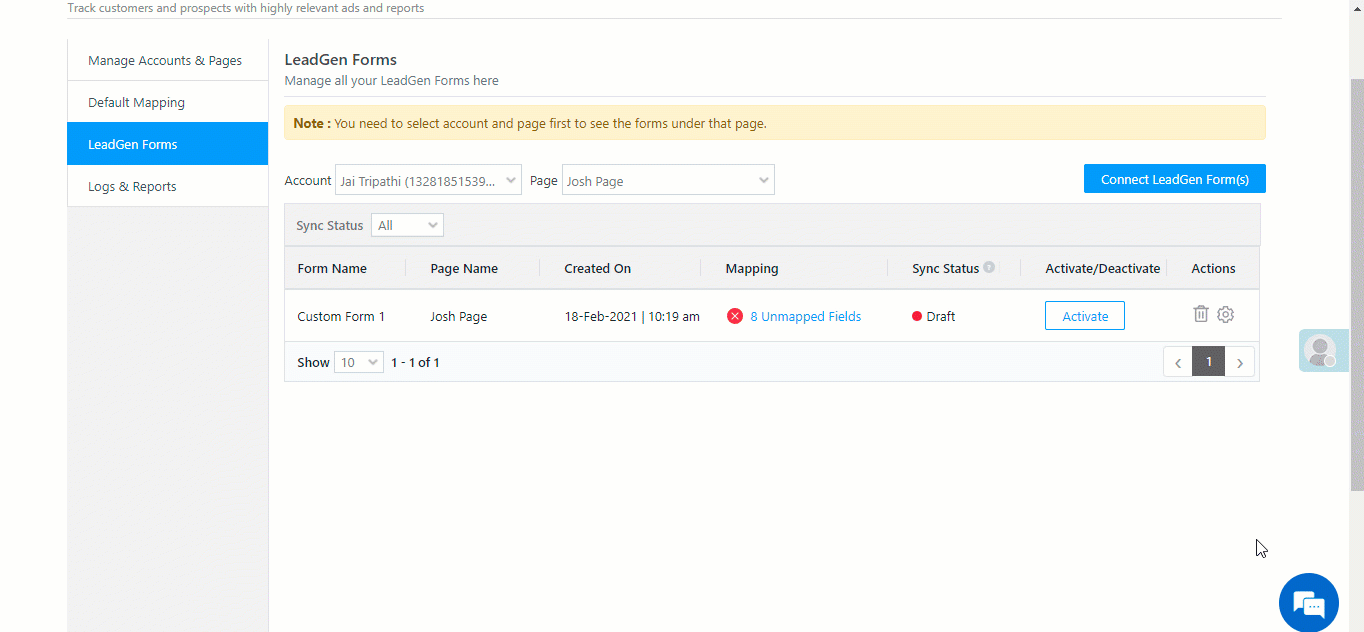
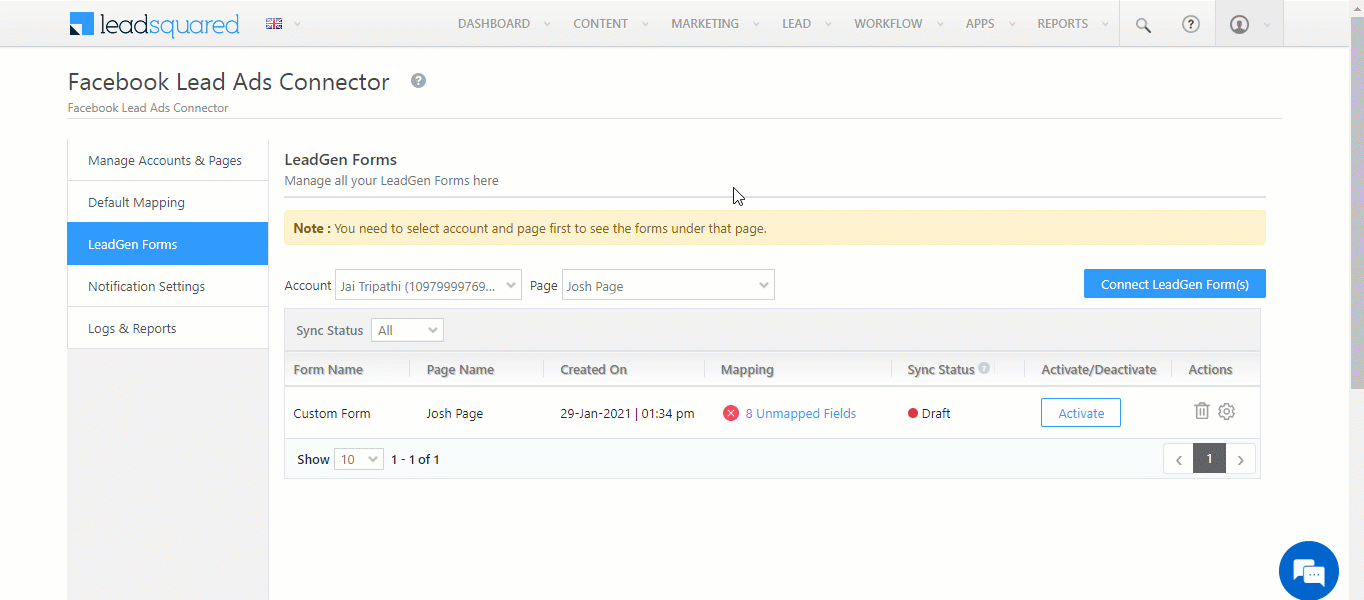
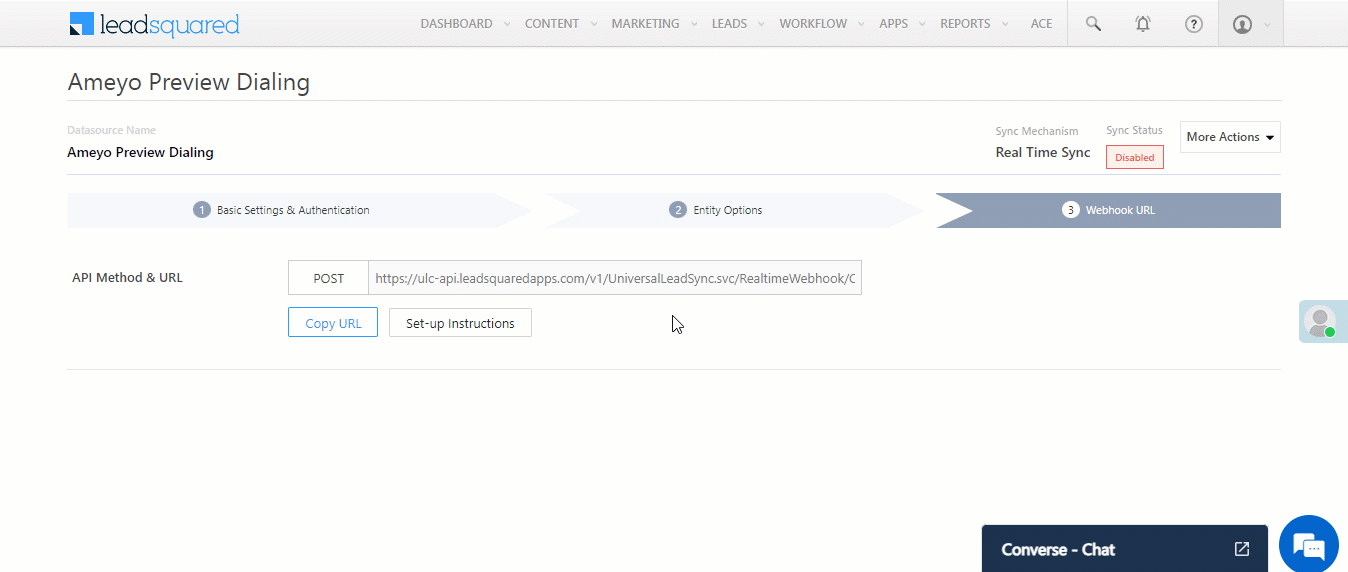
8. Connect LeadGen Form
To send lead data from Facebook to LeadSquared, you must link an active Facebook LeadGen form to LeadSquared. The field mapping you completed in the previous step will reflect here by default.
Note: An active form is a form that’s less than 90 days old. If the form is older than that, please create a duplicate form, and link that to LeadSquared.
- On the LeadGen Forms tab, click Connect LeadGen Form(s).
- On the Sync Active Forms pop-up, select the Account and Page that contains the form you’re looking to link.
- Against Created On, filter by the date range during which the form was created.
- Then, enter the form name in the Search Forms search box.
- Against the form you’re looking to connect, check the checkbox, and click Connect Forms.
- Your form is now synced to LeadSquared.
8.1 Activate Form – Questions
You must map custom LeadGen form fields (if they are present in the form) to the corresponding LeadSquared lead fields. To learn how to create custom lead fields in LeadSquared, see How to Create Custom Lead Fields.
- On the LeadGen Forms screen, click the Activate button.
- Alternatively, if there are unmapped fields that need to be mapped, then click the hyperlink under Mapping.
- On the Activate Form pop-up, on the Questions tab, if there are unmapped custom fields, map it to the corresponding LeadSquared lead field from the Lead Field(s) dropdown.
- To disable a Facebook form field, and not capture that data in the lead creation process, you can leave the lead fields blank, or you can disable the
 slider.
- Once you’re done, click Save Changes & Next.
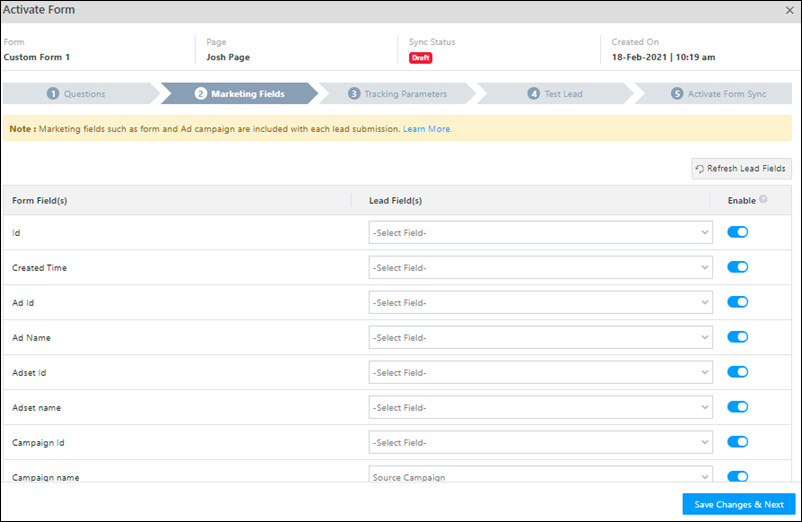
8.2 Activate Form – Marketing Fields
On this screen, you can choose to store the marketing data (Form Id, Campaign Id, etc.) present in the form’s Marketing Fields in your LeadSquared lead fields.
- Against the Form Field(s), from the Lead Fields dropdown, choose the lead field in which you want to store the marketing data.
- If you do not wish to store the data in your lead fields, you can leave the lead fields blank, or you can disable the slider.
- Once you’re done, click Save Changes & Next.
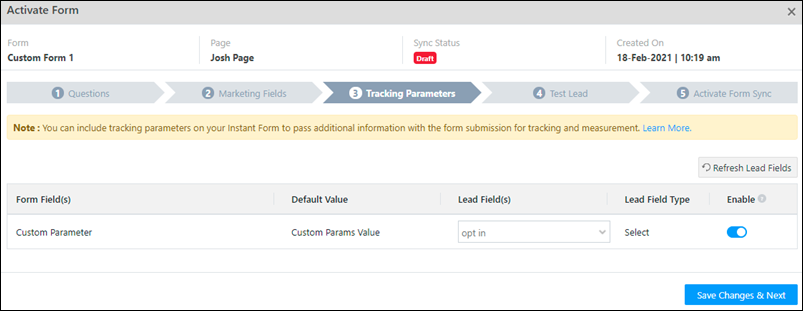
8.3 Activate Form – Tracking Parameters
If you’ve added tracking parameters to your Facebook form, those parameters will show up on this screen. You can choose to store the default tracking parameter value in a lead field. This will help you identify which leads have been created through the tracking parameter (source) that you have listed.
- Against the Default Value, from the Lead Fields dropdown, choose the lead field in which you want to store the tracking parameter data.
- If you do not wish to store the data in your lead fields, you can leave the lead fields blank, or you can disable the slider.
- Once you’re done, click Save Changes & Next.
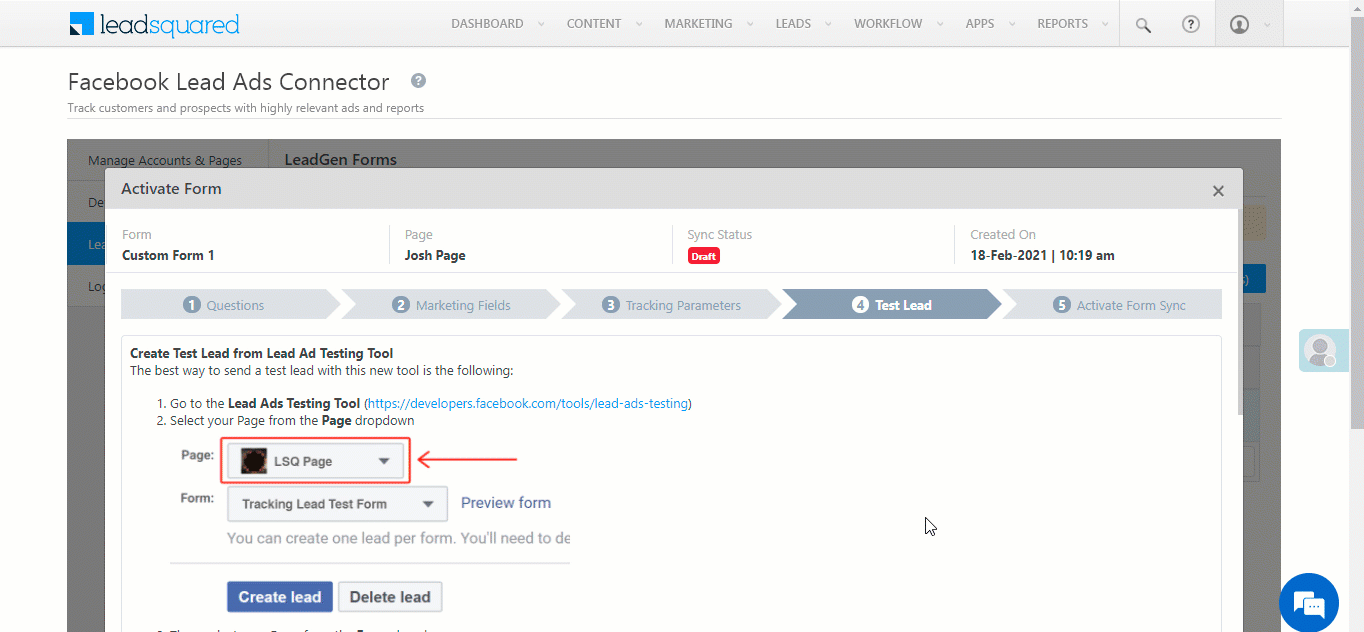
8.4 Test Lead
To create a test lead through Facebook, navigate to Lead Ads Testing Tool. To know more, please refer to Facebook Lead Ads Testing Tool.
Once you’ve created a test lead, to know if the test lead data is successfully pushed to LeadSquared –
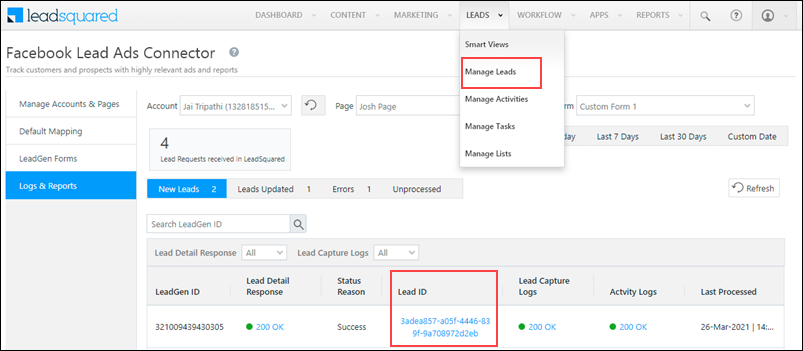
- On the Facebook Lead Ads Connector page, navigate to the Logs & Reports tab.
- Select the Account, Page and Form in which you created the test lead.
- Change the date range to Today. In a couple of minutes, you’ll then be able to view the test lead that was created.
- If the test lead you created has been successfully pushed to LeadSquared, you can view the details here.
- Then, go back to the Activate Form pop-up, and on the Test Lead tab, click Save Changes & Next.
Note: Once the test lead is visible on the
Logs & Reports tab, click the
Lead ID link, or navigate to the
Manage Leads page to confirm that the test lead and all the lead data has been successfully captured by LeadSquared.
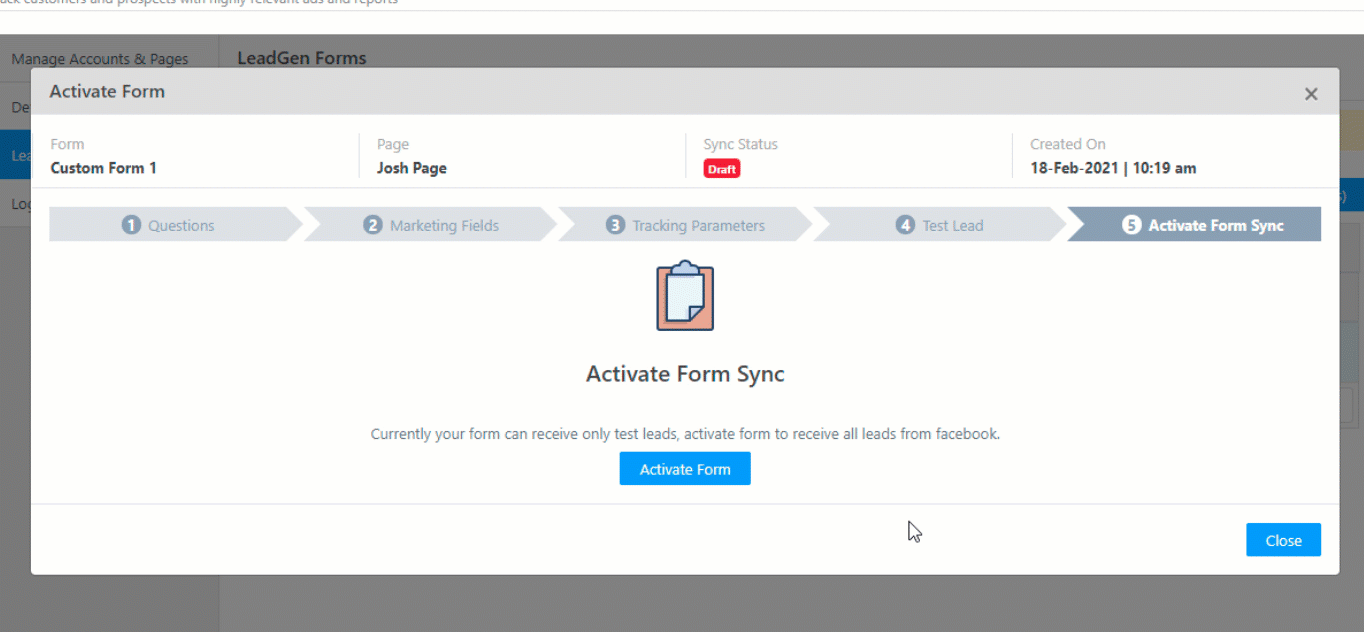
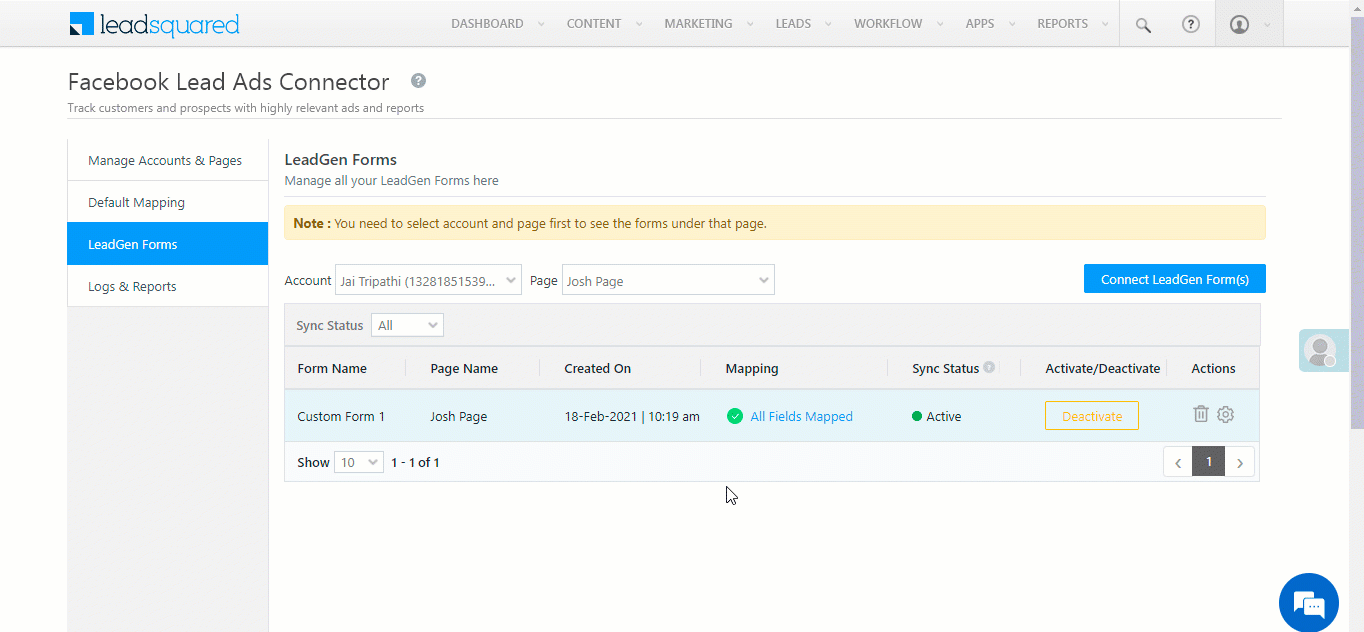
8.5 Activate Form Sync
Once you have created a test lead, and confirmed that the test lead is being pushed to LeadSquared, you must activate the form. To do this, click Activate Form. Once the form is activated, the Sync Status will change to Active.
Your form can now actively capture leads from Facebook, and send lead data to LeadSquared.
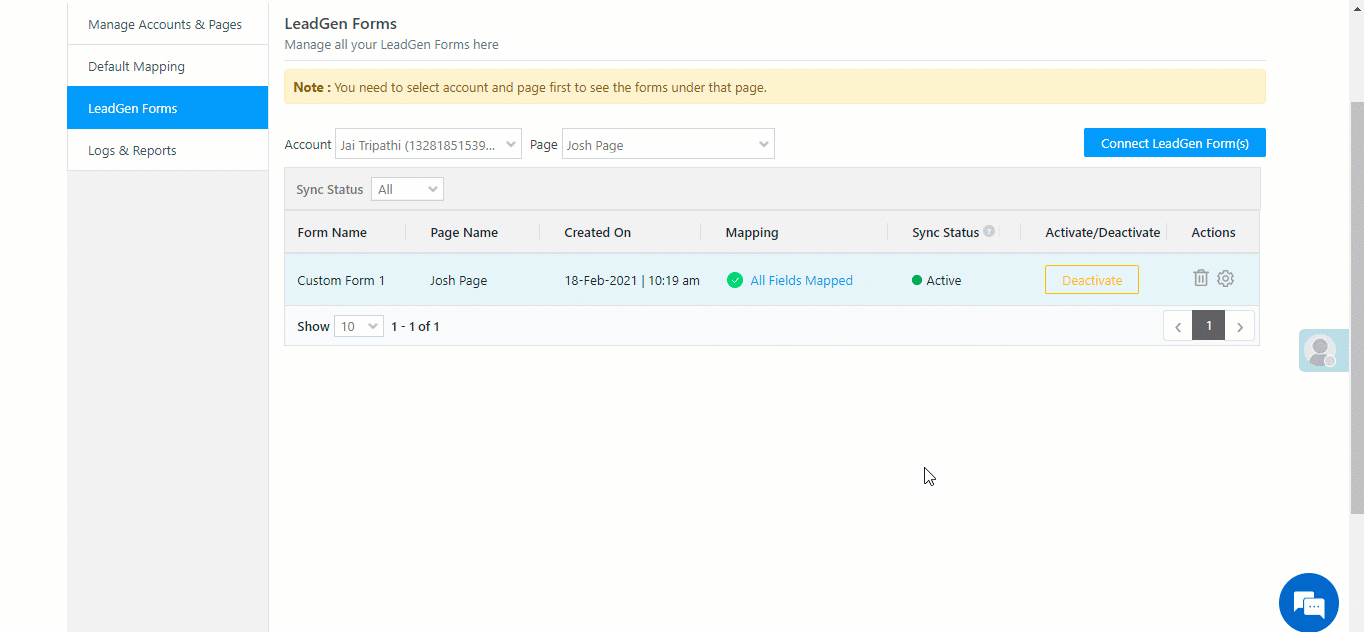
8.6 Additional Actions
You can perform the following additional actions on the LeadGen tab.
- To deactivate a LeadGen form but retain the form configuration, under Actions, click Deactivate.
- To delete a LeadGen form, under Actions, click the
 icon.
icon.
- To configure additional settings, under Actions, click
 . On the Additional Configuration pop-up, you can configure the following settings –
- Lead Source – Select the source you want to enter in the Lead Source lead field for all the leads generated through this form.
- Add lead to list – If you want to add all the leads generated through this form to a lead list, then select the lead list from the dropdown. To know more, see How to Create a Lead List.
- Search By – If required, set a primary search key (e.g., Email Address, Mobile Number, etc.) for all the leads generated through this form.
- Secondary Search By – If required, set a secondary search key for all the leads generated through this form. This is a fall-back option, for a situation where the primary search key value is not provided by the lead.
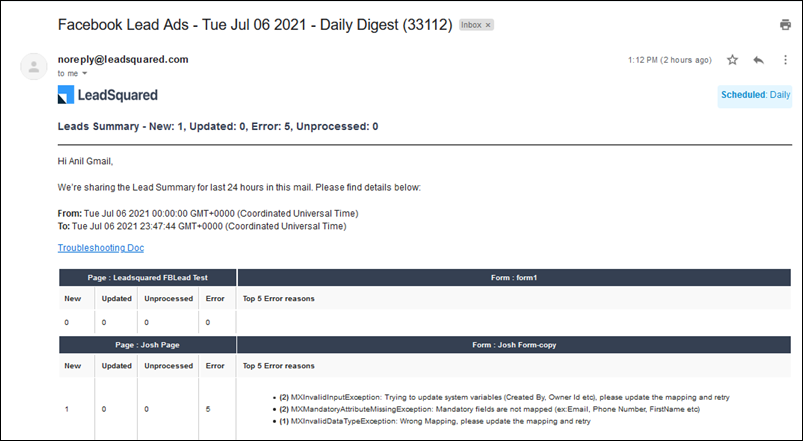
9. Notification Settings
There are various errors (e.g., “Failed to create activity”, “Invalid Phone Format”, etc.) you might encounter when using this connector, which may temporarily break the lead capture process. To fix these errors, please refer to the Errors section under Troubleshooting – Other Issues.
If required, these errors can be consolidated and emailed to you as a daily report. These reports will provide a view of all the errors captured across the Facebook forms linked to your pages. You can add up to 10 LeadSquared users to receive the error reports.
To receive these reports –
- Navigate to the Notification Settings tab, and enable the
 slider.
- From the Select Recipients dropdown, add the list of LeadSquared users who can receive the reports.
- These reports will be sent to the email Ids configured in your LeadSquared accounts.
- Then, select the time you want to receive these reports. The errors captured over the past 24-hours (00:00-23:59 GMT) will be sent at the time you have selected.
- Once you’re done, please click Save & Next.
Note: Once configured, you will begin receiving email reports from the next day, at the selected time.
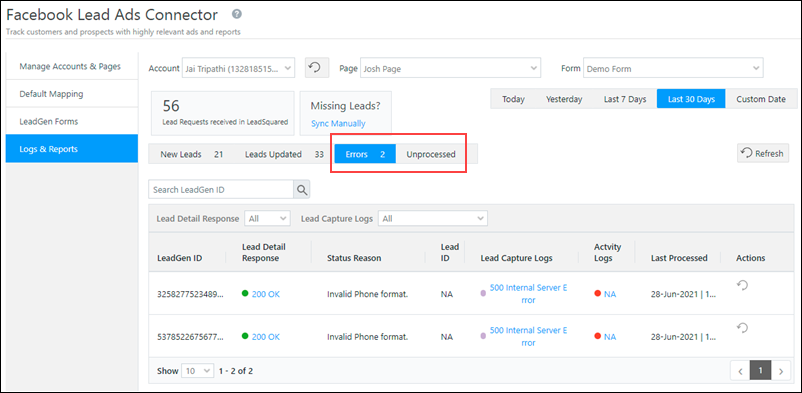
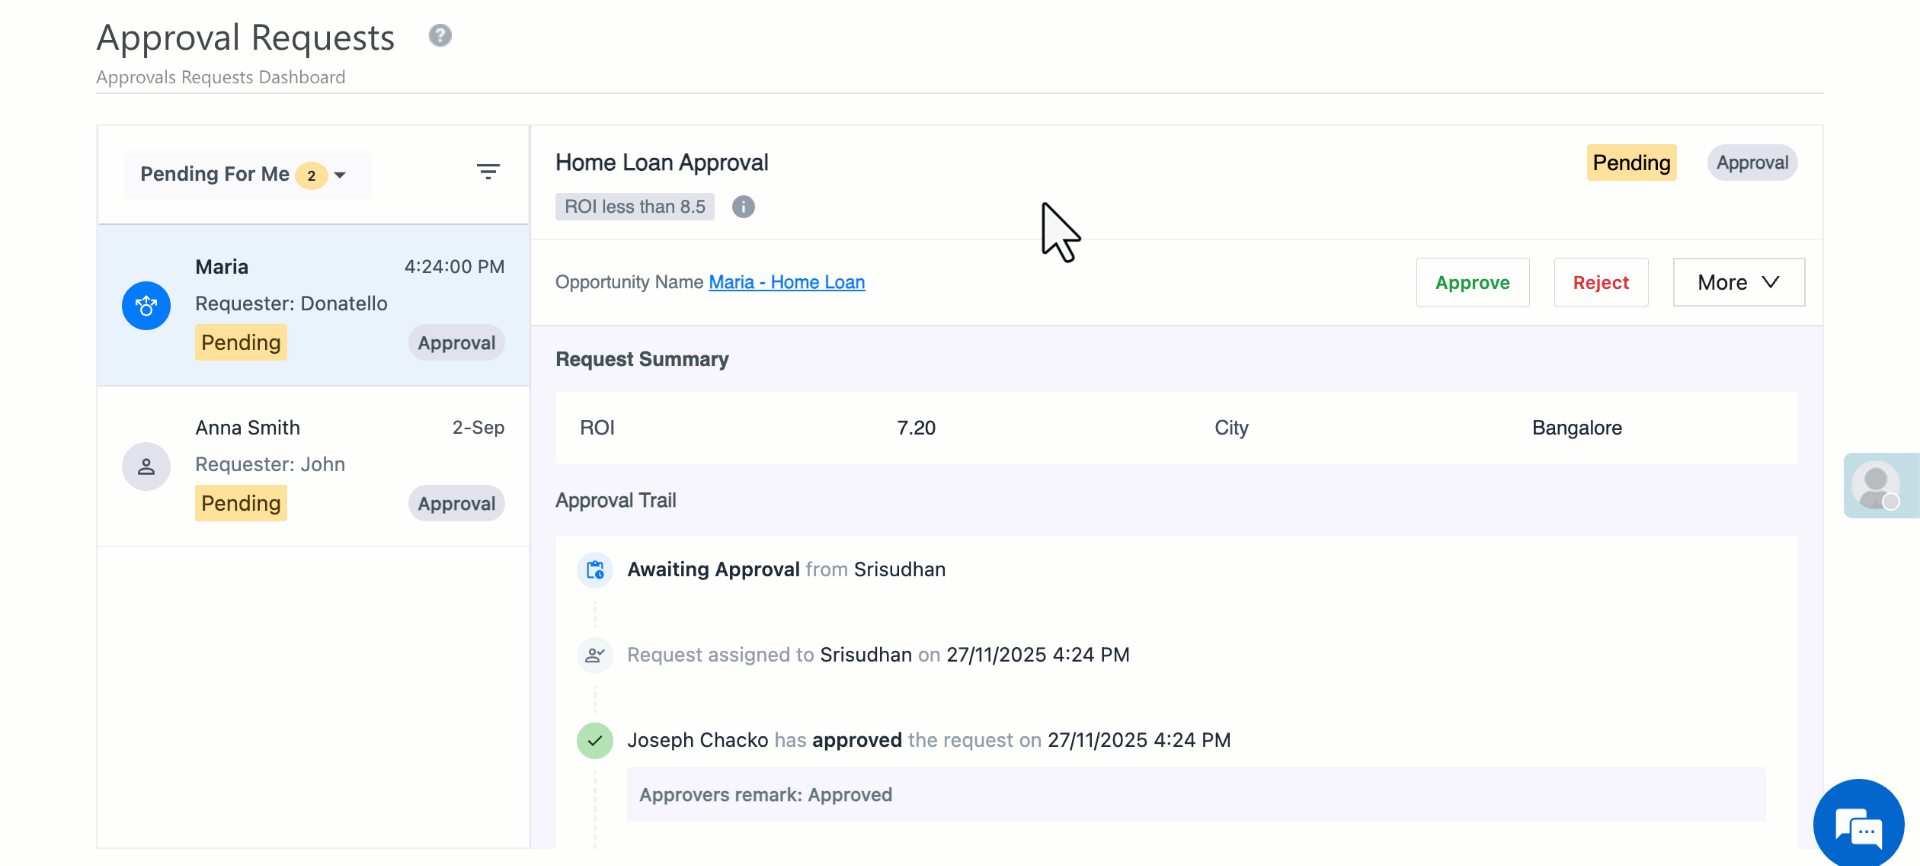
10. Logs & Reports
10.1 View Logs
Here, you can view the lead request logs received by LeadSquared for new leads, updated leads, lead capture error, and unprocessed leads, for each LeadGen form. Select the Account, Page and Form for which you want to view the logs. On these screens, you can filter logs by date range, Lead Detail Response and Lead Capture Logs. You can also search for a lead using the LeadGen ID.
- New Leads – All the new leads that have been pushed to LeadSquared.
- Leads Updated – Existing leads’ whose lead details have been updated through this Facebook form.
- Errors – Leads that haven’t been pushed to LeadSquared, because of an error during lead capture. The reason for this error is listed under Status Reason. Once the error is rectified, to capture the lead details, under Actions, click the
 icon.
icon.
- Unprocessed – Certain leads remain unprocessed due to the Facebook Business account being inactive, or due to permissions-related issues. Once you’ve rectified these errors, click Process Leads Now. This will process all the leads in bulk. You can perform this action only once every 24-hours.
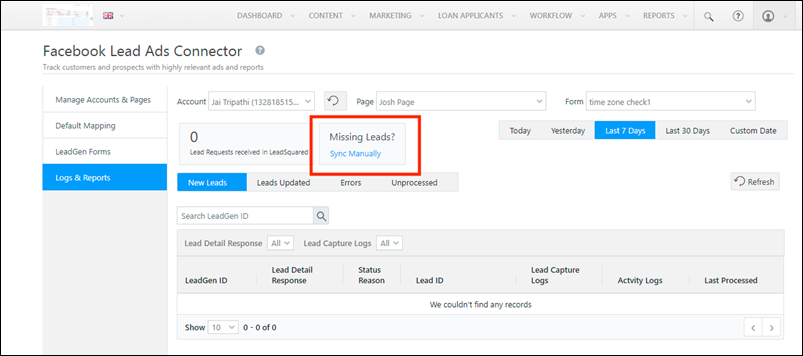
10.2 Sync Missing Leads
In instances when lead data is not pushed from Facebook to LeadSquared (for e.g., when updated Facebook T&C has not been accepted, when the annual Data Use Checkup developer policies are not accepted, when Facebook servers are down, when the API is broken, etc.), you can manually fetch the data once all the issues are rectified and all the policies are accepted. This will capture and sync the lead data to specific lead fields within LeadSquared. To do this –
- Navigate to the Logs & Reports section.
- Select the Account, Page and Form within which leads have not been synced.
- Click the Sync Manually button.
- On the Sync Missing Lead(s) pop-up, enter the date range for which leads have not been synced. The date range must not exceed the last seven days.
- Once you’ve selected the date range, click Sync. Missed lead data from Facebook will be synced to the relevant lead fields in LeadSquared.
Note:
- Manual sync cannot be performed at the account level. It can only be performed on the form level, so please select a form in order to carry out a manual sync.
- If you want to sync missed leads for a date range that exceeds the last seven days, please reach out to your account manager, or write to support@leadsquared.com.
11. Troubleshooting
Facebook Lead Sync Fails Due to Terms and Conditions
- Issue: Leads are not syncing from Facebook because of terms and conditions not being accepted.
- Root Cause: The same Facebook Ad Account is authenticated by multiple users, but only one accepted Facebook’s Terms and Conditions.
- What You Need to Know:
- Only the user who accepted the Facebook Lead Ads Terms and Conditions can push leads.
- If another user re-authenticates the same Ad Account without accepting the terms, lead sync will fail.
- All users linked to the Ad Account must accept the terms to avoid sync issues.
- Avoid re-authenticating the same Ad Account with multiple users unnecessarily.
- Once authenticated, other LSQ users can sync audiences under the account without needing to re-authenticate.
Tip: Always verify that the authenticating user has accepted the terms at Facebook’s Terms Page.
2. Full Control Permissions
When connecting your Facebook Business Account, you must ensure all permissions are granted, or you may get one of the following errors –
- On the Manage Accounts & Pages tab, the Subscription Status will show as Failed. This means that leads won’t be pushed to LeadSquared.
- If a user tries to send a test lead using the Facebook Ad Page link, the ad page won’t be available.
To rectify these errors, and to grant the Manage Page Permission –
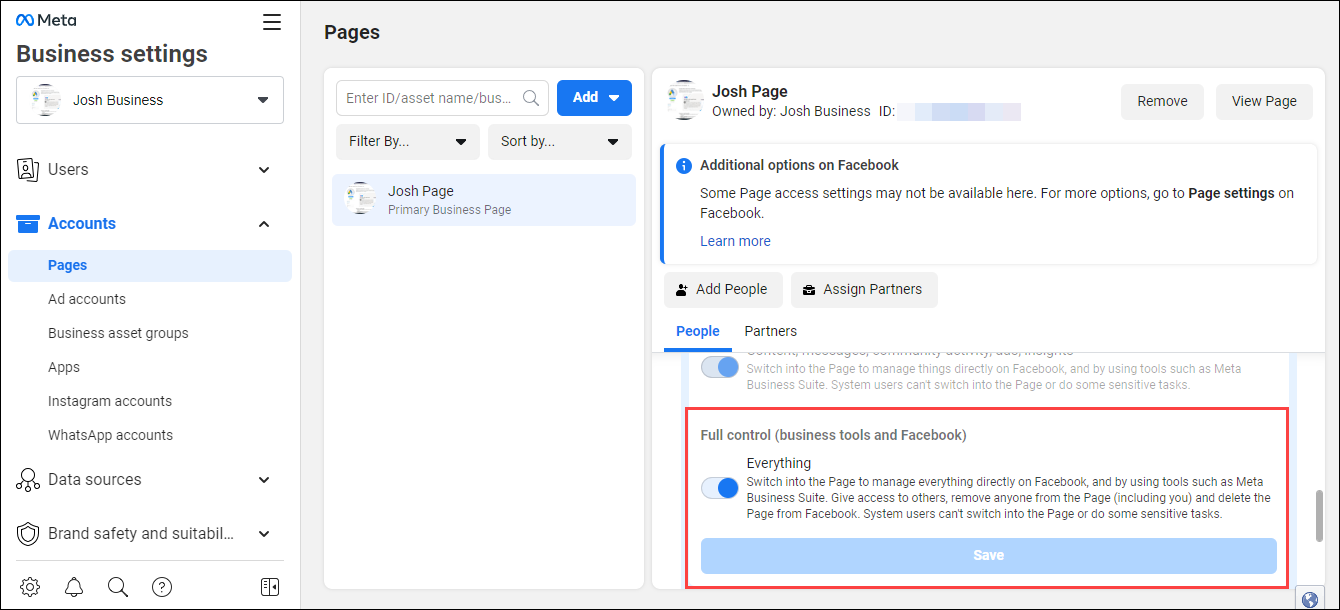
1.1 Verify if Users have Manage Page Permission
- On your Facebook Business Account page, from the left-panel, click Settings, and then click Business settings.
- On the Business settings screen, under Accounts, click Pages.
- Under Pages, select the page that you have added to LeadSquared.
- Then, click on the user profile for which you want to check if permissions are granted, and scroll down to Full control.
- Against Everything, ensure the
 slider is enabled.
1.2 Grant Manage Page Permissions to Users
If the Full Control permissions are not enabled for a user –
- On your Facebook Business Account page, from the left-panel, click Settings, and then click Business settings.
- On the Business settings screen, under Users, click People.
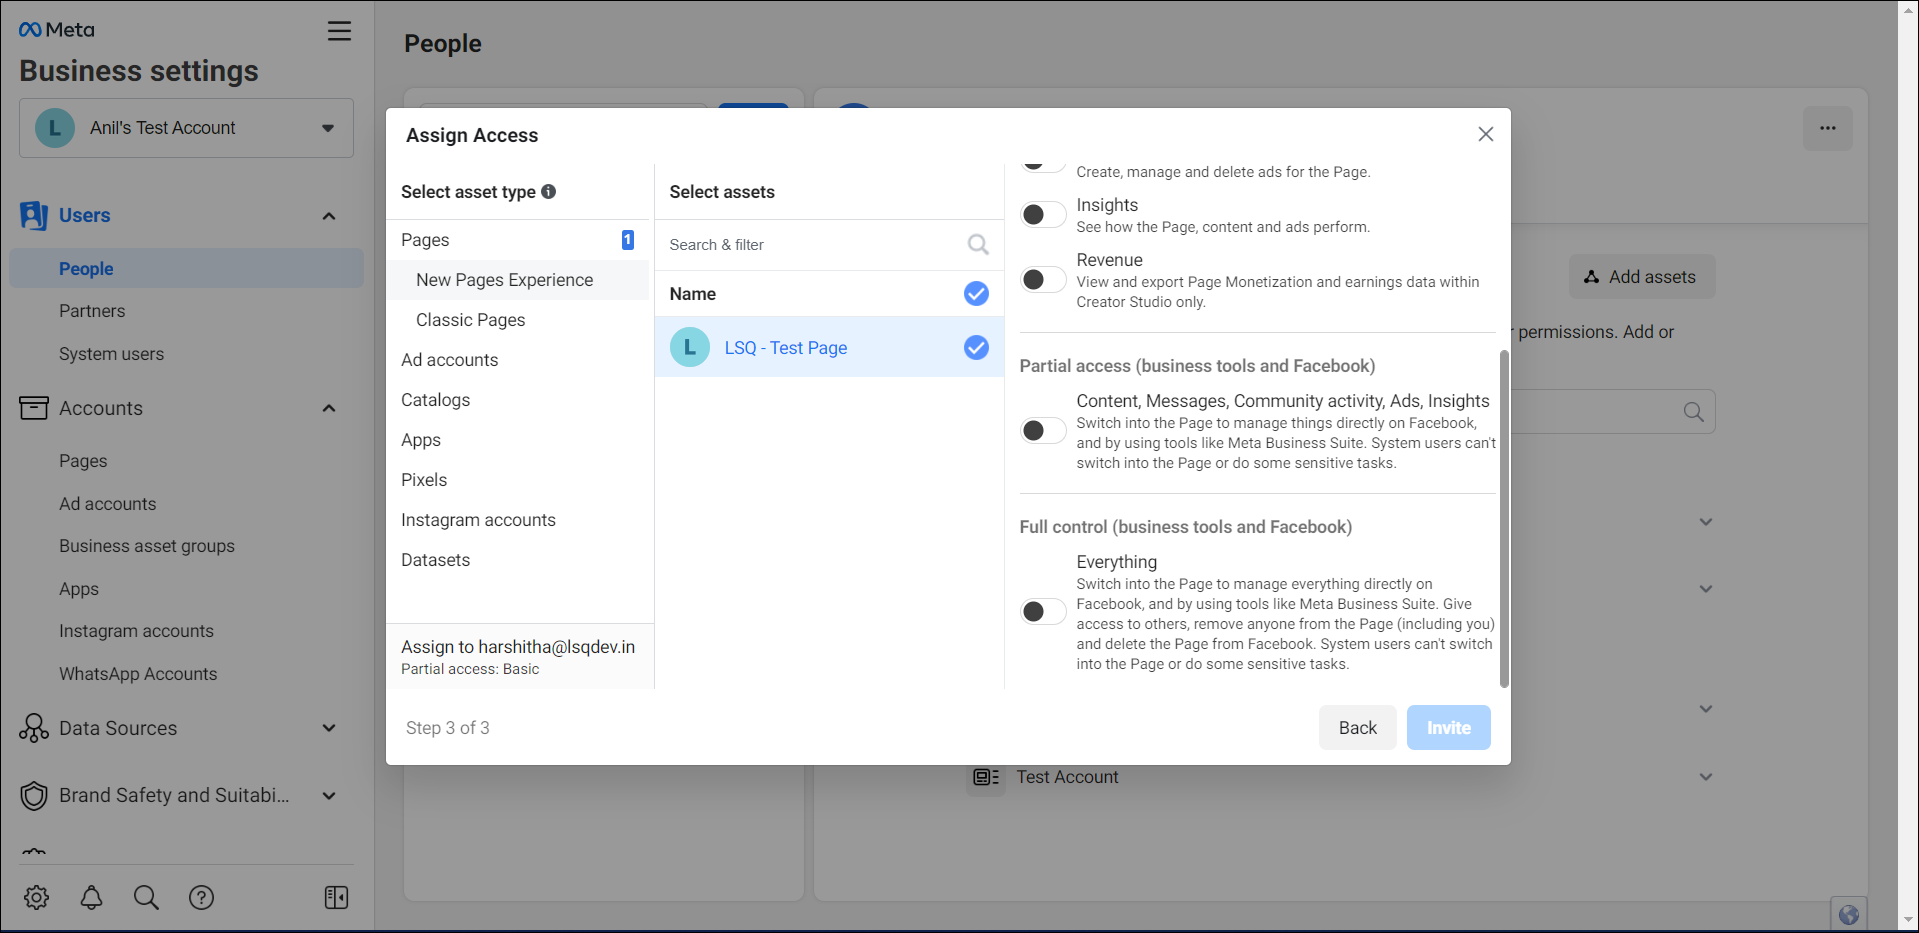
- Under People, in the search box, click Add, and on the Invite People pop-up, enter the email address of the users you want to grant the permissions to.
- Then, on the Assign Access pop-up, select the page for which you want to grant the Manage Page permission, and click Invite.
- Once the user accepts the invitation they have received, they’ll have access to the page.
2. Lead Access Permission
If the Lead Access setting is not enabled, your lead transfer will not get processed in LeadSquared. Under Logs & Reports, you will get a “100 Bad Request error”, and the leads will reflect as Unprocessed. To rectify this error, you must grant Lead Access permission.
- On your Facebook Business Account page, from the left-panel, click Settings, and then click Business settings.
- On the Business settings screen, under Integrations, click Lead Access.
- Select the page you have added to LeadSquared.
- On the page tab, under People, click the Assign People button.
- On the Add People and set permissions pop-up, select the users to whom you want to grant Lead Access permission.
- Once you’ve selected the users, click Assign. Your users can now access your leads’ information.

3. Assigned CRM Set-Up
If the Assign CRM setting is not enabled, you will not receive lead data, or existing lead updates, in real-time. To enable this setting –
- On your Facebook Business Account page, from the left-panel, click Settings, and then click Business settings.
- On the Business settings screen, under Integrations, click Lead Access.
- Select the page you have added to LeadSquared.
- On the page tab, under CRMs, click the Assign CRM button.
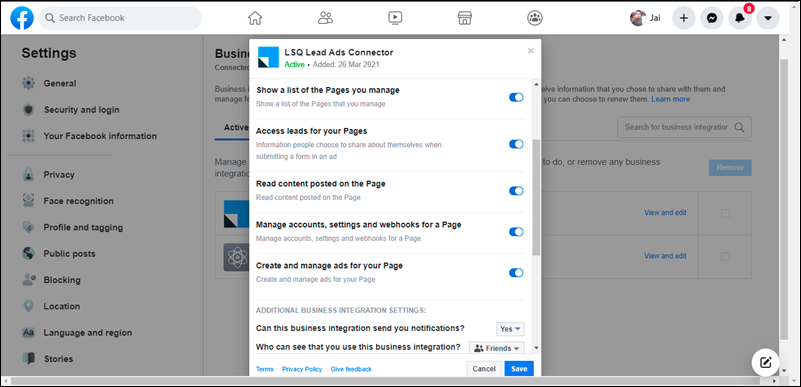
- Ensure that the LSQ Lead Ads Connector app is listed under Apps. If it’s not listed, then please authenticate the connector again on LeadSquared.
- On the Add CRMs and set permissions pop-up, you will see a list of all the CRMs that are connected to your Facebook Page, along with LSQ Lead Ads Connector.
- Against LSQ Lead Ads Connector, click the checkbox, and then click Assign.
4. App Permissions
When connecting your Facebook Business Account to LeadSquared, if any of the following permissions were not enabled (in step 5. Connect Ad Accounts), then lead data transfer will not take place successfully –
- Show a list of the Pages you manage
- Access leads for your Pages
- Read content posted on the Page
- Manage accounts, settings and webhooks for a Page
- Create and manage ads for your Page
To enable seamless lead transfer, you must re-authenticate the account in Facebook Lead Ads Connector by providing all the permissions. To do this –
- Log in to your Facebook account, and navigate to Settings & Privacy>Settings.
- From the left-panel, click Business Integration.
- Then, select the LSQ Lead Ads Connector, and click View and Edit to enable the permissions.
- Once you’re done, click Save.
5. Other Issues
Apart from the ones listed above, you might encounter other issues when working on this connector. These issues will be listed on the Logs & Reports tab, under the Errors section or the Unprocessed section.
Under the Errors section, the following issues are listed –
| Errors |
Resolutions |
| Either form is inactive or not saved |
- Please navigate to Facebook/Instagram Lead Ads>LeadGen Forms.
- Select your Account and Page from the respective dropdowns.
- Then, for the form that’s saved as a Draft, click the Activate button.
- Once the form is in the Active state, navigate to Logs & Reports>Errors, and click the Refresh button. The form will now start capturing leads.
|
| Failed to create activity |
The activity will be created only when the Facebook Lead Ads Submission activity type is Active. To ensure this –
- Please navigate to My Profile>Settings>Leads>Custom Activities & Scores.
- From the Show dropdown, filter by Inactive.
- Against the Facebook Lead Ads Submissions activity, click the
 icon. The activity is now Active. icon. The activity is now Active.
- Once this is rectified, navigate to Logs & Reports>Errors, and click the button.
|
| Attribute “CreatedOn” is ReadOnly. Cannot update the attribute. |
A read-only LeadSquared field cannot be updated with any other value. Please select a different field on the Default Mapping tab, as well as on the LeadGen Forms mapping tab.
Once this is rectified, navigate to Logs & Reports>Errors, and click the button. |
| Invalid Phone Format |
Invalid phone format received, no action required from your end. |
| Invalid Data |
Invalid data sent from Facebook. Please check the Logs & Reports tab for more details. |
| Phone number should be of at least 7 digits |
Invalid phone format received, no action required from your end. |
| Attribute “ProspectActivityDate_Min” cannot be updated |
Default and LeadGen Form mapping is not allowed with system fields. Please select a custom field, and map it to either form.
Once this is rectified, navigate to Logs & Reports>Errors, and click the button. |
| Invalid Owner Id |
Default and LeadGen Form mapping is not allowed with system fields. Please select a custom field, and map it to the form.
Once this is rectified, navigate to Logs & Reports>Errors, and click the button. |
| A Lead with the same email Id/phone number already exists |
Duplicate lead received, no action required. |
| Either of FirstName, LastName, EmailAddress, Phone, Mobile, TwitterId, FacebookId, LinkedInId, SkypeId, GTalkId, GooglePlusId is required. Cannot create Lead |
A primary lead identifier is missing. Please ensure that at least one lead identifier is mapped to the Default and/or the LeadGen Form.
Once this is rectified, navigate to Logs & Reports>Errors, and click the button. |
| There was an error processing the request. Please contact administrator. |
Please navigate to Logs & Reports>Errors, and retry the lead capture process. |
| 503 Service Unavailable |
Please navigate to Logs & Reports>Errors, and retry the lead capture process. |
Under the Unprocessed section, the following issues are listed –
| Unprocessed Reasons |
Resolution |
| Error validating access token: The session has been invalidated because the user changed their password or Facebook has changed the session for security reasons. |
Facebook Authentication has either expired or is missing. Please authenticate the Facebook Ad account that’s linked to your LeadSquared account, and ensure that the required permissions (Manage Leads, CRM Access, Lead Access, etc.), are intact. To know how to rectify this, please refer to the Troubleshooting steps listed above.
Once this is rectified, navigate to Logs & Reports>Unprocessed, and click the button. |
| Unsupported get request. Object with ID ‘771XXXXXXX0’ does not exist, cannot be loaded due to missing permissions, or does not support this operation. |
Facebook Authentication has either expired or is missing. Please authenticate the Facebook Ad account that’s linked to your LeadSquared account, and ensure that the required permissions (Manage Leads, CRM Access, Lead Access, etc.), are intact. To know how to rectify this, please refer to the Troubleshooting steps listed above.
Once this is rectified, navigate to Logs & Reports>Unprocessed, and click the button. |
| The user must be an administrator, editor, or moderator of the page in order to impersonate it. If the page business requires Two Factor Authentication, the user also needs to enable Two Factor Authentication. |
Please ensure that the user connected to this page has admin access. You can grant admin access from your Facebook account, by navigating to Page Settings.
Once this is rectified, navigate to Logs & Reports>Unprocessed, and click the button. |
12. FAQs
1. If you’ve changed your Facebook account’s password, what should you do on this connector?
Users who’ve changed their passwords must reconnect their Facebook account, along with all the pages to this connector. Until this is done, the connector will stop working as intended.
2. If you’re unable to see all the lead details on this connector, what can you do to fix it?
One of the reasons could be that you don’t have Admin access to the Facebook account, or the page you’ve connected to the connector. To know more, refer to Information included when you download your leads and Ad account permissions by role.
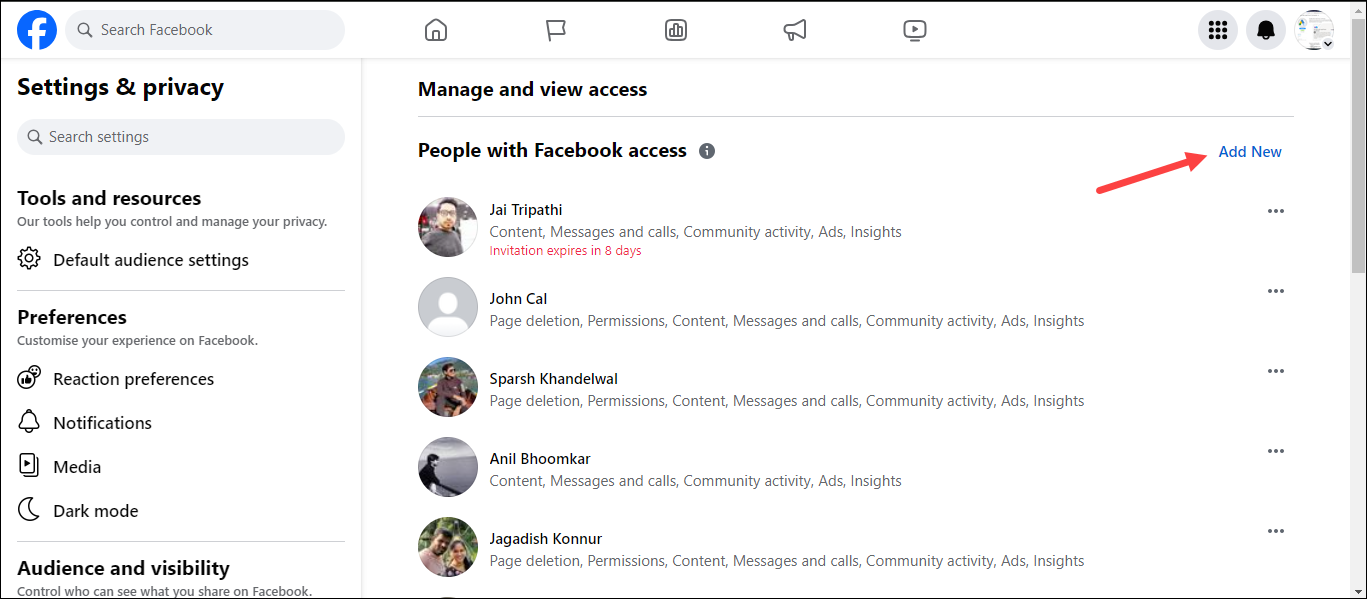
3. Why aren’t my users’ pages getting listed in the connector?
After a user’s page is migrated to the New Pages experience in Meta, to ensure their pages are listed in the connector, the user must be listed under Manage>Professional Dashboard>Your Tools>Page access>People with Facebook access. This can be verified at https://www.facebook.com/
When the user’s name is not available under People with Facebook access, the Page will not be listed in the connector. Suppose a user (e.g., John) isn’t listed under People with Facebook access, any other user (e.g., Paul) that’s listed on this page must log in to their (Paul’s) Facebook account (https://www.facebook.com/), and navigate to Page Access, and over here, they should add and grant full access to the user (John).
Then, the user (John) will get an invite notification, to access the page, on their Facebook account. They must click on the notification, and then click Review Invitation. Once they Accept the invite, they’ll have access to the page.
Once they accept it, they’ll (John) need to navigate to New Page experience>Page access>People with Facebook access, and verify if they have access to the page. Once they have access, the issue is resolved. In case none of the users in your organization are listed under the People with Facebook access, as an Admin, you can give full page access to any of the users in your organization. Then, follow the steps listed above to give them access to the page. To know more, refer to About the new Pages experience on Facebook.
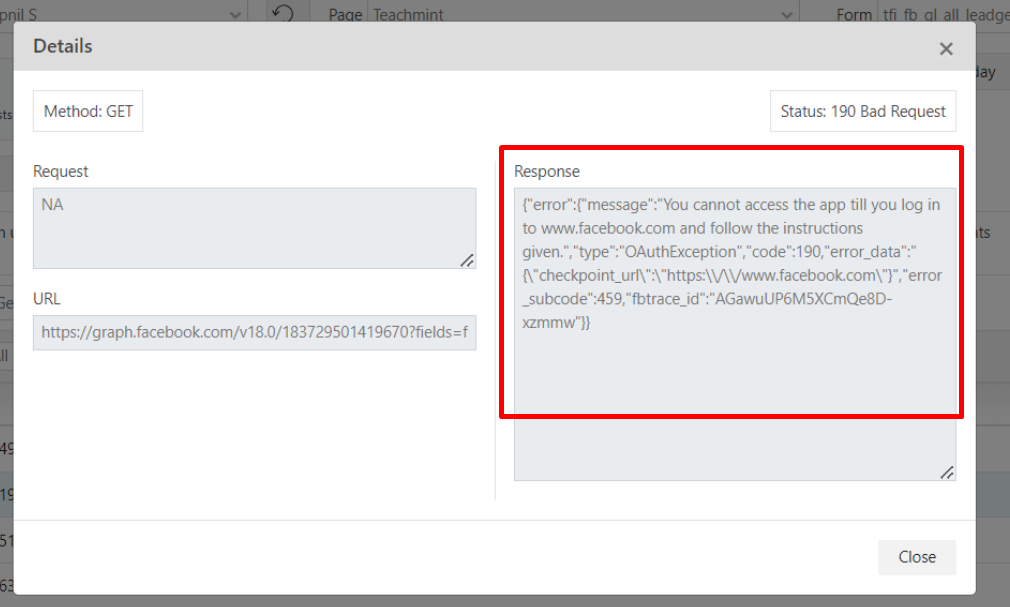
4. Status: 190 Bad Request
- Issue: Leads from Facebook Lead Ads are not being pushed to LeadSquared, and users are seeing a “190 Bad Request” error, with the following error message “You cannot access the app till you log in to www.facebook.com and follow instructions given.”
- Cause: This issue occurs due to security checkpoints at Meta’s (Facebook’s) end, which may result in the user’s account being temporarily locked. This can prevent successful lead push from Facebook Lead Ads to LeadSquared.
- Solution: To resolve this issue, the user must reach out to Meta’s support team to get their account unblocked. Once the account is unblocked, the leads should start flowing into LeadSquared again, resolving the Bad Request error and allowing for successful processing of unprocessed leads.
Any Questions?
Did you find this article helpful? Please let us know any feedback you may have in the comments section below. We’d love to hear from you and help you out!


 .
.