LeadSquared Google AdWords Data Sync App

1. Feature Overview

This app captures all your Leads’ sources and clicks from your Google Adwords account. Using this app, all ad submission data such as keywords, campaign details, ad network details and so on are available in your Lead Details window as an Activity.


2. Prerequisites

  • You should have a Google AdWords account
  • This connector is only available on marketing plans, not on sales plans.
  • You must be logged into your LeadSquared account
  • You must be an administrator user of your LeadSquared account


3. Procedure

3.1 Installation

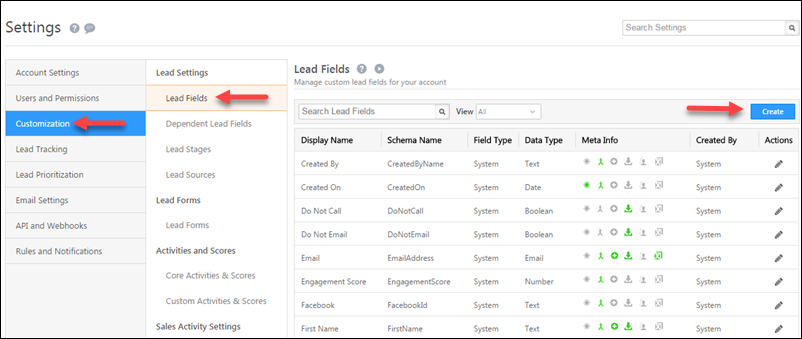
  1. From your default LeadSquared dashboard, go to Apps>Apps MarketPlace.

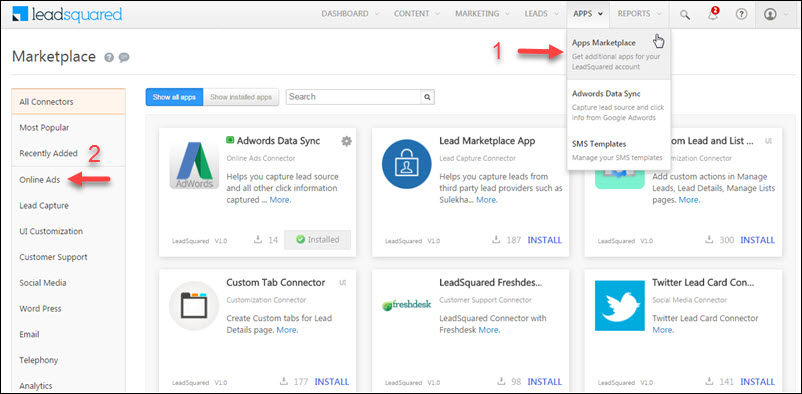
ii. All Connectors>Online Ads and select Adwords Data Sync

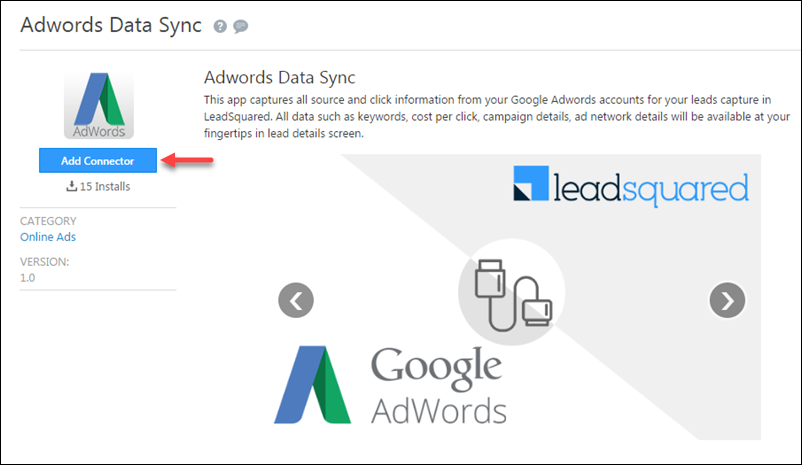
iii. Click Add Connector. The LeadSquared Google AdWords Sync App is now installed.


3.2 Configuration

The settings feature appears in the AdWords Data Sync window once the installation is complete. You now need to configure the settings of your LeadSquared Google AdWords account. To do this –

  1. Under Settings, click ConfigureThe Configure Adwords Data Sync pop-up box appears.
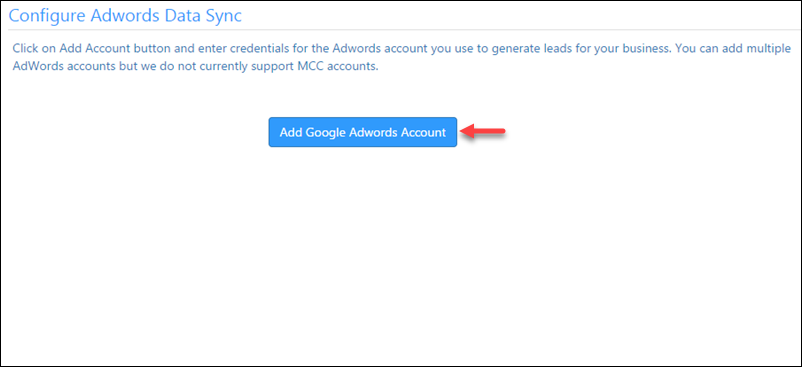
ii. Click Add Account

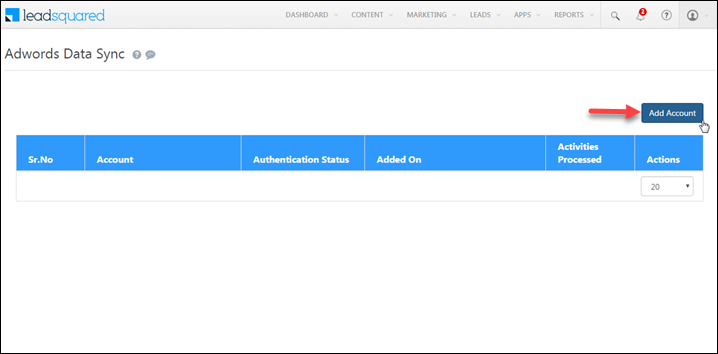
This window allows you to link your Google AdWords account to your LeadSquared account to capture the details. It lets you manage and gives an overview of the AdWords accounts connected to Leadsquared

To link your Google AdWords account to LeadSquared –

  1. Click Add AccountA pop-up box requesting to select the required Google account appears.

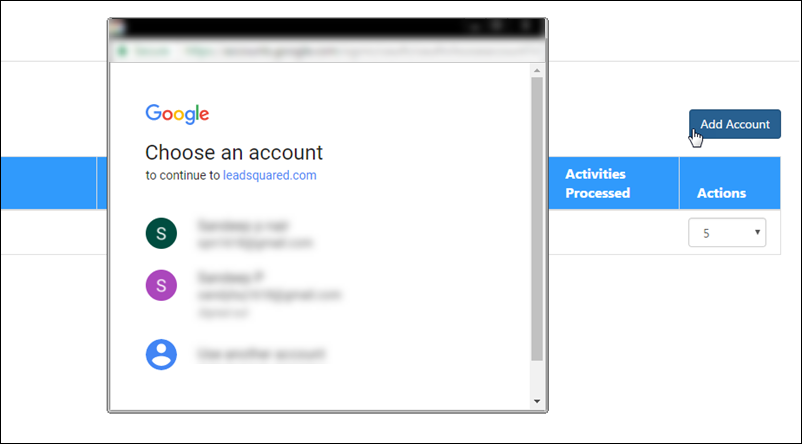
ii. Select the required Google account to which you have Google Adwords enabled.

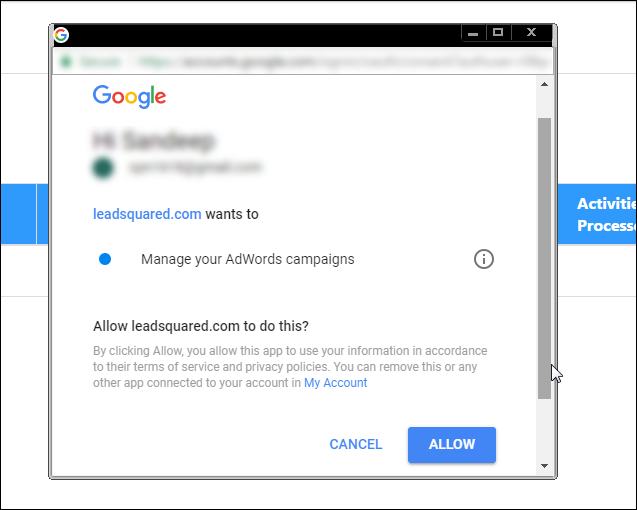
iii. Click Allow. Your Google AdWords is added successfully with the message highlighted in the image below –

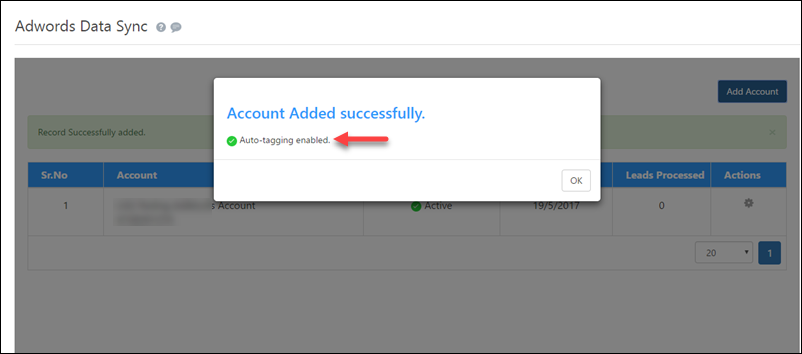
iv. You can see that the account is added with Auto-tagging enabled. This message appears only if the Auto-tagging feature is enabled from your Google AdWords account.

If you try to add an account which does not have the Auto-tagging feature is enabled from your Google AdWords account, the following message appears which allows you to enable Auto-tagging.

v. Select Enable Auto-tagging to proceed. For more information, refer to Auto-tagging.

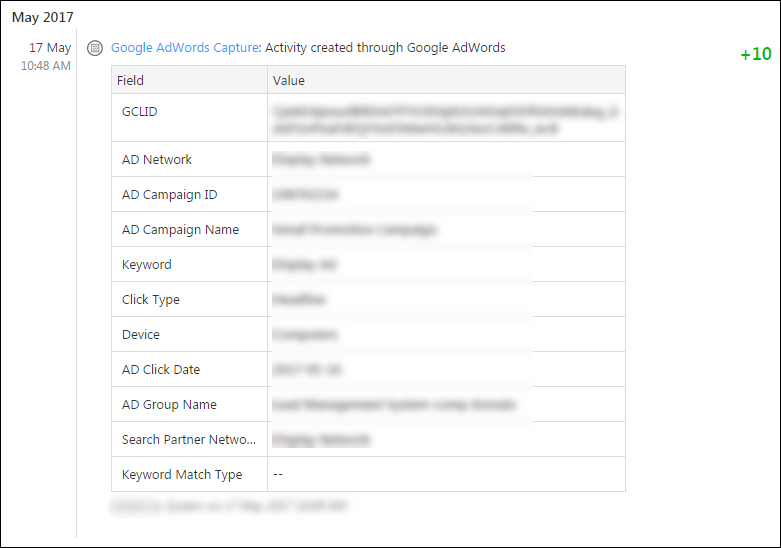
Once the connector has been configured, a custom activity Google AdWords capture is created on the account. All click interaction data captured by AdWords is posted under this activity header to the lead.

Note – The activities are updated once every 24 hours.


3.3 Add Multiple Accounts?

  • Once you add a Google account linked to your LeadSquared Google AdWords Sync App, the credentials of that particular google account are saved.
  • When you try to add another Google account, the previous account credentials are used and you would not be able to add your account.

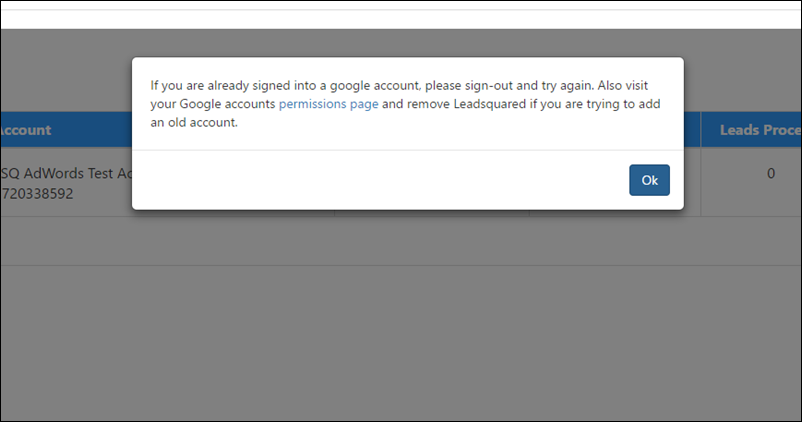
  • In order to avoid this, you need to logout from your Google account before you add another Google account.
  • If you want to add an account which was previously used, then go to your Google accounts permission page and remove LeadSquared from the connected Apps.

Note – In order to avoid the above scenario, it is always advisable to add Google accounts to your LeadSquared Google AdWords Data Sync App in incognito browser mode.


Any Questions?

Did you find this article helpful? Please let us know any feedback you may have in the comments section below. We’d love to hear from you and help you out!


How to Create a Multi Select Dropdown Field?

1. Feature Overview

A Multi-select dropdown is a feature that allows you to select multiple options in a dropdown list. E.g., a college can have Courses as a multi-select dropdown type lead field. This allows applicants to apply for multiple courses.

Note: To create a regular dropdown field, see How to create a Dropdown type Lead Field.


2. Prerequisite

You must be an Admin User of your LeadSquared account.


3. Create Multi-select Dropdown Field

  1. Navigate to Settings>Leads>Lead Fields.
  2. Click Create and enter the relevant lead field details.
  3. Click the Data Input Type dropdown and select Multi-select Dropdown.
  4. Enter the values for the dropdown and click Save.

LeadSquared - Create Multi-select Dropdown


4. Next Steps

Once you create these Multi-select dropdowns, you can add them to your Default or Dynamic lead forms. Dynamic Forms are a better alternative if you wish to create large forms using lead, activity and task fields. To know more about creating a Form, check How to Create a Form and Lead Form Customization. You can also view these dropdowns in the Advanced Search feature.


5. Any Questions?

Did you find this article helpful? Please let us know any feedback you may have in the comments section below. We’d love to hear from you and help you out!

Restrict User Access to LeadSquared Using IP Whitelisting

1. Feature Overview

IP whitelisting is a security enhancement feature that enables you to regulate and limit LeadSquared product and LeadSquared APIs access only to trusted users. By whitelisting user IP addresses, you’ll be creating a list of trusted and secure IP addresses from which your users will be able to access their LeadSquared accounts.

Additionally, you can also create and add a list of IP addresses of your users who are authorized to pass LeadSquared APIs.

Note:

  • This feature is only supported on the LeadSquared web app.
  • Logins through suspect IPs (tors/anonymous proxies) are automatically disabled.
  • You cannot also whitelist IP addresses only for specific users in your organization. IP whitelisting can only be carried out at the account level.


2. Prerequisite

To set up IP Whitelisting, you must be an Administrator user of your LeadSquared account.


3. IP Whitelist for LeadSquared Login

To add a list of users who are authorized to log in to their accounts through the LeadSquared web app –

  1. Navigate to My Profile>Settings>Users and Permissions>Restriction using IP Whitelisting.
  2. On the bottom-right of your screen, click the Add IP Addresses button.
  3. On the Add new IP to whitelist pop-up, enter the following details –
    • Type – Select the IP method you want to follow when adding your users’ IPs. You can either select IP Address or CIDR/IP.
    • IP – Enter the list of user IPs you want to whitelist. If you’ve chosen the method as IP Address, then you can add multiple IP addresses at one go. Ensure each IP address is separated by a comma. For example, if the IP addresses 69.89.31.226  and 98.139.180.149 is added to the IP whitelist, only users using these IP addresses will be able to access your LeadSquared account through the web app. All other IP addresses are blocked from accessing LeadSquared.
    • Description – Enter a description for the list of IPs (e.g., Bangalore Users, Admin Users, etc.). This step is optional.
  4. Alongside Enable IP Restriction, click Yes*.
  5. Once you’re done, click Save. Only the user’s who’s IP is listed here will now be able to log in to their LeadSquared accounts from the web.

Note:

  • *If you do not want IP restriction enabled on your account, alongside Enable IP Restriction, click No.
  • Please ensure you add your own IP address to the Whitelist before enabling IP Restrictions. Enabling IP restrictions without adding your own IP address to the whitelist will block your own access to LeadSquared.
  • To delete existing IPs, under Actions, click .

LeadSquared IP Whitelist


4. IP Whitelist for LeadSquared APIs

To add a list of users who are authorized to use and work with LeadSquared APIs

  1. Navigate to My Profile>Settings>Users and Permissions>Restriction using IP Whitelisting.
  2. On the bottom-right of your screen, click the Add IP Addresses button.
  3. On the Add new IP to whitelist pop-up, enter the following details –
    • Type – Select the IP method you want to follow when adding your user’s IPs. You can either select IP Address or CIDR/IP.
    • IP – Enter the list of user IPs you want to whitelist. If you’ve chosen the method as IP Address, then you can add multiple IP addresses at one go. Ensure each IP address is separated by a comma. For example, if the IP addresses 69.89.31.226  and 98.139.180.149 are added to the IP whitelist, only users using these IP addresses will be able to access your LeadSquared account through the web app. All other IP addresses are blocked from accessing LeadSquared.
    • Description – Enter a description for the list of IPs (e.g., API Users, etc.). This step is optional.
  4. Alongside Enable IP Restriction for APIs, click Yes*.
  5. Once you’re done, click Save. Only the user’s who’s IP is listed here will now be able to log in to their LeadSquared accounts from the web.

Note:

  • *If you do not want IP restriction for LeadSquared APIs enabled on your account, alongside Enable IP Restriction for APIs, click No.
  • Please ensure you add your own IP address to the Whitelist before enabling IP Restrictions. Enabling IP restrictions without adding your own IP address to the whitelist will block your own access to LeadSquared.
  • To delete existing IPs, under Actions, click .

LeadSquared IP Whitelist


Any Questions?

Did you find this article helpful? Please let us know any feedback you may have in the comments section below. We’d love to hear from you and help you out!

Large Options Set – Create a Large Number of Drop-down Options

1. Feature Overview

In some instances, you may need to create lead and activity drop-down fields with  up to 1 lakh (100,000) options/values. For example –

  • If you’re in the education industry, you may want to list down a large number of schools.
  • If you work in healthcare, you may need a drop-down with a large list of doctors or hospitals.
  • Or, irrespective of your industry you might want to input a large number of cities and locations.

The Large Options Set (LOS) feature lets you tackle these use cases by allowing you to import a large number of drop-down values to lead and activity fields.

Note: This feature is available for system and custom lead fields, and custom activity fields.

For information on how to create lead and activity fields, see –


2. Prerequisite

You must be an administrator user of your LeadSquared account.


3. Lead Fields

The process for creating a large number of drop-down options varies slightly for lead and activity fields. For lead fields –

  1. Navigate to My Profile>Settings>Leads>Lead Fields.
  2. You can either create a new lead field or edit an existing drop-down type field.
    • Click the Create button to create a new field or,
    • Alongside the field you want to edit, hover your cursor over the settings icon, then click Edit.
  3. Under Input Data Properties, in the Data Input Type field, select Dropdown.
  4. In the Show As field, select Searchable Dropdown.
  5. You can either enter the options manually, separated by commas, in the Set Options text area, or click the link below to import a CSV file of options.
    1. If you click the Click here to import CSV… link, an Upload File pop-up will appear.
    2. It is recommended to first click the Sample CSV link to download a sample file.
    3. Create your CSV file in the format exemplified by the sample file. On the Upload File pop-up, either click the Click to Upload CSV… link or drag and drop the file into the highlighted area.
    4. The imported options will now appear in the Set Options text area.
  6. Configure all other field properties you require and click Save when you’re done.

Large Options Set for Leads


4. Activity Fields

For activity fields –

  1. Navigate to My Profile>Settings>Leads>Custom Activities & Scores.
  2. You can either create a new lead field or edit an existing drop-down type field.
    • Click the Add button to create a new activity or,
    • Alongside the field you want to edit, click the Edit pencil icon icon.
  3. Click Next to navigate to step 2 of 3. Alongside any dropdown type field, click the settings icon.
  4. Click the Click here to import a CSV… link and follow the same instructions listed in the ‘Lead Fields’ section above.
  5. Click Next to navigate to step 3 of 3 on custom activity pop-up, then click Save.

Large Options Set for Activities


5. Limitations

  • The CSV file size should not exceed 30 MB
  • The maximum number of options/values supported is 1,00,000
  • The character limit for each option is 200


Any Questions?

We hope you found this article helpful. If you still have doubts, leave us a comment below. We’re happy to help!

LeadSquared Zapier Integration

1. Feature Overview

Zapier is a web automation app which allows you to connect apps you use every day to automate tasks and save time. The LeadSquared Zapier integration allows you to integrate LeadSquared with over 500+ third-party web services available on Zapier.

Zapier allows you to create what thye call ‘Zaps’. Zaps are workflows that connect your apps, so they can work together. To use Zaps, you’ll first have to connect your LeadSquared account to Zapier. Zaps start with a trigger – an event in one of your apps that kicks off this workflow. To know more about Zaps and how they work, please refer to How Zapier Works and What are Zaps.


2. Prerequisites

  • You must have an active Zapier account.
  • You must have access to webhooks on your LeadSquared account. For more information on Webhooks, please refer to Webhooks.


3. How it Works

To integrate your LeadSquared account with Zapier –

  1. Connect LeadSquared with Zapier
  2. Create a Zap
    1. Set-up Triggers
    2. Set-up Actions


4. Connect LeadSquared with Zapier

You must begin by connecting your LeadSquared account with your Zapier account. To do this –

  1. Log in to your Zapier account.
  2. On the Zapier dashboard, click My Apps.
  3. On the Apps page, click Add Connection.
  4. On the Add a new app connection pop-up, search for LeadSquared.
  5. On the Connect an Account, against the relevant fields, enter your Access Key and Secret Key.
  6. Once you’re done, click Yes, Continue. Your LeadSquared account is now connected with your Zapier account. To know more, please refer to Connect your app accounts to Zapier.


5. Create a Zap

After connecting your LeadSquared account with your Zapier account, you must then create a Zap. Let’s take the example of how to create a row entry in your Google Sheets when a lead is created in your LeadSquared account.

  1. From your Zapier Dashboard, click Make A Zap.
  2. On the Choose app & event search bar, search and select LeadSquared.

Integrate LeadSquared with Zapier


5.1 Set-Up a Trigger

A Trigger is an event that is the starting point of a Zap. For example, if you want to create a new lead when your Google Sheets is updated with a new email address, then the Trigger is ‘Creating a New Lead’.

The following are the various LeadSquared triggers available in Zapier –

  • New Lead – This trigger starts the workflow when a new lead is created in your LeadSquared account.
  • New Activity for Lead – This trigger starts the workflow when a new activity is posted against a lead in your LeadSquared account. Note that only activity details will be available (not the details of the lead against which the activity has been posted).
  • Lead Stage Changed – This trigger starts the workflow when the Lead Stage of a lead changes in your LeadSquared account.
  • Landing Page Submission – This trigger starts the workflow when a lead submits details on one of your landing pages.
  • Updated Lead – This trigger starts the workflow when any associated lead field value changes in your LeadSquared account.

To know more about Triggers in Zapier, please refer to Setting up Triggers.

Note: LeadSquared Custom Field Sets and File Upload fields are not supported by Zapier.

Integrate LeadSquared with Zapier

You will then have to set-up a Trigger, based on which the Zap will get triggered. This means that you must provide an event within LeadSquared, such as Lead Create, Lead Update, etc., based on which the Zap gets triggered on Zapier.

  1. From the Trigger Event dropdown, choose an appropriate trigger for your Zap, and then click Continue.
  2. From the Choose an account dropdown, choose the LeadSquared account on which you want to create the Zap. Then, click Continue.
  3. Click Test trigger to ensure the trigger you’re setting up is working fine.
  4. If the test is successful, click Continue.

Integrate LeadSquared with Zapier


5.2 Set-Up an Action

An Action is an event a Zap performs. For example, if you want to send an email to a user each time a new lead is created in your LeadSquared account, then the Action is ‘Send Email’. The following are the various LeadSquared actions available in Zapier –

  • Create or Update Lead – This action allows you to create or update a lead in your LeadSquared account. For example, if a new row entry is created in your Google Sheets, a new lead is created in LeadSquared, based on the email address entered in the Sheet. Here, creating a lead is the Action.
  • Create Activity for Lead – This action allows you to create an activity against a lead in your LeadSquared account. For example, if a new task is created in your CRM account, then an activity is posted to the corresponding lead in your LeadSquared account.
  • Create Task on Lead – This action for a trigger allows you to create a task for a lead. For example, if a new lead is created in your CRM account, you can assign a task to the relevant LeadSquared user to take the lead to completion. Here, creating a task is the Action.
  • Post a Sales Activity on a Lead – This action for a trigger allows you to post a sales activity to a lead. For example, if a sale has been made in your invoicing application, you can post a sales activity against the lead in LeadSquared.

To know more about Actions in Zapier, please refer to Using Zapier Actions.

Integrate LeadSquared with Zapier

Searches

You can also use the Searches option that’s available, to search and obtain details from LeadSquared. The following are the available Searches on Zapier –

  • Find Lead – Allows you to find an existing lead in your LeadSquared account, using the email address or a lead Id of a lead, in an Action. For example, you can pass the lead’s email address to find the lead.
  • Find Lead (New) – Allows you to find an existing lead in your LeadSquared account, using any Schema Name (lead field), in an Action. For example, you can search for a lead, by passing any field in your account (or any unique field like PAN Number, Student Id, etc.)
  • Get Activity Details – Allows you to obtain all the information that’s available on an activity. To get the information, you must pass the relevant activity Id.
  • Find Users – Allows you to obtain all the information pertaining to a user. To get the information, you must pass the user’s email address or the user Id.

Integrate LeadSquared with Zapier

Once a Trigger is set-up, you will then have to provide the Action on which the Zap will work. This means that once a trigger event occurs, within LeadSquared, a succeeding action, like Send an Email, Create a Google Sheet entry, etc., must be provided. To do this –

  1. From the Choose app & event search bar, search for the relevant app on which you want to set-up the Action.
  2. From the Action Event dropdown, select a relevant Action or a Search that you want to execute once a Zap is created. Then, click Continue.
  3. From the Choose an account dropdown, choose the external account on which you want to create the Zap. Then, click Continue.
  4. Fill in the other necessary fields. Once you’re done, click Continue. Then, click Test & Continue.
  5. Once the test is successful, click Turn on Zap. Your Zap is now active.

Integrate LeadSquared with Zapier


Any Questions?

Did you find this article helpful? Please let us know any feedback you may have in the comments section below. We’d love to hear from you and help you out!

Email Settings – Restrict Email Senders

1. Feature Overview

With the Email Settings feature in your LeadSquared account, you can restrict your users from sending emails to leads. This setting is different from the From Address Restrictions setting where you can restrict specific user roles from sending emails on behalf of the lead owner or any other user. To know more, see Email Settings – From Address Restrictions.

Note:


2. Prerequisite

You must be the administrator of your LeadSquared account.


3. Restrict Email Senders

This setting lets you choose which of your users can send emails to your leads –

  1. Navigate to My Profile>Settings>Email Settings>Restrict Email Senders.
  2. To revoke a user’s access to send emails, alongside their name, uncheck Checkbox.
LeadSquared - Restrict Email Senders


4. FAQs

Why is the Lead Owner and Lead Owner Manager not appearing in the “From Address” dropdown for mail merge?

  • Issue Description: When sending emails from the system, the “From Address” dropdown does not show the Lead Owner or Lead Owner Manager fields for mail merge.
  • Solution: This issue occurs because certain users were restricted from email settings. To resolve the issue check if the users have been restricted from sending emails as described above.


Any Questions?

Did you find this article helpful? Please let us know any feedback you may have in the comments section below. We’d love to hear from you and help you out!

Lead/Visitor Tracking Limitations with Mozilla Firefox Private Browsing Mode

If your leads or visitors are using Mozilla Firefox (version 59 or later) private browsing mode, we won’t be able to capture UTM parameters when they land on your website/landing pages. This is because Firefox has made changes to prevent leaking user data to third parties when users choose private browsing mode. For more information, see Mozilla Security Blog -Preventing data leaks by stripping path information in HTTP Referrers.

How to Preserve Historical Created On date for leads while importing them in LeadSquared?

This article helps you to understand how to import the CreatedOn field while doing a Lead import using a CSV file in your LeadSquared CRM. The CreatedOn field contains the date and time of when the Lead was created in your CRM.

For more information on how to import Leads using a CSV file into your LeadSquared system, refer to How to import leads to LeadSquared?

Procedure

Consider that you have several Leads in a different sales CRM. All the Leads have a Lead field called CreatedOn which contains the date-time value of when the Lead was created.

When you import these Leads to your LeadSquared system using a CSV file, it allows you to also import the CreatedOn field as well.

  • In Step 02 Map Fields of Lead Import, if there is a Created On field under Fields in CSV file, then that field is automatically mapped to the Created On field of LeadSquared. By doing so, the historical data of when the Lead was created is preserved even while importing to LeadSquared from another CRM. Please see the below image for reference.

import

  • If the Created On field in your CSV file is not automatically mapped to the Created On field of LeadSquared, you can also select Created On from the Map to LeadSquared field drop-down menu.

created on

After importing, you can view this value from the Lead Details window of the corresponding Lead in LeadSquared.

Configure page

In the above image, the Created On field has the date time value which was the same in the previous CRM.

How to Export More than 1 Lakh Leads?

1. Feature Overview

LeadSquared allows you to export up to 1 lakh (100,000) leads per export request. If your database contains more than 1 lakh leads, you must export them in multiple batches. You can achieve this by creating lists containing fewer than 1 lakh leads and exporting each list separately. Lists can be created using any filtering criteria such as lead fields, activities, or tasks.

This article explains a simple approach using the Lead Number field to split your data into manageable batches.

Note: ESS tenants can export up to 5 lakh (500,000) leads in a single request. To enable this feature, contact your account manager or email support@leadsquared.com.


2. How It Works

Every lead in LeadSquared is automatically assigned a Lead Number when it is created.

  • The first lead receives Lead Number 1.
  • The second lead receives Lead Number 2, and so on.
  • Lead numbers increase sequentially and are not reused, even if a lead is deleted.

For example:

Lead Created

Assigned Lead Number

First lead

1

Second lead

2

Third lead

3

If lead number 2 is deleted, the next lead created will still receive Lead Number 4, not 2.

Because of this sequential numbering, you can export leads in ranges of Lead Numbers (for example, 1–100000, 100001–200000, etc.) to retrieve your entire database in batches.


3. Export Leads Using Lead Number

Follow these steps to export leads in batches.

Step 1: Navigate to Lists

  1. Navigate to Lead Management>Lists.
  2. Click Add List.

Step 2: Add List Criteria

  1. In the Create List window, add the following condition:
    Lead Number Less than equal or to 100000
  2. Click Add.

The filter criteria will appear on the panel.

Step 3: Find Leads

Click View Leads to generate the list of matching leads.

Step 4: Save the List

  1. Review the leads.
  2. Click Proceed to Save.
  3. Choose Save List As a Static List.
  4. Enter a List Name and Description.
  5. Click Create List.

Step 5: Export the Leads

  1. On the Manage Lists page, click the newly created list.
  2. In the List Details page, under Actions (three-dotted menu), click Export Leads.
  3. In the Export Leads popup, select either all lead fields or specific lead fields.
  4. Click Export.

export more than 100000 leads

Export Additional Lead Batches

If your account contains more than 1 lakh leads, create additional lists with the following criteria.

Lead Batch

Filter Criteria

First 1 lakh leads

Lead Number ≤ 100000

Second 1 lakh leads

Lead Number between 100000 and 200000

Third 1 lakh leads

Lead Number between 200000 and 300000

Repeat the export process for each list until all leads are exported.


Any Questions?

Did you find this article helpful? Please let us know any feedback you may have in the comments section below. We’d love to hear from you and help you out!

Custom Task Actions Connector

The Custom Task Actions connector lets you add new custom actions to the default list of actions (Edit, Mark Complete, View Details, Cancel, etc.) on the Manage Tasks page. These actions also reflect in task type tabs set up in Smart Views.

custom task action

Here are some examples of custom actions you can create –

  • Post task-related data to another tool/application
  • Send a customized notification to a lead/task owner
  • Open a new window with lead-related data from another application

You can create many more actions depending on your use cases. The connector gives you the ability to define the type of action, add a callback URL where you can mail merge task, lead and user parameters, display an Iframe and even get/post data.


Prerequisites

  • You must be administrator user of your LeadSquared account.
  • This connector is not available on all plans. If you want to enable it for your account, contact us at support@leadsquared.com.


Installation

First, install the connector from the Apps Marketplace –

  1. On the main menu, navigate to Apps>Apps Marketplace.
  2. Search for ‘Custom Task Actions’ in the search bar. Alternatively, you can navigate to the ‘UI Customization’ category on the left pane.
  3. Click Install on the Custom Task Actions connector.
  4. Once the installation is complete, hover your cursor over the settingsSettings iconicon and click Configure. Alternatively, you can click on the connector to open up a new page with the connector details, then click Settings>Configure.

custom task actions connector


Configuration

You can create task actions in two areas –

1. The tasks grid row action menu on the Manage Tasks page (and smart views).

custom task manage tasks

2. The bulk actions menu on the Manage Tasks page (and smart views).

bulk custom actions

On the Configure Custom Task Actions pop-up, first select the area you want the action to appear (from the left pane), then click Add Action.

add new custom task action

Enter the details of the custom action, then scroll to the bottom of the pop-up and click Save.

add new custom action

Attribute Description
Action Label The display name of the action.
Task Type The task type you want the action to appear for. For information on task types, see Managing Task Types.
Action Type 3 action types are available –

  • Show as Popup
  • Call an API
  • Open in New Window
Show in Tab Currently, only the Web App option is available.
Callback URL Enter the HTTPs URL which will be rendered as a custom action. The URL should be of an action that accepts LeadSquared mail merge fields as parameters and passes them to an external application (e.g., a support system, another CRM or marketing system, another LeadSquared account, etc.) to get the data. Hover your cursor over the question markquestion mark iconicon to view the available mail merge fields.

Note: This attribute is mandatory.

Height Enter the height and width of the pop-up. Applicable only for the ‘Show as Popup’ action type.
Width
Iframe Attributes Pass Iframe attributes you want to render on the pop-up. Applicable only for the ‘Show as Popup’ action type.
HTTP Method GET and POST methods are supported.
Content-Type application/json is the only supported content type.
Data You can pass any data here in JSON format.

Once you’ve created a custom action it will appear as shown below.

  • Click the delete delete icon to delete the custom action
  • Click the expandexpand icon icon to edit the custom action

Click the Add Action button to create more custom actions.

create more custom actions

Your custom task actions will now appear as configured on the Manage Tasks and Smart Views grid rows or bulk action menu for the chosen task type.


Any Questions?

If you still have doubts about this feature or any feedback you’d like to share, please leave a comment below.

Automation Best Practices

1. Feature Overview

This article will help you understand the best practices to follow when configuring and running your Workflow Automations on LeadSquared.


2. Prerequisites

  • You must be the Administrator of your LeadSquared account to create and configure an Automation.
  • Automation is a paid feature. To enable it, reach out to your account manager, or write to support@leadsquared.com.


3. Best Practices to Avoid Automation Failure

Most automation failures are due to configuration errors that might have occurred when setting up the automation. Here are a few points to keep in mind during the configuration process – 

1. Send Email Action

When usingSend Email action, make sure the email address of the lead field has a valid email address. Navigate to Manage Leads>Lead Details to edit or verify the lead’s email address. 

automation email id check

Also, make sure the Do Not Email flag is disabled (“No“) for the lead. To find this option, navigate to Manage Leads>Lead Details Page>Lead Details Tab.

automation do not email

2. Mail Merging an Empty Field to a Mandatory Field

When mail merging a field to a mandatory field, make sure it is not an empty field. For example, if you mail merge the Last Name lead field, the Last Name lead field must contain a value (e.g., Smith, etc.). Fields marked with “* are mandatory.

automation last name

3. Mail Merging an Empty Date Field in Schedule Field for Create Task Action

On the Create Task Action, when you are mail merging a date field in the Schedule field, the date field must contain a value. For example, if you mail merge Application Submitted On as the date field, this field will need to have a value on the Lead Details page.

automation create task schedule

4. Mail Merging a Field with Invalid Data Type

When mail merging a field in automation, make sure it is a valid data type. For example, when you are mail merging the Age lead field, make sure the Data Input Type is a Number (and not Text, Boolean, etc.).

automation data type

5. Deleting a Field Configured in a Published Automation’s Advanced Search Condition

If you have configured a field through the advanced search condition and published the automation, make sure to edit the field in the automation when deleting the particular field.

For example, if you have configured ID Proof as a Custom Activity Field through the advanced search condition, and if you are going to delete the Custom Activity Field in the future, make sure to edit this field in the published (live) automation.

automation delete field


2. Common Reasons for Call Lapp and Webhook Failure

Here are some reasons why your Call Lapp or Webhook might be failing –

1. API Rate Limit Exceeded

The API Rate Limit is a configurable limit and varies for different accounts. Ensure you’re not exceeding the rate limits configured on your account.

For example, if your API Rate Limit is five per second, but you have exceeded this number, then you will receive a 429 error. You can view your API Limits by navigating to Settings>Profile>Billing and Usage.

automation api rate exceed

2. Gateway Timeout

When the automation calls a Lapp or a Webhook, it’ll wait for a response for 30 seconds. If there is no response from the Lapp or Webhook within this time frame, it will throw a 504 Gateway Timeout error.

automation gateway timeout

3. Incorrect API URL

If the API URL you’ve configured is not valid, the automation will throw a 403 error. For example, the API could have been valid at the time the automation was published, but if there are any changes made to the API after the automation was published, then your endpoint might not be valid anymore.

automation api url


3. Best Practices for Increasing Automation Efficiency

There are certain pointers to keep in mind if you want to increase the efficiency (execution count) of your automation workflow –

1. Add Additional Conditions in Advanced Search on Each Trigger

Instead of adding an If/Else condition on a trigger, you can add the condition in the trigger itself.

For example, you might want the automation to trigger on lead creation, and run for leads whose City is Mumbai. Instead of adding an If/Else card on the trigger for the City, you can include the City on the trigger itself.

automation inclusion criteria

2. Use “Multi If/Else” Over Multiple “If/Else” Conditions

If you have to configure multiple conditions, it’s more efficient to use a Multi If/Else, instead of adding different If/Else conditions.

multi if else example

3. Reduce the Retry Numbers on Call Lapp and Webhook

When you configure a Call Lapp or a Webhook, you can also specify the number of retries the automation can attempt if it fails while being called. The maximum number of retries you can configure is 3 and the minimum can be left at 0. The automation will wait five minutes before each retry.

To increase the efficiency of the automation, it’s best to set the Retry Count to either 0 or 1.

automation retry count

4. Select Criteria to Exit Automation

Use the exit criteria advanced search to stop automation execution in hard-stop cases. For example, If Lead Stage is Not Interested or Invalid, you do not need the automation to run for that lead anymore. 

automation exit condition


Any Questions?

Did you find this article helpful? Please let us know any feedback you may have in the comments section below. We’d love to hear from you and help you out!

Lead Prioritization

This Help Video allows you to understand the Lead Prioritization feature of your LeadSquared CRM in detail.

Lead Prioritization from Maanas Kalivarapu on Vimeo.

Email to List Reports

The Email to List Report allows you analyze the performance of the Emails you had sent to a list of Leads. The Report allows you know the success/failure rate of the Emails through various metrics available in the report.

Prerequisite

  • You have logged into LeadSquared.
  • You have created and sent the email to the List of Leads using Email Campaign or from the Manage List window

Procedure

Email campaign

  • From the Type drop-down filter, select Email to list. The Emails that are sent to a list appears in the display grid below:

Email to list drop-down 

Email to list report

  • Under Name, click email to list icon against the required Email to List. The corresponding to Email to List report appears.

Email to list report1

Related Articles

How to send SMS to multiple leads from LeadSquared Mobile App?

This help article allows you to understand how to send SMS to multiple leads at the same time from the LeadSquared Mobile App.

Prerequisite

  • You should have installed LeadSquared mobile app android version 5.5 or higher.

Procedure

  • From the LeadSquared Mobile App, go to Leads. The Leads list appears:

  • Multi-select the leads and click the menu in the top right corner and click Send SMS.

The SMS screen appears where you can see your selected recipients and proceed or go back and select more leads.

Send the SMS and the following dialogue box appears which implies that sending the messages involves the cost for sending regular SMSs.

  • Click OK and the SMS is sent to multiple leads. If there is a failure, you will receive a ‘Notification’ from where you can always retry sending your message to the failed recipient list.

Note: You cannot send SMSs to more than 20 leads at a time.

Capture Google Adwords Value Tracking Parameters in LeadSquared

1. Feature Overview

This article helps you capture Google Adwords value tracking parameters keywords and devices.


2. Procedure

2.1 Create Lead Fields

  1. From the default LeadSquared dashboard, go to My Account>Settings>Customization>Lead Fields. The Lead Fields area appears.

Google Adwords

2. Click Create. Complete the details as highlighted in the image below and click SaveFor detailed information, refer to How to create Custom Fields in LeadSquared?

Google Adwords

3. Create another custom field for the keyword UTM_term, as described in the step above.


2.2 Create Tracking Templates for Adwords

Create your tracking URL (with 2 additional values) – utm_term and utm_device.

A sample code –

{lpurl}?utm_source=Pay%20per%20Click%20Ads&utm_medium=adwords&utm_campaign=LeadConvsw&utm_term={keyword}&utm_device={device}

By adding this code, Adwords tracks the device and keyword values dynamically, and captures this in your LeadSquared system.

Note Make sure these parameters in the code is in the proper format. UTM_keyword={Keyword}. If the code is UTM_Keyword=%7keyword%7, the following value is captured  =%7keyword%7.


2.3 Place the Tracking Templates in Adwords

  1. Enter the landing page URL & tracking template in correct places of Adwords which is the step where you create the ad.

Google Adwords

2. Enter the desktop Landing page URL in the first text box.
3. Under Ad URL Options (advanced), enter the mobile Landing Page URL in the first box.
4. In the second box (highlighted with blue in the above image), enter the tracking template.

Note – Enter the template in the text box as highlighted in the image only.


2.4 Value Capture in LeadSquared

When a user clicks your ad from a desktop or any mobile device, the corresponding value is automatically captured in LeadSquared.

  • For Desktop or Laptops, value for UTM_device = “C”
  • For Mobile, value of UTM_device = ”M”
  • For Tablet, value of UTM_device = ”T”

How do the details appear in LeadSquared?

If you notice Step 1, you had created UTM_device field under the Additional Details section (highlighted in black). As per your convenience, you can create a field under any sections like Lead Details, Company Details and so on.

Google Adwords

To view the captured value –

  • Open the lead from Adwords campaign and click the Lead Details section. Under the Additional Details section, you can view the lead fields & the values that are captured.

Google Adwords

Google Adwords

Google Adwords


Any Questions?

Did you find this article helpful? Please let us know any feedback you may have in the comments section below. We’d love to hear from you and help you out!

How to Create a Facebook Custom Tab for Lead Capture?

This article would help you to understand how to create a Facebook Custom Tab for Lead Capture using LeadSquared landing pages and iFrame host. This would help you capture leads from your Facebook page, when someone fills the form out.

Your end product would look something like this:

LeadSquared Integration with Facebook

How to create the Facebook custom tab

Here are the steps to display your landing page as an iframe on your Facebook page:

Step 1: Go to iframehost.com. The window in the below image appears:

LeadSquared Integration with Facebook

Step 2: Click Install Page Tab. It redirects you to a window where you can select the Facebook page where you wish to add this custom tab.

LeadSquared Integration with Facebook

Step 3: Click the drop-down list highlighted in the image above and select the page to which you want to add your landing page.

Step 4: Click Add Page Tab. It redirects you to your Facebook page.

Step 5: Click Configure Page Tab.

LeadSquared Integration with Facebook

Step 6: You will now be redirected to the following woobox page.

Under the Page Source column, click URL.

LeadSquared Integration with Facebook

Step 7: Enter the URL of your landing page. Select height as per your preference (around 700px would be visible in one fold). Keep FanGate settings as “off.”

Note: The URL should be https, as Facebook does not accept an unsecured URL. (Get the https url of your LeadSquared landing page. Here’s how you can do it.)

LeadSquared Integration with Facebook

Step 8: Click Save Settings.

Step 9: Click Tab settings to change the Name and Image to completely customize your Facebook custom tab.

LeadSquared Integration with Facebook

Step 10: Once the settings are changed, click Save Settings.

Once this is done, go to your Facebook page and refresh. Your required tab along with the landing page is now live on your Facebook page.

How to Manually Assign or Change the Ownership of Leads?

1. Feature Overview

You can assign or change the ownership of a Lead to another user in your LeadSquared system. You can also assign the ownership of multiple leads to another LeadSquared user as well.

Example: A sales user in London is assigned a lead from London. However, the lead changed their location to Manchester. In this scenario, you would want to assign this lead to a sales user in Manchester, to work with the lead.

This articles helps you to understand the following:

  • How to Change the Lead Owner of a Single Lead
  • How to Bulk Update the Lead Ownership of Leads
  • How to Change the Lead Owner of Multiple Leads


2. Prerequisites

  • You should be logged into your LeadSquared application.
  • You should be an Administrator/ Marketing User/Sales Manager or the Manager of a Sales Group to change the ownership of a lead to another user.


3. How to Change the Lead Owner of a Single Lead?

  1. From the default LeadSquared dashboard, Navigate to Leads>Manage Leads.
  2. Alongside the relevant lead, click on the Leadsquared - Menu icon. From the dropdown, select Change OwnerThe Change Owner pop-up box appears.
  3. From the Update To dropdown, Select the relevant Lead Owner you want to change the leads to.
  4. Click Save.

Leadsquared - Lead owner management


4. How to Change the Lead Owner of Multiple Leads?

  1. From the Manage Leads window, determine and select the required leads under the list of leads.
  2. Above the list of leads, click on More Actions on the menu that appears. From the dropdown that appears, click on Change Owner.
  3. From the Update To dropdown, Select the relevant Lead Owner you want to change the leads to.
  4. Click Save.

Leadsquared - Lead owner management


5. How to Bulk Update the Lead Ownership of Leads?

From the Manage Leads window, you can only select upto 200 Leads in a page to change the ownership. To bulk update the ownership of all the leads in your system –

  1. From the Manage Leads window, select all the leads by clicking on the checkbox alongside the Lead Name tab.
  2. Click on Bulk Update from the menu that appears. The Bulk Update pop-up box appears.
  3. Enter the following details:
    • Lead Field – Select the value Owner from the dropdown list.
    • Update To – Select the relevant Lead Owner you want to change the leads to from the dropdown list.

4. Once the correct details are entered, click Save.

Leadsquared - Lead owner management

Note: You can also bulk update the ownership of leads matching certain criteria. Filter the Leads using the required search criteria through Advanced Search and then bulk update the ownership of the leads.

Any Questions?

Did you find this article helpful? Please let us know any feedback you may have in the comments section below. We’d love to hear from you and help you out!


How to Record Inbound/Outbound Calls for Leads in the Mobile Application?

1. Feature Overview

This article explains how to enable inbound and outbound call recordings on the LeadSquared mobile app and where to access them.

You can record your users’ inbound/outbound calls for review and quality control. The calls are automatically posted as activities in the Activity History section of the Lead Details page. Recorded calls can also be downloaded.

Note: This feature may not be supported in some mobile phones as it is device dependent. If it is not supported on your mobile, reach out to your account manager or write to support.


2. Prerequisites

  • Install the latest version of the LeadSquared mobile app.
  • Install the latest version of the Call and SMS tracker app and enable all related permissions.
  • You must have an Android mobile device. The call recording feature is not supported on iOS devices.


3. Enable Call Recording on Your Device

3.1. For Android Users

  1. From the dashboard, tap LeadSquared - Mobile app menu.
  2. Tap Setting icon and then tap Call and SMS.
  3. Under Call Settings, enable the following permissions –
    • Show lead identification popup.
    • Show popup for unknown numbers.
    • Record calls.
Note: If you’re using Xiaomi mobile phone, enable call recording through Mobile device settings.

LeadSquared - Enable Call Recording on Your Device


3.2. For iOS Users

Previously, call tracking was not available for iOS devices. We have now introduced this feature on our iOS app as well. However, the following setting must be enabled to access this feature.

LeadSquared - call and sms permissions

  • On the mobile application,
    1. On the mobile app From the dashboard, tap LeadSquared - Mobile app menu.
    2. Tap Setting icon and then tap Calls.
    3. Under Call Settings, enable Track Outbound Phone Calls.

Note:

  • Outbound calls made directly from the dial pad and inbound calls cannot be tracked in iOS devices.
  • Call and SMS tracker app is not required for outbound call tracking in iOS devices.
  • The mobile app must be running in the foreground for the entire duration of the call. If not, the duration of the call may be recorded incorrectly. For example, if the actual duration of the call is 1 minute, but the app is brought back to the foreground 5 minutes after the call ended, the recorded duration would incorrectly be displayed as 6 minutes.

LeadSquared - Outbound call tracking in ios


4. Set Call Recording Permissions on Web App

  1. From the main menu, navigate to My Profile>Settings>Mobile App>Permissions.
  2. Click Edit.
  3. Under Calls and SMS, set these permissions under the specific user roles to record calls –
    • Track Calls.
    • Record Calls
      • No Calls –  No call activities are recorded.
      • All Calls – All call activities are recorded.
    • Track SMS.
    • Override settings on device – If enabled, the call and sms permissions set by the Admin will override the mobile device level settings enabled by the users.
  4. Click Save.
Note: To know more about setting mobile app permissions on the web platform, see Configure Mobile App Settings from the Web Platform.

LeadSquared - Set Call Recording Permissions on Web App


5. View Recorded Activities

  1. Navigate to Lead>Manage Leads.
  2. Click on a relevant lead and open the Lead Details page.
  3. On the Lead Details tab, click Activity History.
  4. Alongside the call activity,
    • To download the recording, click Cloud Calling.
    • To listen to the recording, click LeadSquared CTM Telephony.
Note: The recorded calls are stored in mp4 format.

LeadSquared - View Recorded Activities


Any Questions?

We’d love to answer your questions or hear your own unique use cases. Feel free to share your experiences in the comments section below.

How to schedule a LeadSquared Report?

1. Overview

You can schedule the delivery of your LeadSquared report to your LeadSquared Email address. The scheduled report is delivered and is available only to the user who schedules it.

Note: The schedule feature for Reports is not available to all the LeadSquared Reports. If you want the schedule feature enabled for any of the Reports, please email to support@leadsquared.com


2. Prerequisite

  • You should be an Administrator, Sales Manager or Marketing User of the LeadSquared system in order to schedule a report.


3. Navigate to Reports

To schedule a Report, first, navigate to Reports>Reports Home.

Report Management home 1


4. Schedule a Report

As an example, let’s select the Activity list by Leads report under the Lead Insights category.

Apply the required filters and click Run Report. Next, click  to bookmark the report with the filter settings to save it to My Saved Reports.

LeadSquared Reports 
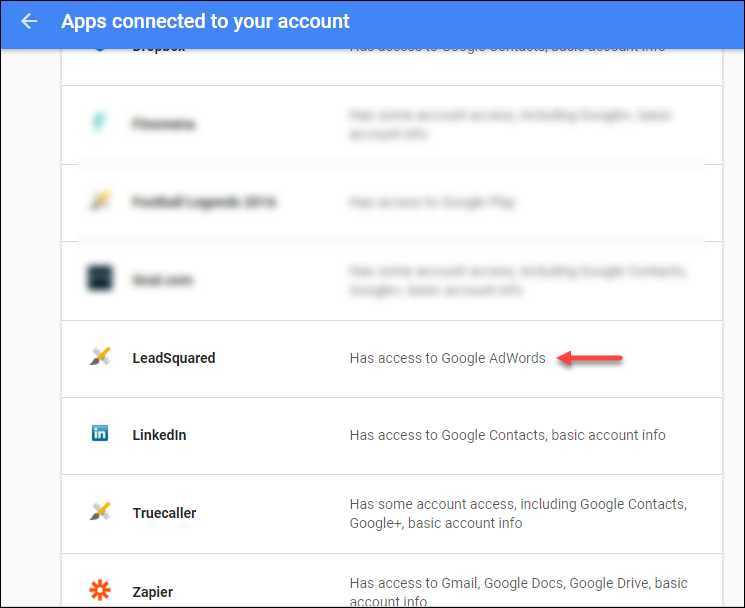
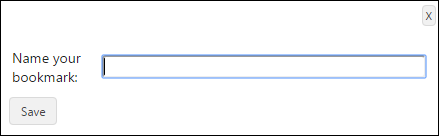
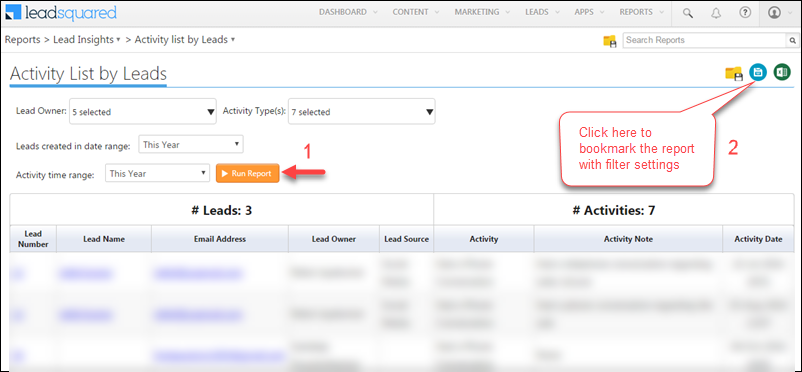
The Name your Bookmark pop-up box appears. Enter the required bookmark name and click Save.

LeadSquared Reports

You can schedule the report using either of the following two methods –

  • From the same report window, click  . The My Report Bookmarks window appears.

Or

  • Go to Reports>My Saved ReportsThe My Report Bookmarks window appears.

LeadSquared Reports

The Bookmark Actions area allows you to re-run the report with new filters, and edit and delete the bookmark. Click  to schedule the report. The Schedule pop-up box appears.

LeadSquared Reports

Select the schedule frequency, Start Time, Start Date, and End Date(if required) and click Create ScheduleThe Report is scheduled and the message appears as shown in the image below:

LeadSquared Reports

The Report is delivered in PDF format to your LeadSquared Email address as shown in the image below –

LeadSquared Reports

Related Article: LeadSquared Reports

Email Settings – Manage Email Subscription Preferences (Email Categories)

1. Feature Overview

You can manage subscription preferences of leads using LeadSquared’s Email Categories feature by –

  • Creating new Email Categories.
  • Assigning Email Categories to every new email sent.
  • Allowing your leads to selectively subscribe or unsubscribe to specific email categories.
  • Allowing your leads to completely unsubscribe from all emails.

Note:


2. Prerequisite

You must be the Administrator of your LeadSquared account.


3. Setting up Email Categories

  1. Navigate to My Profile>Settings>Email Settings>Email Categories.
  2. Next to Mandate category in emails*, click Yes.
  3. Click Create.
  4. Once you can view the Add Email Category pop-up window, enter the relevant details.
  5. Click Save.

Note: 

  • *Enabling Mandate category in emails will force the user to specify a category while creating email campaigns, Autoresponders, one to one emails or sending emails to list.
  • You can add up to 10 email categories.
  • To see how the form will render, click Preview Mailing Preference Form.

LeadSquared - Setting up Email Category


4. Import Mailing Preferences

You can update Mailing Preferences of existing leads by uploading a CSV file. The file must contain the lead’s email address in the first column and mailing preference code in the next column. You can find the code in the Email Categories settings under Code.

Note: You can download a sample CSV file in the Select a CSV to Upload pop-up window to understand the required format.

LeadSquared - sample csv file

To import your mailing preference by uploading a CSV file –

  1. Navigate to My Profile>Settings>Email Settings>Email Categories.
  2. Under Import Mailing Preferences, click Import.
  3. Click Upload CSV and then click Continue.
  4. Click Close.
LeadSquared - Update Mailing Preferences


5. Using Email Categories

Once you set up your mailing preferences, you will see a drop-down to select an Email category whenever you send a new email. Recipients can unsubscribe or manage their mailing preferences by navigating to the footer of the email.

The Unsubscribe option will remove the recipient from the specific Email Category. For example, if the Email was sent under Product Update category, clicking Unsubscribe will ensure that the recipient does not receive emails of this category in the future.

The Mailing Preferences option will give the recipient options to subscribe or unsubscribe to other email categories or even completely unsubscribe from all emails.

Note: The recipient activity will show up in the Activity History of the specific lead.
LeadSquared - unsubscribe


Any Questions?

Did you find this article helpful? Please let us know any feedback you may have in the comments section below. We’d love to hear from you and help you out!

How to set an Administrator as the billing user?

The first Administrator is marked as the billing user in LeadSquared by default. You can have multiple Administrators as the billing users if you have an active subscription. To set another Administrator as the billing user –

  1. Navigate to Settings>Users and Permissions>Users.
  2. Along the row of the Administrator you want to set as the billing user, hover your cursor over   and select Set Billing User.
  3. On the Set Billing User pop-up, click Yes.

Note: 

  • To know more about how to create a User, see Manage Users.
  • You can assign the Billing User role to Sales Cloud Admins as well.

LeadSquared - Setting Admin as Billing User

To view all your billing users –

  1. Click … and in the popup that appears, search “Is Billing User”.
  2. Check the box alongside it and click Show Selected.
  3. All your billing users will be marked with a “Yes” under the “Is Billing User” column.

Leadsquared - Billing User

How to find deleted leads using Deleted Leads History Report?

This article explains how to find deleted leads from your LeadSquared system using the Deleted Leads History Report.

Note:

  • Once deleted, leads can’t be restored in LeadSquared. The Deleted Leads History Report only contains the data of the deleted leads.
  • Before you delete leads, we recommend you export the leads out of LeadSquared. This will ensure a backup of your leads is always available. To know more, refer to How to Export Your Leads/Lead Details?


Prerequisites

You must be an administrator user of your LeadSquared account.


Procedure

To access the Deleted Leads History Report –

  1. On the main menu, navigate to Reports>Reports Home.
  2. Search for “Deleted Leads List”, and click to open the report.
    1. Alternatively, navigate to Lead Insights>Deleted Leads List.
  3. Select the date range, then click Run Report.
  4. Click  LeadSquared Reports to export the report to CSV. You can import the report to create new leads in your account in case you deleted them by accident.

LeadSquared Reports

Lead Stage Distribution (Time-period wise) Report

LeadSquared’s Lead Stage Distribution allows you to view the number of leads allocated to a particular lead stage over a time period. This allows you to analyze the type of leads arriving in your LeadSquared system over a particular time period.

To access this Report:

  • From your default LeadSquared dashboard, go to Reports -> Reports Home. The Reports Home window appears.

reports-home

  • Click Lead Stage Analysis under Categories. The Lead Stage Analysis window appears.

lead-stage-analysis

  • Under Report Name, select Lead Stage Distribution (Time-period wise). The Lead Stage Distribution (Time-period wise) report appears.

lead-stage-distribution

Complete the following details:

  • Select Lead Owner – Select the Lead Owner from the multi-select drop-down list to view the  number of leads which comes under the selected lead owners.
  • Select Lead Stage – Select the Lead Stages from the multi-select drop-down list to view the number leads which comes under the selected lead stages.
  • Select Time Range – Select the time range from the drop-down list to view leads which matches the selected lead owners, lead stages and under the selected time range.

Once the above details are completed, click Run Report. The number of leads which comes under the respective Lead Stages during the selected time period appears in tabular format.

This data can be sorted in day, week or month based on the time range selected using the Show data by filter. Select the required option and click Change.

Capturing leads from Web Forms using JavaScript API

There are three common ways to capture leads from website forms:

If you want to avoid replacing your form or dealing with REST APIs then you can use our JavaScript API to capture leads.

Prerequisites

  1. You should know your LeadSquared account number 
  2. There should be a published landing page (with any form fields) that can be associated with lead submissions. You should know the id of the landing page. To find the landing page id, click on the published page and from the URL copy the alphanumeric text after “LandingPageId=”. An example is shown below:

lpid


Integrating the form

Please follow the below steps to connect your web  form with LeadSquared landing pages.

Step 1

Include following Java Script library:

“https://web.mxradon.com/t/FormTracker.js”

 Example:

<script src=”https://web.mxradon.com/t/FormTracker.js” type=”text/javascript”></script>


Create following Java Script objects of  LeadSquared and map the form fields with the relevant LeadSquared fields by defining the variable.

Example:

var fieldMapping = { }

Objects:

  • MXHOrgCode – This is your LeadSquared Account Number (Mandatory)
  • MXHLandingPageId – The  Landing Page ID for which you wish to capture the submissions (Mandatory)
  • MXHAsc – This is the score you provide for the capture submission. This is an optional property.

Example:

MXHOrgCode: "6049",
MXHLandingPageId: "5f9cec8b-854b-11e6-8f87-22000aa8e760",
MXHAsc: "5",

Fields Mapping:

Format: <LeadSquared Field Schema Name> : “<Form Field Name>”;

Example:

FirstName: "fname",
LastName: "lname",
EmailAddress: "email",
Mobile: "mobile",
mx_Gender: "gender",
mx_City: "city",
mx_Country: "country"

Step 2

Create a new instance of LSQForm() and pass the parameters which is defined in step 1 to the function setupLeadCapture(parameter). Using setupLeadCapture , the form submission is captured automatically no function need to be called.

Format:

new  LSQForm().setupLeadCapture(parameter);

Example:

new LSQForm().setupLeadCapture(fieldMapping);

If you have multiple forms and you wish to capture leads from a specific form, then you can pass the Form ID with parameter as given below.

Format:

new LSQForm().setupLeadCapture(parameters, { id: “form ID” });

Example:

new LSQForm().setupLeadCapture(fieldMapping, { id: "myLandingPageForm" });

Step 3

You can also add an event to run a function on form submission request completion, success or error.

Example:

On Success:

var onSuccess = function (data) {
 console.log("ok");
}

On Error:

var onError = function (data) {
console.log("error");
}

Custom:

var always = function (data) {
console.log("always");
}

Code Snippet:

new LSQForm().setupLeadCapture(fieldMapping,{
onSuccess: onSuccess,   /*optional*/
onError: onError, /*optional*/
always: always   /*optional*/
});

If you have your own code and you do not want to create the lead automatically using setupLeadCapture, then use captureLead , which calls manually and creates a lead in LeadSquared.

To implement the captureLead function instead of setupLeadCapture:

Create a  function like below and inside that function define variables and create instances.

function onFormSubmit() {

/* Step 01 - Map fields*/

var fieldMapping = {
MXHOrgCode: "6049",
MXHLandingPageId: "5f9cec8b-854b-11e6-8f87-22000aa8e760",
MXHAsc: "5",

FirstName: "fname",
LastName: "lname",
EmailAddress: "email",
Mobile: "mobile",
mx_Gender: "gender",
mx_City: "city",
mx_Country: "country"
};

/*Step 02 - Add callbacks*/

var onSuccess = function (data) {
 /* Success callback code goes here*/
console.log("ok");
}

var onError = function (data) {
/*Error callback code is given below*/
console.log("error");
}

var always = function (data) {
/*Always callback code is given below*/
console.log("always");
}

/*Step - 03 Capture Lead in LeadSquared*/
new LSQForm().captureLead(fieldMapping, "myLandingPageForm",
{
onSuccess: onSuccess,   /*optional*/
onError: onError, /*optional*/
always: always /*optional*/
});
return false;
};
Sample Codes: