Mandatory DLT Registration for SMS Services in India

1. Overview

The Telecom Regulatory Authority of India (TRAI) has made it mandatory for all entities to register on the Distributed Ledger Technology (DLT) platform. This has been done to curb Unsolicited Commercial Communication (UCC) and improve mobile subscriber privacy within the country. To read more about the new regulation, see Telecom Commercial Communications Customer Preference Regulation 2018 (TCCCPR 18).

The DLT platform is a block-chain based registration system adopted to keep records of all transactions made between network participants. It’s aimed at creating more transparency and reducing the incidence of spam and fraud.

Note: The regulations mentioned above, only apply to customers using SMS services in India.


2. Prerequisites

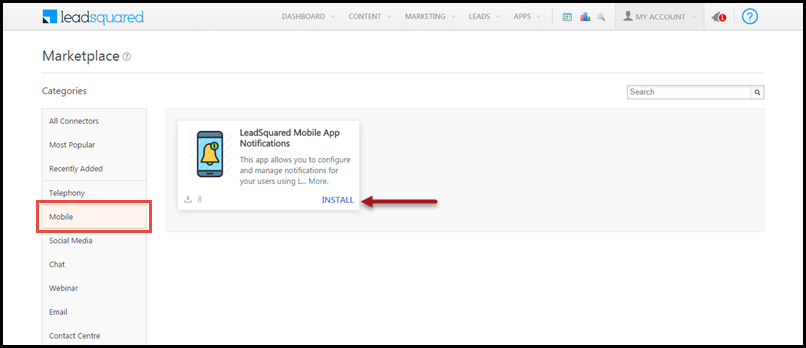
LeadSquared enables you to send SMS to your leads directly, or through automation. These features are facilitated by the SMS Marketing App, which lets you leverage LeadSquared or other service providers (Gupshup, MSG91, etc.) to send SMS. If you’re using LeadSquared or other providers to send SMS to leads in India, these regulations apply to you.


3. How to Register on the DLT Platform

If you’re sending SMS to leads in India, it’s mandatory for you to register on the DLT platform. To register –

  1. Visit https://www.vilpower.in and sign-up. Note: You can also sign-up through other portals. Please refer to the attachments below for step by step registration procedure for Videocon, Vodafone, and Airtel –
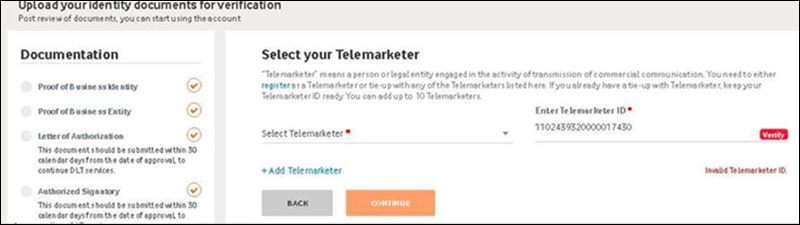
  2. In the Select Your Telemarketer step of the process (page 7 of the Entity Registration Manual) enter the Telemarketer Id of your service provider. The Telemarketer Id Gupshup –
  3. MSG 91 – please refer to MSG91 DLT Related Process. For further queries, please reach out to your MSG91 account representative, or write to teamcrm@msg91.com.

DLT for LSQ

Follow the remaining steps as listed in the manual.

Note:

  • For the KYC process, you may require proof of authorized signatory, self-certification by authorized signatory required on letterhead with name, designation and seal, Proof of Identity, POA: Proof of Address, Consent letter from parent entity, Service Agreement on Rs 100 stamp paper, Pan Number (Entity), GST Number(Govt.), Aadhaar Number of Authorized Signatory.
  • While specifying your telemarketer, you can select the organization and telemarketer Id.

4. Header Registration

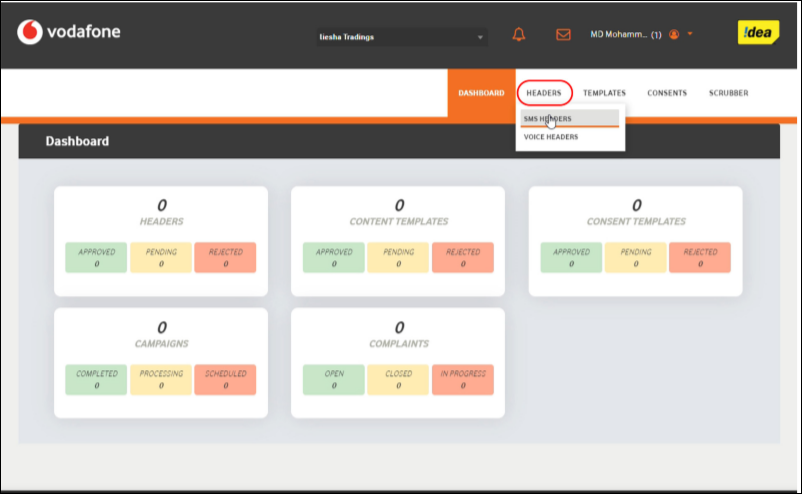
Log in to your account at https://www.vilpower.in. Under Headers, select SMS Headers.

Header Registration Menu

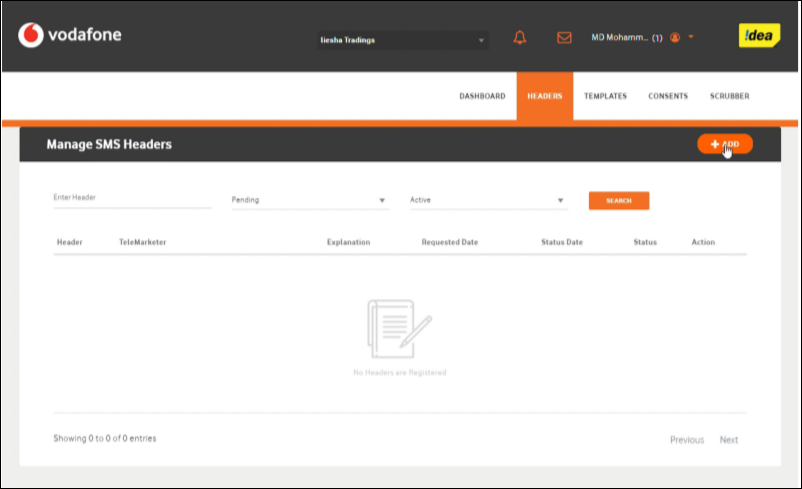
Click Add, enter the required header, then click Search.

SMS Header Listing page DLT

Select a header from the list of available headers.

select header DLT

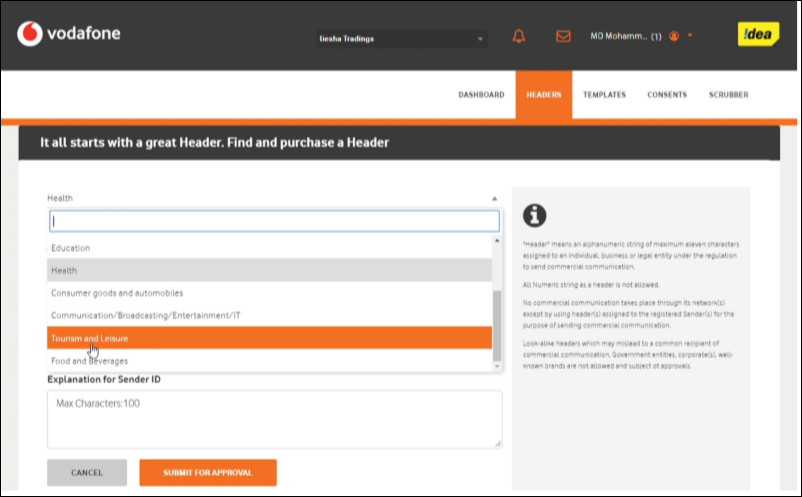
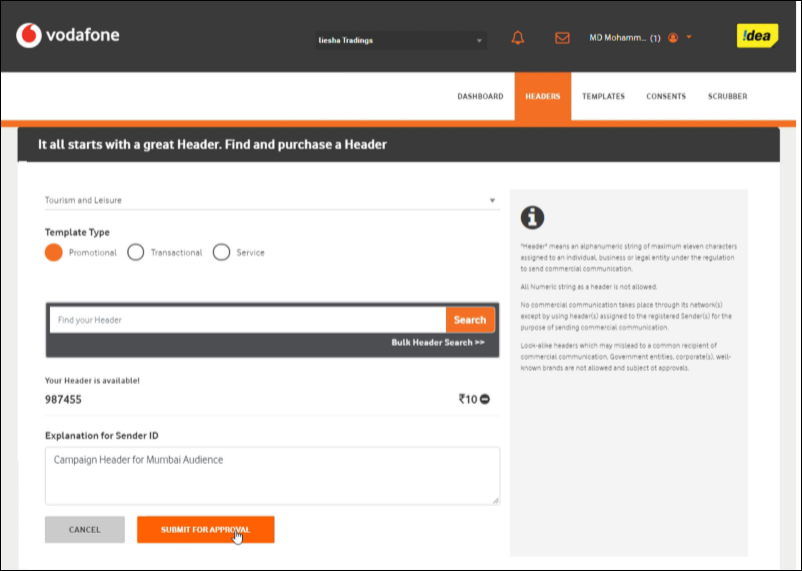
Choose the header type (Promotional, Transactional or Service). Enter a brief description of the header, then click Submit for Approval.

submit header for approval

You can see the status of your request on the headers listing page.

header registration status

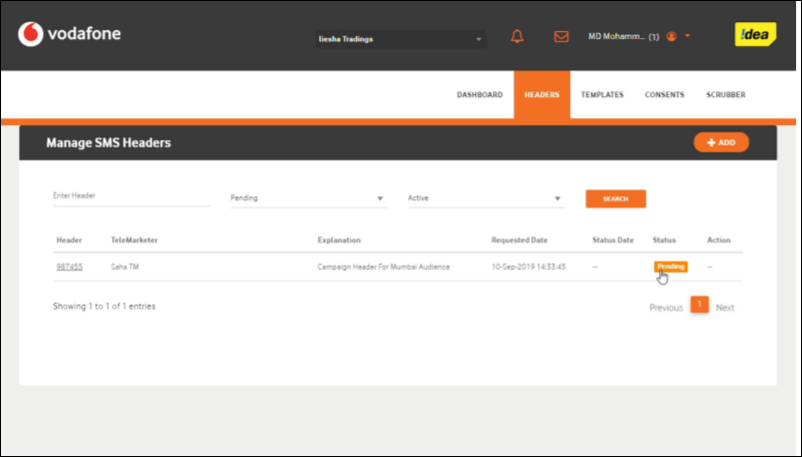
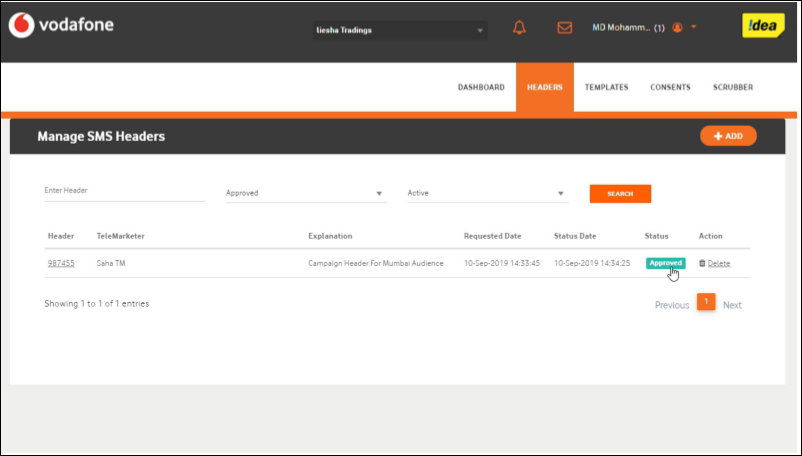
Once approved by the registrar, the status will change to Approved.

header approval


5. Content Template Registration

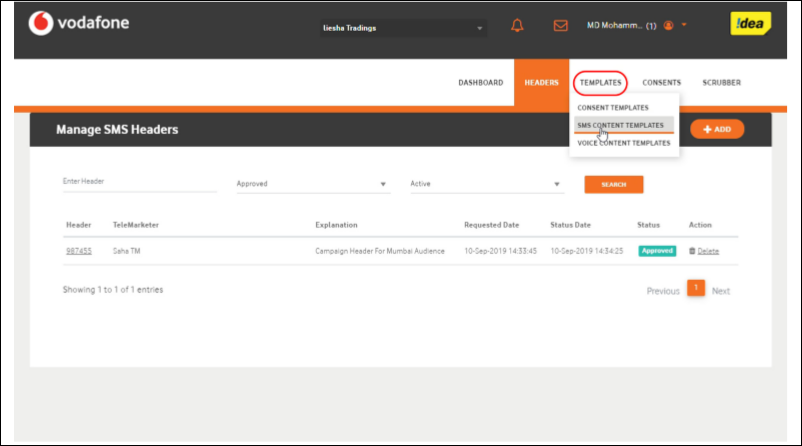
Log in to your account at https://www.vilpower.in. Under Templates, select SMS Content Templates.

Note: View the guidelines for creating templates. There may be slight variations among different service providers.

content template settings

Enter the header name you already created, then click Search.

template creation

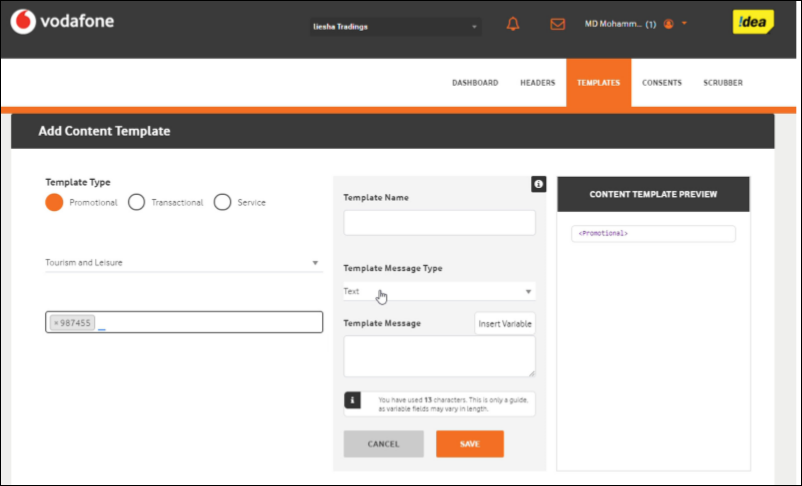
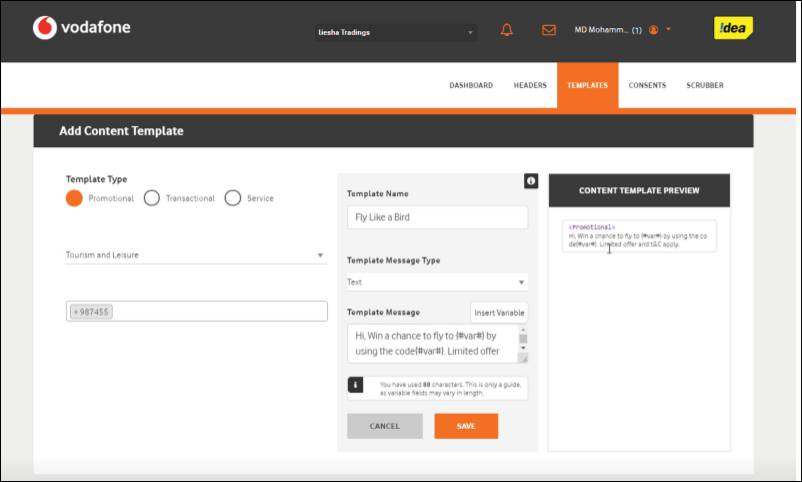
Enter the template details (enter the template name, type, message content, and insert variable placeholders by clicking the variable insert button wherever required). Click Save when you’re done.

template configuration DLT

content template DLT

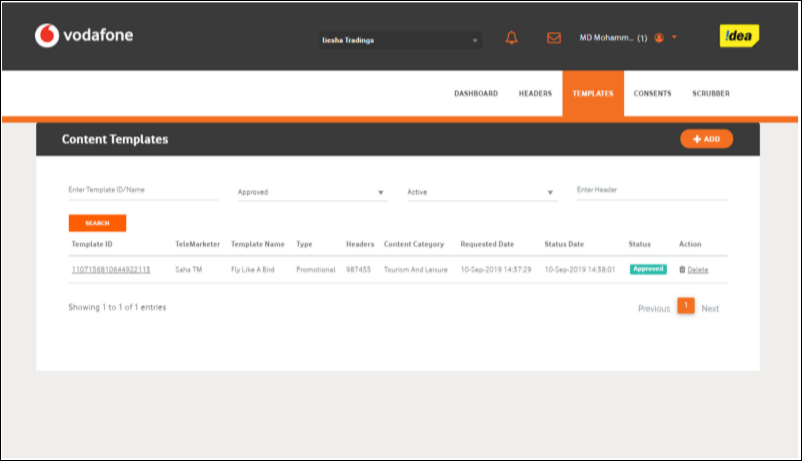
You can view the details of all your templates on the template listing page.

template pending approval

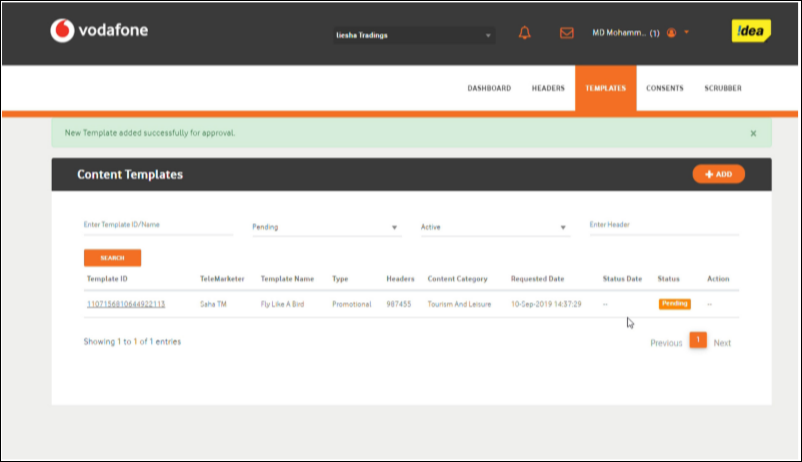
Once approved by the registrar, the template status will change to Approved.

template approved DLT


6. FAQs

For frequently asked questions regarding these new regulations, please visit https://www.vilpower.in/faq/.


Any Questions?

Did you find this article helpful? Please let us know any feedback you may have in the comments section below. We’d love to hear from you and help you out!

Sign-up Users Without Access to Email Inboxes

1. Feature Overview

Using this feature, you can enable users without access to email inboxes to log in to your LeadSquared account.

Let’s say you have vendors, delivery partners, or third-party service providers that don’t have access to email inboxes. You can first create users for them in LeadSquared using dummy email addresses (example.vendor1@gmail.com, example.vendor2@gmail.com, etc.). Once the users are created, instead of receiving a link in their inbox, they can simply log in with the dummy email address, enter their phone number and OTP, and then proceed to set their passwords.

Note: Once enabled, this setting is active at the user level. You can specify which users you want the alternative log-in flow to apply to.


2. Prerequisites


3. How it Works

There are 3 configuration steps involved –

  1. Create a user field (text or dropdown). This field will be used as a flag for each user you want the alternative log-in flow applied to.
  2. Populate the user field for the specified users with the input ‘Yes‘.
  3. on the Advanced Configuration page, configure the Configure Custom Fields for User On-Boarding in Mobile App setting.
    • On the Configure custom fields for User on-boarding in Mobile App pop-up, select the custom user field you’ve created in the previous steps.

All users with the configured custom field populated with ‘Yes’ will now be able to log in without accessing their email inboxes.


4. Configure Custom User Field

First, create a custom user field. This custom user field can be named as per your convenience (e.g., “Custom 2”, “User Auto Sign Up”, etc.). To know how to create one, please refer to Manage User Custom Fields.

Once the custom user field is created, populate the field with the value ‘Yes‘ for the specific users you want the setting applied to –

  1. Navigate to My Profile>Settings>Users and Permissions>Users.
  2. Against an existing user, hover your cursor over the  icon, and click Edit.
    • To know how to create a user, please refer to Manage Users.
  3. On the Create User/Edit User pop-up, click Other Details.
  4. Click Edit, for the field value of the custom field you created, enter the word “Yes“.
    • If you’ve created a dropdown field, then choose the dropdown value “Yes“.
    • The custom field that’s used in the below GIF is named “Custom 8”.
  5. Once you’re done, click Save.

LeadSquared User Onboarding


5. Configure Advanced Setting

Once you’ve created and configured the custom user field, enable the corresponding advanced setting. To do this –

  1. Navigate to My Profile>Settings>Profile>Advanced Configuration.
  2. Against Configure custom fields for User on-boarding in Mobile App, click Configure.
  3. On the pop-up, from the Mobile user onboarding field(s) dropdown, select the custom user field that you created and configured.
    • You can only select one custom user field.
  4. Once you’re done, click Save. Your users can now sign-up and configure their LeadSquared account on their own.

LeadSquared User Onboarding


6. User Sign-In

Your users can log in to the LeadSquared mobile app with the email ID that’s been provided. After entering the email Id, they’ll be prompted to enter their phone number and OTP before configuring their account password.

  1. Open the app, and tap Login.
  2. Enter the user email ID with which the user was created, and tap Continue.
  3. Enter the user’s mobile number, and tap Send OTP.
  4. Enter the OTP you received on your mobile number, and tap Continue.
  5. Set a password, confirm the password, and then click the LeadSquared Mobile Tick icon.
  6. Your password and mobile number are saved, and your account is now successfully created.

LeadSquared User Onboarding


Any Questions?

Did you find this article helpful? Please let us know any feedback you may have in the comments section below. We’d love to hear from you and help you out!

How can Admins Set Passwords for Other Users?

Administrators can set passwords for any user. This is useful when users want to change their passwords but aren’t receiving the password reset email after resetting their passwords themselves.

Changing the Password

  1. Navigate to My Account>Settings>Users and Permissions>Users.
  2. In the users list, hover over the wheel icon alongside the user whose password you want to change, then click Change Password.
  3. On the Change Password pop-up, enter the new password. You can click Show alongside the text box to view your password as you type it in. Be sure to meet all the password criteria appearing in the prompt and try and set a strong password. Then click Save.

Change a User's Password

How to Use Advanced Search?

1. Feature Overview

Advanced Search feature of the LeadSquared application allows you to search for leads that satisfy one or more conditions. This feature is useful when you want to make a list of Leads that satisfy multiple criteria. For example, Leads coming from California, Leads from the education industry and Leads who submitted a form on a particular landing page could be advanced search conditions.


2. Use Cases for Advanced Search

You can use the advanced search feature during any one of the following scenarios –

  • You want to see any last activity on a lead or a specific last activity on a lead. See Advanced Search: Last Activity on a Lead.
  • You want to see leads on which there was some activity in the last few days.
  • You want leads that are submitted on a particular landing page, using a particular keyword to arrive at the page, who are from a specific location and belong to a specific industry type.
  • You want leads who received a particular email campaign, who clicked on a link in that email, whose job title is similar, and from a specific industry type, and time period as yesterday, since, maybe you ran a campaign yesterday.
  • You want leads that visited a particular web page on your website (typically a pricing page), who are from a specific location, and from a specific industry, in the last 30 days.


3. How to Perform an Advanced Search

  1. Go to  Leads>Manage Leads. The Manage Leads window will appear.

LeadSquared Advanced Search

2. In the Manage Leads page, click Advanced Search. The Advanced Search pop-up box appears.

3. Click on Any Criteria to search for leads that match any selected search criteria.

4. Click on All Criteria to search for leads that match all the search criteria.

LeadSquared Advanced Search

Advanced Search feature allows you to search leads based on two broad categories, namely, Activity and Lead Details.

1. Activity

This is any type of action that the lead has performed. Activity also has different sub-divisions or criteria, based on which you can search leads.

  • Sales Activities –  These are sales-related activities that were made by the customer. There are 15 sales activities which you can configure. Out of these, Product, Order Value, Sales Date and Sales Owner are mandatory fields, and are available in the search criteria. The remaining sales activities, if selected as Show In Form from the Sales Activity Fields section will be available as search criteria. For more information on Sales Activities, refer to Sales Activity Management.
  • Email Activities –  These activities are related to the lead’s response with respect to Email Campaigns and Autoresponders that you send. It includes Email Sent, Opened, Bounced, Link Clicked, Marked Spam, Unsubscribed, Inbound Lead through Email and View in Browser Link Clicked.
  • Web Activities – These activities are related to the lead’s presence on a particular website. It includes Page Visits on the Website.
  • Landing Page Activities – These activities are related to the lead’s response with respect to your landing pages. It includes Conversion Button clicked and Form Submitted on the website.
  • Phone Activities – These activities are related to the lead’s response with respect to the phone conversations with the marketers. It includes Inbound and Outbound Phone Call Activity.
  • Other Activities or Custom Activities – These are the activities which you can create based on your requirement. There are also some sample activities, based on which you can create your own activity.

Note:

  • In Advanced Search for Opportunity Activities, filters can only be applied within a 90-day time frame.
  • You can search using Custom Activity which you create from Custom Activities & ScoresThe additional fields for the custom activity can also be used along with the custom activity as the search criteria in Advanced Search. For more information on Custom Activities and additional fields, refer to How to add Custom Lead Activity and associate a Score to it?
  • If you get an error notification while performing an Advanced Search with wildcard operators (Contains, Does not contain, Starts with, and Ends with), you might have exceeded the rate limit. To know more, refer to Wildcard Search Limitations.

2. Lead Details

These are the lead fields that are present in LeadSquared, the fields that you have created. You can also search for leads based on Lead Details. Typical examples could be Lead Source, Lead Stage, Country and so on. You can select any relevant criteria.

3. Tasks

Tasks can be used as a filter to search for leads. You can find leads with –

  • Open tasks of specific task type
  • Overdue tasks
  • Tasks that were completed yesterday
  • Tasks that are due today for a particular owner


4. Selecting Activity as a Search Criteria

1. In the Select Search Criteria section under Advanced Search, select an activity from the drop-down. Set the condition as Is –

LeadSquared Advanced Search

2. As mentioned above, you can select criteria based on the Lead Activity. It could be again sub-divided into activity related to Email Campaigns, Landing Pages, Websites or even Phone Calls (You must have enabled Super Receptionist connector). Select the required activity. For example, in the screenshot below, Conversion Button Clicked is selected.

LeadSquared Advanced Search

3. Next, select the Landing Page or Website on which the condition has to be satisfied. The Landing Page or Website can either be selected from the drop-down, or typed in. In the screenshot below, Any Landing Page is selected –

LeadSquared Advanced Search

4. Next, select the time interval, during which the lead has performed the particular activity. The time interval can be all time, today, yesterday, this month, this year or even a custom time interval. In the screenshot below, Custom is selected and the Start and End Dates are specified.

LeadSquared Advanced Search

5. Click on Find Leads button to see the leads that satisfy the specified criteria. You will be redirected to the Manage Leads page, with the leads that satisfied the criteria, being displayed.

LeadSquared Advanced Search


5. Selecting Lead Details as a Search Criteria

1. In the Select Search Criteria section under Advanced Search, select any relevant Lead Detail from the drop-down. In the image, Lead Stage is selected –

LeadSquared Advanced Search

2. Select the required condition in the next dropdown. In the screenshot below,
Is is selected –

LeadSquared Advanced Search

3. Next, select the available lead stage options from the drop-down list. Note that these lead stages are already present in LeadSquared. In the image below, Opportunity is selected –

LeadSquared Advanced Search

4. Once you have specified the conditions, click on the Add button. Similarly, you can specify any number of criteria to filter the leads. You can also choose, whether all the selected criteria is to be satisfied, or any of the criteria is to be satisfied –

LeadSquared Advanced Search

5. Click Find Leads button to see the leads that satisfy the specified criteria. You are redirected to the Manage Leads page, with the leads that satisfied the criteria, being displayed.


6. Creating a List of Leads who Satisfy the Criteria

1. After you specify the conditions and retrieve the relevant leads, you can create a list of those leads. Select all the displayed leads and hover over the Actions button. Click on Add to List –

LeadSquared Advanced Search

2. The Add to List box opens up. Here, you can add the leads to an existing list or create a new list. Click Add once you have chosen the list –

LeadSquared Advanced Search


7. Selecting Tasks as Search Criteria

In this example, we’re searching for all leads with Overdue tasks –

Advanced-Search-Tasks


8. Search Up to 1,000 Values in a Single Advanced Search

You can search up to 1,000 comma-separated values (for Text, Email, Number, and Phone lead fields) using the In operator on Advanced Search (provided the total character count doesn’t exceed 20,000). This allows you to copy large data volumes from CSV files, and use it to filter leads using fewer search conditions.

Note:

  • For this setting to work, you must enable the Include in Quick Search setting for these lead fields.
  • This feature is available in Advanced Search across the platform, including Automation.
  • This setting isn’t available by default. To enable it on your account, contact your account manager, or write to support@leadsquared.com.

LeadSquared Product Updates


9. Troubleshooting

1. Conditions not visible/No options appearing under the Advanced search conditions drop-down.

If no options appear when selecting your advanced conditions, it may be due to interfering browser extensions. Removing the extensions should resolve the issue. If you need more assistance, contact us at support@leadsquared.com.


Any Questions?

Did you find this article helpful? Please let us know any feedback you may have in the comments section below. We’d love to hear from you and help you out!

How to use LeadSquared connector for Ameyo?

1. Feature Overview

The Ameyo Connector allows to use LeadSquared within the Ameyo Contact Centre application. Unlike other LeadSquared connectors, this allows you to embed LeadSquared within the Ameyo application. It allows you to manage lead activities and capture all lead details at one place. Ameyo is an all-in-one customer interaction suite. For more information on Ameyo, visit: http://www.ameyo.com.

The Ameyo connector –

  • Prevents lead leakage by tracking phone calls as leads and activities.
  • Let’s you access call recordings of inbound calls.


2. Prerequisites

You should be an administrator user of both LeadSquared and Ameyo Contact Centre applications.


3. Installation

  1. From the Leadsquared main menu, navigate to Apps>AppsMarketplace, search for the Ameyo Connector.
    • Alternatively, on the Apps Marketplace page, on the left panel, click Contact Centre. The Ameyo Connector is listed here as well.
  2. On the connector, click Install.
  3. Once the connector is installed, click Configure.
  4. From the Select Solution drop-down box, select Ameyo.
  5. Enter the details in the following fields which pops up after the solution is selected –
    • Virtual Number – Enter the virtual number. Example: +91-9876543210 or 1800XXXXXXX
    • URL: Disposition Codes – Enter the URL to retrieve disposition codes from Drishti Soft. Example: http://123.45.678.900:8786/getDisposition/getDisposition.php
    • URL: Call Dispose – Enter the URL to dispose the call.
    • Enable Click to Call – Check this box if you want to enable click call.

Ameyo

  1. Enable Click to Call – Check this box if you want to enable click call.
  2. Click Save Configuration.
  3. To authenticate, log on to the Ameyo portal using your LeadSquared user ID and password.

Note: Please note down or copy the Single SignOn URL, Customer URL and Home Page URL. These are user-specific and should be provided to the Ameyo team.


4. Incoming and Outgoing Calls

In Ameyo, for existing leads, any incoming call or number dialled pops up the existing Lead Details page of the corresponding lead. For new leads, any incoming call or number dialled will pop-up the Add Leads page for the corresponding lead.

corrected lead details ameyo

lead create with ameyo

The Add Lead pop-window will open for new leads with the telephone number of the new lead as the first name from any inbound/outbound call.


5. Integrate with Opportunities

You can integrate the Ameyo connector with LeadSquared Opportunities. To know how to do this, please refer to Opportunity Integrations in Telephony.

This will enable you to track phone call interactions with your leads, for each opportunity or potential deal. Completed calls will get posted as activities, against the respective opportunities, on the Opportunity Details page.

To integrate with opportunities, you must complete the following steps –

  1. The Opportunity Mapping Id, the Opportunity Id and the Opportunity Type are passed to the telephony provider in the Click2Call request. This is done automatically, and it does not require any action from your end.
  2. Then, you must set up a Single Sign-On URL in a manner such that for every request, we receive all the Ids mentioned in the previous step.


Any Questions?

Did you find this article helpful? Please let us know any feedback you may have in the comments section below. We’d love to hear from you and help you out!

Customize Agent Popup Form

Agent Popup : 

In the context of Telephony Integration, you may enable Real time Inbound Call Notification to the User, seen in the form of an Incoming Call Popup, whenever an inbound call from a lead (made to your SR number) is routed to the LeadSquared User.

Note: You can launch the agent pop-up directly from the search leads box if you have integrated a telephony connector and set the ‘Show agent pop-up’ configuration to ‘On’. Refer to the figure below for details.

Insert the Super Receptionist API (Copied in earlier step) in the API Key field for Agent popup and Click Enable.

configure SR

Below is an image of sample Inbound Call Pop-up for you.

popup with view details

  • Users can capture lead data in the fields on popup and Save the data for the Lead.
  • Any call notes captured in the ‘Notes’ field on pop-up will be added as a note for the Lead in Lead details page.

Customize Agent Pop-up Form: The Pop-up form can also be customized to add required fields to it in your LeadSquared account.

  • Please note: A few mandatory fields can not be removed from the Agent Pop-up Form.

Navigate to My Account > Settings > Customization > Lead Forms. Select Agent Pop-up Form from drop down.

Agent popup form customization

Customize and Save the form.

Necessary Settings for the Popup to appear:

In your LeadSquared account make sure you have Users having phone numbers corresponding to your agents in Super Receptionist.

  • Associate respective SR Agent Phone numbers  to the Users of your LeadSquared account.

An Administrator can do this while Creating Users or by Editing existing Users.

You can update phone number of your LeadSquared users at My Account -> Settings -> Users & Permissions:

User Settings


Also, Users can associate a phone number in their LeadSquared account (It has to be same as their Agent phone number in SR account).

To Associate phone number Navigate to : My Account > Settings > Account Settings > My Profile

Select Show incoming Call Pop-up. This enables Agent Call Notification.

Associate phone number for Agent

If you have any queries, please write to us at support@leadsquared.com.

How to read Activity by Users Report

LeadSquared provides powerful analytics as a part of its product. Now we have added one more report to make you understand how Activities posted by users are being counted.

This report will explain you the number of activities performed by your users .

Activity by user

Activity Owner – The users in your account who have performed an activity on the leads.

Activity Types – You can select the number of activity types that will be displayed as row headers to split the data based on the activity type as shown in the above image.

Activity Time Range – Used to filter the leads based on their activity posted date.  In the above image, I have selected last year, so the report will show the number of leads on which the activity was performed.

Hope the above report helps you in understanding Activities posted by your users.

How to read Lead Distribution Analysis (3 dimensional)

LeadSquared provides powerful analytics around marketing and sales to help you fine-tune your business processes. Now we have added one more report to make you understand how Lead Distribution happens in your account.

This report is accessible  Reports -> Lead Insights -> Lead Distribution Analysis – 3 fields .

This report works on based on 3 fields as explained below

3 dimension report

Select Label (First Column ) – The Lead field which you select will be displayed in the first column of the report, in the above image, I have selected Lead Source.

Select Values (header row) – The Lead field selected will be displayed as a row header of the report, the data will be split based on the field which you have selected in this section. In the above image, I have selected Lead Owner field.

Select Field (Second Column) – The Lead filed selected here will be used to further classify the number of leads . Example : in the above image I have chosen Source as 1st column and Lead Stage in the second column, where the report now gives you a report In Lead Source for a particular Lead Stage how many leads have been distributed for the Owners.

Filters  Can be used if you wish to filter the data on specific criteria.

Lead Created in time Range -Used to filter the leads based on their created dates.  In the above image, I have selected last month, so the report will show the lead distribution for only those leads which were created last month.

Hope this report solves your Lead Distribution question.

How to Add Social Sharing Buttons to Your Email

Great content gets reads. Content that is easy to share, gets shared. So encourage your readers to share the great stuff you send them, on social media. The social sharing buttons in each email makes it easier for your reader to share!

Social Sharing buttons allows you to increase the engagement capability of your Email with Social Media.

This tutorial video helps to understand how to improve the the sharing capability of your Emails using Social Sharing buttons.

Manage Marketing Tags

1. Feature Overview

Use marketing tags to identify and filter out specific landing pages, email campaigns, and automations. For example, let’s say you’ve applied a marketing tag named ‘Christmas offer’ on a set of email campaigns. If you want to find the email campaigns created with this tag, on the Email Campaigns page, enter the tag name in the Filter by Tag bar.

Note:


2. Prerequisite

You must be an Administrator or a Marketing User of your account.


3. Create Marketing Tags

3.1 On Settings Page

  1. Navigate to My Account>Settings>Leads>Marketing Tag Manager.
  2. Click Create.
  3. Enter the marketing tag name.
  4. To save your tag, click .
  5. To save and add a new tag, click Save & New.

LeadSquared - Create marketing tags

3.2 On Email Campaigns Page

  1. Navigate to Marketing>Email Campaigns and click Create Email Campaign.
  2. On step 3, under Marketing Tags, write the name of your tag. You can also choose an existing tag here.
  3. Click Next and finish creating your email campaign.
Note: Create a Marketing Tag in Landing Pages designer using the same method. On step 3, under Apply Tags, write the name of your tag.

LeadSquared - Create marketing tags on email campaign


4. Other Actions

  • To edit a marketing tag, alongside the tag, click Edit.
  • To delete a marketing tag, alongside the tag, click delete.
  • To search for a specific marketing tag, enter the tag name in the Search Tags bar.

LeadSquared - Marketing tags other actions


5. Apply Filters based on Marketing Tags

You can filter out email campaigns using Marketing Tags –

  1. Navigate to Marketing>Email Campaigns.
  2. Alongside Filter by Tag, click the dropdown and select the Marketing Tag. You can select multiple tags.
Note: You can apply these filters for Landing Pages and in Email Library using the same method.

LeadSquared - Apply marketing tag


Any Questions?

Did you find this article helpful? Please let us know any feedback you may have in the comments section below. We’d love to hear from you and help you out!

Customizing Email Footer Message

1. Feature Overview

Default footer messages are included in all email campaigns. You can edit this message and customize it according to your requirements.

Note: To know more about Email Campaigns, see Email Campaign – Feature Guide.


2. Prerequisite

You must be the Administrator or the Marketing User of your account.


3. Customize Email Campaign Footer Messages

To customize the footer message of an email campaign –

  1. Navigate to Marketing>Email Campaigns and click Create Email Campaign.
  2. Select a Message Template and move on to Step 2.
  3. You can see the default footer message on the bottom of the email draft. Click on this row.
  4. Write your new footer message.

LeadSquared - Customise email campaign footer message


Any Questions?

We’d love to answer your questions or hear your own unique use cases. Feel free to share your experiences in the comments section below.

Enable Dynamic Forms on Offline Mode in the Mobile App

Feature Overview

Offline-compatible dynamic forms can be used on the mobile app without an internet connection. You can enter information on the form and save it as a draft. However, you can only submit the form once you’re back online. These saved drafts will be displayed under Offline: Pending Sync.

Offline-compatible forms are displayed on the Manage Forms page as shown below –

LeadSquared - offline compatible form

Note: In order to identify whether an existing form is offline-compatible or not, the form needs to be republished.


Enable Dynamic Forms in Offline Mode

To enable dynamic on offline mode –

  1. Navigate to My Profile>Settings>Mobile app>Permissions and under Offline Leads, enable the Allow Access setting.
  2. Navigate to My Profile>Settings>Mobile App>Additional Settings and under Forms, enable the Offline Dynamic Forms setting.
  3. On the mobile app –
    1. Tap LeadSquared - Mobile app menu.
    2. Tap Setting icon.
    3. Tap Offline and and enable the Leads setting.

Note: Offline-compatible forms will be accessible to users only for the following Add lead work areas for mobile in the Portal Designer

  • Lead list 
  • Lead Smartviews 
  • Leads Near me
  • Accounts
  • Opportunities 
  • Home builder 

LeadSquared - Enable dynamic forms in offline mode


View Saved Dynamic Forms

To view the saved drafts of the dynamic forms on the mobile app –

  1. Tap LeadSquared - Mobile app menu.
  2. Tap Offline: Pending Sync.
  3. Tap Forms. and select the relevant saved form to view.

LeadSquared - Offline forms in mobile


Limitations

A form cannot be offline-compatible if it has any of the following:

  • Fields –
    • Email OTP
    • Phone/PhoneText OTP
    • Iframe
    • LOS
    • Account
    • Associated lead field
    • Associated opportunity field
    • Lead CFS field
    • Grid/tiles
    • File export field
    • QA/Bar code field
    • Payment(Not supported in Mobile Apps)
    • Captcha (Not supported in Mobile Apps)
  • Rules:
    • Set Value from Lapp/API/Mavis
    • Set Options from Lapp/API/Mavis
    • Data From File Lapps


Any Questions?

We’d love to answer your questions or hear your own unique use cases. Feel free to share your experiences in the comments section below.

How to Share a Lead via Email

You can share a lead’s information with other users in your account over email.

Note: To give a user temporary view or edit access to a lead, see How to Share Leads for a Limited Duration.

Follow these steps to share a lead via email –

  1. On the main menu, navigate to Leads>Manage Leads.
  2. Hover your cursor over the actionsSettings iconwheel, then click Share Via Email.

share via email

On the Share Lead Info Via Email pop-up,

  • Use the Email to field to add more users you want to send the email to
  • Use the Notes field to add relevant information or context to the email

Click the Email button when you’re done.

share via email popup

The selected users will now receive an email like the one shown below. They can click the View Lead Detail link to navigate to the Lead Details page in LeadSquared. Note that only users with permission to view the lead will be able to see the lead details page.

share lead email


Any Questions?

Did you find this article helpful? Please let us know any feedback you may have in the comments section below. We’d love to hear from you and help you out!

Exotel Connector

1. Feature Overview

This Connector enables you to integrate Exotel with your LeadSquared system, if you are using Exotel for business to capture the leads with their phone number directly in your LeadSquared account. The features of this Connector are –

  • Prevents lead leakage by tracking phone calls as leads and activities.
  • Ability to make outbound calls (click to call) and automatically track the calls in Lead Activity History.
  • Access call recordings of inbound and outbound calls.
  • Route incoming calls from existing leads to respective lead owners. (Sticky agent)
  • Displays lead information pop-up to LeadSquared Users when an incoming call is received.


2. Prerequisites

  • You must be an Administrator user to install and configure the Connector.
  • You should have an active Exotel Account and must have access to its panel.


3. Procedure

  1. From the default LeadSquared dashboard, navigate to Apps>Apps MarketplaceThe Marketplace window appears.

LeadSquared Exotel Integration

2. In the left pane, click Telephony and select Exotel Connector from the right display pane.

LeadSquared Exotel Integration

3. Click Install. Once the installation is completed, you are redirected to the section where you can configure the connector.

4. Under the Settings section, click Configure. The Configure Exotel V2 appears.

LeadSquared Exotel Integration

Note: You can Disable, then Remove the connector from here at any time after installation and configuration.

You can configure the following features for Exotel –

  • Virtual Numbers
  • Call Route
  • Agent Popup
  • Call Logs
  • Click 2 Call

3.1 Virtual Numbers

Virtual Number is your Exotel Phone number given by the Exotel Telephony provider. To obtain Exotel Phone numbers log onto your Exotel account and click ExoPhones tab under Admin.

LeadSquared Exotel Integration

Add the ExoPhone number in Virtual numbers section (on popup) in the Phone field and Tag it with a name for reference and click Save.

LeadSquared Exotel Integration

Note: International phone numbers are also supported in the virtual numbers (Caller Id) field. For more information, see Organization Settings – Advanced Configuration.


3.2 Call Route

You may Route calls made by the existing Leads in LeadSquared to their respective Lead Owners using Call Route.

Note – Call Route is not mandatory and you may use Sticky Agent feature of Exotel to route calls to the first agent who answered lead’s call earlier.

However, if you wish to enable call routing to lead owners, follow the procedure below –

  1. Copy the Call Route URL from the Call Route tab on popup.

LeadSquared Exotel Integration

ii. From the Exotel Panel navigate to App Bazaar>Installed Apps and click Edit Call App.

LeadSquared Exotel Integration

iii. Paste the copied URL in the Dial Whom section of the Connect Applet in the Exotel Panel.

Note – Paste the URL in all places of the call flows wherever the Connect applet is used.

LeadSquared Exotel Integration


3.3 Agent Popup

You can enable incoming call notifications for agents who see it as an Incoming call popup on active LeadSquared pages. To do this –

  1. Copy the Screen popup URL in the Agent Popup tab of the Configure Exotel pop-up.
  2. Click on Enable button to enable Agent popup notifications.

LeadSquared Exotel Integration

iii. On the Exotel panel, go to App Bazaar and click Edit Call AppThe Call Flow setup appears.

LeadSquared Exotel Integration

iv. In the Call Flow, paste the ScreenPopup URL in Create Popup section of the Connect Applets.

This ensures a popup is shown when a call lands on an Agent’s phone number.

LeadSquared Exotel Integration


3.4 Call Logs

All Inbound and Outbound calls made through Exotel Telepony service can be tracked in LeadSquared in Lead Activity Stream available under Leads Menu.

  1. Copy the Webhook URL for Call Logs.

LeadSquared Exotel Integration

ii. In the Exotel Panel, go to App Bazaar and click Edit Call App to view the call flow setup.

LeadSquared Exotel Integration

iii. Under Voice Applets, find Passthru Applets and place the Call Log Webhook URL in Information Pass Through section on the Passthru Applet. Information Pass Through sends the call log details to LeadSquared.

Note – Passthru Applets is found in Connect Applets to post call logs after a call ends. Passthru can also be used in the Voice Mail Applets also in cases where the call was not answered by any agent. Ensure All Passthru applets are provided by Call Log webhook URLs so that no calls are missed in LeadSquared.

LeadSquared Exotel Integration


3.5 Click 2 Call

You can enable click to call feature for your Users to be able to initiate outbound calls to leads directly from LeadSquared.

  1. Add the Exotel API Key and Servide ID in the text boxes as shown in the image below.
  2. Click Enable, and then click Save.

To obtain API Key & Service Id from Exotel –

  1. From your Exotel home window, go to My Accounts>Settings and select the API Settings tab.
  2. Exotel SID is the Servide Id. Copy the value and place it in Service Id on LeadSquared configuration popup.
  3. Exotel Token is the required API Key. Paste the value of Exotel Token in configuration popup.

LeadSquared Exotel Integration


4. Making Click 2 Call (Outbound Calls) using Async APIs

Use LeadSquared’s Async API framework to ensure more reliable call logs posting for outbound calls.

  1. First, you must enable Async APIs for your account. Navigate to My Profile>Settings>API and Webhooks>Async API, and click Yes to enable it.

Async API Keys

ii. Then, navigate to My Profile>Settings>Organization Settings>Advanced Configurations, and enable the Enable Async APIs for Telephony (Capras) setting.

Once these settings are enabled, the Async APIs will be used to post call logs for outbound phone calls made from LeadSquared. This will be visible in the telephony call logs (navigate to My Profile>Settings>API and Webhooks>Telephony Logs). When you view the call log data, the Async API URL will be visible. For example –

https://asyncapi-in21.leadsquared.com/2/api/telephony/logoutboundcall/4f4b088ffa0a7afd9c617061bd7920b72d?xapikey=<x-API-key>

Exotel Integration with LeadSquared


5. Outbound calls through Exotel

LeadSquared allows you to make outbound calls, through the Exotel Connector.  After your connector configuration is done you will see an option to initiate a call in three places –

  • Manage Lead

LeadSquared Exotel Integration

  • Lead Details

LeadSquared Exotel Integration

  • Lead Activity Stream

LeadSquared Exotel Integration

Exotel is successfully integrated and configured in your LeadSquared Account.

Note – Please Ignore the Single Sign-on and Call Disposition sections. These essentially are for other cloud telephony connectors.

For any queries please write to us at support@leadsquared.com.


Any Questions?

Did you find this article helpful? Please let us know any feedback you may have in the comments section below. We’d love to hear from you and help you out!

Integrate Super Receptionist right from SR Panel

Integrate Super-Receptionist with LeadSquared

Super Receptionist  (SR) is a personal reception hosted virtually in a Cloud Telephony environment.

If you are using Super Receptionist for your business, you can integrate it with LeadSquared to capture the lead with its phone number directly in your LeadSquared account.

Super Receptionist connector in LeadSquared allows you to:

  • Track incoming calls from leads.
  • Create Leads with phone number.
  • Merge phone numbers with existing lead details.
  • Direct/Route incoming calls from leads to respective lead owners.
  • Make outbound calls using Click to call feature
  • Track outbound calls.
  • Agent Call Notification Popup can be enabled for Users when an Inbound call is routed to them.

Prerequisites:

  • You must be an Admin User of your LeadSquared account.
  • Your LeadSquared plan supports telephony integration
  • You are using the Super Receptionist (Knowlarity) service. It is configured and active.

Essentially SR – LeadSquared Integration can be done from both the panels, you may choose either of the two per your convenience.

This article describes the procedures for integration from Super Receptionist panel.

For Integration Set-up procedure from within LeadSquared Application see:

Super Receptionist Connector (Version 2)

Integrate Super Receptionist from SR Admin Panel.

Procedure:

A. You would need the following from LeadSquared Account:

1. API Access Id & 2. Secret Key from your LeadSquared Account.

here is how you can obtain these:

Navigate to My Accounts > Settings > API and Webhooks.

Click on Show Secret Key.

Incase you do not find Access Key and Show Secret Key button on the grid, click Generate key.

You will see an API Access Key popup with API Access Id and Secret Keys.

Copy the Access Id and Secret Key.

B. Now, login to SR panel and navigate to Settings > Integrations.

Locate LeadSquared and click Enable Now.

Sr Panel for Integrations

You will see LeadSquared Configurations page.

Enter or Paste the Access Id and Secret Key (copied earlier) in the corresponding fields;

Select SR Number & Click Save.

Super Recep Panel settings

That is all, your Super Receptionist Account is now integrated with your LeadSquared Account.


For help with Integrating your SR account with LeadSquared from within your LeadSquared Account refer to:

Super Receptionist Connector (Version 2)

Custom Dashlet Builder App

1. Feature Overview

You can build Custom Dashlets to monitor lead stats straight from your dashboard. You can control who gets to access these dashboards and display specific dashlets to different users.


2. Prerequisites

  1. To install the Custom Dashlets Builder app, you have to be the Administrator of your LeadSquared account.
  2. Once the app is installed, Administrator & Marketing users can build/create custom dashlets and add them to the library for users to use/add these dashlets to their custom dashboards.


3. Types of Dashlets

  1. Lead Distribution by 1 Lead Field.
  2. Lead Distribution by 2 Lead Fields.

These Dashlets can be specifically created for 2 kinds of user roles –

  1. All Lead Access – Admin, Marketing & Sales Manager roles
  2. Restricted/Sales User Access – Sales Users roles.

Dashlets thus created will be available for users based on the lead access specified.


4. Installation

  1. From the main menu navigate to Apps>App Marketplace, select the Analytics Category and under the Custom Dashlets Builder app click Install. Alternatively, you could just search for the app directly from the Apps Marketplace.
  2. Once installed, hover the cursor over the SettingsSettings iconicon and click Configure.

Custom Dashlet App


5. Create a New Dashlet

Now that the app is installed, Admin/Marketing users can start building custom dashlets from Dashlet Builder available under the Apps Menu.

  1. On the main menu, navigate to Apps>Dashlet Builder.
  2. Click Add Dashlet.
  3. After filling in the necessary fields (described below), click Preview to see what your dashlet will look like.
  4. Click Save when you’re done.
Note: There is no limit to the number of Custom Dashlets you can create. However, you can add a maximum of 12 Custom Dashlets to your dashboard at a time.

dashlet builder

Here are the fields you need to populate to add a new dashlet –

 Field Description
Name Enter a name for the dashlet
Description Enter a description
Height Height of the dashlet in pixels. This helps dashlets with large content render better on your dashboard. 360 px is the default height.
Dashlet Type
  1. [All Leads Access] – Lead Count distribution by field:
    Admin, Marketing & Sales Managers will have access to this dashlet. It will show you the count of leads for one field (e.g. Lead Stage).
  2. [All Leads Access] – Lead Count distribution by two fields:
    Admin, Marketing & Sales Managers will have access to this dashlet. It will show you the count of leads for two fields. Select one as Lead Label Field and the other as another as Lead Column Field.
  3. [Sales User Acess] – Lead Count distribution by field:
    This dashlet will only be visible to Sales users. It will show you the count of leads for one field.
  4. [Sales User Acess] – Lead Count distribution by two fields:
    This dashlet will only be visible to Sales users. It will show you the count of leads for two fields. Select one as Lead Label Field and the other as another as Lead Column Field.
Select Report Type This option will only be available for the following dashlet types –

  • [All Leads Access] – Lead Count distribution by field
  • [Sales User Acess] – Lead Count distribution by field

You can choose to render these dashlets in tabular form, as pie charts or as bar graphs.

Apply Fixed Filter You can filter in or filter out the results by setting the appropriate filter for the dashlet. For example, if you wish to filter in/out leads of any specific Lead Stage you can add this filter.

Here’s what a Lead Distribution by a Lead Field (Lead Stage) dashlet looks like –

Dashlet by 1 lead field

And here’s an example of lead distribution by 2 Lead Fields (Lead Stage Vs Lead Source) –

Dashlet with 2 fields


6. Add a Dashlet to a Dashboard

To add custom dashlets to dashboard, navigate to the dashboard and click Add Dashlet.

Adding a Custom Dashlet

In the Add Dashlets pop-up, under Select Category, select Custom. Select your custom dashlet, then click Add.

Adding a dashlet to the dashboard

For any queries, feel free to write to us at support@leadsquared.com.


Any Questions?

Did you find this article helpful? Please let us know any feedback you may have in the comments section below. We’d love to hear from you and help you out!

Super Receptionist Connector (Version 2)

Integrate Super-Receptionist with LeadSquared

Super Receptionist  (SR) is a personal reception hosted virtually in a Cloud Telephony environment.

If you are using Super Receptionist for your business, you can integrate it with LeadSquared to capture the lead with its phone number directly in your LeadSquared account.

Super Receptionist connector in LeadSquared allows you to:

  • Track incoming calls from leads.
  • Create Leads with phone number.
  • Merge phone numbers with existing lead details.
  • Direct/Route incoming calls from leads to respective lead owners.
  • Make outbound calls using Click to call feature
  • Track outbound calls.
  • Agent Call Notification Popup can be enabled for Users when an Inbound call is routed to them.

Prerequisites:

  • You must be an Admin User of your LeadSquared account.
  • Your LeadSquared plan supports telephony integration
  • You are using the Super Receptionist (Knowlarity) service. It is configured and active.

You can now Integrate Super Receptionist account with your LeadSquared in the following 2 ways:

1. From LeadSquared Application (Detailed Procedure is described below)

2. Directly from Super Receptionist Panel. (For procedure refer to the below article)

Integrate Super Receptionist right from SR Panel

Below is the Procedure to:

Integrate Super Receptionist from LeadSquared Application

To integrate Super Receptionist with LeadSquared account you would just need to get the following:

  1. API from Super Receptionist panel.
  2. The Virtual Numbers associated with the SR account.

Here is the procedure to obtain the API Key and virtual numbers from your SR account panel.

A. Get your SR Virtual Number and API Key.

Log in to your Super Receptionist account to get the API Key and Virtual Number(s).

Your Super Receptionist phone number is your Virtual Number. Copy and Note it.

SR number 1

For API key : Navigate to SETTINGS > CALL FLOW > PLAN SETTINGS

Plansettings

In Plan Settings scroll down to the bottom of the page to find the API key of your SR account.

Copy and Note the API Key.


Setting up the Super Receptionist App in LeadSquared

 I. Navigate to APPS -> Apps Marketplace and click on “Telephony” from the list of categories.

You may also search for Super Receptionist.

You will see Super Receptionist V2. Click Install.

SR v2

Clicking on the connector, you will be redirected to Super Receptionist connector details page.

Hover the cursor over Settings and click Register option.

SR v2 register

If you wish to Register later the App will be available for you in Show Installed Apps tab section.

V2 sr

Once you click register you will see a pop-up, where you can register using the SR API Key and Virtual Numbers.

Key in the SR API key & Virtual Numbers obtained earlier. Refer to Step A.

Click Register.

SR reg popup

Once registered a success message appears and all the set-up will be automatically done for you both in SR panel and LeadSquared Super Receptionist App Configuration.

That is all.

Super Receptionist App is successfully configured and integrated with your LeadSquared account.


Here are the features that are configured automatically.

1. Call Logs

2. Click to Call

3. Agent Popup for Incoming calls

Note: Agent Popup needs a few necessary conditions to be satisfied, refer to the Agent popup details below.

4. LeadSquared Call Route Feature: 

Besides the first 3 features, LeadSquared also enables you to route the calls from existing leads to their respective Lead Owner.

To enable Lead Route your SR account must support the feature. Procedure to set-up is described in detail below.


Call Log:

All Inbound and Outbound calls made through Super Receptionist account can be tracked in LeadSquared in Lead Activity Stream available under Leads Menu.

Lead Activity Stream

LAS 2

Click 2 Call:

Users can now initiate Outbound calls to leads directly from LeadSquared.

Make outbound calls through SR connector in LeadSquared.

LeadSquared allows you to make outbound calls, through the Super Receptionist connector.  After your SR connector configuration is done you will see an option to initiate a call in three places:

  • Manage Leads (including lead page inside Lists)
  • Lead Details
  • Lead Activity Stream.

Manage Leads

C2C Manage Leads

Lead Details

Call enabled

Lead Activity Stream

LAS

3. Agent Popup: 

Real-time Inbound Call Notification can be shown to the Users in the form of an Incoming Call Popup, whenever an inbound call from a lead (made to your SR number) is routed to the LeadSquared User.

Note: Incoming calls matching a lead’s secondary phone number will be tracked without creating a duplicate lead.

Below is an image of sample Inbound Call Pop-up for you.

popup with view details

  • Users can capture lead data in the fields on popup and Save the data for the Lead.
  • Any call notes captured in the ‘Notes’ field on pop-up will be added as a note for the Lead in Lead details page.

Customize Agent Pop-up Form: The Pop-up form can also be customized to add required fields to it in your LeadSquared account.

  • Please note: A few mandatory fields can not be removed from the Agent Pop-up Form.

Navigate to My Account > Settings > Customization > Lead Forms. Select Agent Pop-up Form from drop down.

Agent popup form customization

Customize and Save the form.

Necessary Settings for the Popup to appear:

In your LeadSquared account make sure you have Users having phone numbers corresponding to your agents in Super Receptionist.

  • Associate respective SR Agent Phone numbers  to the Users of your LeadSquared account.

An Administrator can do this while Creating Users or by Editing existing Users.

You can update phone number of your LeadSquared users at My Account -> Settings -> Users & Permissions:

User Settings


Also, Users can associate a phone number in their LeadSquared account (It has to be same as their Agent phone number in SR account).

To Associate phone number Navigate to : My Account > Settings > Account Settings > My Profile

Select Show incoming Call Pop-up. This enables Agent Call Notification.

Associate phone number for Agent


 4. Call Route :

This feature enables automatic routing of calls from an existing lead to the respective Lead owner in LeadSquared automatically.

The Webhook URL (Lead Route URL) has to be deployed in your Super Receptionist Account.

In the Installed Apps section, locate Super Receptionist (V2) and click on Configure option seen on gear icon.

Call Route

configuration popup appears.

Call-Route-SR-update

Procedure to Setup Route Call Webhook in SR account: 

R1. Log In to your SR account and navigate to SETTINGS > HOOK API > Click Add API button.

Hook API

Add API pop-up appears.

R2. Add the Route Call Webhook next.

  • Select GET as the Request type.
  • You may enter any name as the Name for API or simply “Route Call Webhook” for reference.
  • Paste the corresponding Webhook URL that was copied and noted earlier.
  • Click ADD

route call webhook

R3. Setup LeadSquared CALL ROUTING API in SR account for each extension.

Now you can setup the routing of calls from existing leads to their respective Lead Owners in LeadSquared.

Navigate to Settings > Call Flow > Rules > After Answer Rule.

Edit each or required Extension/Rule where Phone is chosen as Action.

EDIT Rules

Once you click Edit option the After Answer Rule window opens up (For the chosen Rule)

  • Select YES for both Enable Fallback Rule and Use API for Agents options.
  • Next, from WhotoCall API select the relevant API name – Route Call Webhook, that you have specified earlier (In Step R2).
  • Also, you must select a Fallback Agents to receive calls in case the Lead Owner‘s number is busy.

Route API

Save Rule once these steps are complete.

save Call Route

Now, Once these settings are done, all incoming calls from leads will be forwarded to their respective lead owners and then to fallback agents (Incase the Lead owner is busy).

You may edit more “After Answer”  extensions in similar way.

Capture Sales Activities

1. Feature Overview

The Sales Activity feature lets you capture important information related to each sale (e.g., product sold, sales owner, date, order value, etc.). Depending on the nature of the business the Sales Activities are also known as Customer Sign-up, Order Capture, Purchase Order, Paid Subscription, New Registration, Enrollment, New Deal, etc.

These activities sum up to give you the total Revenue generated which can be tracked and analysed using the Sales and Revenue Reports and the LeadSquared Goals feature.

Note: This article describes how users (typically sales users and sales managers) can post sales activities on leads. To configure sales activities to reflect your business requirements, Admins can refer to Sales Activity Management.


2. Prerequisites

  • Only Admins and Marketing Users can configure sales activities.
  • Once configured, all users can post sales activities on leads.


3. How it Works

  1. Navigate to the Manage Leads or Lead Details page on LeadSquared.
  2. Select the option to add a new sales activity against a lead.
  3. Enter the appropriate details and save the activity.


4. Add Sales Activity for a Lead

Sales Activities can be added by Administrators, Sales Users, and Sales Managers.

4.1 Add an Activity From Manage Leads Page

1. Navigate to Leads>Manage Leads.

Sales activity leads nav

2. Alongside the relevant lead, hover your cursor over the LeadSquared icon and select New Sales Activity.

Sales activity new sales 2

3. Enter the relevant details in the New Sales Activity box –

Sales Activity Field Description
Status Select the status of the lead for the new sales activity.
Product Select the product being sold.
Order Value Enter the order value or deal size for the sales activity.
Sales Date Select the date and time of the sale.
Sales Owner Select the owner for the lead.

Once you’re done, click Save.

Note:

  • You can edit the Sales Activity Fields on the Settings page.
  • You can create multiple products that your users can choose from while creating a sales activity.

Sales activity new sales 1

4. If you would like to add an attachment (for example, an invoice) to the sales activity, click on the Attachments tab. Click Upload and select the required attachment. Once the attachment is uploaded, click Save and Close. Once the activity is saved, it is captured in the Activity History panel.

Sales activity upload 2


4.2 Add an Activity From Lead Details Page

1. Navigate to Leads>Manage Leads.

Sales activity leads nav

2. To view the Lead Details page, click the name of the relevant lead. Next, click on Sales Activity.

Sales activity new sales 11


5. Edit or Delete Sales Activity

5.1 Edit a Sales Activity

  1. On the Lead Details page, Under the Activity History tab, click on the sales activity edit icon against the lead activity.
  2. Make the required changes and click Save and Close.

Sales activity edit

5.2 Delete a Sales Activity

  1. On the Lead Details page, under the Activity History tab, click on the  sales activity delete icon against the lead activity.
  2. Enter a cancellation note and click Save.

Sales activity delete

5.3 Advanced Search

You can use advanced search to find leads where custom fields of activities contain or don’t contain data.

  1. Navigate to Leads>Manage Leads.
  2. Click on Advanced Search.
  3. Enter the search criteria for the activity and sales field you are searching for.
  4. Click on + Add to add the search criteria.
  5. Click Find Leads.

Sales activity advanced search

Note:

  • The default currency can be specified in the Sales Activity Settings by an Administrator.
  • Sales Activity can be renamed in the Sales Activity Settings by an Administrator to match your requirement.
    • Example: An education business may call it Admission or Enrollment.
  • Sales Activities can also be added through Smart ViewsManage Lists, and List Details page.


Any Questions?

Did you find this article helpful? Please let us know any feedback you may have in the comments section below. We’d love to hear from you and help you out!

Export Your Data from LeadSquared

1. Feature Overview

Before you deactivate or close your account, make sure you back up your data by exporting it from your LeadSquared account. This article details how you can export data from LeadSquared.

Note:

  • To export larger data sets of lead, activity, and opportunity data, refer to Large Exportable Reports.
  • If the value of a field starts with the following characters + , – , = , | , @ they will be enclosed within quotes in the exported CSV file. This is done to prevent issues that may arise in Excel (such as format issues, excel injections, etc.) as a result of special characters in the cells.


2. Export Leads

Note: You can only export 100,000 leads at once If you’d like to export more, refer to  How to Export More than 1 Lakh Leads?


3. Export Activities

To export system or custom activities, refer to Export Activities.


4. Export Opportunities

To export opportunities from LeadSquared, refer to Export Opportunities.


5. Export Users

To export users from LeadSquared, refer to Manage Users.


6. Export Email Campaign Data

Navigate to Marketing>Email campaign.

  • To export data from email campaigns –
    1. Hover your cursor over Actions.
    2. Click Export Campaign data.

LeadSquared - Export campaign data

  • To export specific lists of leads from the completed Email Campaign Reports (like leads that clicked on the email, leads that ignored the email, etc.) –
    1. Scroll sideways and hover your cursor over LeadSquared - Settings icon.
    2. Select View Report.
    3. Alongside the relevant list of leads, hover your cursor over Actions and click Export Leads.
Note: You can export upto 100,000 leads from the Email Campaign Reports.

LeadSquared - Export leads from email campaign report


7. Export Tasks

To export tasks from your LeadSquared account, refer to How to Create Tasks and Schedule Reminders?


8. Export Accounts

To bulk export multiple accounts from LeadSquared, refer to Accounts Management – Feature Guide.


9. Export Data from Mavis


10. Export SIERA Reports

To export data from SIERA Reports, refer to SIERA Feature Guide.


11. Export Audit Logs

To export your audit history reports, refer to LeadSquared Security Settings – Audit Logs.


12. Export Payment Logs

To export your payment logs, refer to Payment Logs.


Any Questions?

Did you find this article helpful? Please let us know any feedback you may have in the comments section below. We’d love to hear from you and help you out!

How to Configure Mobile App Notifications

Configure notification for your LeadSquared application in your mobile.

Set up device notifications for your users using LeadSquared mobile app. You can setup notifications for task reminders, new leads and lead assignments for your users.

Follow the the below instruction to install and configure mobile app notification.

  • Log on to your LeadSquared account in a web browser .
  • Go to Apps -> Apps Marketplace and click Mobile from the Categories section on the left pane of the window as highlighted in the below image. The LeadSquared Leadsquared Mobile App Notification appears.

2016-01-14_15-47-21

  • Click Install . Once the installation is complete, click Leadsquared Mobile App Notification and the Leadsquared Mobile App Notification window is displayed.

To configure:

  • Under Settings , click Configure. The Configuration pop-up box appears

2016-01-14_15-58-27

2016-01-14_16-04-25

  • Select the options , which sends the notifications when actions are performed.
  • Once selected , click Save Settings

There is also an option in the mobile application of LeadSquared to control to notification of the app.

You will receive the notification in your mobile to make sure that you do not miss any lead.

If you wish to disable or remove:

  • Go to Settings page of the Application and you will have an option to remove it or disable.

View a Lead’s Documents/Images in a Slideshow

1. Feature Overview

You can now view a slideshow of all the images that have uploaded to a lead in the Custom Field Sets (CFS). To know more, see Custom Field Sets.

2. Creating Custom Field Sets

  1. You will have to create a CFS for your lead. To do this, navigate to My Profile>Settings>Leads>Manage Custom Field Set, and then click Create.
  2. Once you have successfully created a CFS, you will have to add it to your lead.

Create Custome Field Set


3. Adding Custom Field Sets to Leads

  1. Navigate to Leads>Manage Leads, and click on any lead.
  2. Under the Lead Details tab, click on the edit Edit icon.
  3. Scroll down to the CFS you created, and upload relevant images under each category.
  4. Click Save once you have uploaded the images.

View Images in Custom Field Sets


4. Configuring the Custom Lead and List Action connector

    1. Navigate to Apps>Apps Market Place, search and Install the Custom Lead and List Actions connector.
    2. After installing the app, hover on the icon and click Configure.
    3. In the Lead Grid Row Action column, click on +Add Actions.
    4. Under Action Label, enter the name of the action you are creating. We’ve called it “View Documents”.
    5. For Action Type, choose Show as Popup.
    6. In the Callback URL box, paste –
      https://{hostname}/Widget/Slides?slideCode=1&entityId=@{Lead: ProspectID,}
      • Substitute “{hostname}” with the host of the region in which your account was created.
      • We have used “in21.leadsquared.com” for the Indian region (Mumbai). This would be –
        https://in21.leadsquared.com/Widget/Slides?slideCode=1&entityId=@{Lead: ProspectID,}
      • For India (Hyderabad), use “in22.leadsquared.com”
      • For the US region, use “us11.leadsquared.com”.
      • For the Singapore region, use “run.leadsquared.com”.
      • For the Ireland region, use “ir31.leadsquared.com”.
      • For the Canada region, use “ca12.leadsquared.com“.
    7. The HTTP Method should be GET.
    8. Click Save.
    9. Close the window, and reopen it again by hovering on the icon and clicking Configure.
    10. You can now see that your Lead Grid Row Action has been created.

Custom Lead and List Actions


5. View List Action

  1. Navigate to Leads>Manage Leads.
  2. Against any lead, under the Actions tab, hover on the Action Icon icon. You can view the List Action that was created.
  3. Click on the List Action item, and you can view the image slideshow.

View Images in Custom Field Sets


Any Questions?

Did you find this article helpful? Please let us know any feedback you may have in the comments section below. We’d love to hear from you and help you out!

Capturing Leads from Gravity Forms in LeadSquared

Important: If you’re looking to integrate Gravity Forms with your LeadSquared account after 1st January, 2023, install the new Gravity Forms connector. The connector listed in this article does not support new installations after the specified date.

1. Feature Overview

Many companies use Gravity Forms on their WordPress sites to capture leads. We provide an integration with Gravity Form to get these leads into LeadSquared.


2. Prerequisites

  1. Gravity Form should be installed in your WordPress account. The version of Gravity form should be 1.9.10.16 and above.
  2. You should have LeadSquared Administrator access


3. Procedure

  • To download the file, from the LeadSquared dashboard, navigate to Apps>Apps Marketplace and Gravity Form.
  • Login to your WordPress account.
  • Navigate to Plugins>Add New.

2016-01-11_12-30-11

  • On the Add Plugins page, you will have the option to Upload Plugin as shown in the below image.

2016-01-11_12-38-34

  • In the next page, Choose File option is available. Choose the downloaded zip file.
  • Once done, click on Install Now.
  • Then click on the Activate Plugin as shown in the below image,

2016-01-11_12-44-05

  • The plugin is now activated.

Follow the below steps to synchronize Gravity Form and your Leadsquared account.

  • Once the Plugin is activated you will be able to see Gravity Forms Leadsquared Add-On.
  • ClickSettings on Gravity Forms Leadsquared Add-On.

2016-01-11_12-49-34

  • In the Settings page, you have to provide Access Key and Secret Key of your LeadSquared Account.
  • You will find your API Access Key and Secret Key in the Settings page of your LeadSquared Account.

2016-01-11_12-54-40

  • If the give Access Key and Secret Key is correct then you will see a tick mark as shown in the above image. If the key is incorrect, you will see an (X) symbol in red.
  • Now you can Gravity Form fields to LeadSquared fields.
  • On the Forms column, click on Add New as shown in the below image, or edit your existing forms.

2016-01-11_13-42-37

  • Click on Form Settings and choose LeadSquared from the drop-down as shown below image
  • Now click on Add New as directed below

2016-01-11_13-52-53

  • Now you have to set the appropriate feed settings between the Gravity Form and Leadsquared.
  • You can also specify the Lead Owner for all the leads which are from Gravity Form that you are designing in Feed Settings
  • Also, you can customize the Lead Source.

2016-01-11_14-10-26

  • Once the Settings are done, click on Update Settings.

You are Gravity Form is ready to capture leads and push it to Leadsquared.

Note – If you would like to capture the lead source and enable tracking, kindly follow the below steps in additional.

While creating form create a new field (Single Line Text ) and name the field as “ProspectID”. For this field please provide Custom CSS class name as “ProspectID gform_hidden”.

test

Once you’ve completed this, click Save or Update. In Form Settings, go to LeadSquared, add a new field and map it to the Prospect Id in Gravity Form filed.
Leave the Lead Source field blank as shown in the below image.

test2


Any Questions?

Did you find this article helpful? Please let us know any feedback you may have in the comments section below. We’d love to hear from you and help you out!

Reverse IP Lookup

1. Feature Overview

The Reverse IP Lookup setting allows you to automatically view the location (City, State and Country) of a lead that’s captured from a landing page. The location of these leads is displayed on the Lead Details page.

LeadSquared - location on vcard


2. Prerequisite

To configure this setting, you must be the Admin user of your LeadSquared account.


3. Enable Reverse IP Lookup

  1. Navigate to Settings>Lead Tracking>Reverse IP Lookup.
  2. Alongside Enable Reverse IP look-up, click Yes or No based on whether you want to capture the lead’s location or not.

LeadSquared - Reverse IP lookup


4. FAQs

Why is the Country field auto-filled in my form submissions?

  • Issue: When a LeadSquared form is embedded on a website, the Country field is being captured automatically, even though it is not included in the form.
  • Possible Cause: This happens when the Reverse IP Lookup feature (detailed above) is enabled. This feature automatically detects and fills the Country field based on the IP address of the lead submitting the form.
  • Resolution:
    If this behaviour is not required, you can disable the Reverse IP Lookup feature described above.


Any Questions?

Did you find this article helpful? Please let us know any feedback you may have in the comments section below. We’d love to hear from you and help you out!

Embed Lead Capture Form in email

1. Feature Overview

This procedure shows how to embed a LeadSquared Form Widget in an email.


2. Create and Publish the Form Widget

Read this article to create and publish a LeadSquared Form Widget.


3. Embed Form Widget into an Email

  1. Copy the Form Widget’s JavaScript code.
  2. Navigate to Marketing>Email Campaigns and click on + Create Email Campaign.
  3. Add an HTML block to your Email and insert the JavaScript code into the Content Properties.

The Form Widget to capture leads is now embedded into your email.


email campaign