Email Settings – Blocked Email Address Domains

1. Feature Overview

This setting allows you to block certain domains from receiving your emails.

Note: 


2. Prerequisite

You must be the Admin of your LeadSquared account.


3. How it Works

  1. From your LeadSquared account, navigate to My Profile>Settings>Email Settings>Blocked Email Domains.
  2. Click the Block button.
  3. Under Block Domain, enter the Domain Name and Notes in the relevant fields.
  4. Once you’re done, click Save. The domain you’ve entered is blocked.

Blocked Domains in LeadSquared


Any Questions?

Did you find this article helpful? Please let us know any feedback you may have in the comments section below. We’d love to hear from you and help you out!

LeadSquared Generic Telephony Connector

1. Feature Overview

LeadSquared Generic Telephony Connector (LGTC) allows you to integrate any cloud telephony service with LeadSquared and it works across all regions. Your developer would need to understand the standard format of data to be posted into LeadSquared.

Note: For all new implementations, we suggest configuring LGTC as an instance within the Universal Telephony Connector. This allows you to not only integrate multiple telephony providers but also leverage powerful features like team mapping.

LeadSquared Generic Telephony Connector has the following features:

  • Capture Call logs
  • Click to Call
  • Agent Popup
  • Call Routing
  • Call Disposition
  • Single sign-on API

Follow the steps below to configure the LeadSquared Generic Telephony Connector in your account –


2. Prerequisites

  • You must be an Administrator to install and configure this connector.
  • You may require coding experience to configure the connector with your telephony provider.


3. Installation

Navigate to Apps>Apps Marketplace>Telephony, and under the LeadSquared Generic Telephony Connector, click Install 

screen1


4. Configuration

Click on Settings>Configure

screen2


Name

Enter the name of the Telephony service provider and save.

name


Virtual Numbers

Add virtual numbers and tag name one by one and save it.

virtual


Call Route

This API is used to get the lead/opportunity owner. It is setup up automatically.

  1. Copy the Call Route API URL from Call Route API tab on the popup and deploy it in your cloud telephony account.
  2. Use HTTP GET method to send the data. Please refer to the usage section to understand how to send the data.

LeadSquared Generic Telephony Connector


Agent Popup

You may enable Real-time Inbound Call Notification to the User, seen in the form of an Incoming Call Popup, whenever an inbound call from a lead (made to your virtual number) is routed to the LeadSquared User.

Note:

  • Incoming calls matching a lead’s secondary phone number will be tracked without creating a duplicate lead.
  • If you have multiple leads with the same phone number, you can pass the LeadId in the Agent Popup API. This will ensure that the correct lead details appear in the agent popup. For e.g., "LeadId": "4c70ce73-0732-4977-85a2-fb49a978b85c".
  1. Copy the Agent Popup API URL from Agent popup tab and deploy it in your cloud telephony account.
  2. Use HTTP POST method to send the data to LeadSquared in JSON format.
  3. Enable Agent Popup by selecting the checkbox.

Please refer the ‘Usage’ section to understand how to send the data.

updated agent popup api

The agent panel gives you a convenient way to manage your call center actions directly from your LeadSquared account. You can add a custom URL here, and append mail merge parameters (click the help help icon). The Use External URL option allows you to configure a custom URL to show/load the agent pop-up.


Call Log

All Inbound and Outbound calls made through your Telephony account can be logged in LeadSquared by setting up Call Logs.

After a call (incoming or outgoing) you can post the call logs to LeadSquared. This ensures that each phone interaction is logged in LeadSquared.

When your Telephony provider calls the LeadSquared API, data can be pushed into LeadSquared using POST method in JSON format.

{

"SourceNumber":"%2b919611795983",

"DestinationNumber":"%2b919611795980",

"DisplayNumber":"%2b919020897874",

"StartTime":"2015-08-20 18:26:38",

"EndTime":"2015-08-20 18:26:38",

"CallDuration":"12",

"Status":"Answered",

"CallNotes":"Enquired about product",

"ResourceURL":"server/filename.extension",

"Direction":"Inbound",

"CallSessionId":"080673309211440075398",

"CallerName":"Rakesh",

"CallerCity":"Bangalore",

"CallerState":"Karnataka",

"CallerCountry":"India",

"CallerZipCode":"560078"

}
 Property Sample Value Description Mandatory
 SourceNumber +919611795983 For Inbound Call-  Lead’s contact  number
For Outbound Call-  Caller’s Number or  Agent’s number
 Yes
DestinationNumber +919611795980 For Inbound Call-  Caller’s Number or  Agent’s number
For outbound Call-  Lead’s contact  number
Yes
DisplayNumber +919020897874 Virtual(DID) Number provided by the provider Yes
StartTime 2015-08-20 18:26:38 Start time of the call Yes
EndTime 2015-08-20 18:26:50 End time of the call Yes
CallDuration 12 Duration of call in seconds Yes
Status Answered Status of the call, can be Answered, Missed, Voicemail Yes
CallNotes Enquired about a product Additional notes about the call No
ResourceURL Server/filename.extension URL of the file with a recording of the conversation No
Direction Inbound Inbound or Outbound Yes
CallSessionId 080673309211440075398 Call Unique Identifier No
CallerName Ram Caller’s Name No
CallerCity Bangalore Caller’s City No
CallerState Karnataka Caller’s State No
CallerCountry India Caller’s Country No
CallerZipCode 5600102 Caller’s zip code No

You will find the Call Log API URL in Call Log API tab on the popup, deploy it in your cloud telephony account to log inbound and outbound phone calls.

Please refer to the usage section to understand how to send the data.

calllog

Note: CallSessionId should be unique to avoid posting duplicate call logs.

Click 2 Call

The Click2Call feature enables your sales reps/agents to place an outbound phone call just by clicking the lead’s phone number (on the Manage Leads or Lead Details pages). If you use the Opportunities feature, click 2 call can be used to call leads from the Opportunity Management and Opportunity Details pages as well.

Depending on the capabilities of your telephony provider, it can be configured using either a server-side API or a client-side script.

Server-side API

This is the default configuration option.

Your telephony provider’s Click2Call API is configured here, and you can append mail-merge parameters (like agent phone number, lead phone number, etc.) to the API URL to facilitate the calling functionality.

  1. Pass the Click2Call API in the URL textbox.
  2. You may optionally pass custom headers to the API for authentication.
  3. Select the HTTP method needed by the telephony operators Click2Call API.
  4. Map a keyword from the response of the Click2Call API. Typically we use a keyword like “success”. This lets our system know that the API request fired correctly and a response was received.
  5. Click the Enable Checkbox checkbox.

LeadSquared Telephony Features

Client-side Script

For telephony providers with JavaScript SDKs, the Click2Call functionality can be configured using a client-side script. The outbound phone call functionality will be handled by the script and the call will be initiated via the browser to the telephony provider.

  1. Enter the URL of the Javascript file, which must be hosted on the LeadSquared domain (external domains are not supported). The JS file will be published only after an internal review process.
  2. You can pass data to the script using mail-merge parameters (like agent phone number, lead phone number, etc.).

LeadSquared Telephony Integration

Note:

  • For a sample JS file template, please reach out to your account manager
  • Additionally, a flag called Is Softphone Enabled must be checked for each agent, in the user settings UI. This also disables the “Agent Panel” for the agents.

LeadSquared User Settings


Call Disposition

When the call is ended between User and client, some of the telephony providers will not free the agent to take another call unless the current call is disposed, so the call has to be disposed with appropriate values.

After integration, the user can dispose calls from LeadSquared.

For it Create a Custom dropdown field in LeadSquared (say Disposition) with Call disposition options/values.

Now when the call is ended agent can select appropriate disposition value on Call/Agent-Notification Popup and dispose the call and get ready for the new call.

  1. Deploy URL provided by your telephony service in URL field with necessary parameters.
  2. Select the HTTP method in which your telephony service accepts the data.
  3. Select the request and response details.
  4. You can initiate the following actions (and make them mandatory if required) once a call is disposed –
    • Create a task.
    • Create a custom activity.
    • Update a lead field.

LeadSquared Telephony Integrations


Single Sign-on API

This API will help you to embed LeadSquared within your telephony application.

Use Single sign-on API and use HTTP POST method to send data to LeadSquared in JSON format. And to get lead details use Lead Details API.

Please refer to the usage section to understand how to send the data.

Single


Integrate with Opportunities

You can integrate the LeadSquared Generic Telephony Connector (LGTC) connector with LeadSquared Opportunities. To know how to do this, please refer to Opportunity Integrations in Telephony.

This will enable you to track phone call interactions with your leads, for each opportunity or potential deal. Completed calls will get posted as activities, against the respective opportunities, on the Opportunity Details page.


Any Questions?

Did you find this article helpful? Please let us know any feedback you may have in the comments section below. We’d love to hear from you and help you out!

Advanced Search: Find Leads Where Activity Fields Contain/Don’t Contain Data

1. Feature Overview

You can use Advanced Search to find leads where a custom activity field either contains or does not contain data. This is useful for identifying gaps in your activity records — for example, finding all leads whose Home Visit activities are missing a scheduled date.

For a full guide to Advanced Search, see Advanced Search in LeadSquared. To learn how to create custom activities and their fields, see Custom Activities and Scores.


2. How It Works

When you create a custom activity, you can add custom fields to capture additional details about that activity. Advanced Search lets you filter leads based on whether those fields have been filled in, using the Contains Data or Does Not Contain Data conditions. You can also apply a time period to narrow the results further.


3. Search Leads by Custom Activity Field

  1. Go to Lead Management>Leads.
  2. Click + Filter, and select + Advanced Filters.
  3. Click + Add Condition, in the search criteria dropdown, select Select Lead Activity Is and choose the relevant custom activity (for example, Home Visit).
  4. Select the custom field you want to evaluate (for example, Scheduled Date).
  5. Select Contains Data or Does Not Contain Data depending on what you are looking for.
  6. Select a time period, click + Add, then click Show Results.

Advanced Search Find Leads Where Activity Fields Contain or Don’t Contain Data


Any Questions?

Did you find this article helpful? Please let us know any feedback you may have in the comments section below. We’d love to hear from you and help you out!

Email Settings – Blocked Email Address List

1. Feature Overview

If you have any leads in your system-

  • Who have unsubscribed
  • Who have invalid email addresses
  • To whom emails have bounced
  • Who have marked your emails “Spam”
  • Who your users manually check the Do Not Email field when adding or editing a lead
  • Who’s Do Not Email field was checked, when importing the lead into LeadSquared

They will show up in the Blocked Email Address List, along with the reason as to why they’ve been blocked, and a note explaining the same. There are no actions available for you to perform on this page. You can only view the list.

Note:

  • If you want to email a lead who’s part of the Blocked Email Address List, you must manually edit the lead, and uncheck the Do Not Email field.
  • To block an entire email domain from receiving emails, see Block Email Domains.
  • To opt-out all leads from receiving emails by default, and send emails only to leads that manually opt-in, see Data Protection and Privacy Settings.
  • For more details on Email Settings, see Email Settings – Feature Guide.


2. Prerequisite

You must be the Admin of your LeadSquared account.


3. Block Emails to Individual Leads

To block specific email addresses from receiving your emails –

  1. Navigate to Leads>Manage Leads and click on the relevant lead.
  2. Click Lead Details.
  3. To edit the lead details, click Icons.
  4. Alongside Do Not Email, click Azure checkbox.
  5. Click Save.
Note: You can unblock emails to the lead by following the same steps.
LeadSquared - Block Emails to Individual Leads


4. View Blocked Email Address List

To view this list, from your LeadSquared account, navigate to My Profile>Settings>Email Settings>Blocked Email Addresses.

Blocked Email Lists in LeadSquared


Any Questions?

Did you find this article helpful? Please let us know any feedback you may have in the comments section below. We’d love to hear from you and help you out!

Can I send attachments with my Email Campaigns in LeadSquared?

Yes, you can add attachments to your email campaigns. To enable this feature, contact your account manager or reach out to support@leadsquared.com.

Note:

Lead Quality Criteria – Setup

1. Feature Overview

Lead Quality Criteria lets you define rules that evaluate leads against your ideal customer profile and assign each lead a quality score between 0 and 10. This score helps you prioritize leads most likely to convert.

Rules are built around lead attributes (fields) that matter to your business. Each attribute is assigned a weightage, and value-based conditions determine the score assigned for each attribute. The final quality score is a weighted combination of all attribute scores.

To know more about leads, please refer to Lead Management – Feature Guide.


2. Prerequisites

You must be an administrator or marketing user to set up Lead Quality Criteria.


3. How It Works

  1. You select the lead fields (attributes) that indicate lead quality for your business — for example, Location, Age, or 12th Grade Results.
  2. You assign a weightage to each attribute to reflect its relative importance (for example, City at 50%, Results at 30%, Age at 20%).
  3. For each attribute, you define value rules that map specific field values or ranges to a score out of 10.
  4. LeadSquared evaluates each lead against these rules and calculates a weighted quality score between 0 and 10.

Once published, the quality score is visible on the Lead Details Page and on the Manage Leads page under Lead Quality.

Note: The first-time score calculation may take a few minutes depending on the number of leads and rules in your account.

Lead quality criteria view


4. Set Up Lead Quality Criteria

  1. Go to My Profile>Settings>Lead Prioritization>Lead Quality Criteria.
  2. Click Create, or edit an existing criteria.
  3. In the Choose Lead Quality Attributes pop-up, select the lead fields you want to use to evaluate quality.
  4. Assign a weightage to each attribute (click the save icon next to the weightage once you’re done). Equal weightage is applied by default if no changes are made.
  5. Click Define Attribute Score, then select the lead fields to which you want to assign a quality score.
  6. For each attribute, define value rules that assign a score based on the field value or range.
  7. When you are done defining rules:
    • Click Save & Publish to apply the criteria, or
    • Click Save to continue defining rules for additional attributes before publishing.

Example

For a high school, lead quality might depend on three attributes with the following weightage and rules:

Attribute Weightage Rule Score
City 50% Is “Bangalore” 10
Is any other city 5
12th Grade Results 30% 85–99% 10
75–84% 6
Below 75% 4
Age 20% 18–21 10
Over 21 4
Under 18 8

Lead quality criteria setup


Troubleshooting

Quality score not reflecting or incorrect after lead import

When leads are added manually, the quality score updates immediately. For imported leads, the score can take up to 4 hours to reflect. If the score is still not updated after that time, contact support@leadsquared.com.


Any Questions?

Did you find this article helpful? Please let us know any feedback you may have in the comments section below. We’d love to hear from you and help you out!

Database Usage of Your LeadSquared Account

1. Feature Overview

This article helps you understand your account’s database usage and how storage is distributed across different entities. Through LeadSquared’s Database Size report, you can monitor database usage to improve system performance and reduce storage costs.

Note: On the Manage Subscription page, you can view your active plan and storage limits. Use the Database Size report to keep track of your usage.


2. Prerequisites

You need to be an Admin user to access this report.


3. Database Usage

To check your Database Usage, navigate to Reports>Reports Home and search for the Database Size report.

Navigation to database usage report

This report provides a breakdown of storage usage across different entities in your account. Each entity has two key columns: the total number of records for each entity and its total storage size in Gigabytes.

Here’s a description of each entity –

Entity Name  Description
Leads This entity stores all the lead data in your account. For example, lead name, lead phone number, etc.

To free up space, consider deleting lead data you no longer require.

Leads Audit This entity stores certain changes or audits related to a lead such as Owner assign history, lead merge history, leads that were deleted, etc.

Once leads are deleted, audit data related to those leads is also deleted.

Activities and Opportunities This entity stores all the Activities and Opportunities (if enabled) data in your account. For example, opportunity details, activity details, etc.

To free up space, consider deleting activities and opportunities data you no longer require. Read the following article to delete custom activities in bulk: Bulk Export and Delete Data.

Activities and Opportunities Audit This entity stores certain changes or audits such as activities or opportunities that were deleted.

Once activities and opportunities are deleted, audit data related to them are also deleted.

Accounts This entity stores all the Account data. For example, the different account created, owners of each account, etc.

To free up space, consider deleting accounts you no longer require.

Note: The Accounts feature must be enabled for this entity.
Accounts Audit This entity stores certain changes or audits such as accounts that were deleted.

Once accounts are deleted, audit data related to them are also deleted.

Note: The Accounts feature must be enabled for this entity.
Tasks This entity stores all the Task data. For example, task types, upcoming tasks, etc.

Once tasks are deleted, audit data related to those tasks are also deleted.

Email Records This entity stores all Email Campaign data.

To free up space in this entity, consider deleting email campaigns you no longer require.

Change Logs This entity stores data related to user check-in and check-out data.
User This entity stores data related to Users. For example, user history, user permissions, user configuration, etc.

To free up space, consider deleting user data you no longer require.

Forms & Process This entity stores data related to Forms & Processes.

To free up space, consider deleting forms and processes you no longer require.

System Data This entity stores miscellaneous data that does not fall into any of the above entity categories.


Any Questions?

Did you find this article helpful? Please let us know any feedback you may have in the comments section below. We’d love to hear from you and help you out!

How to Set Web Browser Notifications for Task Reminders in your LeadSquared CRM?

This Help Article allows you to understand how to set web browser notifications for task reminders in your LeadSquared CRM. These browser notifications allows you to remind about the upcoming tasks in your LeadSquared CRM.

The task reminder notifications pop-up based on the time period you specify to remind while creating a task. Please see the below image for reference.

LeadSquared Tasks

A sample task reminder notification is shown in the image below:

LeadSquared Tasks

  • If your task is associated with a Lead, clicking the task reminder notification redirects to the corresponding Lead Details window.
  • If your task is not associated with a Lead, clicking the task reminder notification redirects to the corresponding task detail.

Prerequisite

  • You should use either Google Chrome, Mozilla Firefox or Opera as your web browser. Compatibility with other web browsers are not guaranteed.
  • Your Google Chrome browser must be of version 50 or higher
  • Your Mozilla Firefox browser must be of version 44 or higher

Procedure

How to Enable Notifications for your Web Browser?

Google Chrome

  • Log on to LeadSquared system. The default dashboard appears and also a pop requesting to show notifications appears.

LeadSquared Tasks

  • Click Allow you want the reminders to pop-up.

Mozilla Firefox

  • Log on to LeadSquared system. The default dashboard appears and also a pop up requesting to show notifications appears.

LeadSquared Tasks

  • Click Always Receive Notifications, if you want the reminders to pop-up.

How to re-enable Notifications for your Web Browser?

Google Chrome

If you want to re-enable the task reminder notifications after blocking, follow the steps below:

  • Go to your  LeadSquared system and click the Site Info from the address bar.

LeadSquared Tasks

  • Click Notifications and select Use global default (Ask). A new message appears below as highlighted in the image below:

LeadSquared Tasks

  • Click Reload. The LeadSquared window reloads and new permissions takes effect.

LeadSquared Tasks

Mozilla Firefox

If you want to re-enable the task reminder notifications after blocking, follow the steps below:

  • From your Firefox browser, go to your LeadSquared system and click the Site Info from the address bar.

LeadSquared Tasks

  • The permission is set to block in the Receive Notifications drop-down. Select Always Ask and reload the pageA pop up appears requesting to receive notifications or not.

LeadSquared Tasks

Note: Notifications do not work properly, if multiple users of your LeadSquared CRM use the same browser in the same computer.

Example: Consider if a Sales User logs onto your LeadSquared CRM. The user gets the pop-up box requesting to show the notification. The User allows it and creates a task based on his requirement.

After this, consider that an administrator logs onto your LeadSquared CRM by using the same browser in the same computer. The administrator not only does not receive a pop-up box requesting to show the notification but also receives the task reminders which was set by the Sales User. The following error message appears in the Task Grid/Lead Details Page, if you click  the task reminder.

”Task not found/Lead not found” 

This browser specific issue happens because once a LeadSquared user allows the notification using the Receive Notification pop-up box, it is stored in the browser based on the user details. If another LeadSquared user logs onto your LeadSquared CRM using the same browser, the previous user details are used and the Receive Notification pop-up box does not appear. The tasks corresponding to the previous user also appears which is not valid to you.

Implementing LeadSquared Tracking via Google Tag Manager

1. Feature Overview

Google Tag Manager (GTM) is a free application that allows you to add code snippets to your website/mobile application without having to directly access their codebase every time. GTM provides a single script to be placed in your website – once installed, custom scripts can be added as “tags” within GTM, based on various “triggers” that you’ve identified. You can use Google Tag Manager to set up tracking on your LeadSquared website.


2. Get LeadSquared Tracking Code

To get your LeadSquared website’s tracking code –

  1. From your main menu, navigate to My Profile>Settings>Lead Tracking>Tracking Script.
  2. Copy the code snippet that’s listed on this page.

LeadSquared Tracking Script

Note: If you’ve already installed LeadSquared tracking script within your website, you’d have to delete it while implementing tracking through Google Tag Manager.


3. Set Up the Tags in GTM

Within GTM, follow the following steps –

  1. Sign in to your GTM account and select the relevant container from the Accounts tab. If you haven’t yet set up your GTM Account, please refer to GTM Setup.
  2. Add a new tag and select type as Custom HTML Tag. Name the tag as “LSQ Tracking Script” and click Continue.
  3. Paste the copied code snippet from LeadSquared into the HTML field.
  4. Open up Advanced Settings and set the Tag firing priority to any value (for eg, 5). Tag firing priority ensures that a tag with higher value gets fired before tags of lower value.

After you complete the above steps, your screen should look like this –

GTM


4. Set Up Triggers

Select All Pages as the trigger. This is to ensure that the LeadSquared tracking script is present on every page of your website.

All pages


5. Finishing Up

  1. Click Create Tag and select Publish on the top right corner. GTM will now add the LeadSquared tracking script to your website.
  2. Check if the tags are fired within GTM. On the top-right menu, under Publish, select Preview. Your GTM account is now in Preview mode.

Preview mode

    • Open up your website on the same browser. The Tag manager debugger would open up and you can check if the tag you have just created have been fired.

Debugger


iii. Checking if the tracking script is installed in LeadSquared. On using GTM, the Tracking Script page will show the message, “Tracking Script has not been installed on the website.”, as the application doesn’t currently have the facility to check if it has been installed through GTM. To resolve this –

    • Right click on your website and select Inspect element.
    • Select the Console tab and type in MXCProspectId or pidTracker. If successfully installed, on clicking enter, no error would come up.
Note: This method will work depending upon the permissions provided by your website. For further support, please reach out to support@leadsquared.com.


Any Questions?

Did you find this article helpful? Please let us know any feedback you may have in the comments section below. We’d love to hear from you and help you out!

Advanced Search: Find Leads with Activities in the Last or Next N Days

1. Feature Overview

LeadSquared’s Advanced Search lets you filter leads based on whether a specific activity, or any activity, has taken place within a given number of days. This is useful when you need to act on leads based on recent engagement — for example, following up with leads who had a phone call in the last 5 days, or identifying any leads with recorded activity in the last 2 days.

This article covers activity-based searches using the Last N and Next N Days conditions. For a full guide to Advanced Search, including filtering by lead details, tasks, email activity, and landing page activity, see Advanced Search in LeadSquared.


2. How It Works

Advanced Search filters leads across two broad categories: Activity (actions a lead has performed) and Lead Details (field values on the lead record). For activity-based searches, you select the activity type and a time condition. LeadSquared then returns all leads that match the criteria from the Manage Leads page.

Two time conditions are available:

  • Last N lets you define a rolling lookback window — enter a number and choose Days or Hours (for example, “5 Days” returns leads with matching activity in the past 5 days).
  • Next N Days lets you look ahead, returning leads with activity scheduled in the upcoming N days.


3. Search Leads by Activity Using the N Condition

  1. Go to Lead Management>Leads.
  2. Click + Filter, and select + Advanced Filters.
  3. Click + Add Condition, in the search criteria dropdown, select Lead Activity.
    • To search for a specific activity type, select it from the list (for example, Phone Call or Form Submitted).
    • To search for any activity, select Is Any Activity.
  4. Set the time condition:
    • Select Last N and enter a number, then choose Days or Hours to search for activity in the past N days or hours, or
    • Select Next N Days and enter a number to search for activity scheduled in the upcoming N days.
  5. Click + Add to apply the criteria, then click Show Results.

Advanced Search Find Leads with Activities in the Last or Next N Days


Any Questions?

Did you find this article helpful? Please let us know any feedback you may have in the comments section below. We’d love to hear from you and help you out!

Why Do I See a Difference in the Number of Conversions in Adwords and LeadSquared?

Sometimes you would see different conversion numbers in LeadSquared reports and Google Adwords reports. There are several factors, that cause this. Let’s discuss the most commonly observed ones.

Before that, you need to understand how Google Adwords reporting works, because there are several “conversion” metrics there, and you might not be looking at the right ones.

It’s recommended that you read this initial section carefully as not understanding how Google tracks conversions would cause the most observed discrepancies.

So, this is how Adwords attributes conversions:

1. 

If Adwords plays a part anywhere in the conversion funnel, even if the conversion happened eventually through Organic search (or any other source), Adwords attributes the conversion to the last Adwords click.

Let’s assume the conversion path looks like this (it might seem long, but it generally happens, and it happens over several days)

Action 1: Searches for “Keyword” on Google and clicks on Ad 1 –> Doesn’t fill out the form (no conversion)

Action 2: Searches for “Keyword” on Google and clicks on an organic listing and lands on your website –> Doesn’t fill out the form (still no conversion)

Action 3: Searches for “keyword” on Google and clicks on Ad2 –> Doesn’t fill out the form

Action 4: Searches for “keyword” on Google, and clicks on another Organic listing –> Fills out a form and converts.

Here, Adwords would attribute conversion to “Ad2”, and the conversion would be counted on the date when this ad was last clicked or seen.

2. 

This happens within the conversion window set by you – maybe you have set it as 7 days (default is 30 days).

So, if the difference between the click on “Paid Search Keyword 2” and Conversion is more than 7 days, this conversion will not be attributed to Adwords at all, even if the conversion happens on the landing page associated with the Ad.

Now that you understand this, let’s discuss the two metrics that would be key to your conversion measurement. There are several other conversion metrics as well, and I would discuss them as and when the need arises in the article:

Converted Clicks and Conversions

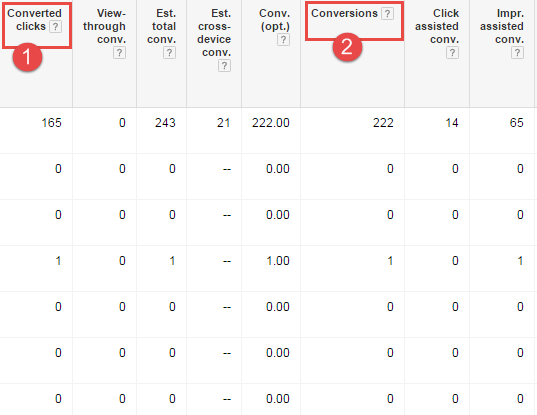
Conversion Metric 1: Converted Clicks

This means the number of ad clicks that led to the conversions. For instance, with 1 ad click, a person may have filled out 4 forms. But Converted Clicks would show you 1 as the value here. So, it tracks unique conversions

So, ideally this is a good metric to look if you want to track unique conversions.

Conversion Metric 2: Conversions

This means the number of total conversions that happened as a result of Adwords (remember, Adwords could have played just an intermediary role in bringing about these conversions as well).

So, in the above example, where with 1 ad click, a person has filled out 4 forms. You would see”4” under the Conversions column.

So, if this is the metric you are looking at while comparing conversions, it would always be much higher than the actual “unique conversions” that you would see in LeadSquared

So, what metric do you need to check?

1. So, ideally in Adwords, “Converted Clicks” would be the metric you should see, when you are comparing Adwords reports against the number of unique leads you see in “LeadSquared landing page report”.

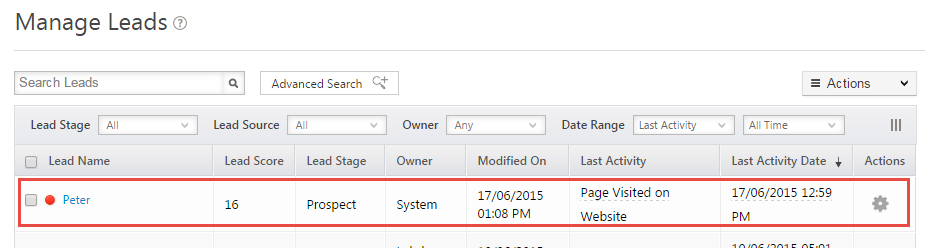
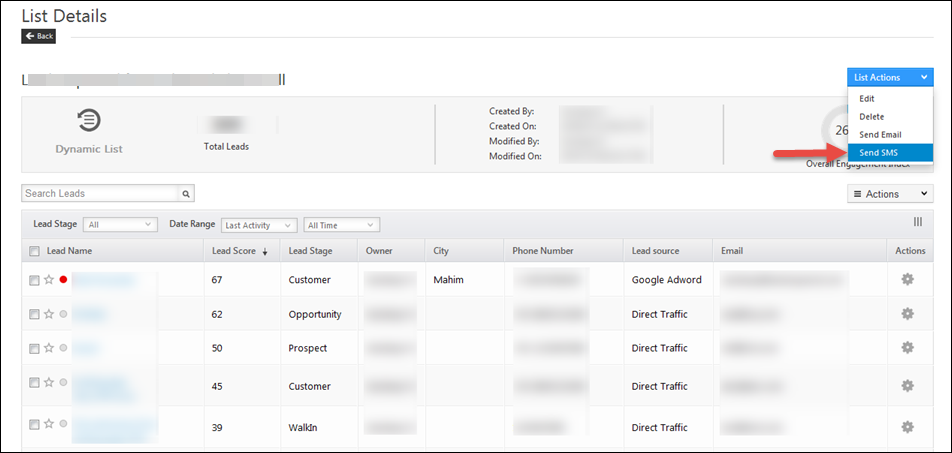
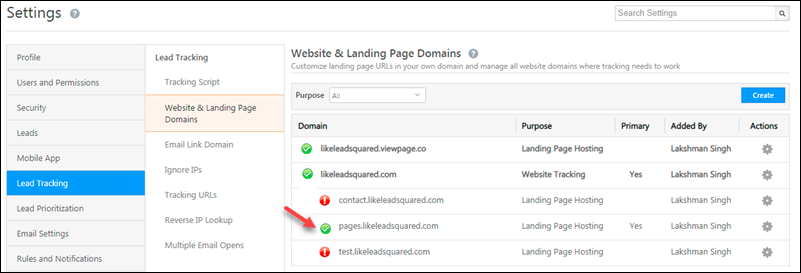
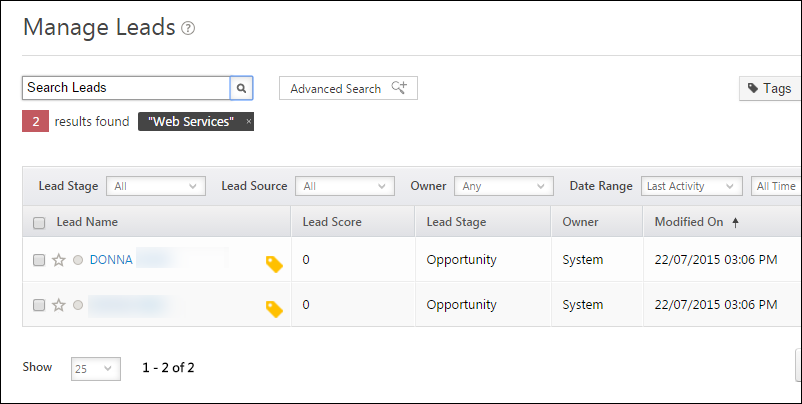
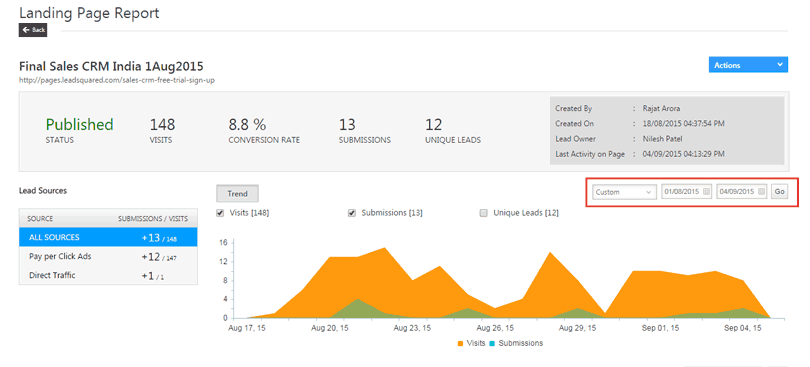
2. Alternatively, in LeadSquared, you can set “Campaign Source” as “Pay per Click Ads,” and “Source Campaign” as “Your Source Campaign Name” in the lead view for that particular time range in LeadSquared. (Check the image below).

LeadSquared-Advanced-Search-Report---Sources

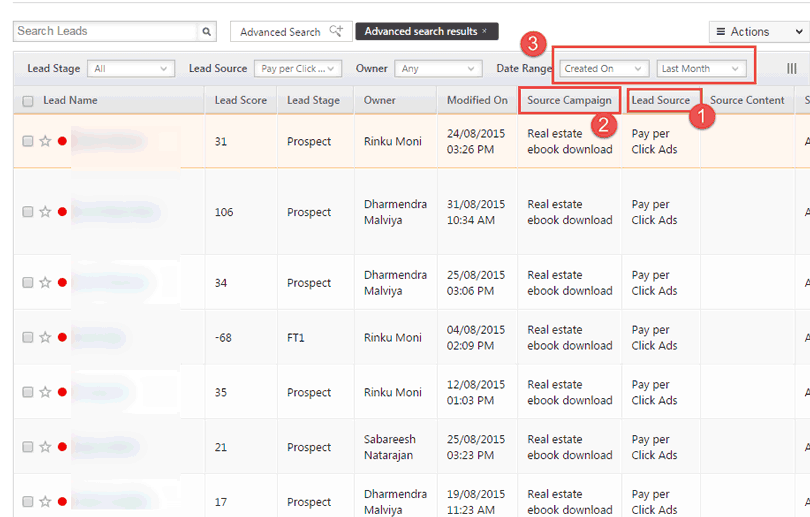
Remember, you need to compare this against “Converted Clicks”, not “Conversions.” (This would work only if you are using a landing page with UTM parameters/tracking script in your ads).


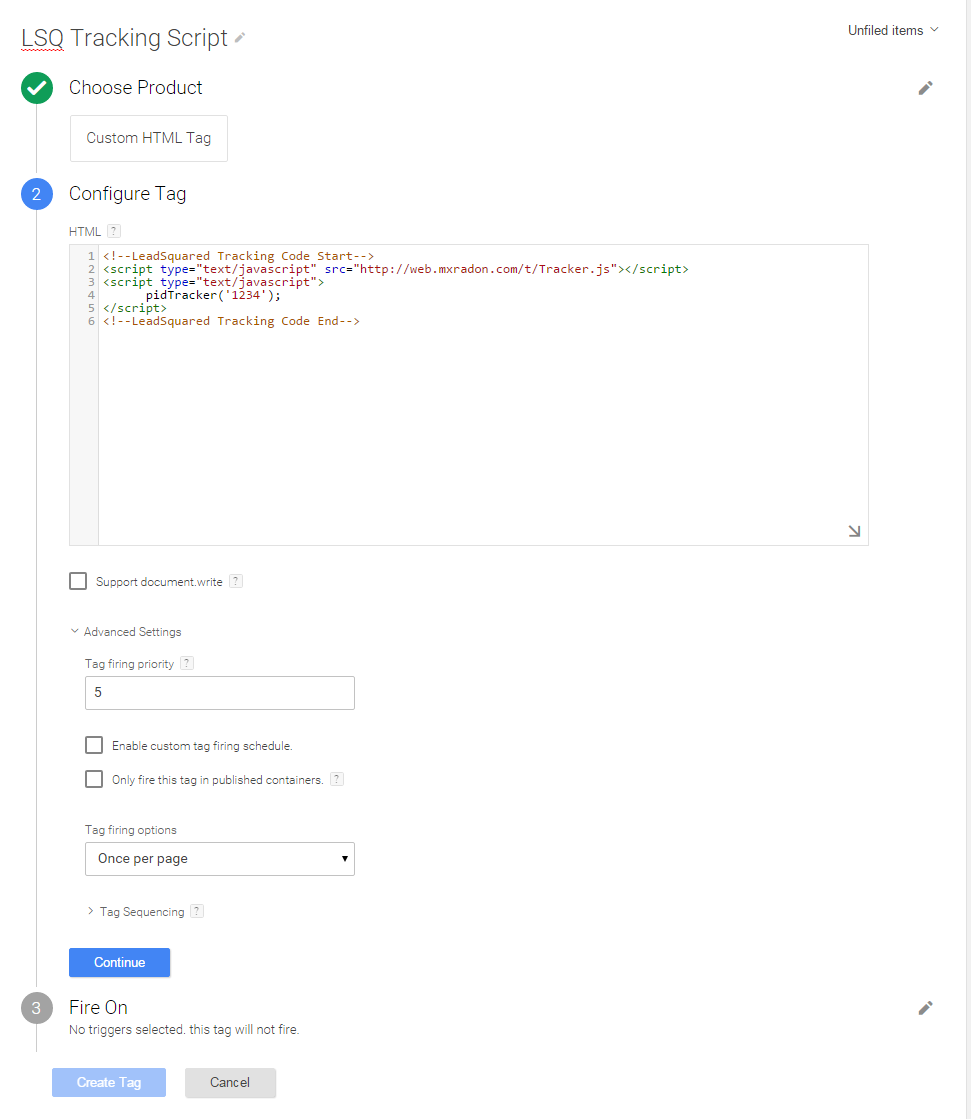
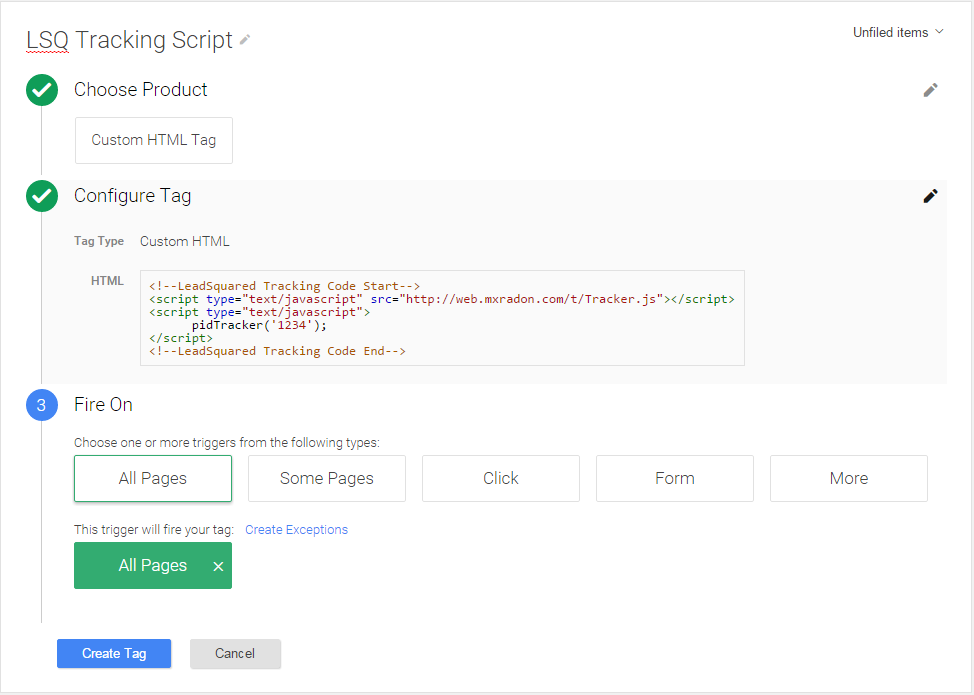
Conversion Tracking Methods

The number you see under these two columns in Adwords – “Converted Clicks” and “Conversions” would depend on the Conversion Tracking Method you use, which in turn would depend on your actual conversion actions (are you conversions equivalent to sales – ecommerce, or are they equivalent to lead capture). You can set up different methods for your different goals, but make sure that you place the correct tracking scripts on the relevant pages.

There are two types of conversion tracking methods – “All” and “Unique.”

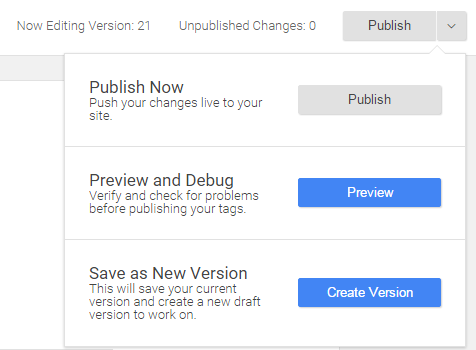
Choosing these settings would affect how conversions are counted in Adwords. Most of you would have created a script long ago, and might have selected an option that you might want changed now to have accurate conversion settings in both Adwords and LeadSquared. If you edit it, you’ll have to place the new script on the post-submission page one more time.

You can get to this screen by clicking on Tools –> Conversions –> Create New/Edit Old. Most of you would be using the Website Conversion option:

conversion-tracking-methods

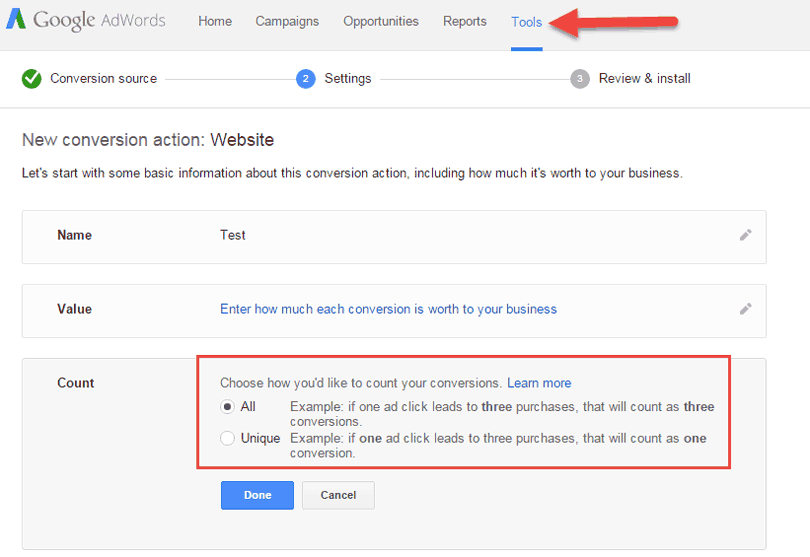
Let’s suppose you have planned to track all conversions using one tracking script only. In that case, it would be best if you select “All” option because you can see Unique Conversions under “Converted Clicks” anyway.

So, if, through 1 click, 4 downloads happen on your website, then “Conversions” would show 4 and “Converted Clicks” would show 1.

Coming to the direct reasons for disparities now!


1. The lead gets created using a complex path, instead of a direct one. 

Direct Path: Ad Click –> Conversion on the LP associated with the ad.

Indirect Path: Ad Click –> Landing Page Visit –> Website visit –> Conversion on a landing page not associated with the ad.

Now, this is just an example of an indirect path. There can be multiple indirect paths (Adwords should be just one touch-point somewhere in the path, and the conversion is attributed to it in Adwords reports.)

Someone might click on the ad, reach the landing page for which you are looking at the report and instead of filling the form goes ahead to check out your website.

Now, this would be counted as a conversion in adwords, however, it would not show up in LeadSquared under the landing page associated with the ad.

Instead, it would show up under the landing page/form the lead eventually filled out.

So, you would not see this conversion counted in that particular landing page report, but you would see it under “Converted Clicks” in Adwords reports.


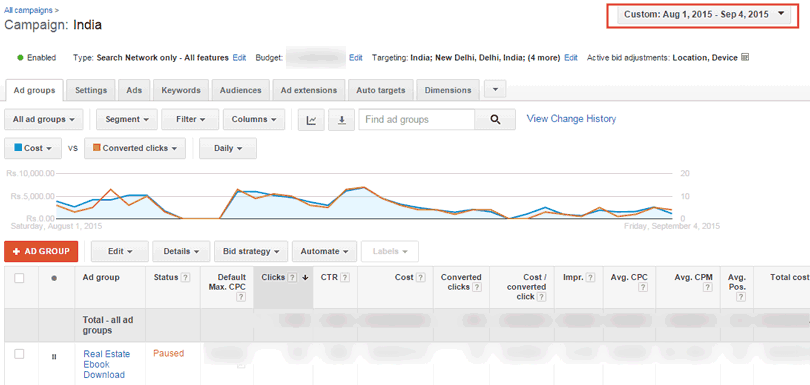
2. You may have set different time filters in LeadSquared and Adwords

This one might seem quite obvious, but it happens quite a lot. Just check whether the date range in the campaign/ad group/ad you are trying to analyze is set as “Past 30 days” if it’s set as past 30 days in the landing page report.

Time-filters---Adwords


Time-Filters---LeadSquared


3. You aren’t using a landing page exclusively for an Adwords campaign/ad group

You might be doing this by design, as it’s not really easy to create 100 landing pages if you have 100 ads running in your account. However, what you must do is use tracking scripts (UTM parameters for all these different ads/ad groups, otherwise you’ll not be able to track which lead is coming from which particular campaign.)

If this is the case you would see a higher conversion number in LeadSquared landing page report, than in the Google campaign conversion report.

So, instead of looking at the landing page report, you should look at the Lead view, and set “Pay per click ads” as the lead source, the same timeline that you are checking in Adwords, and set an Advanced filter to check “Source Campaign”  – “Whatever Campaign Name you gave while setting UTM parameters,” and then look at the number of leads.


4. View-through conversions (relevant for display campaigns)

Sometimes conversions might happen in this manner. One person sees your ad on search/display campaign, but does not click on it. Now this same person can come back and fill out a different form (from some other campaign – say Facebook or organic search) in 15 days. (I am assuming that your conversion window is greater than 15 days).

These conversions will be counted in Adwords as view-through conversions. You’ll see a huge discrepancy if you look at the View-through conversions and try to compare it against the landing page report in LeadSquared, as these conversions happen on different landing pages/forms.

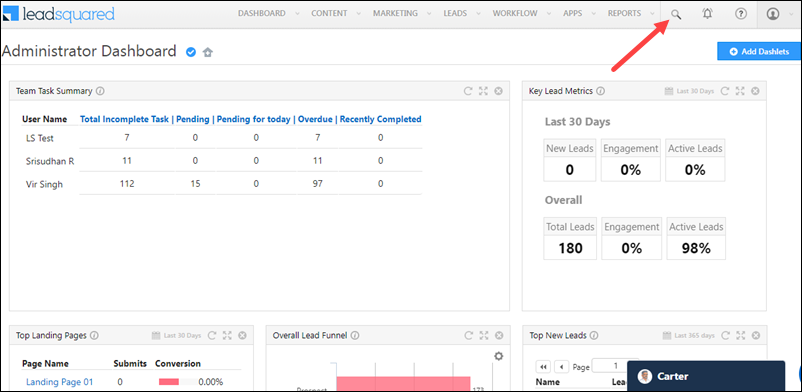
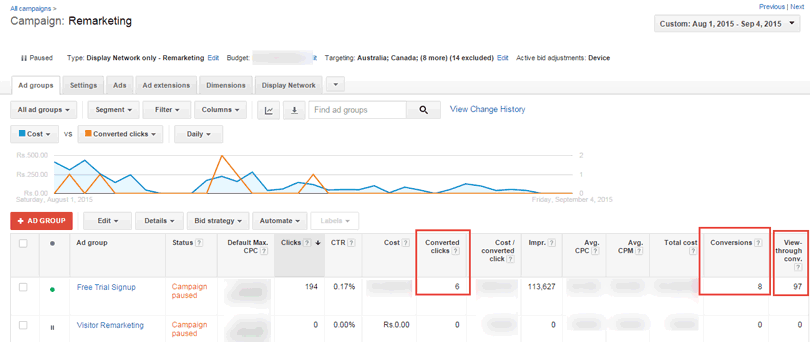
See the numbers in the image below:

  1. Converted clicks = 6
  2. Conversions = 8
  3. View-through conversions = 97 (these leads would be captured in LeadSquared but would be scattered across different landing pages – remember, Adwords would make this attribution even if display ad had some role to play, and wasn’t key in the conversion.)

Viewthrough-Conversions


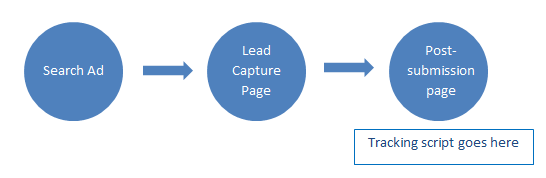
5. Conversion tracking code is placed in pages that aren’t actually conversion areas

Google Adwords tracking script should be placed in the post-submission page.

Sometimes people make the mistake of placing it in the landing page associated with the ad. When that happens, then every click would count as conversions thus showing a higher number in Adwords reports than in LeadSquared.

Tracking Script


6. If you have used 2 landing pages within the specified time period, but are looking at only one landing page report.

Sometimes, within an Adwords campaign, you might have created multiple ads and used multiple landing pages.

However, you might make the mistake of looking at the reports only for the landing page currently in use. When that happens, you would see a higher number of conversions in Adwords than you would see in that particular landing page report.

Say For the month of August, you used Landing Page A from 1st to 15th August in an ad. On 16th, you decided to change the landing page; to not lose the past data, you would ideally pause the current ad and make another copy of it wherein you’ll change the landing page to Landing Page B.

Total leads

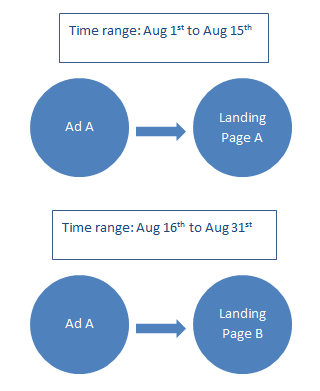
Now, on 31st, when you analyze this particular Ad for the entire month of August, you might look at LeadSquared analytics only for Landing Page B, and therefore, see faulty data.

You might also make the mistake of only looking at the currently running ad data in Adwords (because by default “all enabled ads” view is in use.)

In both these cases, you would see a discrepancy in the conversions recorded by Adwords and LeadSquared. In the first case, the data in LeadSquared would appear less (as, you are not looking at the landing page that was in use before 16th August). In the second case, the conversions tracked in Adwords would be less.

Total Conversions for August in LeadSquared = Leads in (Landing Page A + Landing Page B).


7. Different time zone settings between Adwords account & LeadSquared account

LeadSquared would capture your leads immediately, and they would start showing up under the particular campaign/landing page reports.

However, if there is a difference between the time zone in Google Adwords account settings (maybe IST), and the time you have chosen to run the ads (EST – if you are targeting American audience), there would be a lag in counting the conversions, and the conversion counting would be a bit late.

Consider this if you are looking at recent conversions (say today’s or yesterday’s data)


8. Conversion delays because of Conversion windows

Generally in Adwords reporting, the conversions would be attributed to the time the impressions/clicks took place (last click before the conversion), not the actual conversions.

So, in LeadSquared landing page report, you would see a lead that converted yesterday, but in Adwords conversion reports you would see this same lead attributed to one week earlier, when the last impression/click for that particular ad had taken place.

If you look at your conversion time lag report, you’d be able to better understand what’s your general difference is between the time an ad is viewed/clicked and the actual conversion.

In the below screenshot, I can see that some conversions happen several days after the click as well, so even though in Adwords reports, these conversions would be counted against day 1 (if you look at the reports 12+ days later), however, in LeadSquared landing page reports these 7 conversions would be counted for the days when the lead capture actually takes place.

Time-Lag-in-Conversion

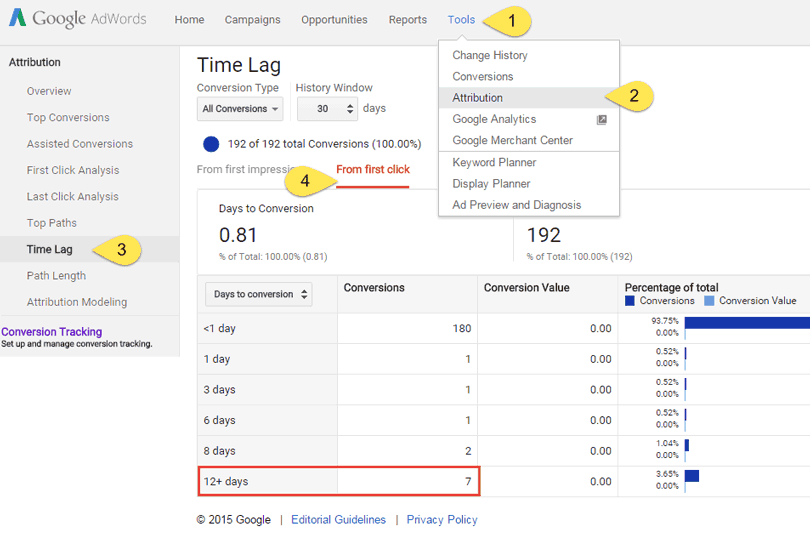
This might affect the historic conversion data you see in Adwords and LeadSquared as well, because the conversions are counted at different points.


9. Conversion Tracking Settings

Conversion-Type

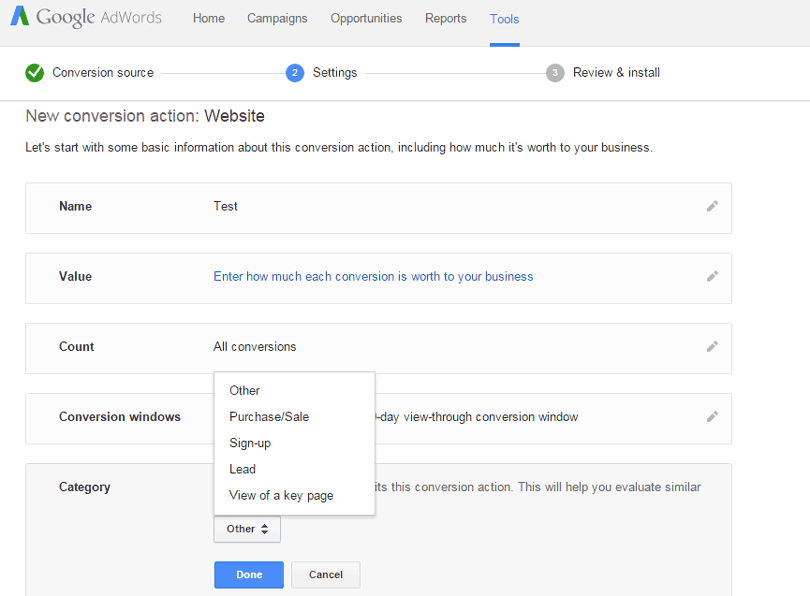
While setting up your conversion actions, “category” is another choice that you need to make. Now, if you have chosen a wrong option while creating the conversion script, then your conversions showing up in Adwords would always be wrong. For instance, if you generate leads but have set up “View of a key page” / “Purchase/Sale” as the conversion category, you would see more number of conversions in Adwords than in Landing Page report. This is less frequent but might happen.


10. The visitors/leads have disabled cookies

The conversion tracking in Adwords would not happen if the lead has disabled cookies in his/her browser; however the lead will be captured in LeadSquared. So, you would see more leads in landing page report than in adwords conversion report.


11. Conversion tracking script was never initiated

The lead clicked on the ad, viewed a landing page, and instead of filling out that form, went to the website, and filled a web form/landing page that does not have a TY page associated with it – instead has a pop-up box.

Now, in LeadSquared this particular lead would be attributed to PPC, because that’s where it came from, but Google would not track this as a conversion, as the conversion script was never initiated for this.


12. You are trying to measure conversions for a very short timeline

You might check yesterday’s conversions in Adwords and you see 4 conversions, however in LeadSquared, you see only 2 conversions from that particular campaign, yesterday. This happens because of Google’s method of allocating conversions – the actual conversion might have happened today (therefore LeadSquared doesn’t show these leads in yesterday’s data), but Google will allocate it to the last click (which probably happened yesterday).

You can correct this easily by putting a longer time range. For instance, when we see this problem, we increase the timeline to past 7 days, and the conversions in the two reports generally match.

How can you avoid some of these problems?


1. Read the initial section of this article, and understand how conversion tracking works

2. Use Tracking URLs (UTM parameters):

It might not be possible for you to use different landing pages for different campaigns. However, what you can do is create tracking URLs for different ad groups/different ads, so that while looking the reports in LeadSquared, you can find the correct number by using Campaign Source and Campaign Name as parameters.

When you are using tracking urls, you can look at the conversions in LeadSquared by going to “Manage Leads” section, and putting the filters of “Time” – “Created on,” Lead Source as “PPC/Pay per click,” and “Advanced Filter” with “Campaign Name” “Campaign Medium” (based on whatever UTM parameters you used), and you would see a more accurate number.

So, these are a few of the reasons you would see a discrepancy in the conversion analytics in Adwords and LeadSquared. I would explain the other conversion parameters in a later post and add other reasons for discrepancies as and when I find them.

Lead Follow-up Analysis by User Report

This Report allows you to find which leads were contacted and which were not in a given time period.

Use

  • Helps to Quickly Analyse the Performance of User(s) based on the Activities they post on Leads while following up with them for business.
  • Offers the flexibility of choosing one or  multiple specific type of Activities you might wish to consider for analyzing Lead Followup by the Users at a time.
  • Provides User wise information on the number of ‘Leads owned by the User‘, ‘Leads with Activity (specified)’ and Leads Not Contacted (based on the specified Activities – considered while running report).

To access this report:

  • From the default LeadSquared dashboard, go to My Account -> Reports Home -> User Activity Reports -> Lead Follow-up Analysis by Owners. The Lead Follow-up Analysis by Owners Report window appears.

LeadSquared Reports

This report also offers the flexibility of analysis of Lead Follow-up based on the following parameters:

1. Leads Created in Date Range

You can selectively choose leads created in certain time range.

LeadSquared Reports

2. Activity Time Range

You can specify the time range to see Activities added during that time period/range.

LeadSquared Reports

3. Filter by User (s)

You can consider generating the report for One or More than one or All Users of your LeadSquared account at once to gauge performance.

You can Check all or multi-select a few Users from the Filter by Users drop-down list as required.

LeadSquared Reports

4. Lead Stages

You may select from Lead Stages to analyse lead followup status. You may do it one Stage at a time or  multi select various Lead Stages for analysis.

LeadSquared Reports

5. Activity Types

You can selectively choose the type of Activities (choose one or multi select a few) that you would wish to consider to gauge/analyse Lead Followup done by the Users.

LeadSquared Reports

Once the parameters are specified, click Run Report to generate required report.

LeadSquared Reports

Contact Form 7 to LeadSquared – LeadSquared WordPress Suite

Important: If you’re looking to integrate Contact Form 7 with your LeadSquared account after 1st January, 2023, install the new Contact Form 7 connector. The connector listed in this article does not support new installations after the specified date.

1. Feature Overview

This article shows you how to capture leads from your WordPress Contact Form7 to your Leadsquared account.


2. Prerequisites


3. Procedure

Activate Contact Form 7 to LeadSquared in LeadSquared WordPress Suite.

1

After activating Contact Form 7 to LeadSquared. Click on Contact and Add New to create new contact Form or click Edit on an existing form.

2

You will see Add New Contact Form page with default field tags.

  1. Name the Form – This name will be seen as the form title/header where the form is deployed on website.
  2. Using Form-tag Generator you would need to create/generate field code of required LeadSquared fields. (one at a time)

3


3.1 Form-tag Generator :

  1. Form-tag Generator is button that has various field (Datatype) options to choose from.
  2. Choose the options tagged with LeadSquared to integrate LeadSquared fields with the Contact Form.
  3. Select appropriate Data Type of LeadSquared to see the Fields of that datatype available in your LeadSquared account.
  4. For example: If you select LeadSquared Text all ‘Text’-type of fields in your LeadSquared account will be listed.

4


Note: Only the LeadSquared tagged fields will be mapped to your LeadSquared account.

Meaning, any field without Leadsquared tag would not capture/store lead data in your LeadSquared account.


3.2 Lead Source tracking:

Lead Source tracking can be achieved by using this shortcode [tracking] in your contact form:

Once done, Save the Form to generate Shortcode of the form that can be used in your website.

 5

Note 1: For Lead Source tracking to work, full Tracking should be enabled for your LeadSquared account.

Note 2: WordPress plugin for LeadSquared Tracking Script needs to be installed on your website.

Click here to download the plugin

Tracking Leads in LeadSquared

  1. A visitor submits his information in your WordPress website.

form-fill1

  1. The visitors details are captured in the Manage Leads page in LeadSquared.

lead-tracked

Comments to LeadSquared

1. Feature Overview

Comments to LeadSquared is one of the plugins of LeadSquared WordPress Suite. It allows you to capture leads form WordPress post’s comments.
For existing leads, it helps you to track each comment as an activity under Lead Activity History. If the comment is with a new lead, the new lead is added in LeadSquared and the comment is tracked under Activity history of that new lead.


2. Prerequisites

You should have an active LeadSquared WordPress Suite, along with Configured Security Credentials.


3. Procedure

1. After installing LeadSquared WordPress Suite, click Comments to Lead to activate it.

1i

2. Click Comments to LeadSquared which you would find under LeadSquared menu, on the left side of the screen.

2

3. It opens the Comments to Lead Configuration window where you can set up your comments form. If you would like to track each comment as an Activity, enable Track Each Comment as Activity and select an Activity type which will be added automatically when a comment is posted.

Map LeadSquared fields with default WordPress Comments fields and click Save.

3

4. As soon as you approve a visitor’s comment, a lead will be created with the comment as an Activity.

4

5. You can view the lead in your Manage Leads page.

5


Any Questions?

Did you find this article helpful? Please let us know any feedback you may have in the comments section below. We’d love to hear from you and help you out!

LeadSquared Forms in WordPress

This module allows you to use LeadSquared published forms in your WordPress account to capture leads.

Prerequisites

You have activated LeadSquared WordPress Suite.

Configured Security Credentials. Ignore if you have already configured.

You have published forms or landing pages in your LeadSquared.

Procedure

After activating LeadSquared WordPress Suite, Activate LeadSquared Form.

Forms

Click on “Forms” tab which is under LeadSquared tab.

9

Click on “Add New” button to add a new form which is already published in your LeadSquared account.

10

Enter a relevant name for the form.

Select your form from the dropdown which is displayed towards right side.

Click on “Load” to view the preview of the selected form.

Click on “Publish” to generate a code for the form.

11

After clicking publish, a code will be generated for that form.

12

Copy the code and paste in your page, post or widget to use the form.

How do I find if LeadSquared tracking script is on my website?

By installing LeadSquared tracking script on your website, you can track the lead visits on your website in your LeadSquared account. Please see this to know about Installing tracking script on your website.

How do I find if LeadSquared tracking script on my website.

On successful installation of Leadsquared tracking script on your website, you can find your tracking script as shown below.

  • Open your website
  • Right click and click on ‘ View page source ‘
  • Press ‘ CTRL+ F ‘ keys from your keyboard and search for ‘ mxradon ‘ keyword.

view page source

tracking

Note:

  • The Leadsquared tracking script is unique for each account, so your script will contain a unique id OR Leadsquared account number.
  • On finding the tracking script in your website, the unique id there in the tracking script must match with your Leadsquared account number.

You can find your Leadsquared account number as shown below.

acc no

Related resources :

To know about Deploying the tracking Script on your website
To know about I have deployed the website tracking script, but visitor visits are not being tracked. What could be the issue?

How do I configure MSG91 SMS provider with LeadSquared

It is now possible to integrate MSG91 SMS service with LeadSquared. Please follow the below procedure to configure & setup MSG91 SMS service with your Leadsquared account.

Prerequisite

You must be an Admin User of your LeadSquared Account.
You must have created an account with MSG91 SMS service
You must have MSG91 – API key.

Procedure

Step-1: To setup SMS app, navigate to Apps -> Apps Market place > and select SMS App and click on Install button.

SMS app

Step-2:  On installing the app, Click on SMS app it will be redirected to SMS connector details page, hover the mouse over Settings button to configure the appp.

configureOR, On Installing the app, you’ll spot the SMS app in Show in installed app to Configure the app.

config sms

Step-3: Configure the SMS app in the following order:

  • Select SMS account type as Global (MSG91),
  • Specify the Sender ID,
  • Specify MSG91 – API key
  • Click on Save Settings button to complete the configuration of SMS app.

SMS

On clicking Save Settings, you’ll see the confirmation message. Now, you’re set to send SMS to your leads.

Step 4: To send SMS to your leads across the world, navigate to Leads -> Manage leads -> and select the desired lead record and click Send SMS option.

Send sms
Send SMS to List of Leads
To send SMS to list of leads, navigate to Leads > Manage list > select your list > hover the mouse over Action icon and click on Send SMS.

Send sms's

It is also possible to send SMS to list of leads from list details page.

SMS to list

Step 5: Choose your SMS template and click on Send Message to send SMS to your leads.

Send sms


Once the SMS is sent you can see the log in Lead Activity History.

Lead detaisl

How to use the LiveChat connector

LeadSquared LiveChat connector enables all chat conversations and offline messages (called tickets) to be captured in LeadSquared. For existing leads, it helps you to track each chat conversation as an activity under Lead Activity History. If the conversation is with a new lead, the new lead is added in LeadSquared and the conversation is tracked under Activity history of that new lead.

Prerequisites

You should be Admin user of LeadSquared to access the connector.

Procedure

To add LiveChat Connector, follow these steps:

Browse to Apps > Apps Marketplace, select LiveChat connector and click on ‘Install’ button

Live chat

Configuring LiveChat Connector

On Installing the app, click on LiveChat connector where you will be redirected to Live chat connector details page. This is not yet ready to be used.  You need do two simple configuration steps to make it functional.

configure

OR. on installing Live chat connector click on Show installed apps tab to configure Live chat tool.

Live config

This will open up the LiveChat Connector Configuration dialog.

Source and Activity

  • If a chat conversation happens with a new lead, the Source will be set to “LiveChat” by default. You can again change this configuration.
  • Each chat conversation will be tracked as an activity in LeadSquared.  Select the activity that you want to associate with chat. If you don’t find a matching activity, create it first and then come back to the configure connector section.

Once your settings are complete, click “Save Settings”.   You will see a message on the top on config windows:

As the message suggests,  to start capturing LiveChat in LeadSquared, add the displayed URL in your LiveChat  Webhooks. Copy the displayed URL. It will be in following format:

https://livechat.leadsquared.com/Capture.aspx?OrgID=<your org id>&AccessToken=<your access token>

Login to your LiveChat account and navigate to LiveChat settings (click on the gear icon on the header) -> Integrations -> Webhooks.

You need to then add the Webhook URL that you receive on LeadSquared connector window on two events:

1. When chat ends, select all the “Data types”

2. When Ticket is created, and include the “ticket” data.

Chat End Webhook


The first one captures all chat conversations while the second one will capture all “offline” messages.

Ticket Created Webhook

Save the changes.  All LiveChat chat conversations will start getting tracked in LeadSquared:

Lead Details

Add Landing Page Hosting Domain

1. Feature Overview

The Website and Landing Page Domain settings allow you to associate your business/brand domains (and sub-domains) with your LeadSquared account. We track website visits on these domains and post them as activities against your leads. In addition, you can also host Portals and Landing Pages built with LeadSquared on sub-domains created under your main domains.

Note: To add multiple domains to your LeadSquared account, see Configuring Multiple Domains in LeadSquared.


2. Prerequisites


3. Adding Landing Page Sub-Domains

The default domain to host LeadSquared landing pages is <yourdomainname>.viewpage.co.
viewpage.co is a domain name owned by LeadSquared.

Alternatively, you can host landing pages created using LeadSquared on your own sub-domain. For example, page.yourdomainname.com 

3.1 Add a CNAME Record in Your DNS

First, add a CNAME record in the Domain Name System (DNS) server where your website is hosted (GoDaddy, Hostgator, Bluehost, etc.).
The CNAME record must point your landing page sub-domain (e.g., page.yourdomainname.com) to cloud.viewpage.co. Your service provider will have documentation available on this. Here are some docs of popular hosting providers

Note: The settings in your DNS may take up to 48 hours to reflect.

3.2 Configure the new sub-domain on LeadSquared

Once the DNS settings take effect, go to your LeadSquared account and –

  1. Add a new website domain as described in the previous section.
  2. Next, click Create to add a new domain.
  3. Under purpose, click Landing Page Hosting.
  4. From the drop-down, select the domain added in step 1.
  5. Enter the sub-domain name.
  6. Click Save.

add new landing page domain

Your landing page is now live. You’ll see a green tick green tick alongside the sub-domain.

landing page verification

You can add multiple landing page sub-domains across your primary domains. To mark a sub-domain as primary, hover your cursor over the settings  icon, then click Set as Primary.


Any Questions

If you still have questions, please leave us a comment below.

Tracking Landing Page Submission on same Page in Google Analytics and Facebook

1. Feature Overview

LeadSquared offers you to track the visitor trend on the same Landing Page by using conversion scripts. If you want to track form submissions using Google conversion script and Facebook conversion pixel code by redirecting a visitor to a Thank You page, then click here for help.

This article explains the process of tracking form submissions using Google conversion script and Facebook conversion pixel code, without redirecting a visitor to another page.


2. Prerequisites

  • Obtain the conversion script from your Google Analytics account (click here for help).
  • Obtain conversion pixel from Facebook (click here for help).
  • You must complete steps 1 and 2 of creating a landing page.


3. Procedure

3.1 Add Google Conversion Script to a Landing Page

  1. In Step 4 of the Landing Page builder scroll down the Embed JavaScript section. Paste the Google Conversion Script in Inside Head tab.
  2. Replace the nine digit value in ‘conversion_id’ with your Id in below-mentioned script.
  3. Replace the value in ‘conversion label’ with your conversion label value and click Next to proceed.

Download Google Conversion Script

Tracking Landing Page Submission on same Page 1


3.2 Add Facebook Conversion Pixel to a Landing Page

  1. In Step 4 of the Landing Page builder scroll down the Embed JavaScript section. Paste below mentioned Facebook Conversion Pixel in the Inside Head tab.
  2. Replace the nine digit value in ‘conversion_id’ with your Id in below-mentioned script.
  3. Replace the value in ‘conversion value’ with your conversion label value
  4. Replace the variable in ‘conversion currency’ with your currency value and click on Next to proceed .

Download Facebook Conversion Pixel

Tracking Landing Page Submission on same Page 2

References https://developers.facebook.com/docs/ads-for-websites/conversion-pixel-code-migration


Any Questions?

Did you find this article helpful? Please let us know any feedback you may have in the comments section below. We’d love to hear from you and help you out!

Change Email Id of LeadSquared User

1. Feature Overview

Admin users can update the email Id (or user Id) of existing users. This helps when –

  • You want to replace an old LeadSquared User with a new one.
  • You want to display a different email Id for users when they send emails to leads. For example, rather than sending emails from bob@mycompany.com, you want to display support@mycompany.com.
Note: This is a restricted feature. If you want to enable it for your account, please contact support@leadsquared.com


2. Procedure

How to change the email Id –

  1. Navigate to My Account>Settings>Users and Permissions>Users.
  2. In the Users list, under the Action column, hover over the wheel icon alongside the user whose email Id you want to change, then click Edit.
  3. On the Edit User pop-up, in the top section, click the pencil icon alongside the user’s email Id.
  4. Type in the new email Id then click the tick icon. You’ll get a prompt saying User updated successfully. You can now close the pop-up.

Changing User Email Id

Note: Once the email id of the user is updated, an automated email to set the password for the user’s account will be sent to the new email Id. The user can set a new password and access the account.


Any Questions?

Did you find this article helpful? Please let us know any feedback you may have in the comments section below. We’d love to hear from you and help you out!

User Roles and Access Rights

You can control access to different features and data by associating roles to users. When a new LeadSquared account is created, the first user automatically assumes the Administrator role. Admins have access to all features based on your account plan.


Manage Users

Administrators can see the roles of existing users, navigate to My Profile> Settings>Users and Permissions>Users:

admin user access


Roles and Permissions

To assign user roles, refer to Manage Users. There are 4 user roles to choose from –

User Role Access Rights
Sales User
  • Can access only the Leads assigned (where the user is the Lead Owner)
  • Cannot access Marketing Functions like Email Campaigns, Landing Pages, Autoresponders, Automation
  • Sales Users can be associated in groups, to know details about creating and managing groups please refer Manage Groups
Sales Manager
  • Can access ALL leads (leads assigned to any user)
  • Cannot access Marketing Functions like Email Campaigns, Landing Pages, Autoresponders, Automation
  • Limited access to Settings
Marketing User
  • Can access ALL leads (leads assigned to any user)
  • Can access all Marketing Functions
  • Limited access to Settings (more than Sales Manager but less than Administrator).
Administrator
  • Complete access to everything
Super Administrator
  • Can apply permission templates to restrict access given to administrator users
  • Can set administrator users as super admins

You can also control permissions at a more granular level using permission templates. For more information, see How to control lead export and lead delete permissions for users? 


Any Questions?

If you have any questions related to user roles and access right, please let us know in the comment. We’ll be happy to help.

Tag Your Leads

Important:

  • For customers onboarded after 17th January 2023, the Lead Tag Manager feature will not be available.
  • For customers onboarded before the said date, if the feature was not enabled on your account before 17th January 2023, the feature is no longer available for you.

1. Feature Overview

Once you’ve created Lead Tags on your account, assign these tags to your leads. When tags are assigned to multiple leads, enter the lead tag in the Quick Search bar to identify all the leads that share a common tag.

Note: When you use the Quick Search bar, if the lead tag contains more than one word (e.g., New York City), put the tag name in quotes like “New York City”.

Lead Tags


2. How it Works

You can tag leads as follows:

  • Tag a lead from the Manage Leads page.
  • Tag multiple leads at once from the Manage Leads page.
  • Tag a lead from the Lead Details page.

Tag can be a word or a phrase of words. The maximum number of characters allowed per tag (tag length) is 50.


3. Tagging from the Manage Leads Page

You can tag one lead at a time or multiple leads from the lead details page –


3.1 Tagging One Lead at a Time

  1. Under the Actions column, hover your cursor over the settings Settings icon icon corresponding to the lead you wish to tag,
  2. Click Add Tag from the list of actions.

Add tag to a lead

On the Tags pop-up,

  1. You’ll be able to add tags by selecting from the available tag options.
  2. If you have permission to add new tags, you can key in the new tag name and press Enter.

121 tag popp


3.2 Tagging Multiple Leads at Once

  1. Select one or multiple leads by selecting the checkbox alongside the Lead Name.
  2. Click the Tags button to add tags to the selected leads.

Tags-in-Manage-leads

On the Tags pop-up,

  1. You can add tags by selecting from the available tag options.
  2. If you have permission to add new tags, you can key in the new tag name and press Enter.

Tags in ML popup

Leads with tags can be identified with the golden/yellow tag icon seen next to the leads on the Manage Leads page.

Manage-Leads-tag-icon

To see or edit the tags of a lead, click on the Tag icon. You’ll see a pop-up where you can add more tags or delete the existing tags as required.


4. Tagging Leads from the Lead Details Page

You can also tag a lead from the Lead Details page. You’ll see Tags section a little below the Vcard to the left of the page, click the Add a tag link to select from the available tag options.

Lead details Tags

You can also add new tags and press the Enter key to add a tag to the lead.

Lead details tags 2

All the tags attributed to the lead can be seen in the Tags section.


5. Searching for Tags with Quick Search

You can search for tagged leads using Quick Search.

  • If the Tag has a single word, use it directly in the quick search bar.
  • If the tag is a phrase comprising of two or more words, use double quotes while searching the leads. E.g., “Web Services”.

Search-Tags


Any Questions?

For any queries, feel free to leave us a comment below.