Creating Landing Page from external HTML, CSS, Scripts and Images

The External Landing Page feature allows you to create and host landing pages in LeadSquared if you have your own HTML of the landing page, or have purchased a template from marketplaces such as ThemeForest (www.themeforest.net).

Please note that this feature is targeted at HTML developers. You need to have basic HTML/JavaScript development skills to be able to use this feature.

After you click on “Create Landing Page”, select the third option “Use your own Template/HTML” option and click “Next”.

That will take you to Step 2/Build Landing Page. There are two steps to setting up the landing page design/content:

External-Landing-Page-Content

Step 1 – Paste your HTML. Copy the entire HTML of your landing page, which you have built, or purchased from a third party.

The key thing here is to ensure that the path of your images, JavaScript (js) and CSS files is correct. You need to make sure they point to the URL where they are hosted. A good place to host them would be your website. You can also upload and host them in LeadSquared at Content-> Images & Documents.

An illustration of how the URLs of your images/js/css files should be changed:

Suppose your website is http://www.mydomain.com . Assuming that your CSS files are stored in /css location under your website home, JavaScript files are stored in /js location and images are stored in /img location respectively:

If your JavaScript includes look like

<script type=“text/javascript” src=“js/myjsfile.js”></script>

In the HTML you paste in LeadSquared editor, it should change to following if you host it on your website:

<script type=“text/javascript” scr=http://www.mydomain.com/js/myjsfile.js></script>

Or similar to following if you host in LeadSquared Content -> Image & Documents :

<script type=“text/javascript” scr=http://leadsquaredsns.wowpages.co.s3.amazonaws.com/content/documentss/myjsfile.js></script>

Similarly you would have to change the URLs of your CSS (stylesheet) includes and all the images.

Once your HTML is all set, you need to setup the form.

Step 2 – Setup the Form.

Map-Form-Fields

We have made it easy to modify the form in your landing page to make sure it can capture leads in LeadSquared. If there is a form in your HTML, the form editor will be able to pick all the input elements and try to match them with corresponding fields in LeadSquared. The idea here is that each field in your HTML form should correspond to a lead field in LeadSquared.

You can mark fields as mandatory if needed. Important Note – If your current HTML page has any JavaScript code written on form submission, you must remove it, else form won’t get submitted.

This form mapping makes sure that:

1. The fields are mapped to LeadSquared lead fields, so all data is captured.
2. We add necessary scripts required to make sure this page behaves as a landing page and the leads/visitors are tracked for analytics.

Once you setup the form, you can go to Step 3 and setup your actions.

Capture Email Sender and Recipients as Leads using Markcopy Connector

Important: This connector is deprecated, and we no longer support it. If you’re still using this connector, it is mandatory to migrate to the Mark Copy v2.0 Connector. To migrate, contact your account manager, or write to support@leadsquared.com.

1. Feature Overview

In the normal course of a business, you would be interacting with leads using emails outside LeadSquared. You might be using your email client like Gmail, Outlook, Apple email client etc.  You can capture the sender and recipient of these emails as Leads in LeadSquared through our Markcopy Connector.

You just need to generate a unique email Id in this format –  XYZ@markcopy.com


2. Procedure

2.1 Capturing Inbound Email as Leads

  1. In your email client, set up an auto-forward rule to forward a copy of email to your MarkCopy email Id.
  2. The sender will be captured as Leads and email will be captured as a Lead Activity.

2.2 Capturing Outbound Email as Leads

  1. Copy the outbound emails (CC or BCC)  to your MarkCopy email id.
  2. The recipients in “To” will be captured as Leads and email will be captured as a Lead Activity.
  3. Note that the Addresses in CC or BCC will not be considered for lead creation.
  4. The Emails sent using MarkCopy are not trackable  – which means open click event on such emails will not be captured.
  5. If a recipient reply is copied to the MarkCopy email Id then the reply will also be captured as Lead Activity in LeadSquared.


3. Configuring MarkCopy Connector

  • To configure the MarkCopy connector, Navigate to Apps>App Marketplace>MarkCopy Connector and click on the Install button.

Email sync

  • Clicking on Markcopy Connector it will be redirected to the details page, hover the mouse over settings button to configure the app.

configure markcopy

  • Or, on Installing the app, you’ll spot the Markcopy app in Show Installed apps tab. Hover the mouse over the Action Icon icon to configure the app.

config markcopy

  • Select the values for Source and Activities (which are created by default, if not already present) and Save the settings.

Markcopy - Settings

  • Once you save the settings, you will receive an email address like  xyzNNN@markcopy.com on the Configure page.
  • Just copy (CC or BCC) this email address which is unique to your account, and all the conversations with your leads will be automatically tracked in LeadSquared. If a lead is not present, then it is automatically created.

Markcopy Email id


Any Questions?

Did you find this article helpful? Please let us know any feedback you may have in the comments section below. We’d love to hear from you and help you out!

How to get LeadSquared Mobile App?

LeadSquared mobile app is available on iOS and Android. Click on the app store image to access it.

LeadSquared CRM

Google PlayStore

LeadSquared app for mobile helps marketers and sales people to manage their sales leads, find leads which are more likely to close, manage their sales follow-ups, analyze the lead data and view results of various marketing campaigns.


LeadSquared-Mobile

Features on Mobile

Leads

View your own lead list, corresponding lead details, activities and tasks. If you are a Marketer, Administrator or Sales Manager, you can view all the leads of the system too.

Actions on Leads

Edit leads and post activities on the leads

Tasks

View your pending tasks, create tasks for yourself and mark them complete.

Reports

Learn how your recent email campaigns and most active landing pages are performing. Look at your marketing funnel. Get a list of most engaged leads. See how your users are using LeadSquared.

You will need a valid LeadSquared Account to login into the app.  If you are new to LeadSquared, you can sign-up on our website.

Opportunity Assignment Quotas

1. Feature Overview

You can set daily, weekly and monthly limits on the number of opportunities that can be assigned to users through opportunity distribution automations.

Once set up, you’ll have to configure the Distribute Opportunity card of an Automation to execute the opportunity assignment quotas defined here. To know how to do this, please refer to Opportunity Distribution Automation.

Note: You can also define lead distribution quotas to limit the number of leads assigned to your users through the distribution engine. To know more, please refer to Limit the Number of Leads Assigned to a User – Lead Assignment Quotas.

Distribute LeadSquared Opportunities


2. Prerequisites

To enable this feature, please reach out to your account manager, or write to support@leadsquared.com.


3. How It Works

  1. Create a custom user field (or use an existing one) of number type.
  2. Update this field with the maximum number of opportunities you want to assign for each of your users.
  3. Enable and configure the Opportunity Assignment Quota setting under Users and Permissions.
    1. During configuration, specify the custom user field you created in step 1.
  4. While creating an automation, in the distribute opportunity action card, apply the assignment quotas you configure here. To know more, see Automation Actions – Sales Execution.

When your automation runs, opportunities will be distributed according to the quotas defined for each user (based on the value of the specified custom field). If the custom field value is empty, the default value defined during quota configuration will be used.


4. Create a Custom User Field

While configuring the rules, you’ll need to use a custom user field (see Manage User Custom Fields) under Configuration Value (for example, a custom user field called “Opportunity Assignment Daily Limit”). This field should contain the opportunity assignment quota for each user. This field will then be used to configure the opportunity assignment quota as shown below.

Note: You can configure up to five custom user fields to set limits.


5. Configure Opportunity Assignment Quota

Once set up, you’ll be able to set quotas to assign opportunities to individual users in your account. As an example, let’s look at a vehicle insurance disbursal company that has five sales users (Joe, Ed, Paul, Leo, and Rex), and wants to assign 10 opportunities each to three users (Joe, Ed, and Paul) and 15 opportunities each to the remaining two users (Leo and Rex). In order to do this, the organization will have to configure user-specific opportunity assignment quotas. The organization can further define quotas for different durations  (daily, weekly, monthly) for each individual user.

To enable this feature –

  1. Navigate My Account>Settings>Users and Permissions>Opportunity Assignment Quota.
  2. Click the Enable Opportunity Assignment Quota slider.

LeadSquared Opportunity Assignment

Enter the following details –

LeadSquared Opportunity Assignment

Configuration Description
Configuration Key The name of the configuration that you set. This will help you distinguish the configurations on the Distribute Opportunity card automation.
Configuration Value The custom user field based on which opportunities get distributed to your users.
Default Value The default field value you want to assign to the selected custom user field. If the custom user field is blank for a particular user, then the default value will get assigned to the user. But if the field already has an existing value, then the default value will be ignored.
Add To add additional configurations, click Add.

The assignment quota limit for a user will apply across all automations. So for example, if a user’s quota is defined as 10, and multiple automations are set up, opportunities assigned from either automation will increase the assignment quota counter. Once the quota is exceeded, more opportunities won’t be assigned to the user from any of the automations.

Once you’re done, click Save.

Notes: If an existing non-number custom field (such as a DateTime or Text field) with existing non-number values (such as ‘Dec’, ‘BLR lead’, etc.), is edited and converted into a Number field, then the default value will be assigned in place of the non-number values.


Next Steps

Once you’ve configured the opportunity assignment quota, you can set up an opportunity distribution automation where it can be applied. The settings configured here can be used to configure your automation. To proceed, please refer to Opportunity Distribution Automation.


Any Questions?

Did you find this article helpful? Please let us know any feedback you may have in the comments section below. We’d love to hear from you and help you out!

Sales Activity Management

1. Feature Overview

Sales Activity Management in LeadSquared lets you configure, capture, and manage revenue-related transactions against leads. Depending on your business, each sales activity records the information your organization needs to track a sale, such as the product sold, order value, sales owner, or transaction date.

Sales activities aggregate into total revenue figures, which can be tracked and analyzed using LeadSquared’s Analytics and LeadSquared’s Goals feature.

Note: This article covers both admin configuration of sales activities and how users can log them against leads. For admin-only configuration, see sections 4 through 6. For logging activities as a sales user, see sections 7 through 9.


2. Prerequisites

  • Only administrators can configure sales activity settings, add products, and customize the activity form.
  • Once configured, all users (administrators, sales managers, and sales users) can log sales activities against leads.


3. How It Works

Sales Activity Management is built around three layers of admin configuration. Complete these in order before sales users begin logging transactions.

  1. Configure activity settings — Set a display name, default currency, and behavioral options such as allowing pre-dated entries or triggering automatic lead stage changes.
  2. Configure the activity form — Choose which fields appear when a user logs an activity. LeadSquared provides four default system fields and eleven configurable custom fields; only enabled fields appear on the form.
  3. Add products — Create the products users can select when recording a transaction. Products must exist in the system before they can be referenced in an activity.

Once all three steps are complete, sales users can log activities from the following locations:


4. Configure Sales Activity

Admin users can configure Sales Activity settings like the display name, default currency, etc.

  1. Navigate to Settings>Leads>Sales Activity Settings.
  2. Enter the Display Name for your sales activity (e.g., New Registration).
  3. Enable or disable the settings below based on your organization’s requirements.
  4. Click Save.
Note: Default currency can be changed in your Company Profile settings.
Setting Description
Log Activity Changes When enabled, edits or changes to the sales activity will appear in the Activity History tab on the Lead Details page. To know more, see How to Log Activity Changes.
Allow Pre Dated Activities When enabled, users can create activities for past dates.
Change lead stage of a lead to ‘X’ when sales activity is added When enabled, adding a sales activity automatically moves the lead to the final lead stage configured in your account.

Leadsquared - Sales Activity Management


5. Configure Sales Activity Form Fields

You can customize the Sales Activity form by configuring the fields that users will fill in while posting a sales activity. LeadSquared provides 4 default system fields and 11 configurable custom fields. To configure form –

  1. Navigate to Settings>Leads>Sales Activity Fields.
  2. Click Edit.
  3. Enter Display Names for the required fields.
  4. Click the Type dropdown and customize the activity field type.
  5. Select the checkbox alongside a field to include it in the form.
  6. Click Save.
Note: If you require additional fields apart from those available in your account, contact us at support@leadsquared.com.

Leadsquared - Sales Activity Management


6. Add Your Products

Products must be created so users can select them when recording a sales activity. You must be the Administrator of your account to add products.

  1. Navigate to Settings>Leads>Manage Products.
  2. Click Create.
  3. Enter the Product ID, Product Name, and Product Description.
  4. Click Save.

Leadsquared - Sales Activity Management


7. Capture Sales Activity for a Lead

Sales Activities can be added by Administrators, Sales Managers and Sales Users.

7.1 From Manage Leads Page

  1. Navigate to Lead Management>Leads.
  2. Hover over the Actions icon alongside the relevant lead and select New Sales Activity.
  3. Fill in the activity details in the pop-up. The fields displayed depend on how your administrator has configured the activity form. Default system fields include Status, Product, Order Value, Sales Date, and Sales Owner.
  4. To attach a file (for example, an invoice), click the Attachments tab, click Upload, and select the file.
  5. Click Save. Once saved, the activity appears in the Activity History panel on the Lead Details page.

Leadsquared - Sales Activity Management

7.2 From Lead Details page

  1. Navigate to Lead Management>Leads.
  2. Click the name of the relevant lead to open the Lead Details page.
  3. Click Sales Activity and enter the relevant details.
  4. Click Save.
Note: Sales Activities can also be added through Smart ViewsManage Lists, and List Details page.

Leadsquared - Sales Activity Management


8. Edit or Cancel a Sales Activity

The sales activity of your leads will be displayed in the respective Lead Details pages. You can edit or cancel an existing sales activity here –

  1. Navigate to Lead Management>Leads.
  2. To view the Lead Details page, click the name of the relevant lead.
  3. To edit the details of the sales activity, click the Edit icon.
  4. To cancel the sales activity, click the Delete icon.

Leadsquared - Sales Activity Management


9. Search for Leads by Sales Activity

You can use Advanced Search to find leads based on data in sales activity fields.

  1. Go to Lead Management>Leads.
  2. Select Filter, and then select Advanced Filter.
  3. Enter your search criteria using the relevant activity and sales fields.
  4. Click + Add to apply each criterion.
  5. Click Show Results.

search lead by sales acitivity


Any Questions?

Did you find this article helpful? Please let us know any feedback you may have in the comments section below. We’d love to hear from you and help you out!

Lead Form Customization

1. Feature Overview

LeadSquared provides five built-in lead forms to help sales and marketing users capture and manage lead data without navigating across multiple pages. Each form is designed for a specific context, from detailed desktop entry to quick mobile capture and agent call pop-ups.

Note: For more advanced form functionality, the Forms and Process Designer features let you create intelligent forms to capture lead, activity, and opportunity data. See How to Create a Form for details.


2. Prerequisites

  • You must be an administrator of your LeadSquared account to configure lead forms.
  • Identify the lead fields you want to capture before customizing a form. To create custom fields for your business data, see How to Create Custom Fields.


3. How It Works

When a user triggers a lead-related action, such as adding a new lead or receiving a call, LeadSquared presents the appropriate form based on the context. Each form pulls from the same pool of lead fields defined in your account, but displays only the fields you have configured to show for that form type.

Administrators configure each form independently through Settings>Leads>Lead Forms. Fields can be shown, hidden, or reordered by dragging them between sections. Fields moved to the Hidden Fields panel are not deleted; they are simply excluded from display in that form. This means the same field can appear in one form type and be hidden in another.

Sections within a form can be created, renamed, reordered, and deleted, giving administrators control over how lead data is grouped and presented to users.


4. Form Types

Form Description
Lead Form A detailed form for entering comprehensive lead information.
Quick Add Form A short form for capturing only key lead details for faster data entry.
Lead Form on Mobile A form in the LeadSquared mobile app for adding leads on the go.
Lead VCard A card on the Lead Details page displaying minimal but important lead information.
Agent Pop-up Form A pop-up form that appears during inbound or outbound calls, allowing agents to log or view lead details.


5. Configuring a Lead Form

The steps below apply to all five form types. Where a form type requires additional context, it is noted in the relevant section.

  1. Go to Settings>Leads>Lead Forms.
  2. In the Select Form to Edit dropdown, select the form type you want to configure.
  3. Manage fields and sections as needed using the options below, then click Save.

Fields

  • Drag a field to the Hidden Fields panel on the right to remove it from the form.
  • Drag a field from the Hidden Fields panel back into a section to restore it.
  • Drag a field within a section to reorder it.

Sections

  • Click Create Section, enter a name, and click Save to add a new section.
  • Hover over a section title and click the Edit icon to rename it.
  • Hover over a section title and click the Delete icon to delete it. All fields must be removed from a section before it can be deleted.
  • Drag a section to a new position to reorder it.

Leadsquared - Lead Form Customization


6. Lead Form

Entering Lead Details

  1. Go to Lead Management>Manage Leads or Lead Management>Smart Views.
  2. Click Add New Lead to open the form.
  3. Fill in the lead details across the relevant sections.
  4. Click Save & Close.

Leadsquared - Lead Form Customization


7. Quick Add Form

The Quick Add Form is designed for fast lead entry using only essential fields.

Entering Lead Details

  1. Go to Lead Management>Leads or Lead Management>Smart Views.
  2. Click Quick Add Lead.
  3. Fill in the lead details and click Save & Close.

Leadsquared - Lead Form Customization


8. Lead Form on Mobile

The mobile lead form allows field users to capture lead data from the LeadSquared mobile app.

Entering Lead Details

  1. Open the LeadSquared app and log in.
  2. Tap Leads to view your lead list.
  3. Tap the Add Lead icon in the bottom-right corner.
  4. Fill in the lead details and tap Submit.

Add-Lead-on-Mobile


9. Lead VCard

The Lead VCard displays key lead details, quality metrics, and lead properties on the Lead Details page. Users can edit the VCard directly from that page.

Note: Changes made to the Lead VCard in Lead Form settings may not reflect on the Lead Details page until the corresponding section is also updated in the Lead Details View Customization (LDVC) feature. LDVC provides greater flexibility for customizing the VCard and the full Lead Details page.

Editing Lead Details in the VCard

  1. Go to Lead Management>Manage Leads.
  2. Click a lead name to open the Lead Details page.
  3. In the left panel, click More and select Edit VCard.
  4. Update the details and click Save & Close.

Leadsquared - Lead Form Customization


10. Agent Pop-up Form

The Agent Pop-up Form appears automatically when a sales user handles an inbound or outbound call. The user can enter details for a new lead or view an existing lead’s information directly from the pop-up.

For information on setting up telephony integrations, see Universal Telephony Connector.

Leadsquared - Lead Form Customization


Any Questions?

Did you find this article helpful? Please let us know any feedback you may have in the comments section below. We’d love to hear from you and help you out.

LeadSquared Getting Started Guide for Marketing Users

Welcome to LeadSquared. The purpose of this document is to provide you step by step guidance on the setting up and using of LeadSquared as a Marketing User.


1. Log in to LeadSquared

Log on to LeadSquared using your username and password at run.leadsquared.com. If you do not have your login credentials, please check with your LeadSquared Administrator.


2. Update your Personal Settings

Update your Profile Manage your personal details Help
Update your Password Update your LeadSquared password Help
Update Email Signature My Email Signature Help
Manage Report Subscriptions Allows you to manage which reports you want to subscribe Help
View Request History Allows you to view history of all bulk export, delete and other requests Help


3. Customize Lead Stages and Sources

Update Lead Stages Capture the stage that define your sales – from new lead to closure. Help
Update Lead Sources Populate the sources from which you get or expect to get the leads. Help


4. Customize Lead Activities and Scores

Update Score of Core Activities Customize lead score of core activities like Email open/click, website visit and so on to know how active is the lead with your business. Help
Create Custom Activities Use this to create your own Lead Activities that sales or inside sales employees can associate with the leads. Help


5. Customize Sales Activity Settings

Manage products Create the list of products/services that you sell. Help
Sales Activity Settings Configure basic details about your sales activities Help
Sales Activity Fields Customize the fields you want to see on sales activity Help


6. Manage Task Types

Manage Task Type Allows you to manage multiple Task Types and configure their properties Help


7. Manage Tags

Manage Tags Allows you to manage marketing tags Help


8. Install Tracking Script

Website Tracking Script for WordPress Sites Use this option if your website is hosted on WordPress. We have a plugin to install our tracking script.  Help
Website Tracking Script for other Sites*  You will need to copy/paste our tracking script on all our pages for non-WordPress websites.  Help

*Available in Standard and higher plans.


9. Manage Website and Landing page domains

You need to add website domains that can be tracked.  For each website domain you add multiple landing page sub-domains.

Website Domains Allows to connect websites to LeadSquared for tracking. Help
Landing Page Domains Allows to connect landing pages to LeadSquared for tracking. Help
Multi-domain setup* Allows to track website visits on multiple domains. Help

*Available in Standard and higher plans.


10. Manage Email Link tracking domain

Email Link Tracking domain Allows tracking of website visits after leads open email through LeadSquared. Help


11. Setup Lead Quality Criteria

Lead Quality Criteria Allows to measure lead quality using custom quality rules. It helps to identify the leads that are close to your ‘Ideal customer profile‘. Help


12. Setup Lead Engagement Scoring

Engagement Score * Allows to capture the engagement level of leads with your business. You can create your own custom rules of engagement scoring. Help

*Available in Standard and higher plans


13. Email Settings

Email Categories Allows leads to selectively subscribe/unsubscribe from specific types of emails rather than completely Unsubscribing from all emails. Help
Landing Page Auto response You can create a custom email template for automated email that can be sent when landing page submission happens. Help


14. Rules & Notifications

Rules and Notifications * This feature allows you to automate user notifications based on lead events. For example, you can notify your sales reps whenever any lead visits pricing page of your website. Help

*Available in Standard and higher plans


15. Manage the Content in LeadSquared

Email Library Allows you to create templates for Email communication. Help
Images and Documents Allows you to manage the images and documents which is used in LeadSquared. These are used in the landing page designer and email composer. Help


16. Manage the Marketing Features of LeadSquared

Email Campaign Allows you to design and create feature rich Email Campaigns which can be scheduled, tracked and analyzed. Help
Automation Powerful Workflow Automation Help
Landing Pages Allows you to create Landing Pages and analyze lead conversions Help
Website Widgets Allows you to create various website widgets for lead capture. Help


17. Manage the Leads in LeadSquared

Manage Leads Allows you to create and manage leads at one place. It also allows you to manage lead activities. Help
Manage Tasks Allows you to create tasks and reminders for your leads. Help
Manage Lists Allows you to categorize your leads into various lists based on your preference. Help


18. Manage Reports & Dashboards

Dashboards Allows you to capture the important marketing and sales indicators in a chosen time-frame. Help
Reports Provides analytics around marketing and sales to help you fine tune your business processes using various reports. Help


19. Attend Training and Start Using

Our customer success team will organize a usage training for you. Attend and get started.


Any Questions?

Check help.leadsquared.com or write to support@leadsquared.com for any queries.

You can also download this document in PDF format from below:

leadsquared-getting-started-guide-for-marketing-users

Transactional vs Promotional SMS

Note: All SMS templates must be approved on the DLT platform.


Transactional SMS

These are SMS messages you send to leads to inform them about details necessary to use your products/services. For example –

  • A message sent by a college to a student about a joining date.
  • A message sent to a lead as confirmation of their online submission.
  • A message sent to a caller acknowledging their call to your sales/support number.

Examples of Transactional SMS Templates:

  • Your order no %d% has been shipped. You will receive this order by %s%. Thanks for using our services.
  • Thanks for your interest in our product. Your enquiry number is %s%.
  • Thank you signing up for LeadSquared. We will contact you shortly.

Note:

  • %s% is used to substitute the text which is unique to your contact/prospect.
  • To send SMS within Indian territory, refer to TRAI Notification.

LeadSquared - Transactional SMS


 Promotional SMS

These are SMS messages you send to leads with the objective of promoting your product/service. This category includes any sales and marketing messages which may or may not be required for the recipient.

Examples of Promotional SMS Templates:

  • Dear <name>, Get Flat 10% Off on all our products. Buy now on our website!
  • Dear <name>, Our team wishes you a very Happy <event>. We’ve sent you a gift voucher to your email address.  Hurry! Last date to avail the voucher is <date>.

Note: 

  • In India, promotional SMS can only be sent from 9AM to 9PM and only to phone numbers that are not on the NDNC registry (DND number).
  • All SMS messages that have offers, coupons, etc., can be considered as promotional content.

LeadSquared - Promotional SMS


Note:

How to embed Flash (.swf) file in landing pages

Flash files can be embedded in LeadSquared landing pages.

Note that the flash (.swf) file should be hosted in a server, which means it should have a URL. Please contact support@leadsquared.com if you need any assistance with the flash file URLs.

Prerequisites:  

You have logged in to LeadSquared.

You have hosted the flash file and have the URL ready.

Procedure

Add a HTML block in the landing page where you need the flash file to be appeared.
Double click the block and open the editor, click on “Source” to go to the HTML source view of the html block. Paste this code there:

Code

The above code is available as text file at: Code to Embed Flash Objects.

Replace your flash file URL with the URL of your flash file in above code.

You can change the dimensions of the file by changing height and width in the code.

Click on ‘Save’ in the HTML block once the changes are done.

Publish the landing page.

Flash file in the landing page should work.

Managing Lead and Account Access for Sales Users – Sales Groups

1. Feature Overview

You can organize your sales users into different groups based on location, business unit or any other categorization of your choice. This makes it easier for you to manage your users and leads in keeping with your business use case.

Let’s say you have a business that operates in two regions – north and south. The ‘Group’ feature will help you –

  • Segregate your sales team into region-specific groups.
  • Configure lead view and modify permissions within the groups.


2. Prerequisites

  • It is available only on certain plans. Please contact support@leadsquared.com for more information.
  • This feature can be configured by Administrator users by default. However, you can also grant sales managers access so they can create new own groups or add/remove users from existing ones. For more details, see Grant Access to Sales Group Managers.


3. Group Manager Permissions

You can set permissions for group managers to –

  • View all leads in the group
  • Modify all leads in the group
  • Add users to the group
  • Create Automations for users in the group (View and Modify permissions must be set as prerequisites). For more information, see Group Level Automation.

In addition, group managers can also –

Note: If Opportunities are enabled on your account, whenever you create a sales group, the following permissions are applied –

  • Sales users will be able to view –
    • all opportunities owned by them
    • all opportunities associated with the leads owned by them
  • Group managers will be able to view –
    • all opportunities viewable by their sales reps
    • all opportunities owned by them
    • all opportunities associated with the leads owned by them
  • Admin, Marketing User & Sales Manager user role will be able to view all the opportunities.


4. Creating Hierarchies between Groups

If you want to control lead access rights for users across groups, see Managing Lead Access Across Groups – Group Hierarchies. 


5. Access to Accounts

If you’ve enabled the accounts feature (see Account Settings), you can set permissions for sales groups at the account level.

With account-level permissions you can give your group managers the ability to

  • View all accounts owned by their group members.
  • Modify all accounts
  • View all leads in the accounts.
  • Modify all leads in the accounts.

Note:

  • Lead share will not work when account based access is enabled.
  • Group managers can view/modify all accounts and leads owned by the users in their sales groups.
  • Users that own leads in an account automatically get access to the account details page and can also post activities on the account.
  • To know the behaviour when Accounts and Opportunities are enabled on the same account, refer to Leads, Opportunities and Accounts.

If you want to set permissions at the account level, you’ll be able to control which accounts are accessible to a sales group. To do so –

  1. Navigate to My Account>Settings>Users and Permissions>Sales Groups.
  2. Alongside Group Settings, click Account Based Access.
  3. On the confirmation pop-up, click Yes.

account based settings

When you create or edit a sales group, while setting permissions for the group manager you’ll now see account level permissions. Select the appropriate permissions, then click Save.

group manager permissions

Note: Sales users in the group will have access (to view and modify leads) in only to the accounts they own. However, you can give the group manager permission to view and modify leads in all accounts owned by all the sales users in the group.


6. Grant Sales Group Configuration Access to Sales Managers

To ease the work of admins, you can also grant sales managers access to the Manage Sales Group UI (from where they can add/delete users from groups or create new sales groups)  –

Note: You must enable the Allow sales group functionality to sales manager setting before you complete the following steps. To know more, refer to Organization Settings – Advanced Configuration.
  1. Navigate to My Profile>Settings>Users and Permissions>Users.
  2. Alongside the user you want to grant access to (the user must have the sales manager user role) click the settings icon, then click Edit.
  3. Navigate to the Manage Permissions tab, click Edit, and alongside Allow Sales Group Access, enable the checkbox Checkbox.
  4. From the Manage Users dropdown, ensure permission is also granted for Checkbox Sales Users and/or Checkbox Sales Managers.

Sales Manager Permission for Sales Groups

The Sales Manager will now have access to the Manage Sales Groups page (My Profile>Settings>Users and Permissions>Sales Groups).

sales groups UI


FAQs and Troubleshooting

Sales Group Manager Unable to View Subordinate Leads
If a Sales Group Manager cannot see their subordinates’ leads, one possible reason is that the Reporting Manager Hierarchy feature may be enabled for your account. To confirm this, go to the Manage Users page and check the Actions menu—if you see the User Hierarchy option, then the Reporting Manager Hierarchy is active. In this case, lead access is controlled by reporting relationships instead of sales groups.


Any Questions?

Did this article solve your sales group-related doubts? Let us know if you have any feedback or suggestions in the comments section below. We’ll immediately join in the discussion!

Casa for Web

1. Feature Overview

Casa is LeadSquared’s powerful homepage builder that lets you create a Single Page CRM—a centralized, customizable workspace where users can view and act on everything that matters, all from one place.

With Casa, you can design a personalized homepage that brings together key insights, quick actions, and team-specific tools in a clean, intuitive layout. It reduces the need to navigate between modules and makes your CRM experience faster, smarter, and more focused.

Here’s what you can do with Casa:

  • Design unique homepages for different teams based on their roles, goals, and workflows.
  • Display everything in one place—upcoming tasks, reports, lead lists, and more.
  • Add one-click actions like opening the Lead List or creating a task, so users can jump straight into work.
  • Personalize the look and feel by adding a branded cover image to reflect your company’s identity.
  • Embed external web pages (like help centers, dashboards, or internal tools) right within the homepage.
  • Add quick-launch icons to open high-use pages and features instantly.

Casa turns your LeadSquared homepage into a single source of truth and action, improving visibility, speed, and productivity across your teams.

Note: To know more about Teams, see Teams.

Leadsquared - Casa for Web


2. Prerequisite

  • You must be an Administrator user to access this feature.
  • Casa for Web is available only on NextGen UI. Reach out to support@leadsquared.com to get this enabled.
  • To assign the homepage and launch bar to particular teams, ensure that you’ve configured the teams.


3. How It Works

  1. On Casa, admins can create homepages and launch bars, and configure relevant widgets that they want the users to see.
  2. The homepages and launch bars can be published and set as default or be assigned to different teams.
  3. The published homepage and launcher will be visible to the user to whom they are assigned.


4. Build Your Web App Homepage

To create the homepage for your web app –

  1. Navigate to Apps>Casa from your LeadSquared dashboard.
  2. On the side panel, click the Leadsquared - Casa for Web Web icon. Here, you’ll see a table with three columns – Teams, Homepages and Launchers.
  3. On the top-right corner of the page, click Recently Modified and select All from the dropdown. All your Teams will be displayed under the Teams column.
  4. Under Homepages, alongside Default or the relevant team, click Add Page.
  5. On the home builder page, add the required widgets and configure them.
  6. You can enable the Preview Mode to get a look at the homepage you’ve created. Once you’re done customizing your homepage, click Publish.

Note: The widgets in the homepage builder show a sample preview, even after configuration. The actual values will only be visible once the homepage is published.

Leadsquared - Casa for Web

4.1 Set As Default or Select Teams

  1. To set this homepage as default, enable Set as default.
  2. To assign the homepage to specific teams, click Select Teams and then click on the relevant team. Click Publish.

Leadsquared - Casa for Web

4.2 View All Your Homepages

To view all the Launch Bars you’ve created –

  1. On the Team Management page, click the Leadsquared - Casa for Web homepage icon.
  2.  You can see all your Homepages (Published, Unpublished and Draft) here. You can create a homepage from here by clicking Create New.
  3. You can select multiple homepages and delete them by clicking the Leadsquared - Casa for Web Multi-select icon and clicking the delete icon.

Leadsquared - Casa for Web


5. Add Heading, Description & Cover Image

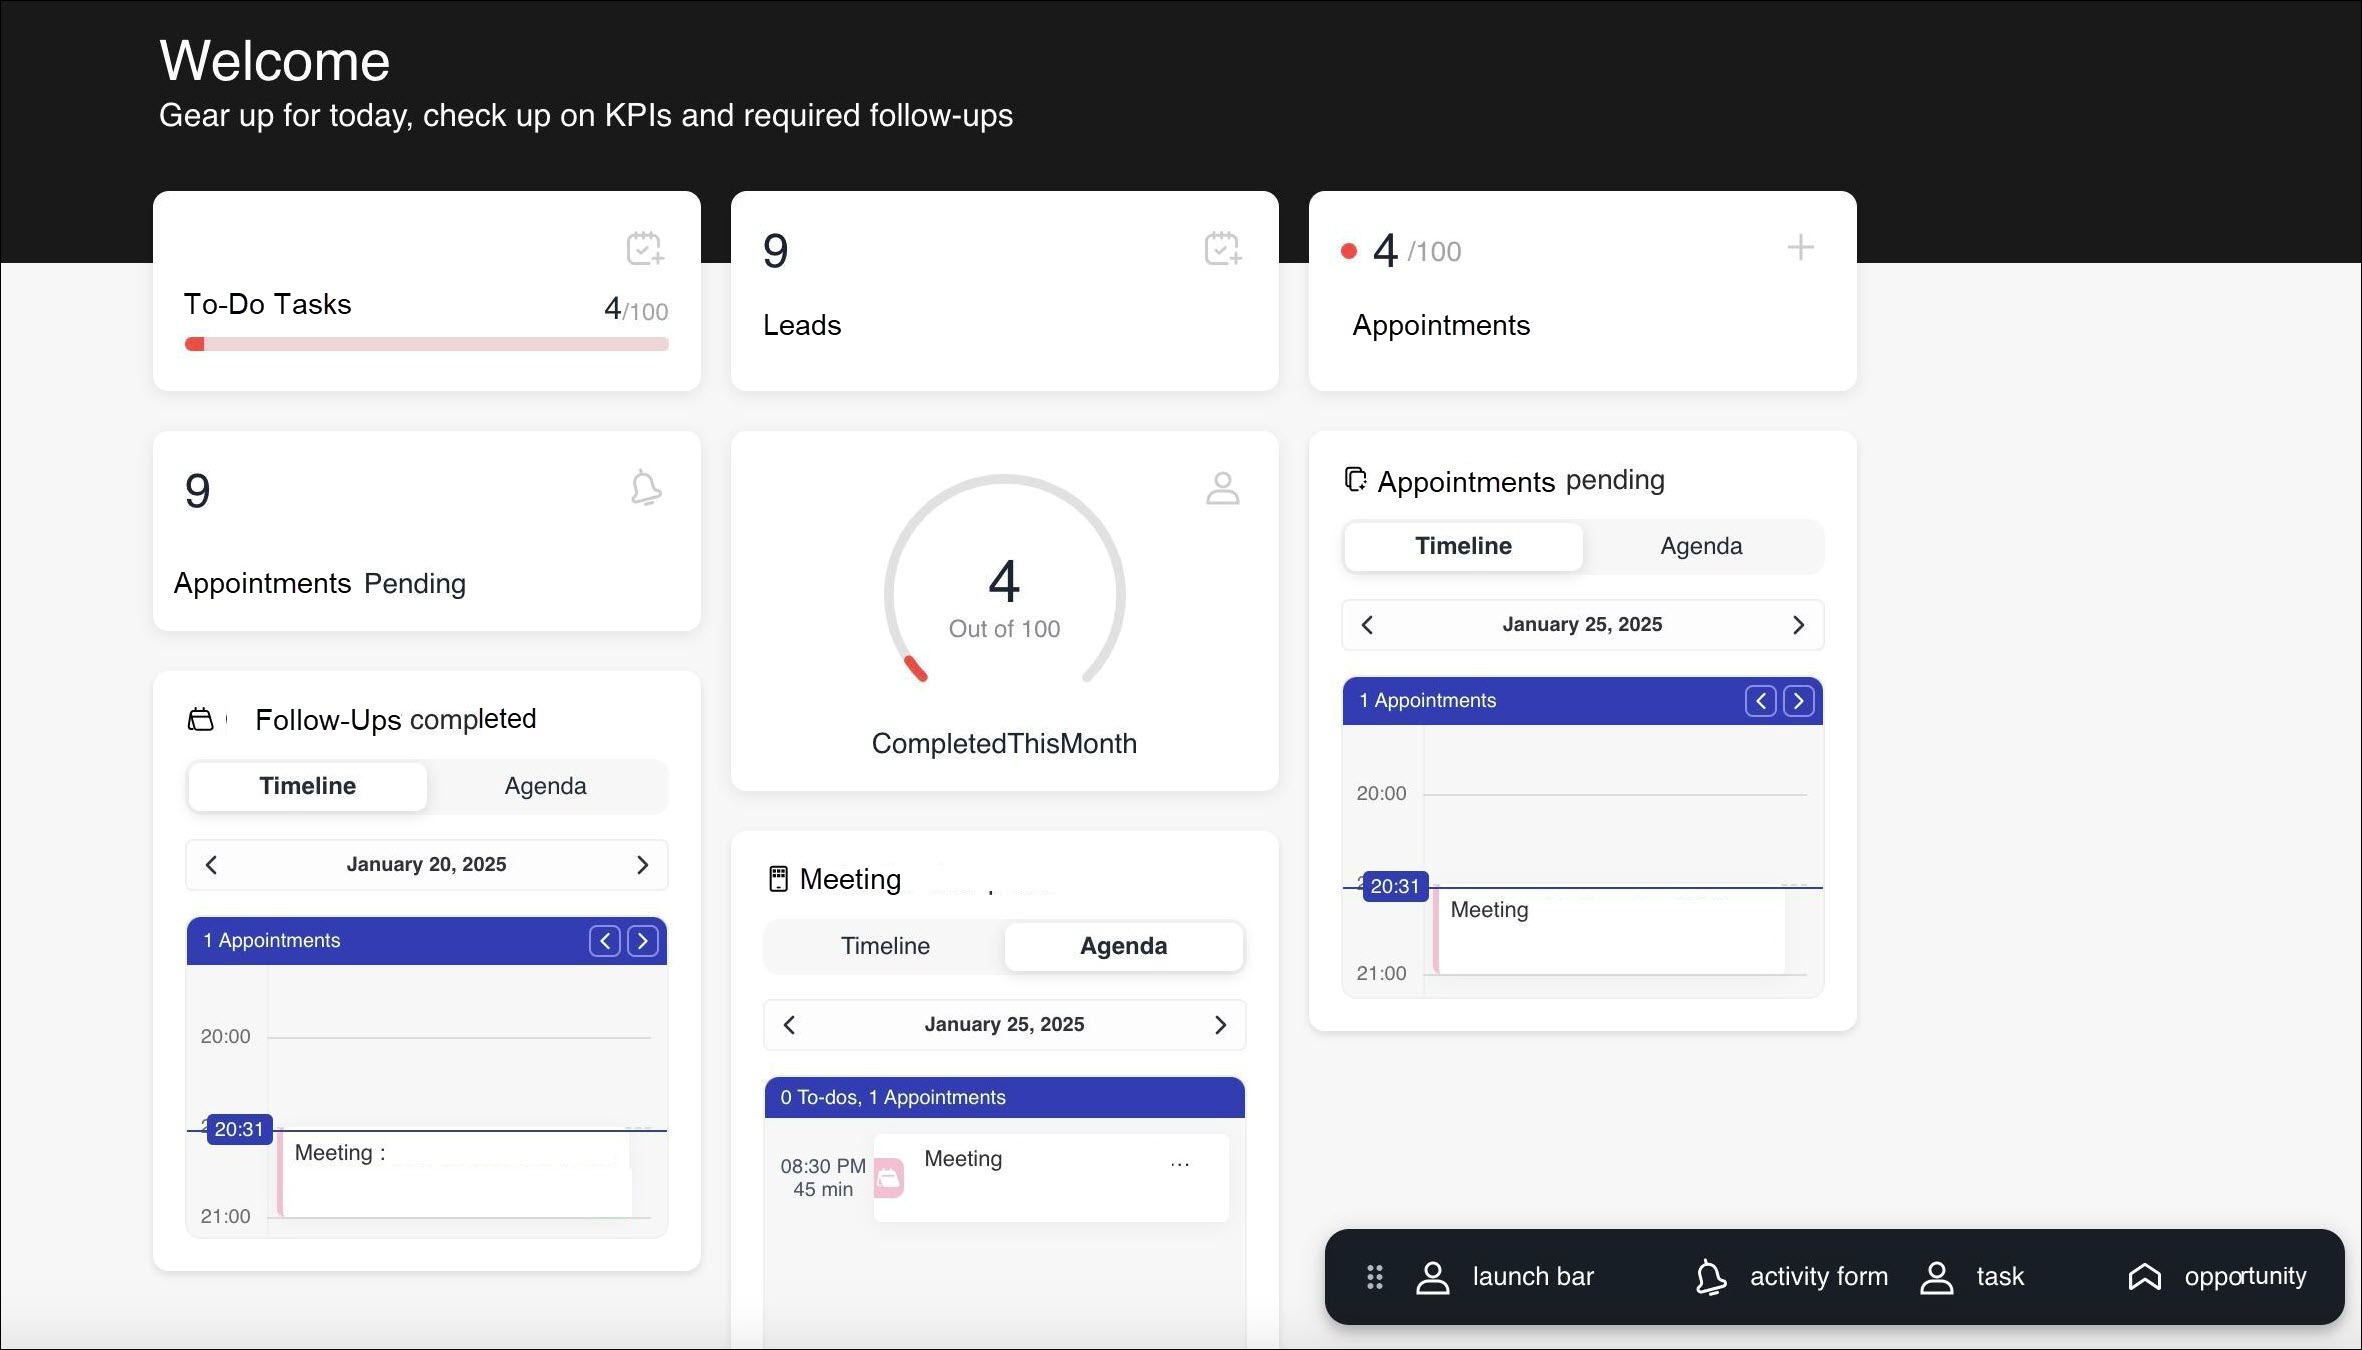
Customize the LeadSquared Web App to reflect your organization’s branding. On the Homepage Builder screen, start by adding a heading, description, and cover image to the first section. Choose an appropriate heading and description to display on your homepage. For example, you could set the heading as “Welcome!”. In the description, you can mail merge user fields for a personalized experience. For instance, the description could be “Hi Phil! Gear up for today, check your KPIs” if you’ve added the user’s first name mail merge field.

Note: The description is limited to 50 characters maximum.

Leadsquared - Casa for Web

When setting up the cover image, you have two options: upload an image from your organization or select a solid color from the six available options. Before uploading an image, review the Image Recommendations to ensure optimal display.

Leadsquared - Casa for Web


6. Progress Bar Widget

The Progress Bar widget can give the user an overview of all your completed tasks for a specific time period in a bar format. To configure the progress bar widget –

  1. Enter the relevant task name that you want to track and select an icon.
  2. From the Task Filters, select the Task Type and Date Range for which you want to view the progress bar for.
  3. By enabling Set Thresholds, you can set minimum and maximum values to be displayed in the progress bar and define colour-coded ranges (e.g,  0-25% in red, 26-50% in yellow and 51-100% in green) using the slider. However, this is optional.
  4. Once you’ve configured the widget, click Save.

Leadsquared - Casa for Web


7. Single Counter Widget

This widget can display the user’s tasks or the data count present in the smart views which can include accounts, leads, opportunities, activities, and tasks. Based on the team you’re assigning this homepage to, you can assign the relevant smart views tab. To configure this widget –

  1. Enter the relevant widget name and select an icon.
  2. Select the relevant entity.

If you’ve selected Tasks –

  1. Choose the Task Type and the Status (either completed, pending or overdue).
  2. Select the date range for which you want the counter to be displayed and click Save.
Note: You will be able to set a threshold for tasks if you select the Completed status.

Leadsquared - Casa for Web

If you’ve selected Smart views-

  1. Choose the relevant teams.
  2. Under the Select Smart View section, you will only be shown the smart views that are relevant to that particular team. Select a Smart View and the corresponding Smart View Tab.
  3. You can enable Set Threshold to set minimum and maximum values to be displayed in the single counter and define colour-coded ranges (e.g,  0-25 in red, 26-50 in yellow and 51-100 in green) using the slider. However, this is optional.
Note: A maximum of 2 Smart View tabs can be added to the homepage.

Leadsquared - Casa for Web


8. Speedometer Widget

The Speedometer Widget gives you a overview of all your completed tasks for a specific time period in the speedometer format. To configure this –

  1. Under the Widget Name, enter the relevant task name that you want to track and select an icon.
  2. From the Task Filters, select the Task Type and Date Range for which you want to view the speedometer for.
  3. By enabling Set Thresholds, you can set minimum and maximum values to be displayed in the speedometer and define colour-coded ranges (e.g,  0-22% in red, 23-78% in yellow and 78-100% in green) using the slider. However, this is optional.
  4. Once you’ve configured the widget, click Save.

Leadsquared - Casa for Web


9. Calendar View Widget

This widget displays your tasks – either complete, pending, overdue or pending and overdue in the Calendar view. You can either choose to view your tasks for a particular date on a timeline by switching to the Timeline view or as a list by selecting the Agenda view. To configure this –

  1. Under the Widget Name, enter the relevant task name that you want to view and select an icon.
  2. From the Task Filters, select the Task Type and Task Status.
  3. Once you’ve configured the widget, click Save.

Leadsquared - Casa for Web


10. Web View Widget

The Web View widget displays a web view of the target URL within the section. You can resize the widget as required. To configure this –

  1. Enter the relevant name to the widget.
  2. Under Navigate To, enter the relevant Custom URL you want the user to be directed to.

Leadsquared - Casa for Web


11. Icon Launcher Widget

Display a maximum of 10 icons that quick launch items from the homepage. The icons and the destination they lead to can be configured. There are numerous ways you can configure these icons. For example, you can configureLeadSquared - Leads icon to direct users to the Lead List page. You can also configure an icon to navigate to a different website (like a help site). To configure this –

  1. Enter the relevant name for the widget and click Add Launch Item.
  2. Select an appropriate icon and add a label.
  3. From the Navigate To dropdown, select the internal or external destination you want to open when the icon is clicked.
  4. Click Add. To add another icon, click Add Launch Item and repeat the process.
  5. Click the Leadsquared - Casa for Web edit icon alongside the added icon to edit it, or Leadsquared - Casa for Web to delete it.

Leadsquared - Casa for Web


12. Banner Widget

Add banners (a carousel view of images) on the homepage to display company announcements or navigate users to internal or external destinations. You can choose the adjust the size of your banner image by zooming. To configure this –

  1. Enter a name for the banner.
  2. The Show Frame toggle is enabled by default. If you do not want the frame to be visible, you can disable the toggle.
  3. Click Upload to upload the banner image. Ensure that you’ve gone through the Image recommendations before you upload an image.
  4. Under Navigate To, select the relevant destination you want to direct the user to. This can either be an internal destination like a form or an external link.
  5. Click the Leadsquared - Casa for Web edit icon if you want to replace the banner image, or the Leadsquared - Casa for Web delete icon to delete the banner image.
Note: The default forms of Lead, Task, Opportunity and Accounts are supported in the Banner widget.

Leadsquared - Casa for Web


13. Resize & Remove Widgets

13.1 Resize Widgets

Once you’ve added the widgets to the homepage, you can resize and rearrange them as required.

  1. Hover over the relevant widget. You will see a blue border around it.
  2. Hold the Leadsquared - Casa for Web drag and drop icon and move the mouse to change the position of the widget.
  3. Hover over one of the blue dots and move the mouse to resize the widget.

Leadsquared - Casa for Web

13.2 Remove Widgets

If you want to remove a widget, click the relevant widget and select the Leadsquared - Casa for Web delete icon. On the Delete Widget popup, click Delete.

Leadsquared - Casa for Web


14. Build Your Launch Bar

The Launch Bar is a movable quick-access toolbar that appears on the homepage. It can be dragged and dropped anywhere on the screen as needed. A maximum of 10 items can be configured here. The icons on the Launch Bar can be customized to quickly open internal or external destinations. The default forms of Lead, Task, Opportunity and Accounts are supported in this widget. To configure this –

  1. Navigate to Apps>Casa from your LeadSquared dashboard.
  2. On the side panel, click the Leadsquared - Casa for Web Web icon. Here, you’ll see a table with three columns – Teams, Homepages and Launchers.
  3. On the top-right corner of the page, click Recently Modified and select All from the dropdown. All your Teams will be displayed under the Teams column.

Leadsquared - Casa for Web

14.1 Add Launcher

  1. Under Launchers, click Add Launcher.
  2. On the Launcher page, click Add Launch Item.
  3. Select an appropriate icon and add a label.
  4. From the Navigate To dropdown, select the internal or external destination you want to open when the icon is clicked.
  5. Click Add. To add another icon, click Add Launch Item and repeat the process.
  6. Click Leadsquared - Casa for Web alongside the added icon to edit it, or Leadsquared - Casa for Web to delete it.
Note: If more than five launch items are configured, only their icons will be displayed by default. The labels will appear when you hover your cursor over the icons.

Leadsquared - Casa for Web

14.2 View All Your Launch Bars

To view all the Launch Bars you’ve created –

  1. On the Team Management page, click the Leadsquared - Casa for Web Launch Bar icon.
  2. You can see all your Launch bars (Published, Unpublished and Draft) here. You can create a launch bar from here by clicking Create New.
  3. Click the Leadsquared - Casa for Web edit icon to edit a launch bar, or click Leadsquared - Casa for Web to delete or unpublish it.

Leadsquared - Casa for Web


15. Unassign Homepage & Launch Bar

Once you’ve published your homepage and launch bar for a team, you can unassign it from the Team Management page or from the builder.

  1. Hover over the relevant homepage or launch bar.
  2. From the dropdown that appears, select Unassign.
  3. On the Unassign popup, click Unassign.
Note: Once you unassign homepages and launch bars, they will not be visible alongside the team.

Leadsquared - Casa for Web


16. Unpublish Homepage & Launch Bar

The difference between unassigning and unpublishing is that if a homepage is assigned for multiple teams and you unassign a homepage for one particular team, then the homepage will not be visible for that particular team. But when a homepage is unpublished, then it will go to the Unpublished section of the Web Homepage page and will not be visible for any team. You can unpublish it from the Team Management page or from the Web Homepages page.

16.1 Unpublish from Team Management Page

To unpublish a homepage or launch bar from the Team Management page –

  1. Hover over the relevant homepage or launch bar and click .
  2. From the dropdown that appears, select Unpublish.
  3. On the Unpublish popup, click Unpublish.

Leadsquared - Casa for Web

16.2 Unpublish Homepage from the Web Homepages Page

If you want to unpublish a homepage from the Web Homepages page –

  1. Click Leadsquared - Casa for Web alongside the relevant homepage.
  2. From the dropdown that appears, select Unpublish.
  3. On the Confirm Unpublish popup, click Unpublish.

Leadsquared - Casa for Web

16.3 Unpublish Launch Bar from the Launchbars Page

If you want to unpublish a homepage from the Launchbars page –

  1. Click Leadsquared - Casa for Web alongside the relevant launch bar.
  2. From the dropdown that appears, select Unpublish.
  3. On the Confirm Unpublish Launcher popup, click Unpublish.

Leadsquared - Casa for Web


Any Questions?

Did you find the content in this article helpful? Feel free to leave doubts/questions in the comment section below. We’ll get back to you as soon as possible.

Setup Criteria of Lead Engagement Scoring

1. Feature Overview

LeadSquared provides 3 core lead qualification metrics – the lead quality score, the lead score, and the engagement score.

While the quality score helps you identify your ideal customer persona, the lead score and engagement score indicate the level of interest your leads demonstrate in buying your product/service.

The lead score and engagement score are both calculated by assigning points to your lead’s actions/activities (e.g., responding to your email campaigns, visiting your website/landing pages, etc.). The lead score is the sum of all the activity points throughout the lead’s history, while the engagement score is the sum of a select few activities within a short period.

The engagement score tells your sales team which leads are the most likely to buy your product or service right now. You can customize the engagement score by defining the time period, the activities you declare most valuable, and the lead stages you want to include.

LeadSquared Lead Score


2. Criteria for Engagement Scoring

The engagement score is computed based on –

  • Activity Period (in days): The number of days you want to include in the calculation of the engagement score. The default value is 30 days.
  • Lead Stages to include: The lead stages to include in the calculation of the engagement score.
    The default value is set as all the active lead stages in your account excluding the final stage (since the last active stage is usually a Customer/Client/Sign-up etc).
  • Lead Activities to include: The activities to include in the computation of the engagement score. For example, website visits, email opens, email link clicks, inbound phone calls, etc. To customize the score/points attributed to each activity, see How to Edit an Activity Score.

LeadSquared Lead Criteria


3. Set Up Engagement Scoring

  1. Navigate to My Profile>Settings>Lead Prioritization>Engagement Scoring.
  2. On the Engagement Scoring page –
    1. Enter the Activity period (number of days) for which you want to calculate the engagement score.
    2. The maximum limit is 366 days. Select the check box for Lead Stages to include in the calculation for engagement score.
    3. Now select the Lead Activities to include to calculate the engagement score.
  3. Click Save to save changes.

LeadSquared Lead Engagement Score


4. Next Steps

You can make use of Engagement Scoring in the following ways –

  • Advanced Search to find the leads that are most/least engaged.
  • Create lists of engaged/disengaged using Manage Lists. You can send out email campaigns, run automation, perform tasks based on these lists.
  • Use Smart Views to target leads based on Engagement Scores.


5. FAQs

Why is the Engagement Score not updated correctly in the Lead VCard?
Engagement Scores are not updated in real-time. They are calculated once every hour, so recent lead activity may not reflect immediately. Check back after some time to see the updated score.


Any Questions?

Do you have questions or issues with the content in this article? Let us know in the comments section.

What errors can I encounter when importing leads?

Your leads may be present in a spreadsheet, or  a database application such as MS Access, or in any other software application. You will have to first export the lead details to a CSV (Comma Separated Value) file. Or if you have leads in an Excel file, you can save it as a CSV file. You can upload the CSV file in LeadSquared to import the leads to LeadSquared. For more information, see How can I import leads to LeadSquared?

You may encounter few error messages during importing leads. These may be due to possible  errors in the CSV file. Below is the list of scenarios, which may be the reason of an erroneous import. If you encounter an error during import, it may be due to one of the following reasons.

(i) Your CSV file content should not have comma (,) semicolon (;), pipe (|), tilde (~), back quote (`), caret (^) in the header. Header is the first column (column name) in your CSV file. It is mandatory to include column names for successful import. Typical examples of column names would be First Name, Last Name, Email, and so on. Ensure that there are no special characters in the header.

Header

Special Character in Header

(ii) When your CSV files contain Date fields, such as, Contacted OnFollowed Up on, Birthday, and so on, you should ensure that you have created a custom field for that. For more information, see How to Create a Custom Field. The dates in your CSV file can be in one of the below formats:

  • dd/mm/yy
  • dd/mm/yyyy
  • mm/dd/yy
  • mm/dd/yyyy

If the date is in any other format, or in different formats, you will encounter an error. In the below screen shot, you can see that there are different formats in the CSV. You will not be able to import such files.

Date

(iii) In some cases, you might have deleted the contents of a particular column, and not the column itself. In this case also you will encounter an error during import. When you see the CSV file, you will see that the column is empty, but open it as a Text (.txt) file and you can see the below error (Two commas at the end).

Column not deleted

To avoid this, select the particular column completely and delete it, so that the column is absent from the CSV file.

(iv) The column header or the column name may be empty in your CSV. Ensure that there is a column name/column header for each and every column. Do not leave it blank.

Empty Header


(v) your CSV file should not contain Backslash (/). You may encounter an error if it contains this symbol. Ensure that Backslash is not present in the CSV file.

(vi) Some times you might encounter a problem with unwanted special symbols in your Lead Details page and Lead Grid page, for eg:

UTF-8-Encoding

To avoid this, Export that respective list. Open that CSV as text (.txt) file and Click on ‘Save as’ and select Encoding as UTF-8
and Click Save. You will get a dialogue box asking whether to Replace the existing file or not, Click on Yes.

Now Import the new list to Leadsquared and make sure you select ‘Overwrite Duplicates’ in Actions (step 03).

How to Publish Landing Pages within your Domain Name?

The landing pages that you publish through LeadSquared, by default, will show the following address on the address bar of browser when anyone views them:  <companyname>.viewpage.co/<landing-page-name>. 

“viewpage.co” is a domain name owned by LeadSquared.

But you can publish the landing page in your own domain name. Note that it is not mandatory to publish the landing page in your own domain name.  The landing pages will always be available in viewpage.co domain even if you don’t provide your own custom domain.

PrerequisiteYou are Admin user of LeadSquared

Landing pages can be published within your domain name in just 3 steps.

  1. Choose a subdomain name to host the landing pages
  2. Create a CNAME record in your DNS (Domain Name Server) of the chosen name
  3. Specify landing page sub-domain in LeadSquared

1. Choose sub-domain Name

Lets say your domain name is practicalfunnel.com.  Your default landing page hosting domain will be  practicalfunnel.viewpage.co .

You can change it to

pages.practicalfunnel.com or info.practicalfunnel.com or marketing.practicalfunnel.com or anything.practicalfunnel.com.   It’s up to you to choose the prefix like “pages”, “info”, “marketing”.

Lets say you choose “pages”.  Then your landing page base URL will become pages.practicalfunnel.com. And your landing page URLs will be like http://pages.practicalfunnel.com/landingpagename.

2. Create CNAME record in your DNS

Login to your DNS and create a cName record like the example shown below:

pages.practicalfunnel.com  points to cloud.viewpage.co

or in generic terms:

<your chosen sub domain name>.<your domain name> points to cloud.viewpage.co

Here is an article on doing cName setting in control panels of popular hosting providers: How to Edit DNS Settings in Web Hosting Services.

Note that DNS settings may take upto 48 hours to propagate.

3. Specify the sub-domain name in LeadSquared

Navigate to My Account->Settings->Domain Settings->Website and Landing Page Domains

You will notice your default landing pages domain <yourdomainname>.viewpage.co.

LP default domain

Click Add Domain.

Add Domain Button

  1. Select Landing Page Hosting tab
  2. Select the domain in which you want to specify a sub-domain. You may see multiple domains  if your subscription plan supports it. To know more about multi-domain setup, check: Configuring multiple domains in LeadSquared
  3. Specify the sub-domain name
  4. Save

LP - create domain

If your cName setting is not completed or propagated, you will see a red icon next to the added sub-domain.

LP - Set Primary

One your cName setting reflects, the red icon will turn to green:

LP cName connected

Green icon signals that you can use the new landing page domain.  Note that the landing page will still be accessible with the viewpage.co URL.  Landing pages are available in all sub-domains that are configured in your domain.

Verify the new Landing Page Domain

Once you have created and published a landing page, you can use “Get Landing page URL” option in landing page list:

LP Get URL

Select a sub-domain to get the corresponding URL.

Get URL Popup

The URL will be displayed:

LP Published URL

How to use Tracking URL feature?

Tracking URL feature in LeadSquared allows you to use landing page in multiple marketing campaigns, such as Facebook, Google Pay Per Click ads and so on. You should use tracking URLs when you’re directing traffic to a landing page from somewhere other than a call-to-action on your own site, like an email blast, PPC campaign, banner ad, and so forth. By using tracking URL feature, you can accurately track the lead source. For example, you might want to know how many users come to a landing page from a particular Facebook ad, or Google Search ad, or how many users signed up on your newsletter landing page on a particular website page.

A landing page with tracking URL looks like this (Token is bold): http://pages.leadsquared.com/Webinar-How-to-Get-Started-With-Website-SEO?utm_source=Pay%20per%20Click%20Ads&utm_medium=Google%20PPC%20Ads&utm_campaign=How%20to%20get%20started%20with%20SEO

To create a Tracking URL

1. Navigate to Dashboard > My Account > Settings. Click on Tracking URLs. In the Manage Tracking URL page, click on Create Tracking URL.

Tracking url

2. Enter the tracking URL information in the box.

  • Page URL: Select the Landing Page for which you want to create the tracking URL. If you choose any website URL, you must make sure that page has LeadSquared tracking script installed. Ideally, it should be a page on your website.
  • Campaign Source: Select a relevant Campaign Source. Specify where this URL is being used. This is critical for assigning these URLs to a segment in your landing page report. For example, if you’re using the tracking URL in an email campaign, select Email Marketing. This way, this traffic will appear as Email in the landing page report.
  • Campaign Medium: Enter the medium, that should, show up as the source of your landing page visits.
  • Campaign Name: This is visible to your website visitors in your URL. This is mainly used in the keyword analysis. Hence, give a relevant campaign name.

Click on Save.

Tracking URL Info

3. Copy the Tracking URL that appears, and use that as the hyperlink in your Email, Google Adwords, Facebook ad, etc. In this way, you can accurately track the lead source and the source medium.

Tracking URL

EXAMPLE: In the landing page report, navigate to Lead Sources, and click on the relevant source. You will see the leads coming from that particular source.

LP Report

For more information on how to check the lead sources, see How can I track where my Leads have come from using Lead Source Report?

How to redirect the host page after lead submits on embedded form?

LeadSquared Landing Pages can be used to create forms and these forms can be embedded as iFrame in your website. Here is an article describing the process. 

On submission of the form, you may want to redirect the lead to a thank-you page or any other web page. By default the redirected page will open within the iFrame in which form is embedded.  If you want the host page (the web page in which form is embedded) to redirect to the new URL, follow these steps:

Create a new landing page having size same as the form size.  Add a simple HTML block with text “Redirecting…”   (you can put any text you want). In the Page Settings step 4 of building landing page, towards the bottom of the page you will see  “Embed JavaScript” section.

Insert the following script  in “Embed JavaScript” section “Inside Head”:

<pre><script>window.top.location.href = "http://www.yourwebsite.com/desired-url";</script></pre>

Example: If the redirect URL is www.google.com then the script will be:

<pre><script>window.top.location.href = "http://www.google.com";</script></pre>

Publish this landing page and get the URL. In your form only landing page which you intend to embed on your web page, add an option to redirect to this URL.

Please note that if your landing page is accessed through “http”, you can only direct to a page through http. The redirect will fail if you try to redirect to a page with “https” URL.

How to Deactivate Users

1. Feature Overview

In order to preserve the integrity of your LeadSquared account history, we don’t allow you to delete users. Instead, you can deactivate them. Users who’ve been deactivated won’t be able to log into LeadSquared.

Note:

  • You cannot deactivate
    • A billing user
    • A user who is part of a live automation (for example, part of lead distribution actions, notify user actions, etc.)
  • Before deactivating a user you should ensure that all leads, opportunities and tasks under the user are assigned to an active user. This way you won’t miss out on critical tasks you have to perform. This can be done via Bulk Update.


2. Configure User Deactivation Rules

To restrict your Admins from deactivating users with associated leads/opportunities, enable the following Advanced Configuration setting –

  1. Navigate to My Profile>Settings>Profile>Advanced Configurations.
  2. Search for Configure User Deactivation rules, and click Configure.
  3. On the User Deactivation Rules pop-up, enable the checkbox Checkbox to restrict deactivation –
    • If user has associated Leads
    • If user has associated open Opportunities
    • If user is a Reporting Manager
  4. Once you’re done, click Save.

When these rules are enabled, deactivating a user associated with any of these rules will require replacing them with another active user.

Note: Opportunities that have their Status as Open are considered Open Opportunities.

user deactivation configure rules

Additional Rule for Opportunity Ownership

When you navigate to My Profile>Settings>Profile>Advanced Configurations, you’ll also find the Enable change of Opportunity owner on Lead Owner change configuration. When this is enabled, the opportunity owner will automatically update to match the new lead owner. However, if the admin manually selects a different user as the new opportunity owner, this will override the automatic update.

enable change of opp owner on lead owner change


3. Bulk Update the Lead/Opportunity Owners

Ensure that no leads or open opportunities are tagged to the user you’re about to Deactivate. To do this, change the owner for all the leads and open opportunities tagged to the user –

3.1 Bulk Update Lead Owner

Bulk update the lead owner of all the leads tagged to the user –

  1. Navigate to Leads>Manage Leads.
  2. Alongside the leads tagged to the user you’re about to deactivate, click the Checkbox checkbox.
  3. Then, hover your cursor over the Actions menu, and click Change Owner.
  4. On the Change Owner pop-up, from the dropdown, select the new lead owner, and click Change. This will bulk update the lead owner for the selected leads.

Deactivate Users

3.2 Bulk Update Opportunity Owner

Bulk update the opportunity owner of all the open opportunities tagged to the user –

  1. Navigate to Leads>Manage Opportunities .
  2. Alongside the opportunities tagged to the user you’re about to deactivate, click the Checkbox checkbox.
  3. Then, hover your cursor over the Actions menu, and click Bulk Update.
  4. From the Opportunity Field dropdown, select Owner, and from the New Value dropdown, select the new opportunity owner.
  5. Once you’re done, click Update. This will bulk update the opportunity owner for the selected opportunities.

Deactivate Users


4. How to Deactivate a User

When deactivating users, they will either be subject to a validation rule (Billing User, Reporting Manager, Lead Owner, Opportunity Owner, Automation) or not.

4.1 Deactivating users without a validation rule – 

  1. Navigate to My Profile>Manage Users.
  2. Alongside the user you want to deactivate, hover your cursor over LeadSquared, and click Deactivate.
  3. On the confirmation pop-up, click Deactivate. This will deactive the user from your account.

Deactivate Users

4.2 Deactivating users with a validation rule

  1. Navigate to My Profile>Manage Users.
  2. Locate the user you want to deactivate, hover over the icon, and click Deactivate.
  3. If required (*), replace the user with another active user.
  4. Click Proceed.

Note:

  • In the example below, changing the Owner for Leads is optional since the If user has associated Leads option hasn’t been mandated in the deactivation rules (refer to Section 2).
  • It is mandatory to replace a billing user, this option cannot be disabled.

User deactivation with validation rule

4.2.1 Deactivating users who are part of an Automation

If a user is part of an automation, they must be replaced with an active user before deactivation.

For users in single or multiple automations, you can:

  • Bulk Replace: Select multiple automations and click Bulk Assign to replace the user across all selected automations.
  • Replace Per Automation: Click Select User under the Assign column and choose a new user for the entire automation.
  • Replace Per Action: If the user is assigned to multiple actions within an automation, click Select User, then choose Each Automation Action to assign different users for different actions.

deactivating users part of an automation


5. How to Reuse a User’s Email Address

You cannot create a new LeadSquared user with the same email address as a deactivated user. However, you can mark a Deactivated user Obsolete, and then reuse the email address to create a new user in another LeadSquared account.

  1. After you’ve Deactivated a user, navigate to the Users page.
  2. Filter the Status by Inactive.
  3. Alongside the user who’s email address you want to use, hover your cursor over LeadSquared, and click Mark Obsolete.
  4. On the Make User Obsolete pop-up, click Yes. You can now reuse this email address, and assign it to a different user.
Note: You can identify a user marked obsolete when the word “obsolete” is appended to their email address.

Deactivate Users


6. FAQs

I need to retrieve all leads assigned to a deactivated user, but the user is not showing up in the owner dropdown list. How can I filter leads by this user?

Explanation: Once a user is deactivated, they will no longer appear in the “Owner” dropdown list, making it impossible to filter leads by that user in the “Manage Leads” section or through advanced search conditions.

Solution: To handle prevent this situation, configure User Deactivation Rules as described above. These rules prevent user deactivation if the user still has assigned leads. If deactivation is attempted, an error message will appear, informing you of the number of leads still assigned to that user. Reassign the leads to another user and then deactivate the concerned user.


7. Troubleshooting

Issue: User Creation Error for Rejoining Employees. When an admin attempts to create a new user account for an employee who previously left the organization and was marked as obsolete, an error occurs.

Scenario: An employee left the organization, and the admin deactivated the user and marked them as obsolete. Six months later, the employee rejoined the organization, but the admin encounters an error while trying to create a new user account using the same email address.

Root Cause: If a user with the same email address already exists in the tenant (even as an obsolete user), a new user account cannot be created using that email ID.

Error Message: If the admin attempts to create the user via Import Users, the success report will display the following error in the CSV file:
There is already an obsolete user in this account, please try activating it.

Solution: To resolve this issue, the admin should reactivate the existing obsolete user account and modify the user details if required.


Any Questions?

We’d love to hear your feedback to help improve this article. Feel free to enter your questions or grievances in the comments section below.

How to use Olark Connector?

LeadSquared Olark Connector will help you track Chat Activities with your current and new leads. For existing leads, it helps you to track each chat conversation as an activity under Lead Activity History. If the conversation is with a new lead, the new lead is added in LeadSquared and the conversation is tracked under Activity history of that new lead.

Prerequisites:

  1. You should be Admin user of LeadSquared to access the connector.
  2. Apart from capturing Lead data and chat transcripts, you can also capture Olark Group Data and page on which chat started. If you want to capture any of both of these, you need to create corresponding custom fields first.  You may choose “Olark Chat Group” and “Chat Start Page”  as the name of the two respective fields.

Procedure:

To Add Olark Connector, follow these steps:

Browse to Apps > Apps Marketplace, select Olark connector and click on ‘Install’ button

olark config

Configuring Olark Connector:

On Installing the app, click on Olark connector where you will be redirected to Olark chat connector details page. This is not yet ready to be used.  You need do two simple configuration steps to make it functional.

Olark_2

OR, On Installing the app, click on Show Installed Apps tab to configure Olark connector.

Olark

This will open up the Olark Connector Configuration dialog.

Connector Setup

  1. If a chat conversation happens with a new lead, the Source will be set to “Olark Chat” by default. You can again change this configuration.
  2. Each chat conversation will be tracked as an activity in LeadSquared.  By default, we create a custom activity called “Olark Chat Conversation” for your convenience.  You can use it, or if you wish to create your own activity and use that, you may do so.
  3. [optional] You can specify the custom field to capture Olark chat group info (your Olark account needs to support groups)
  4. [optional] You can specify a custom field to capture the page URL where chat started.

Once your settings are complete, click “Save Settings”.   You will see a message on the top on config windows:

Olark Config done

As the message suggests,  to start capturing Olark chat in LeadSquared, add the displayed URL in your  Olark Webhooks. Copy the displayed URL. It will be in following format:

https://olark.leadsquared.com/Capture.aspx?OrgID=<your org id>&AccessToken=<your access token>

Login to Olark and navigate to Settings->Integrations->Webhooks

Olark Settings

  1. Paste the displayed URL that you got from LeadSquared Olark connector Config windows
  2. Check “Send ALL transcripts automatically”
  3. Save

Once you Save the settings, all chat conversations will start getting tracked in LeadSquared:

Chat logged in LSQ

Can I have conditional access to my Landing Pages?

Yes. You can have conditional access to your landing pages. Conditional access means, access to a particular page, if a particular condition is satisfied. In other words, you want visitors to submit on a particular form, only after, submitting on another form.

Example: You have a landing page to capture leads, say Landing Page A. You have another landing page, in which a product video is present, say Landing Page B. Now, if visitors visit Landing Page B, you would want them to visit Landing Page A first, and then visit Landing Page B. For this to happen, all you have to do, is paste a Java Script in the Landing Page B.

Edit the required landing page in LeadSquared,  and go to Step 04 – Page Settings. Scroll down and go to section Embed JavaScript. Paste following script there:

<script type=”text/javascript”>

 var sourcePageURL = ‘URL of Landing Page A’;

if ((document.referrer != “” && document.referrer.indexOf(sourcePageURL) == -1) || document.referrer == “”) {

  location.href = sourcePageURL;

}

</script>

Republish the landing page.  Now, clear cache of your browser and visit the first landing page again. You will be redirected to the second landing page.

How to Bulk Update Lead Fields?

1. Feature Overview

The Bulk Update feature lets you update a single lead field across multiple leads at once. This is useful when you need to apply the same change to many leads, such as reassigning a Lead Owner, updating a Status, or modifying a custom field.


2. Prerequisites

You must have access permission to edit lead fields.


3. How It Works

Bulk updates work in two steps: first filter the leads you want to update, then apply the change.

Leads can be filtered and updated from the Manage Leads page or the SmartViews page. You select the field to update and the new value, and LeadSquared queues the update for processing. Once submitted, a confirmation message appears with a link to track the update status.

Note: Bulk updating Lead Stages is not supported if the Enable Comments on Stage Change setting is active in your account. To check or change this, go to My Profile>Settings>Leads>Lead Stages.


4. Perform Bulk Update

Step 1: Filter your leads

On the Manage Leads or SmartViews page, use one of the following search options to narrow down the leads you want to update:

  • Quick Search — for simple, keyword-based filtering.
  • Advanced Search — for applying detailed conditions and multiple filters.

Step 2: Select and update

  1. Select the leads you want to update:
    • Check the box alongside individual leads, or
    • Click the checkbox next to the Lead Name column header to select all leads in the list.
  2. Click Bulk Update.
  3. In the Bulk Update pop-up, select the Lead Field you want to update from the dropdown.
  4. Enter the new value in the Update To field.
  5. Click Save.

Leadsquared - Bulk Update Lead Fields


Any Questions?

Did you find this article helpful? Please let us know any feedback you may have in the comments section below. We’d love to hear from you and help you out!

How can I find leads who visited one of my landing pages or website in the past 30 days using Advanced Search?

You can easily find the leads who visited a particular website page or landing page, in the past 30 days, using our Advanced Search feature. Follow the below steps

1. Navigate to Dashboard > Leads > Manage Leads. Click on Advanced Search.

Manage Leads

2. Select the following criteria

  • Lead Activity
  • Is
  • Page Visited on Website

3. You will now have the option of selecting Any Landing Page or Website Page, Any Landing Page or Any Website Page. You can also select any of the listed Landing Page names.

Any page

4. If you want to find leads who came from a specific website page, then start typing in the box. As shown in the screen shot below, if you type “www.“, all the website pages will be displayed. You can select the required page.

Type webpage

5. If you want to select a landing page, you can start typing the landing page name in the box. All the relevant landing pages will be displayed and you can select the required landing page.

Type landing page

6. Select 30 days as the time interval.

7. Click on Add. Select the All Criteria check  box. Click on Find Leads to get the leads who visited a particular website page/landing page in the last 30 days.

8. You will be redirected to the Manage Leads page and all the leads that satisfy the criterion will be displayed.

Results

For more information on Advanced Search, see How do I use Advanced Search feature in LeadSquared?

How can I find leads who have been active in the past 1 week using Advanced Search?

To find leads that were active in the last 7 days-

  1. Navigate to Leads>Manage Leads. Click on Advanced Search.
  2. Set the Select Search Criteria to Lead Activity>Is>Any Lead Activity>In the Last 7 Days. Click +Add.
  3. Select the All Criteria checkbox and click Find Leads.

LeadSquared Advanced Search

To know more refer to the Advanced Search article.

How to configure SMS Autoresponder for my Landing Pages?

You can send an automated SMS/text-message to your leads when they submit a form on your landing pages. These text messages are transactional in nature, meaning they can be sent to phone numbers marked DND (do not disturb). But, there will be a limitation to what you can send.

Prerequisites:

1) Your SMS connector should be configured and active. Please contact your Admin user if you can’t see SMS feature in LeadSquared.

2) Sending SMS will incur extra cost. Please get in touch with support@leadsquared.com about the cost details.

NOTE: This is an add-on service and you will need to contact support@leadsquared.com to buy this additional service.

Steps to configure the SMS Autoresponder

1. Go to APP -> SMS Templates and create a transactional message template for the autoresponder SMS. You can find more about creating templates at Creating SMS Templates.

2. Use the “Setup Autoresponse SMS” option on the chosen template as shown below. Copy the webhook URL.

SMS AR Webhook URl

3. Navigate to,  My Account -> Settings -> API and Webhooks -> Webhooks and click “Create”

Webhook new

4. Click on Add Webhook button. Make the following settings in the Add Webhook section

  • Event: Landing Page Submission.
  • Trigger for all Landing Pages: Select the check box if you want the webhook to be applicable to all landing pages. Elese, uncheck the box and put paste page URLs in the “Landing page URLs” section.
  • Webhook URL: the URL you copied from SMS template page
  • Description: Enter a brief description for the webhook.

Press verify to make sure webhook is correctly captured.

Create Webhook

5. Click Save to enable the webhook. That’s all. Your Landing Page is now setup to send the SMS message as per the template you selected on every submission that has valid phone number.

Help Video – How to Perform Advanced Search

In this short video, you’ll how to segment leads based on your requirements  –

For more information, see How to Use Advanced Search.