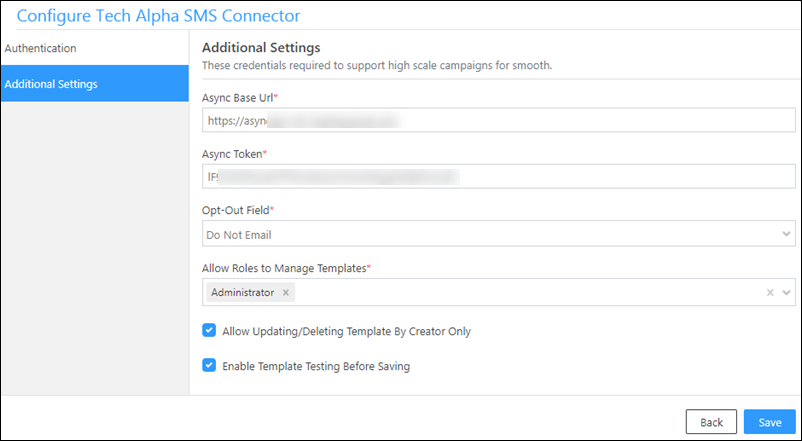
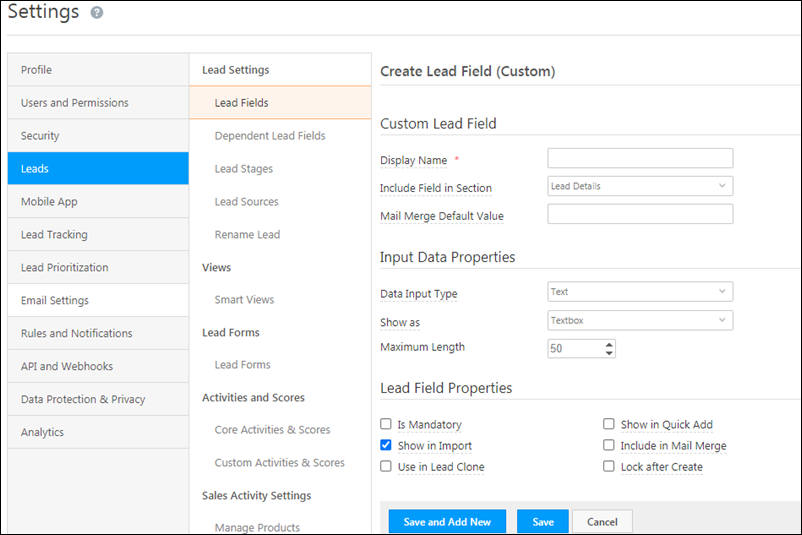
1. Feature Overview
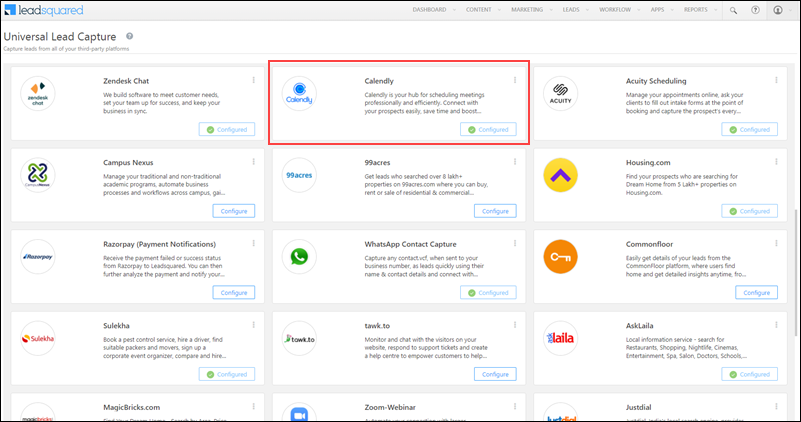
In addition to the default lead capture connectors (99acres, Zendesk Chat, Google Forms, Zoom Webinars, etc.) listed on your account, you can also build your own custom connectors to capture leads and activities from other data sources (e.g., HubSpot, Zohodesk, etc.) through the Universal Lead Capture Connector (ULC).
You can use the custom connector to make inbound and outbound requests. Once the leads are synced, you can leverage LeadSquared’s CRM features to nurture and convert your leads.
Note:
- This article lists down steps to build a custom real-time and periodic sync connector. To configure the connector once it’s built, we recommend you refer to this article for –
- You must install and configure the the Universal Lead Capture Connector (ULC). This is a paid feature. To enable it on your account, contact your account manager, or write to support@leadsquared.com.
- To learn how to map the entity options for lead capture, click here.
2. Prerequisites
- You must be the Administrator of your LeadSquared account.
- You must install and configure the Universal Lead Capture Connector. This is a paid feature. To enable it on your account, contact your account manager, or write to support@leadsquared.com.
- You must have developer experience. The custom connector requires API integration.
- API to facilitate periodic lead sync from the third-party application to LeadSquared. The API must allow leads to be fetched by date range. The API must satisfy the following conditions –
- Only REST APIs are supported.
- Only GET, POST and HEAD methods are supported.
- The connector also allows you to configure a transformation API to normalize the data (convert it to a flat JSON format).
- Authentication must be passed through the API (using the header or query string). Complex authentication methods such as OAuth are not supported.
3. How it Works
Note: To demonstrate the following steps, we’ve built a Calendly custom connector, using
Calendly Public APIs. This is purely done for instructional purposes and can be substituted with the data source of your choice.
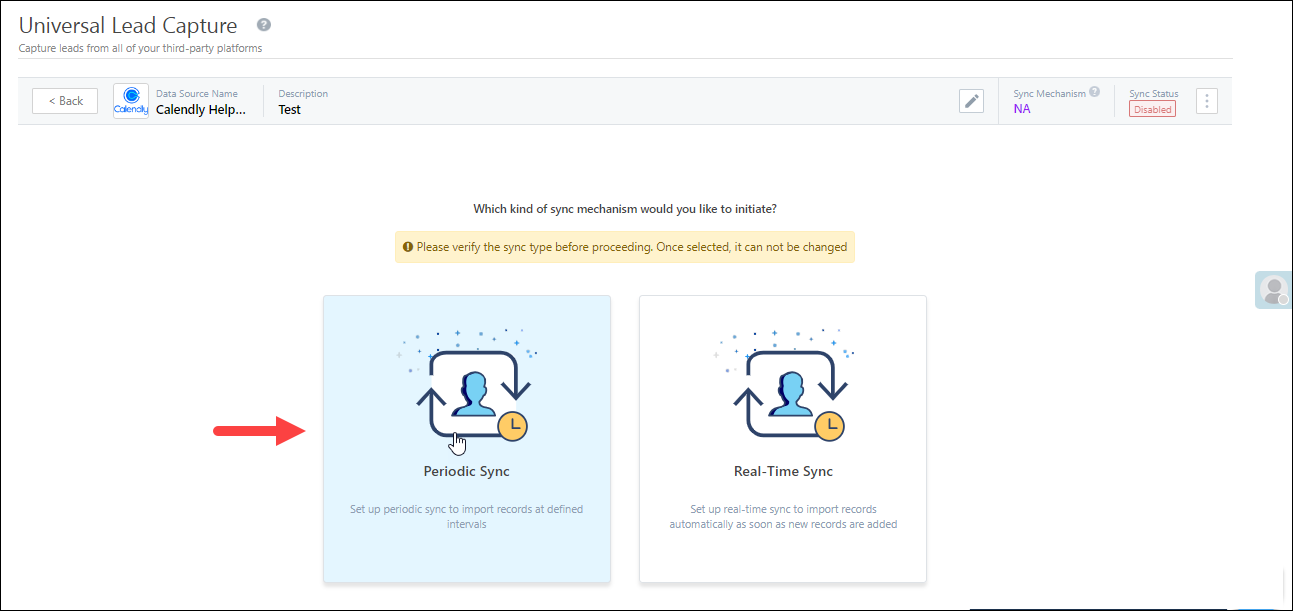
Real-time Sync
First, build, configure and test your custom data connector. To do this –
- Configure the webhook format, configure the authentication variables (which is optional) and map the API response data to the corresponding lead, activity or any other LeadSquared entity. To map the API response data to other LeadSquared entities (such as task fields, opportunity fields, etc.), enable Call Custom Actions, and use a relevant LeadSquared API to build and configure the custom action.
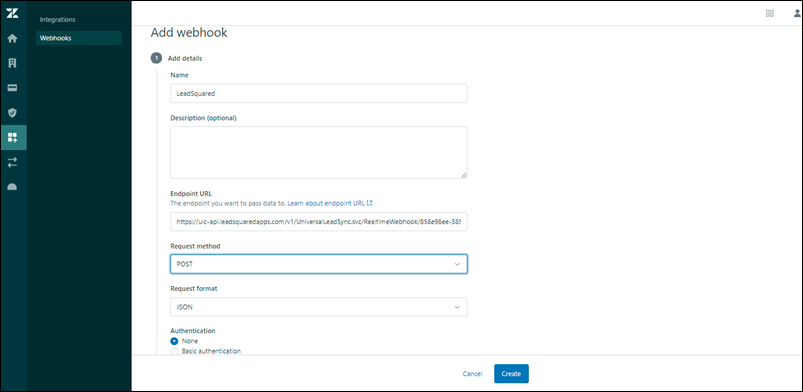
- Once you map the connector fields in LeadSquared, a webhook URL is generated.
- Configure this URL in your data provider’s account. To do this, you can either –
- Copy this webhook and manually configure it in your data provider’s account.
- Automatically pass the webhook from your LeadSquared account to your data provider’s account. To do this, you must develop a webpage that’ll perform this action, and configure this webpage inside the connector.
Periodic Sync
Create, configure and test your Sync API to capture leads and activities from your custom data source to LeadSquared.
- In this step, configure the authentication variables, map the API response data to the corresponding lead, activity or any other LeadSquared entities, define the accepted formats for date/time data, and determine the sync frequency.
- Then map the API response data to the corresponding lead, activity and other entity fields in LeadSquared.
In the steps below, we’ve configured the connector using the following example API, where leads will be fetched when the created-on date is after the start time of the sync operation…is the API fine? –
GET https://{{BaseURL}}/api/v2/users/search?query=created>{{START_DATE_TIME}}+role:end-user
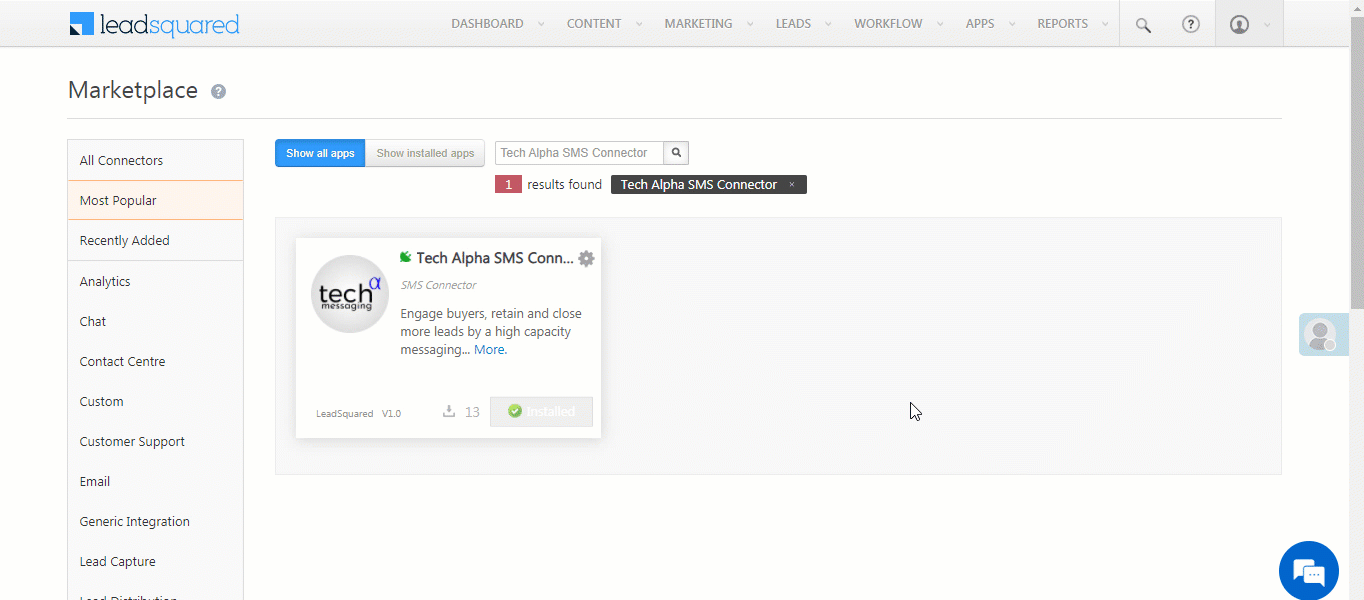
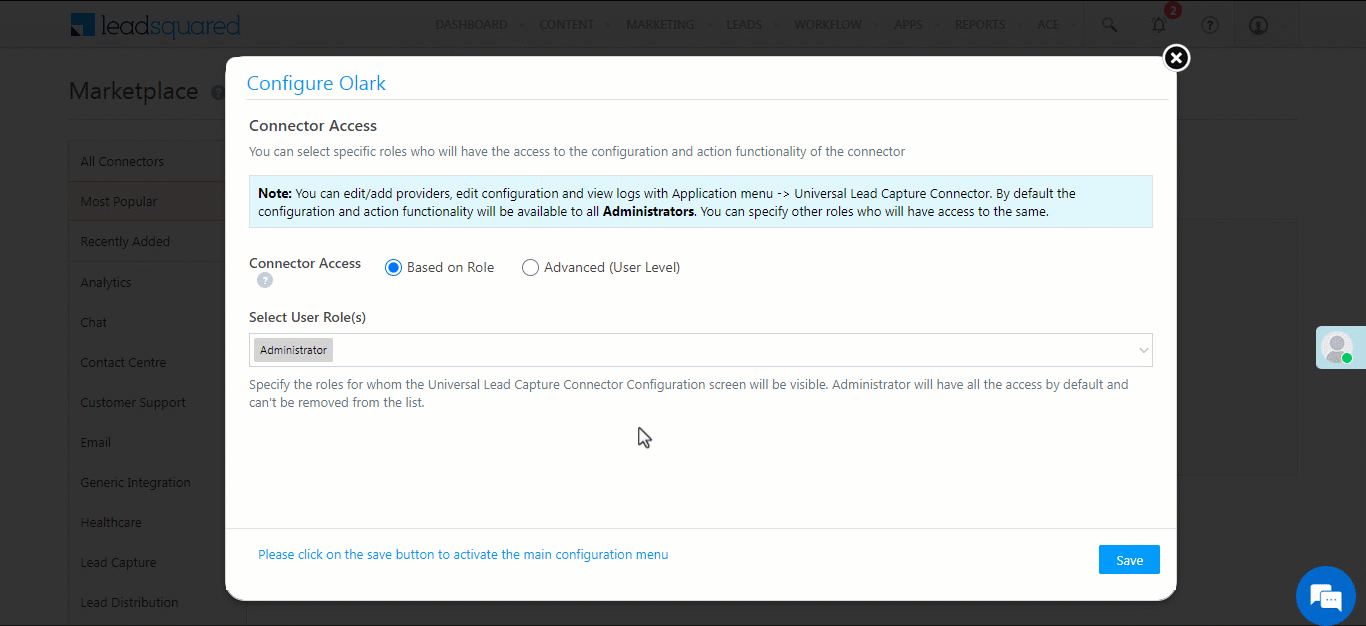
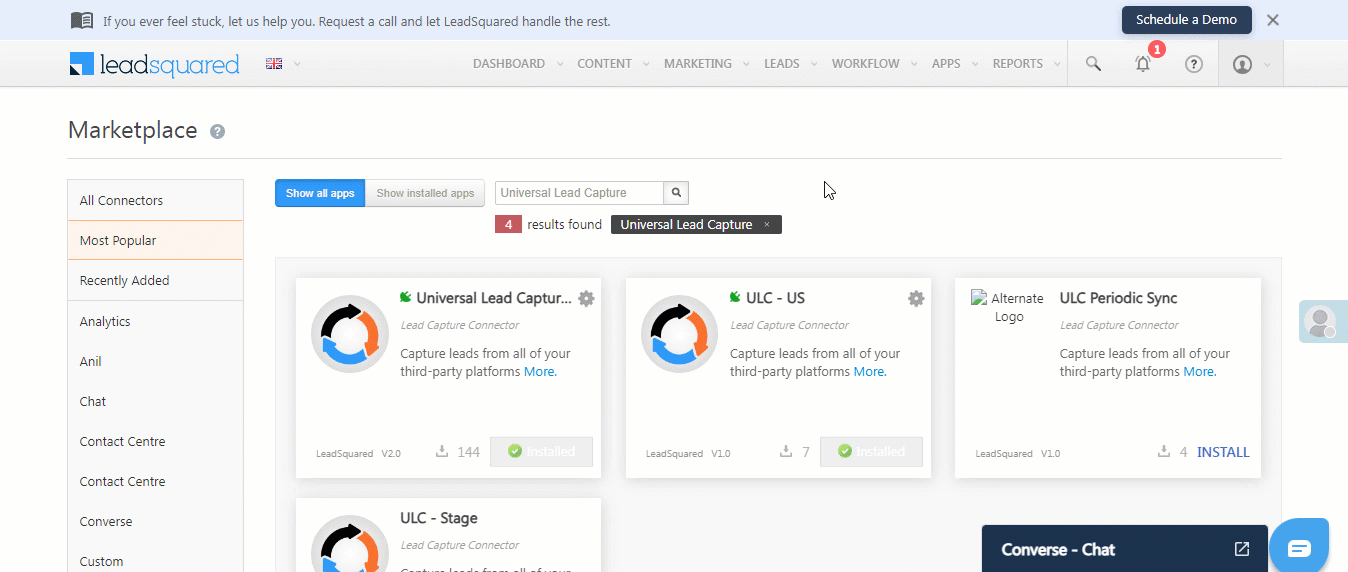
4. Install the Connector
To install the Universal Lead Capture app –
- From the main menu, navigate to Apps>Apps Marketplace,
- Search for Universal Lead Capture, and click Install.
- Alternatively, you’ll find the app listed under the Lead Capture tab.
- Once the connector is installed, hover your cursor over
 , and click Configure.
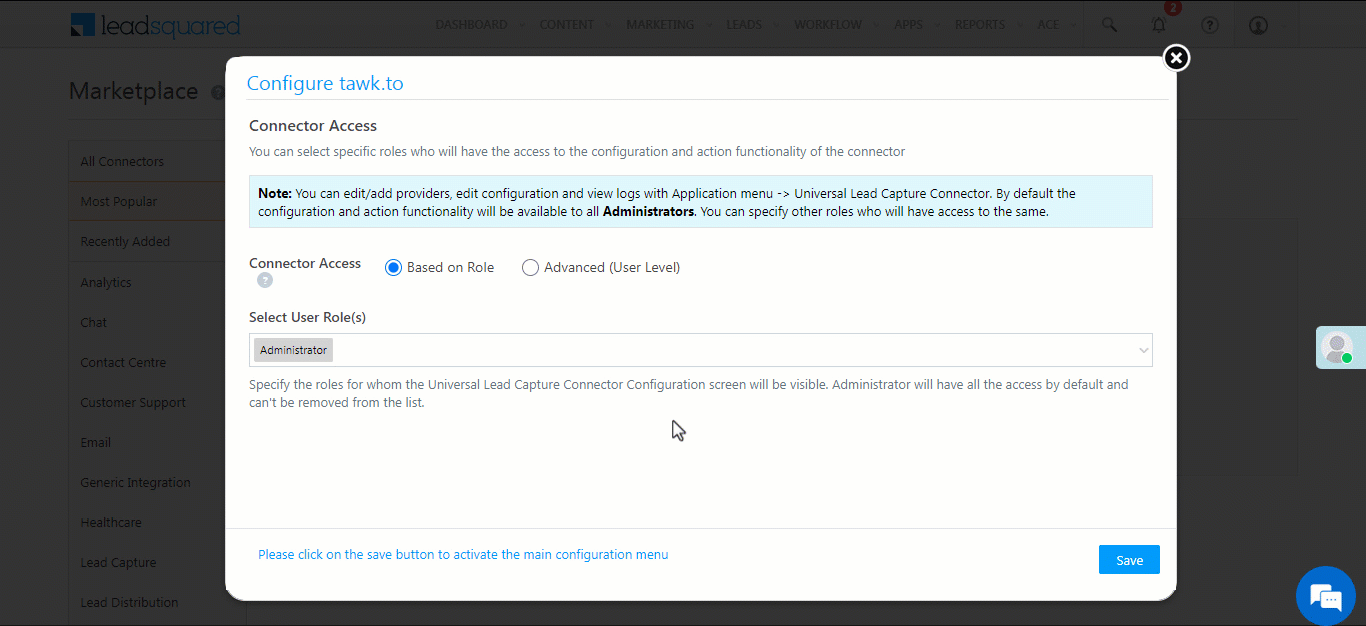
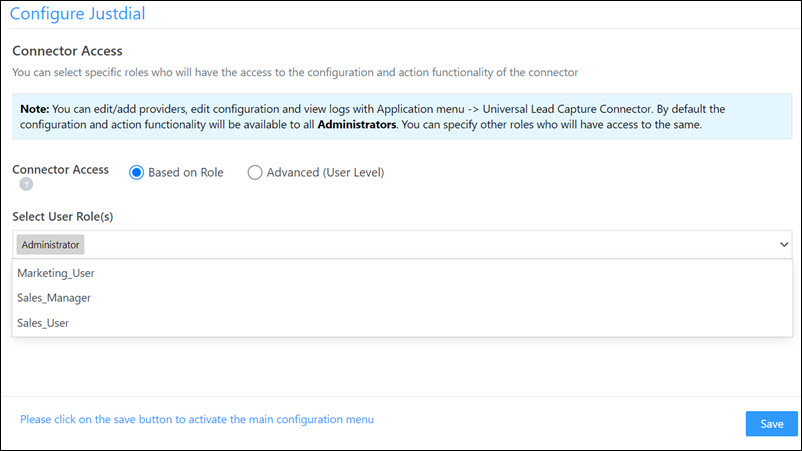
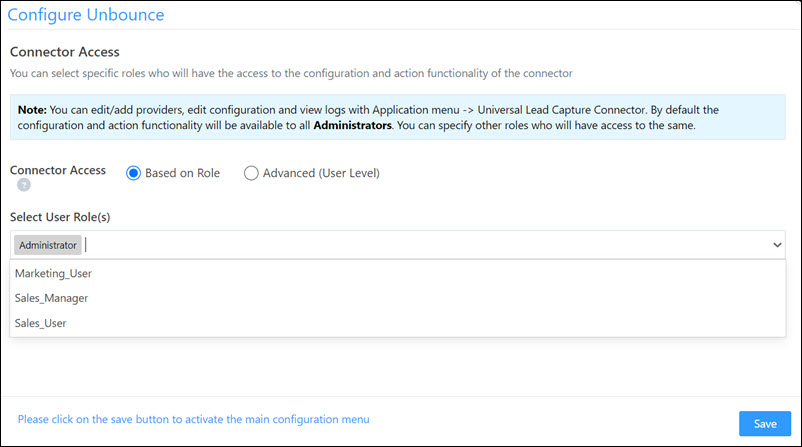
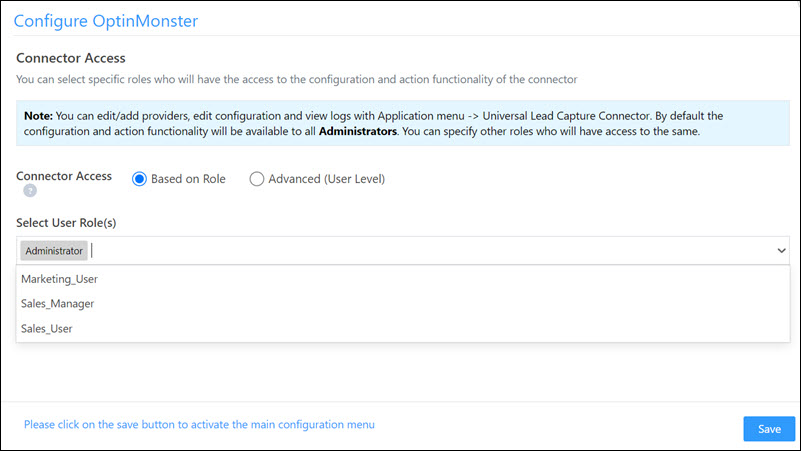
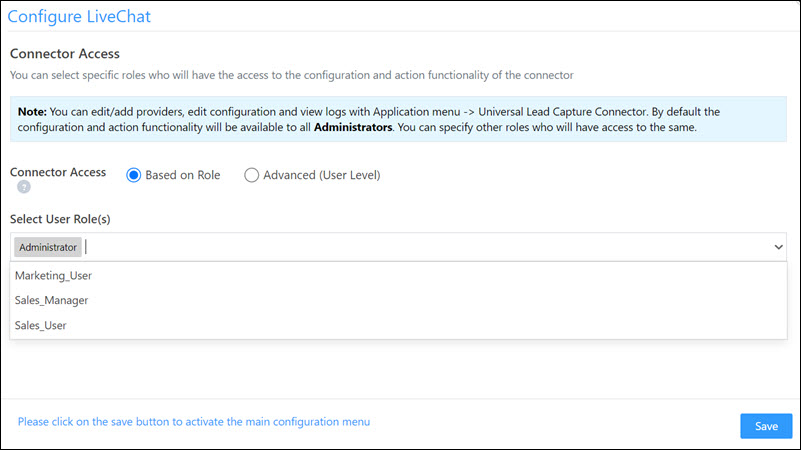
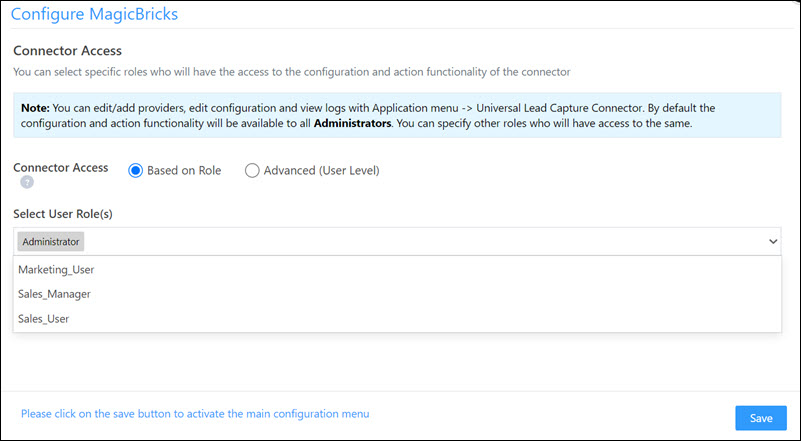
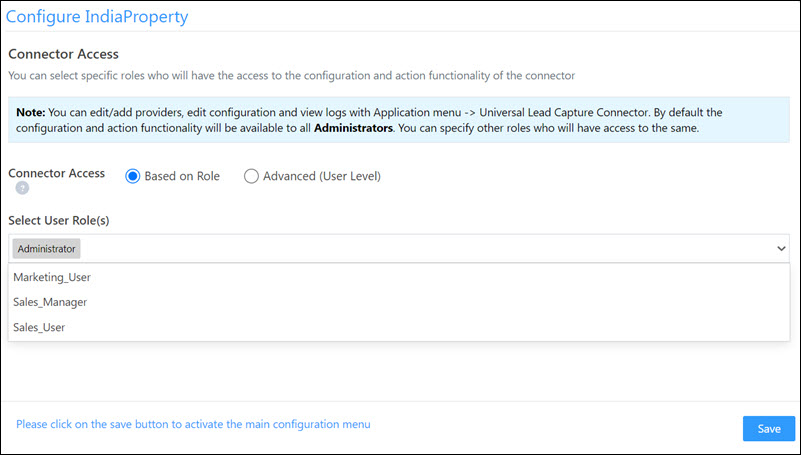
- On the Configure Universal Lead Capture pop-up, from the Select Role dropdown, choose the user roles for which you want to give connector configuration and actions permission.
- If you choose to not give permissions to other user roles, then skip this step, and directly click Save.
- Once you’re done, click Save. The connector is successfully installed.
No further configuration is required. To access and configure each individual connector, navigate to Apps>Universal Lead Capture.

5. Configure Custom Lead Providers
Once the Lead Capture connector is installed, create and configure your custom data source.
- On your LeadSquared account, navigate to Apps>Lead Capture.
- Click Add Custom, and pass the following details on the Enter Basic Information pop-up –
- Data Source Name – The name of the data source from where leads will be pulled.
- Help – The help article URL that covers installation and configuration.
- Description – A short description of the connector instance.
- Logo – You can either drag and drop the data source logo, or you can use the Choose File button.
- Once you’re done, click Save & Next.
6. Set-up – Real Time Sync
On the Universal Lead Capture screen, click Real-time Sync.

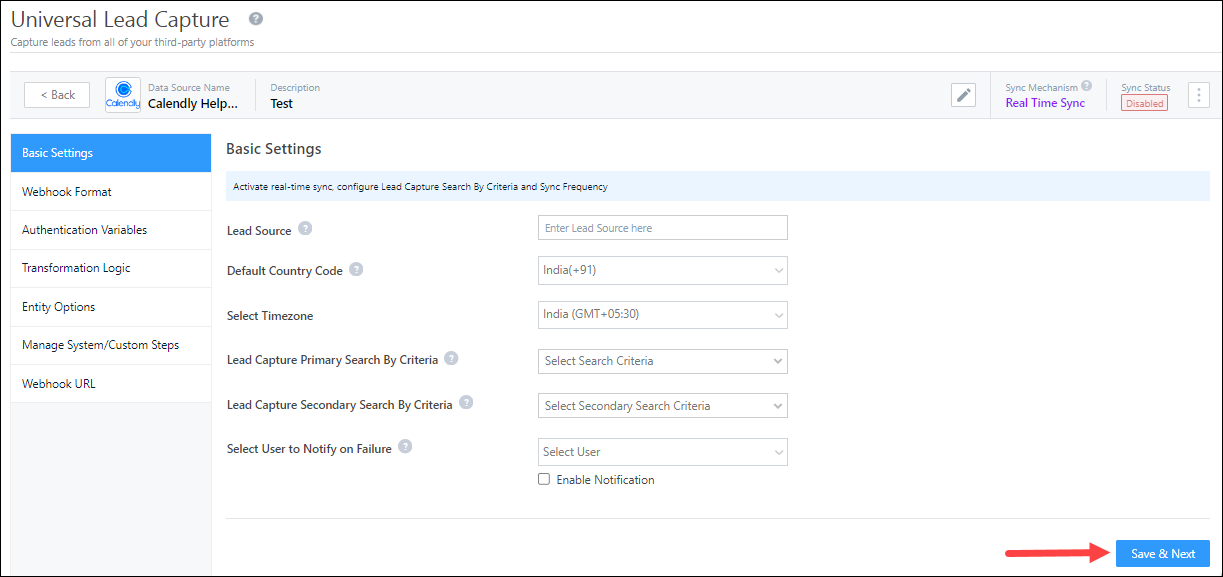
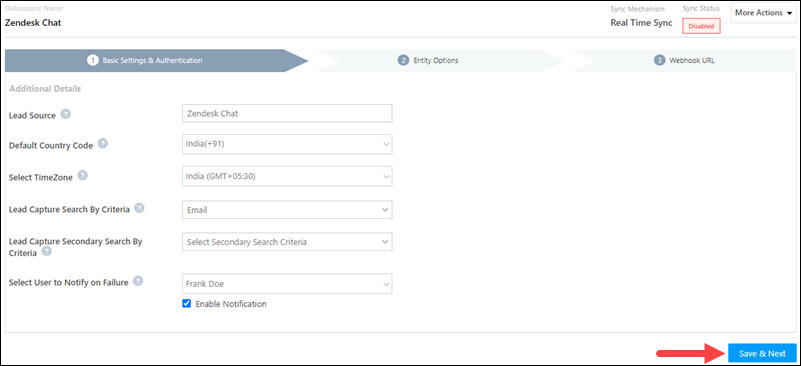
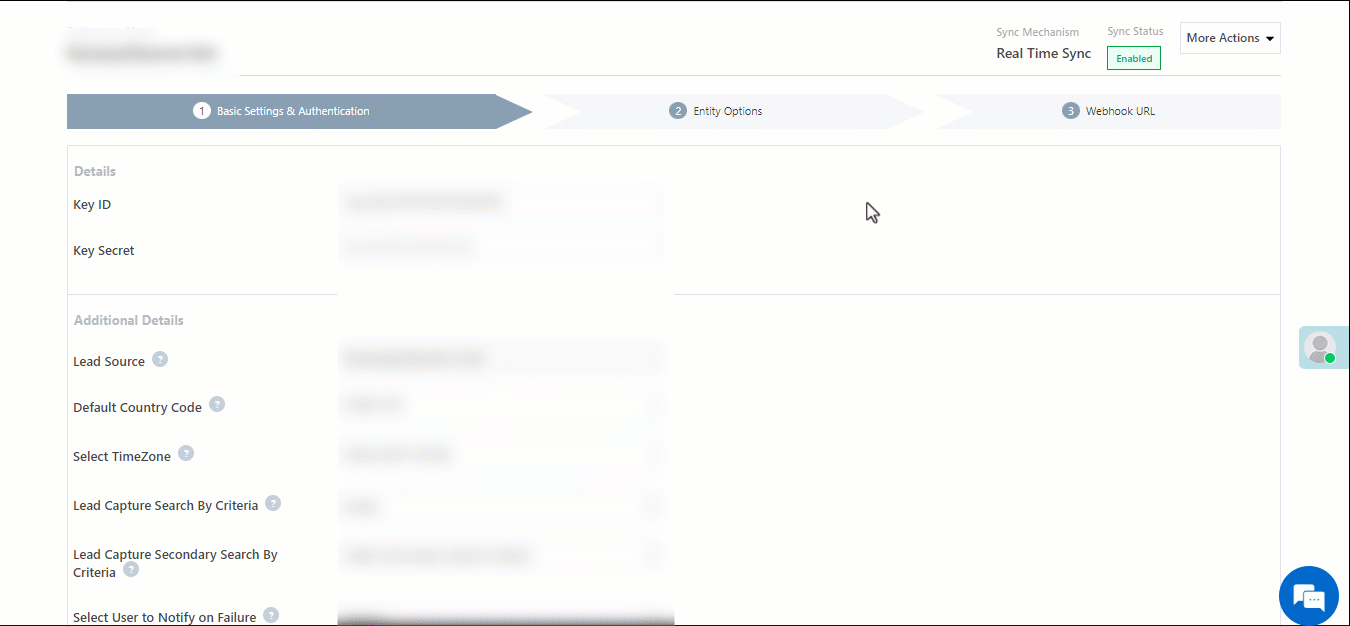
6.1 Basic Settings
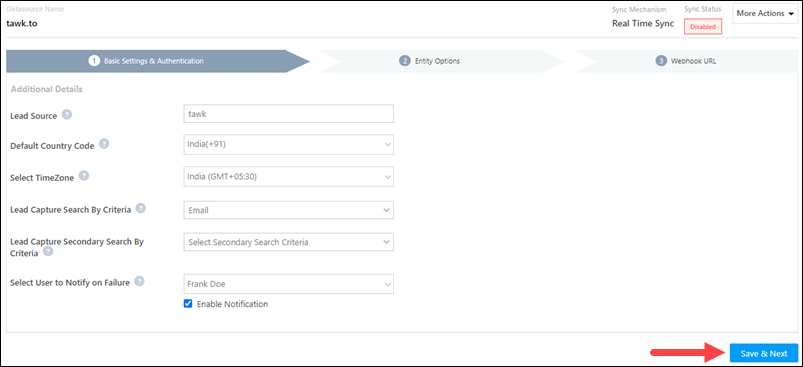
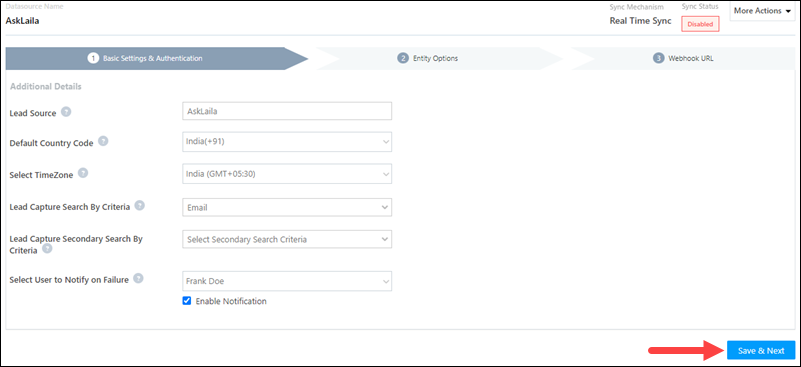
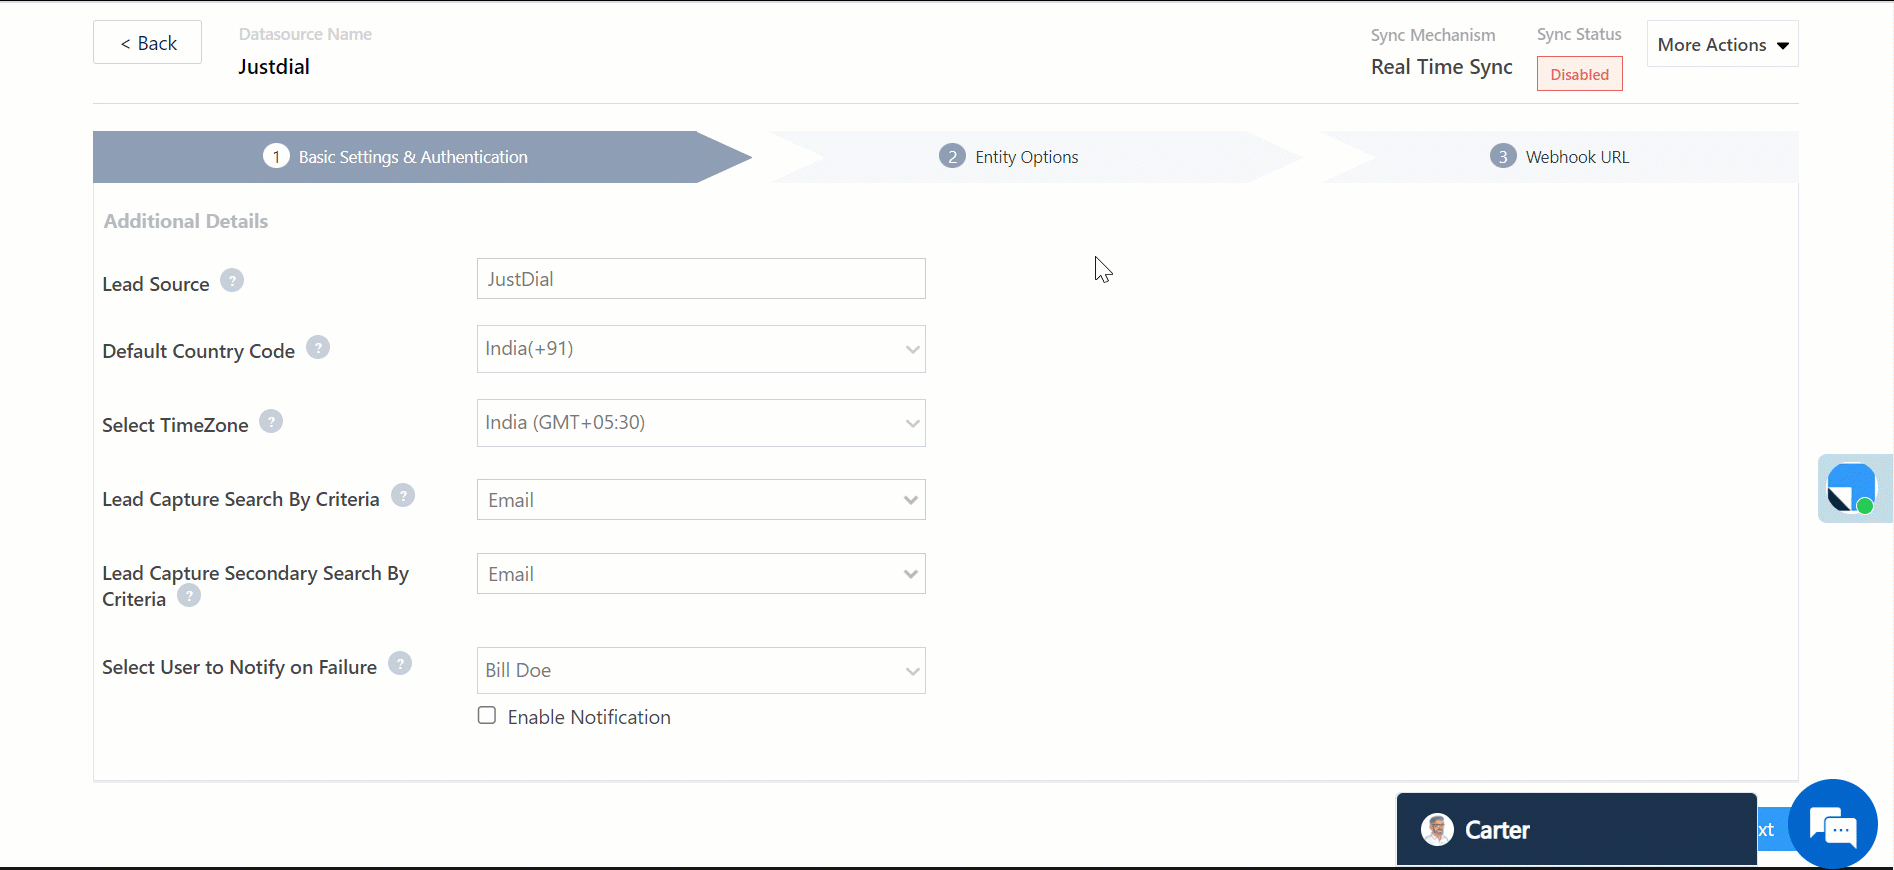
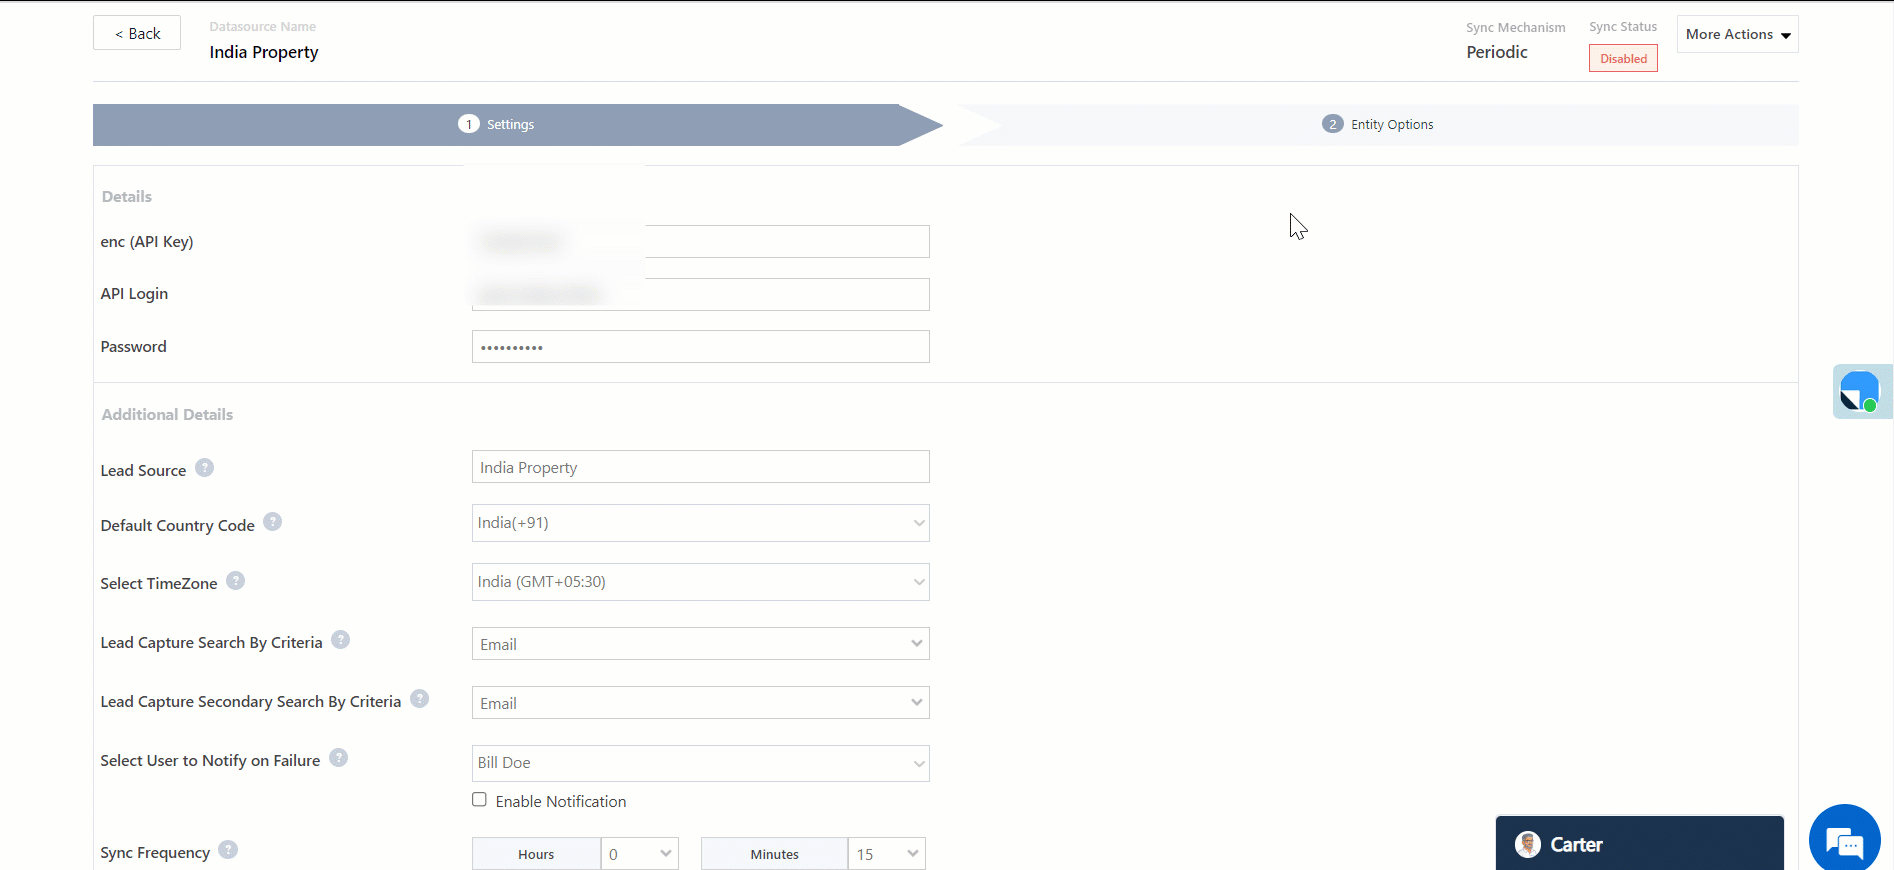
On the Basic Settings screen, enter the following details –
| Property |
Description |
| Lead Source |
Enter the lead source through which the leads were captured (e.g., Zendesk, QuikrHomes, email campaign, etc.). This detail will be displayed on the Lead Details page, under Lead Source.
To make the lead source Editable, click the  checkbox. checkbox. |
| Default Country Code |
If the lead’s mobile number is captured without a country code, the system will automatically append the default country code selected from the dropdown to the lead’s mobile number. |
| Select Timezone |
The timezone followed in your custom data source’s account. |
| Lead Capture Search By Criteria |
To avoid capturing duplicate leads, select one unique lead field (e.g., email Id, mobile number, PAN number, etc.) as the search key. This will be used to identify and pull leads from your data provider’s account.
To know how to mark a LeadSquared lead field as unique, please refer to How to Make a Custom Field Unique. |
| Lead Capture Secondary Search By Criteria |
If lead identification and capture fail through the primary Search By criteria, a re-attempt will be made using the secondary Search By criteria. |
| Select User to Notify on Failure |
If there’s an error in fetching leads, the chosen user will receive a failure message via email. Select a user from the list of available users in your LeadSquared account.To know more about the type of errors, please refer to Error Notifications. |
| Enable Notification |
To ensure notification emails are sent to the selected user when there’s a failed query, enable the checkbox. |
Once you’ve entered the details, click Save & Next.
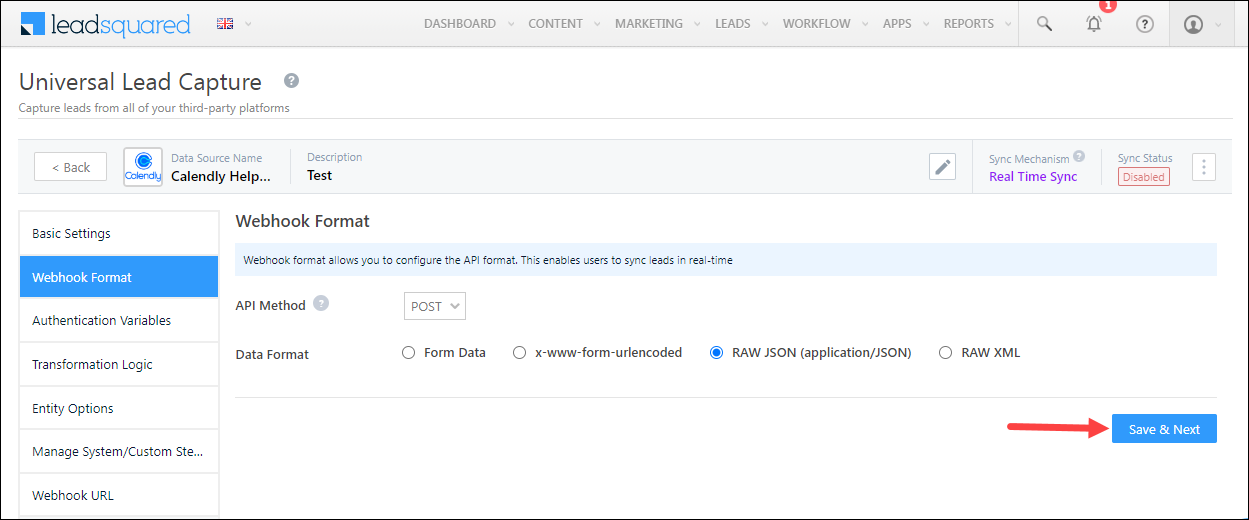
6.2 Webhook Format
Enter the following webhook details –
| Property |
Description |
| API Method |
The format in which you receive data from your data provider. You can choose between GET, POST and HEAD. POST is selected by default. |
| Data Format |
The data format of the webhook you’re creating. This option will show up only if you select the API Method as POST. You can select one of the following –
- Form Data
- x-www-form-urlencoded
- RAW JSON (application/JSON)
- RAW XML
|
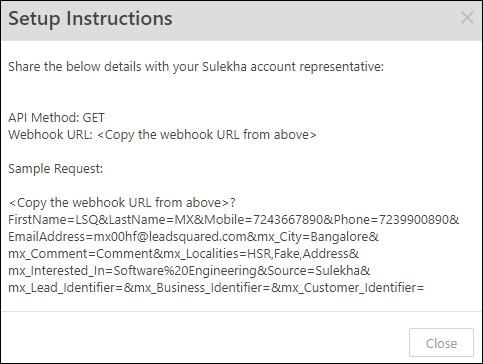
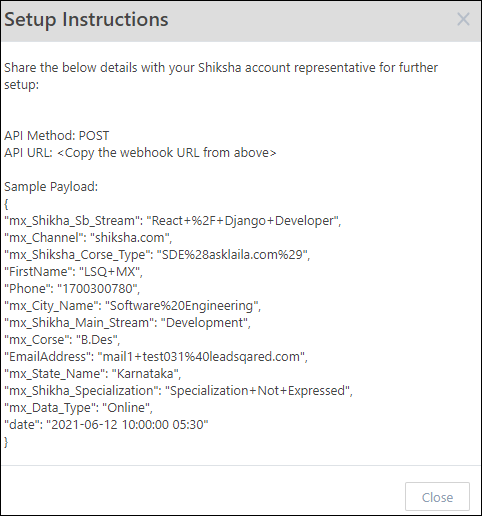
| Set-up Instructions |
If required, you can add set-up and configuration instructions for your users. |
Once you’re done, click Save & Next.
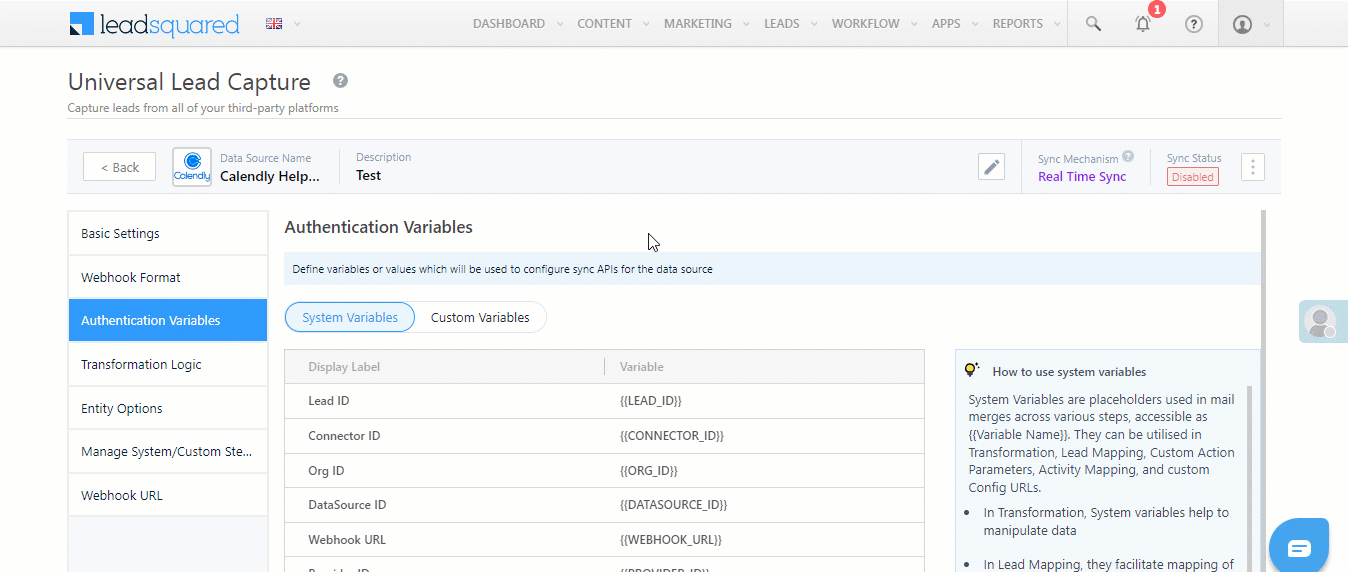
6.3 Authentication Variables
System Variables
A set of system variables are generated by default, which can be used to configure the API. These variables can be used to define the Transformation Logic, Lead Mapping, Custom Action Parameters, Activity Mapping, and custom configuration URLs.
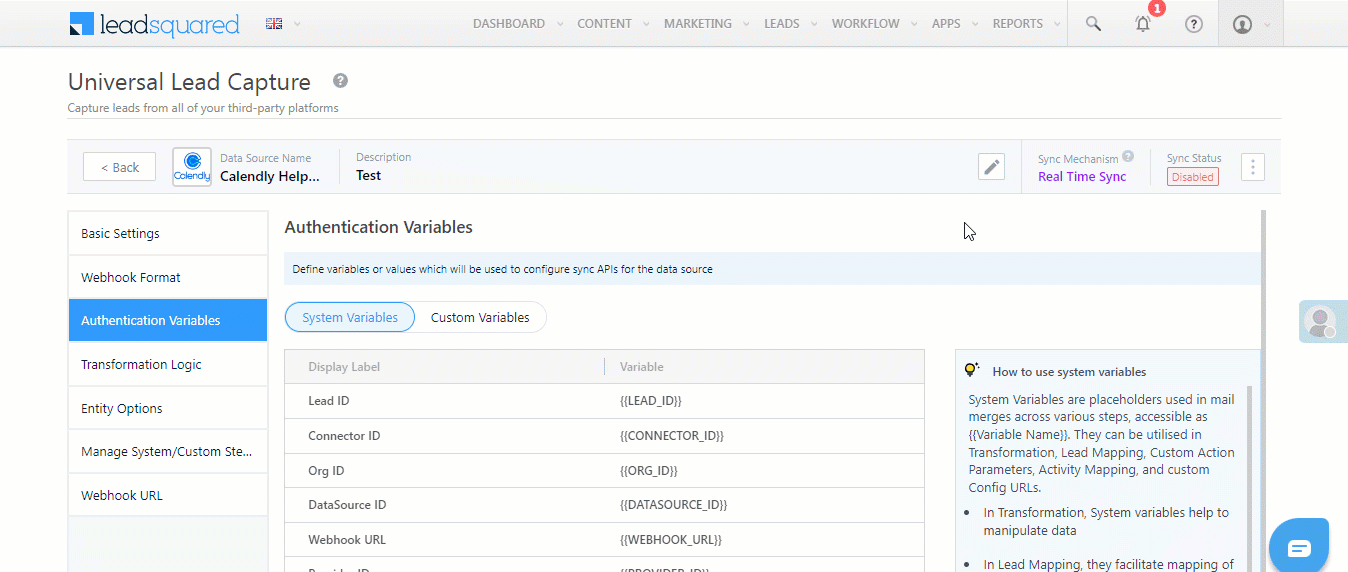
Custom Variables
Depending on the data source you’re working with, define your own set of authentication variables (e.g., Base URL, Token, API Keys, etc.).
- Navigate to the Custom Variables tab, click the Add New button, and enter the following details –
- Display Label – The display name of the variable (e.g., Secret Key, Token, etc.).
- Variable – The variable name that’s passed (e.g., {{secretKey}}, {{token}}, etc.). This variable should be written within curly brackets “{{example}}”.
- Value – The value of the variable that’s passed. Based on your requirements, you can choose to –
- Call API/Lapps – The value will be fetched from an API or Lapps. This can be used to fetch the authentication value from a different API. You can do this by calling the API/Lapp in the API Builder pop-up, and map its response as the value.
- Custom Values – Select this option to pass a custom value. In the pop-up, enter the custom value, and click Save & Close.
- Type – Select the data type of the variable from the following options –
- Text
- Password
- Boolean
- Number
- Sensitive Info – When this checkbox is enabled, the variable is marked as sensitive, and it will not be displayed on the interface. A log of this variable will not be maintained either.
- Once you’re done entering all the details, click
 to save the variable.
- To add more variables, click the Add New button.
- Once you’re done adding variables, click Save & Next.,
Note:
- To edit an existing variable, click
 .
.
- To delete an existing variable, click
 .
.
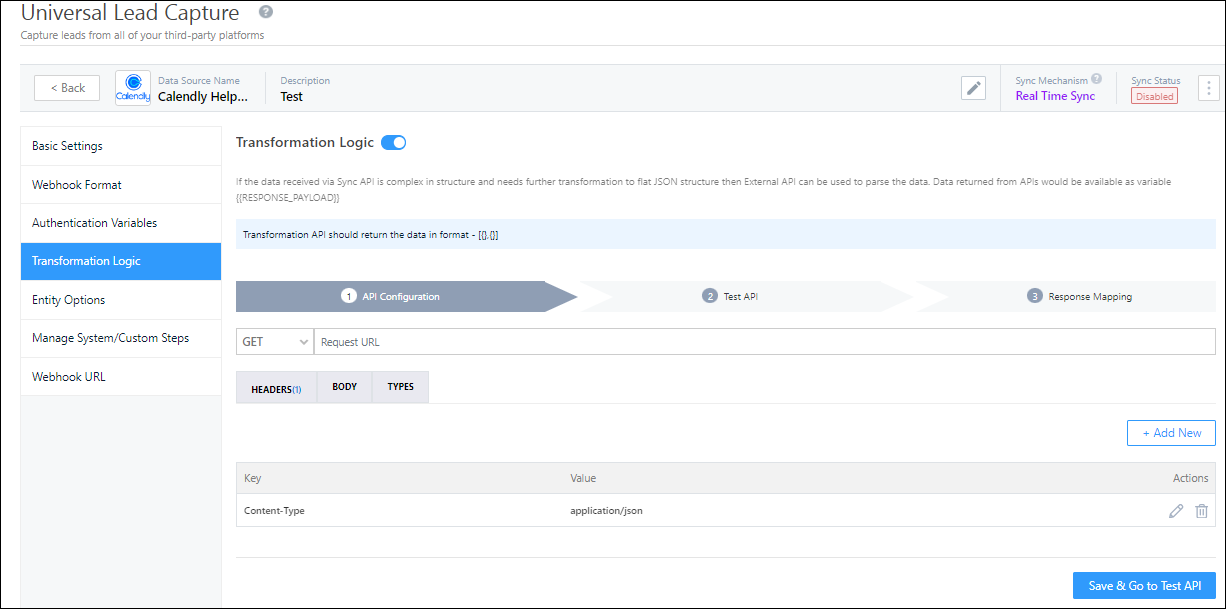
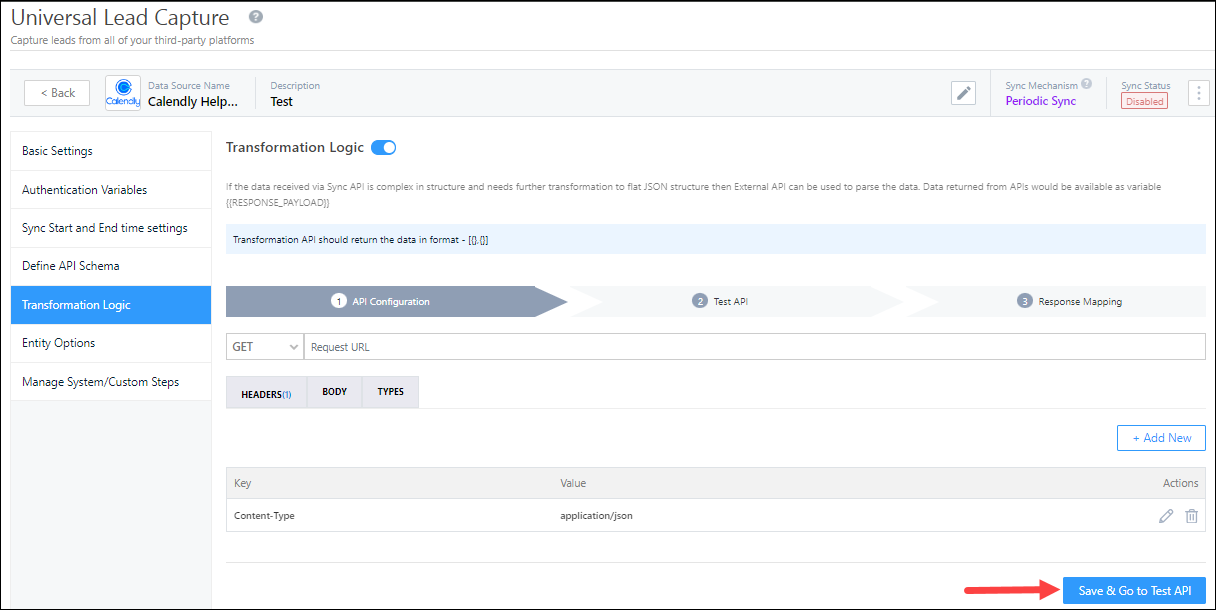
6.4 Transformation Logic
If the data received via Sync API is complex in structure and needs to be further transformed into a flat JSON structure, you can configure an External API here to parse the data. To do this, enable  , and configure the transformation API. The steps to configure the API are similar to the section below – Define API Schema.
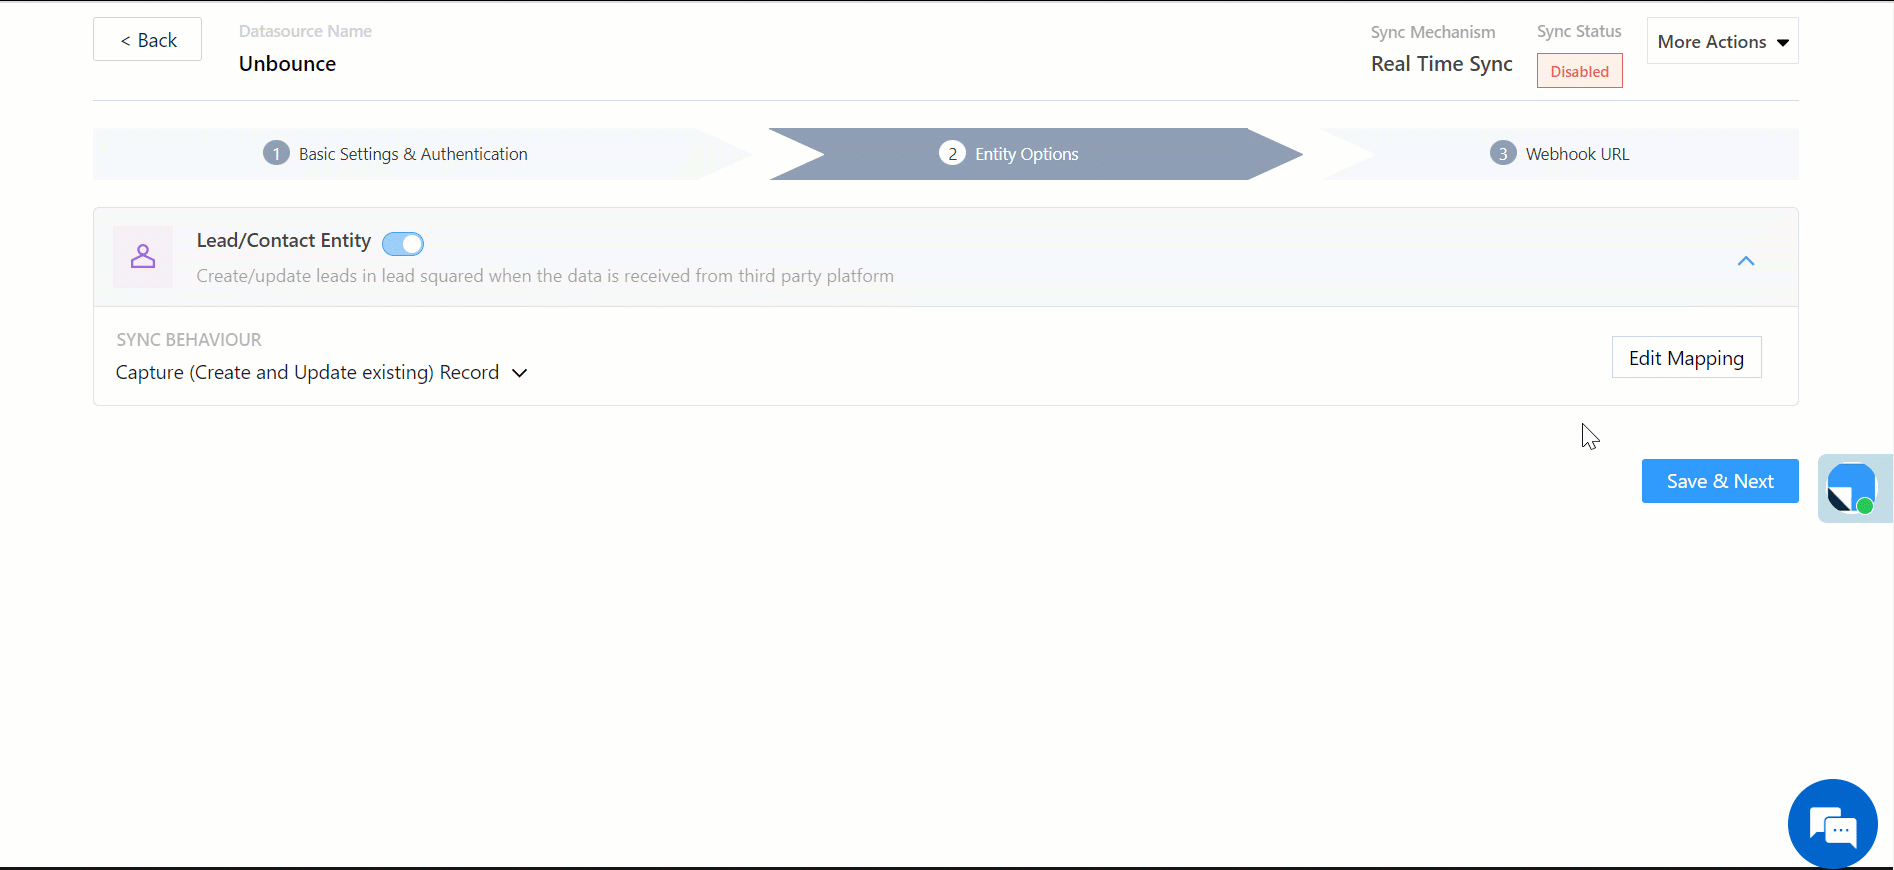
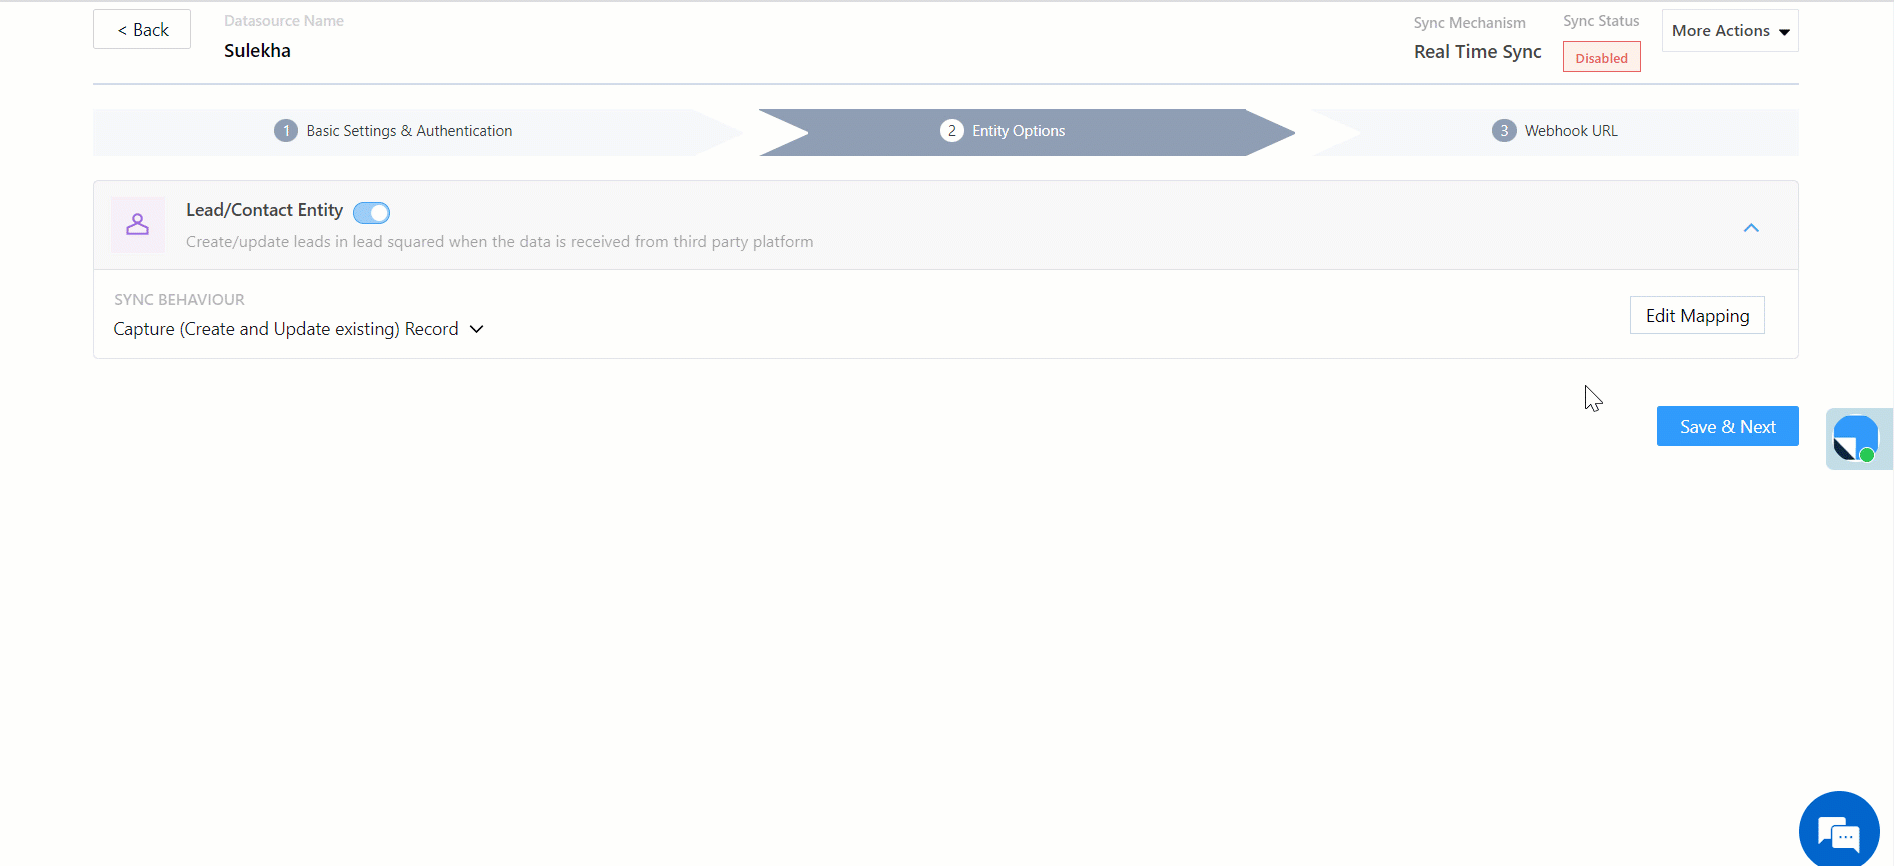
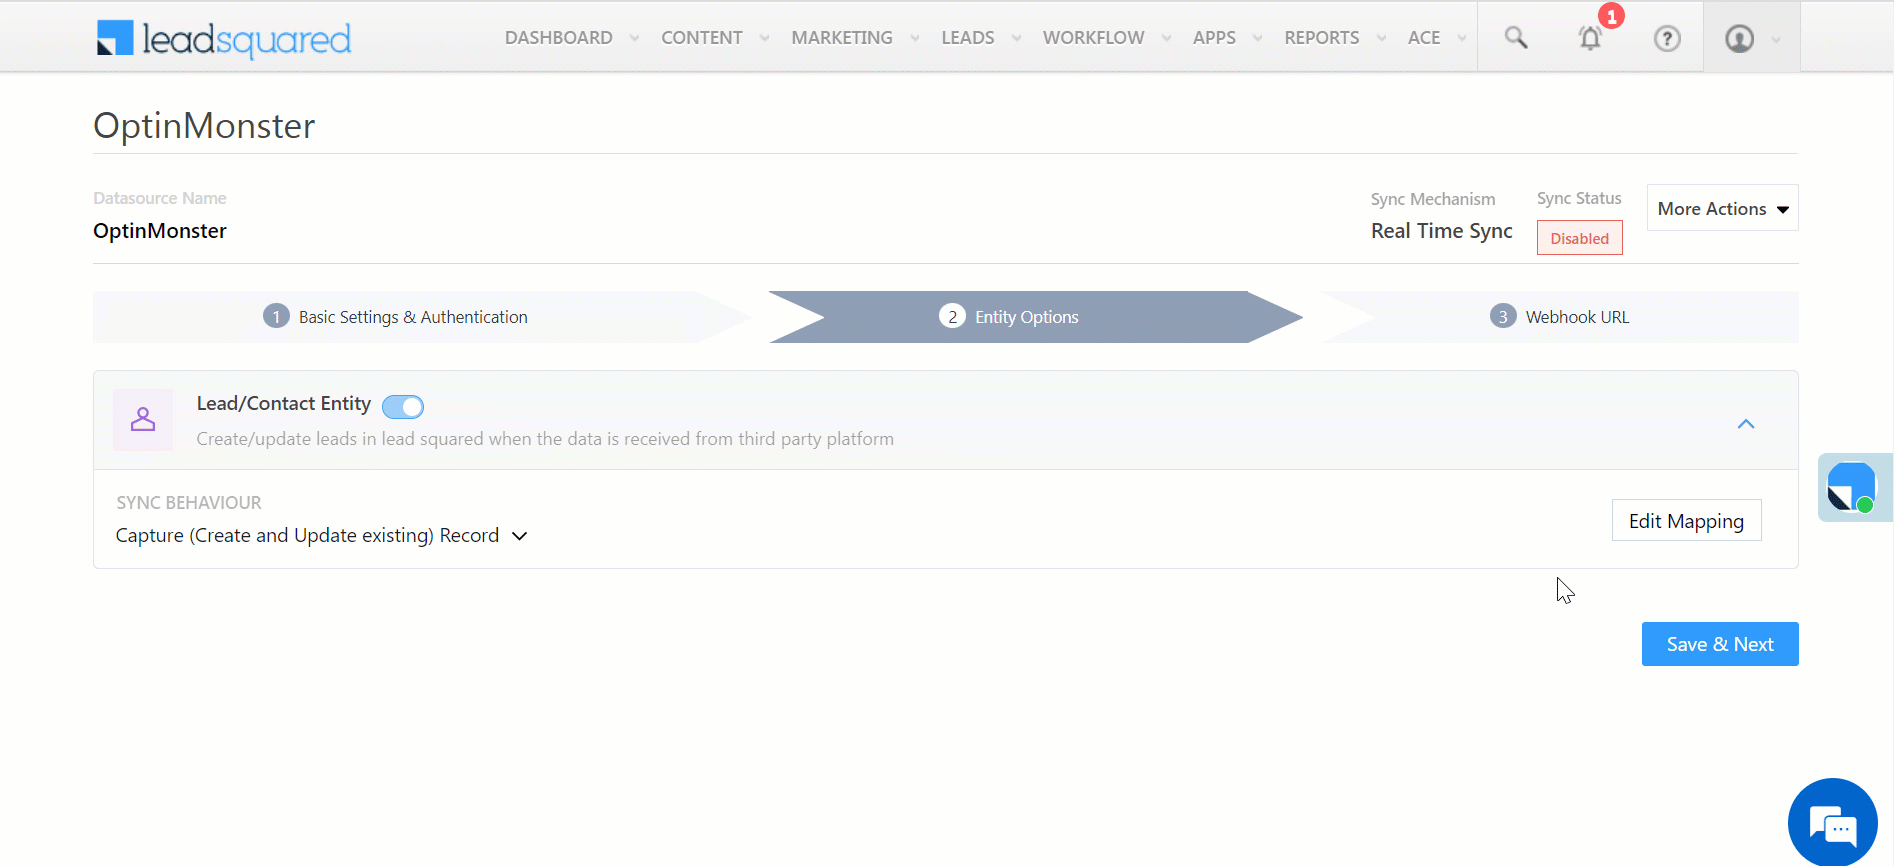
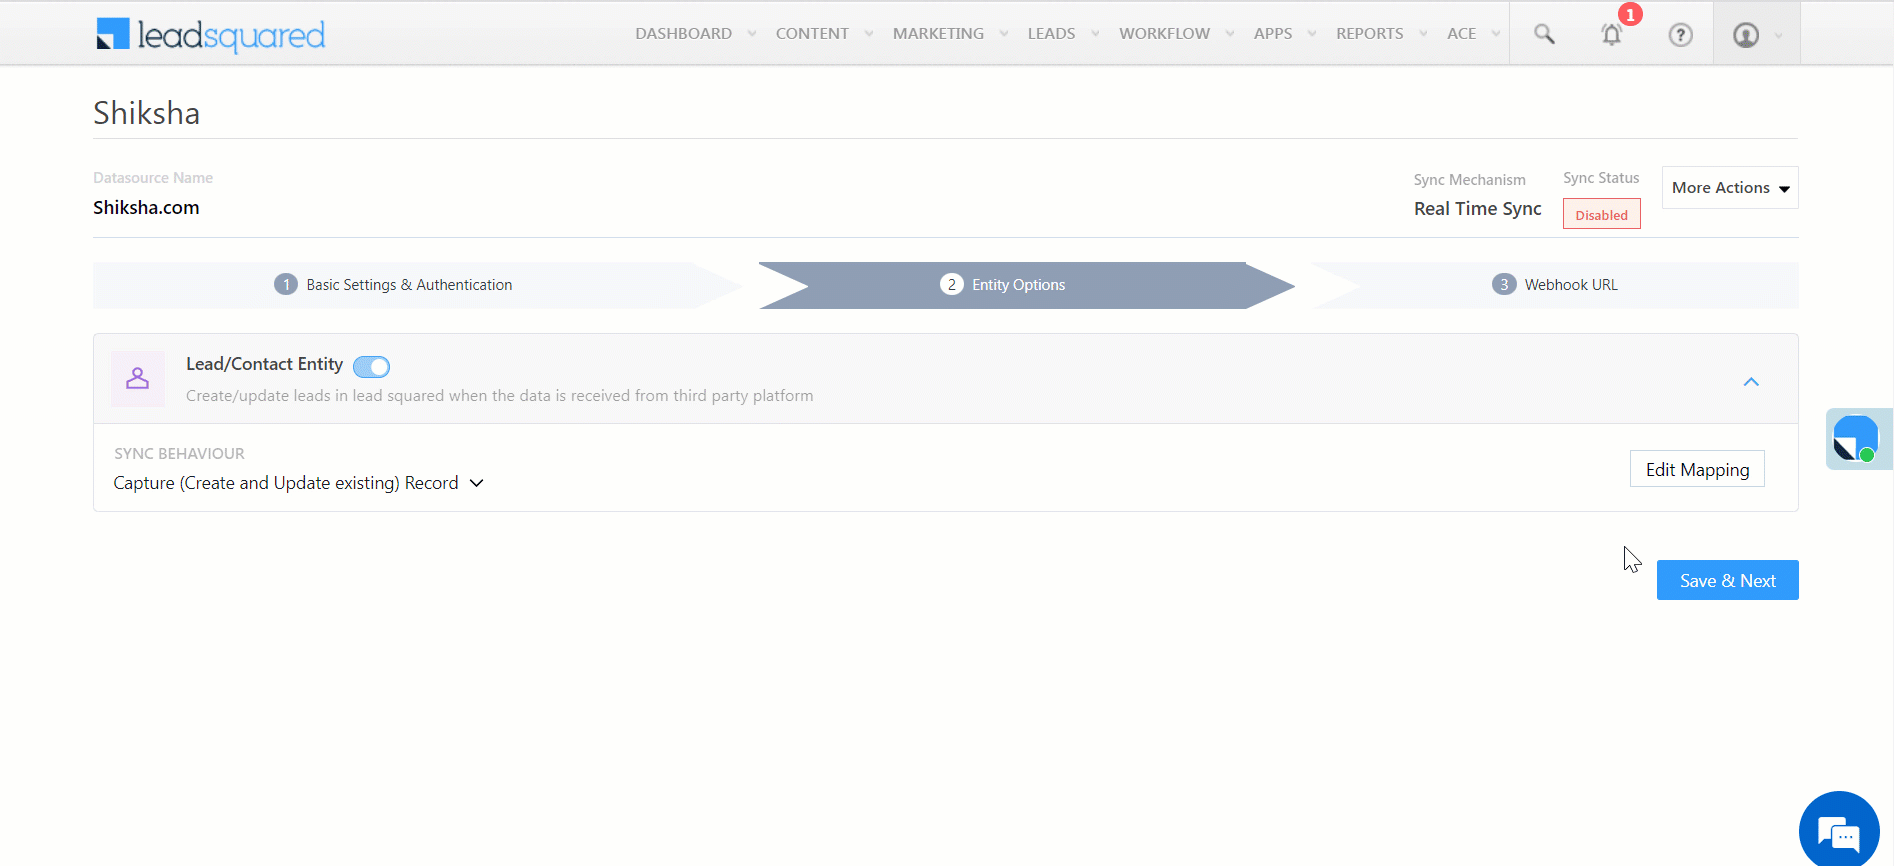
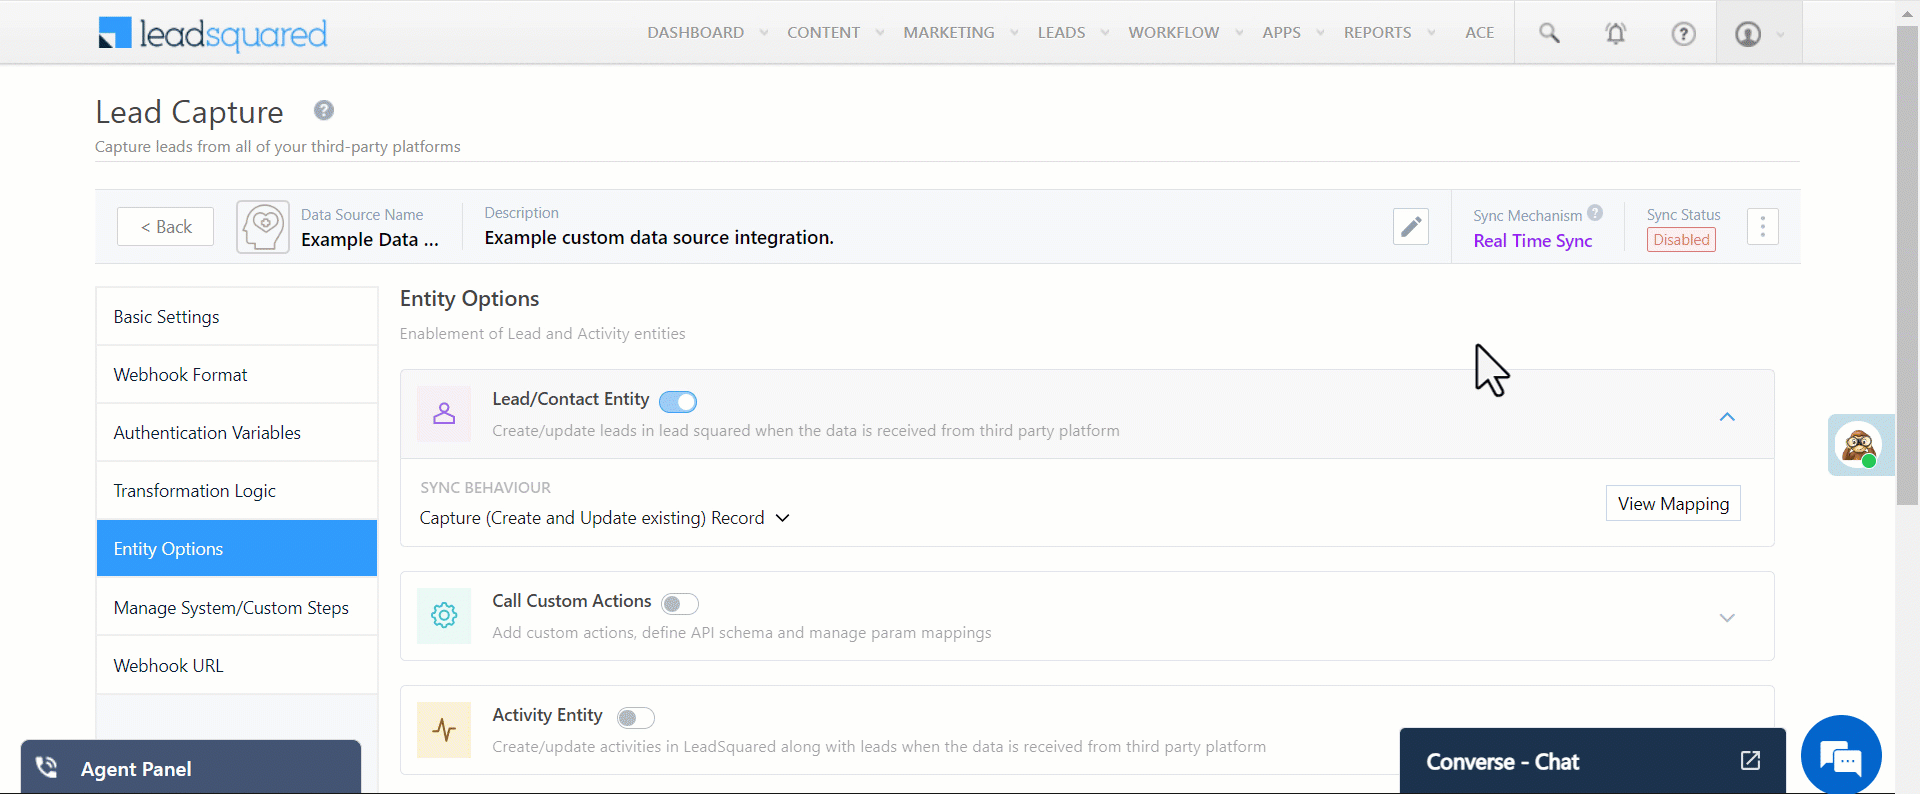
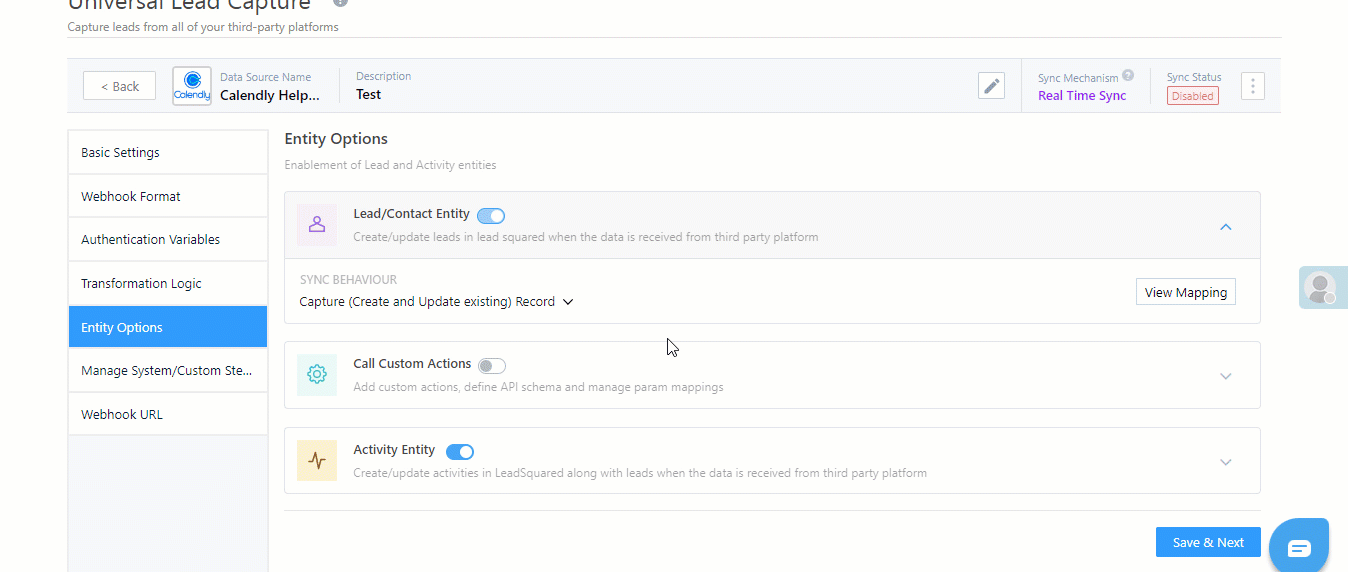
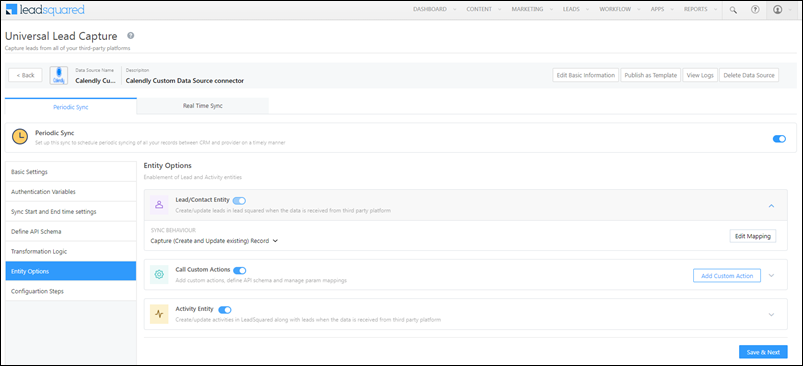
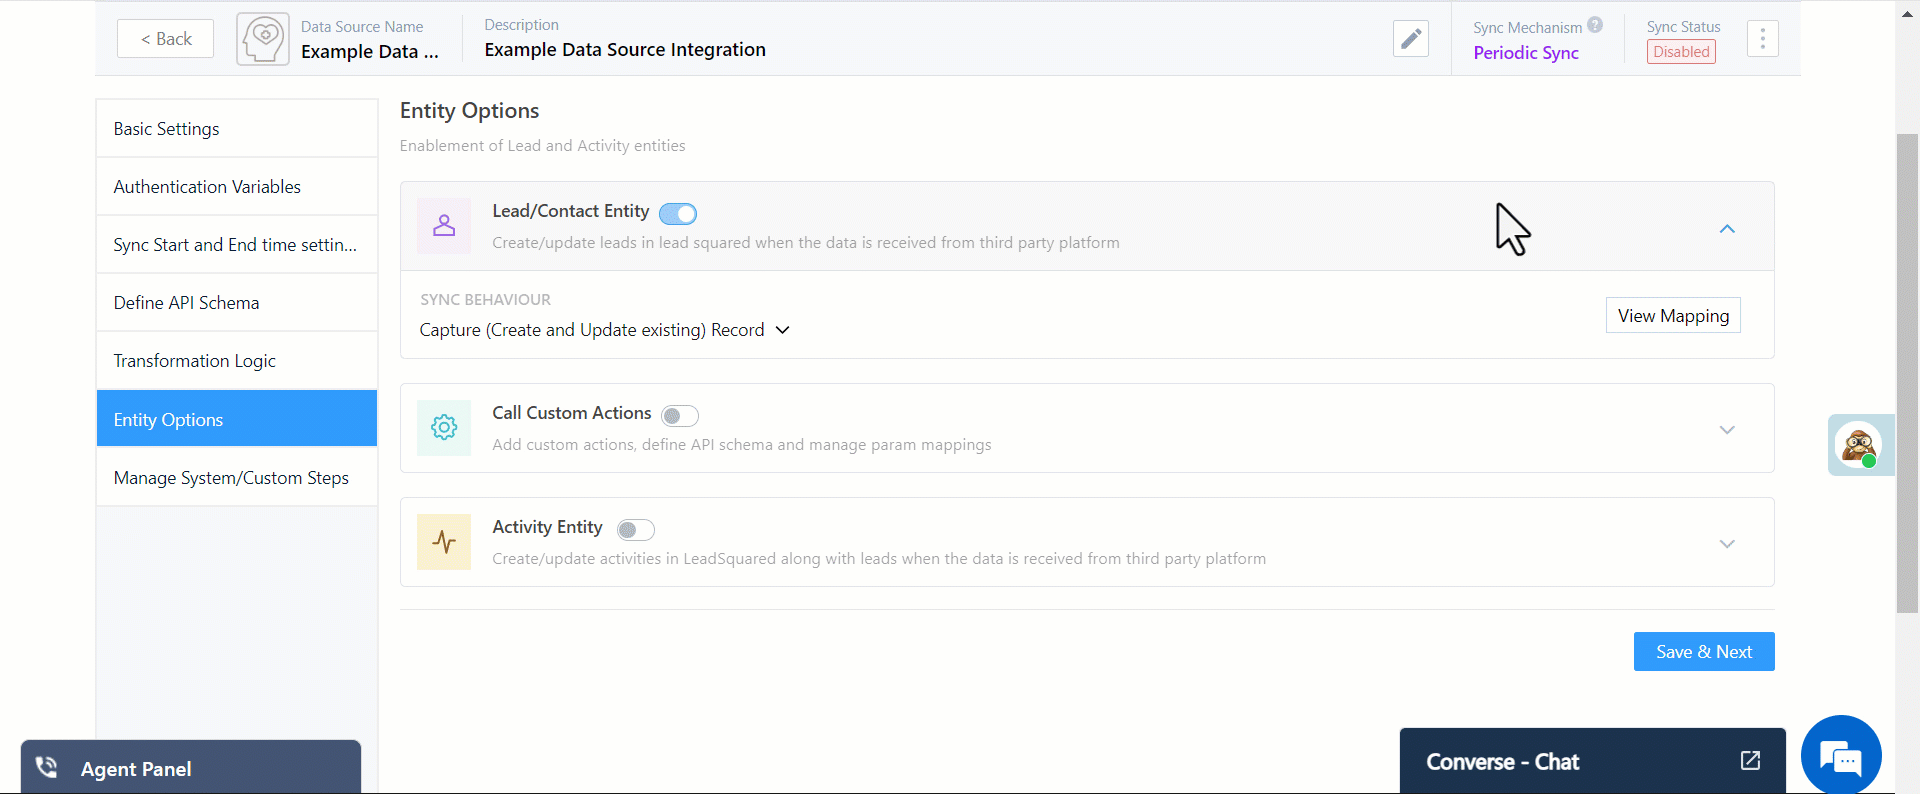
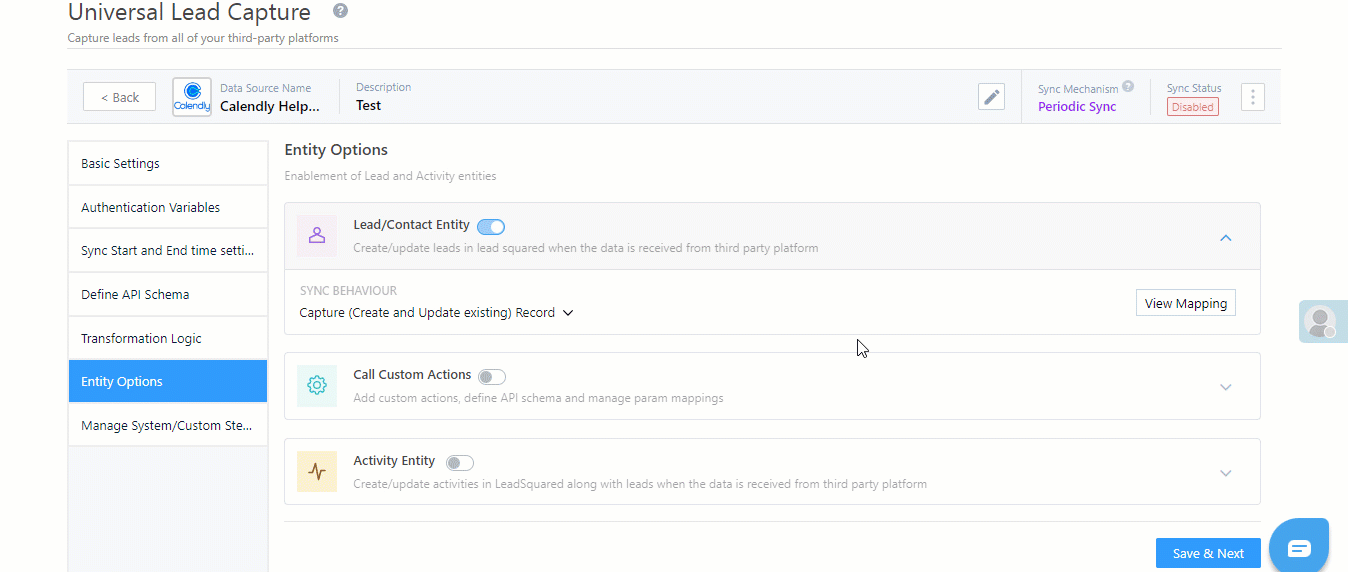
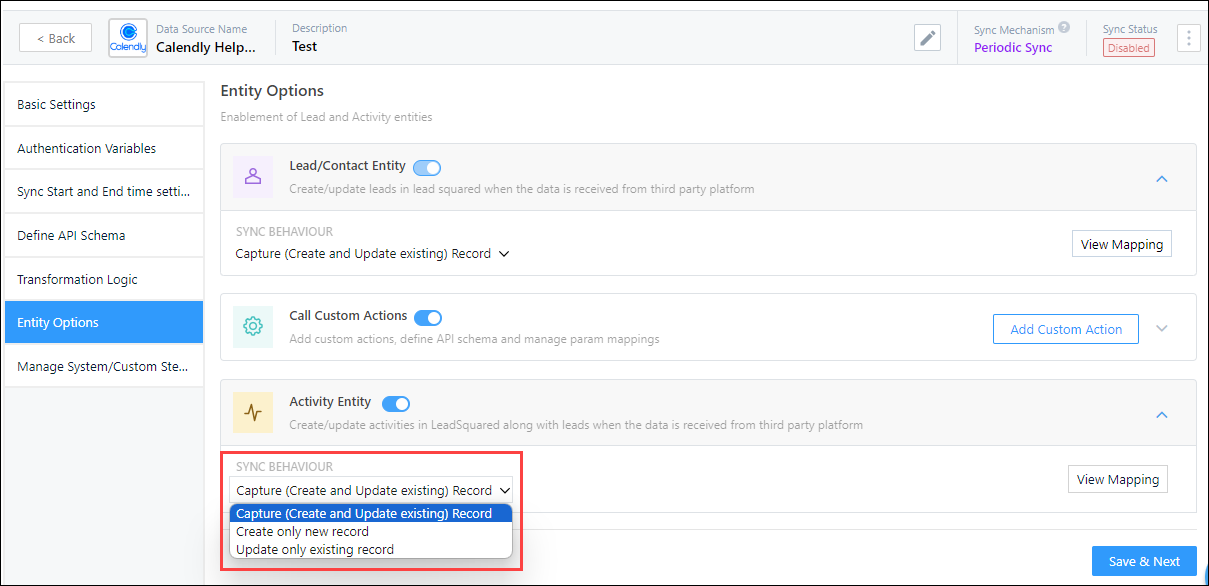
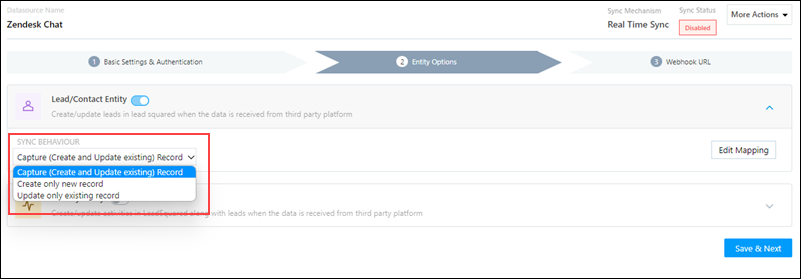
6.5 Entity Options
Note: To learn how to map the entity options for lead capture,
click here.
Here, define the sync behaviour of the connector when leads, activities and other entities are captured.
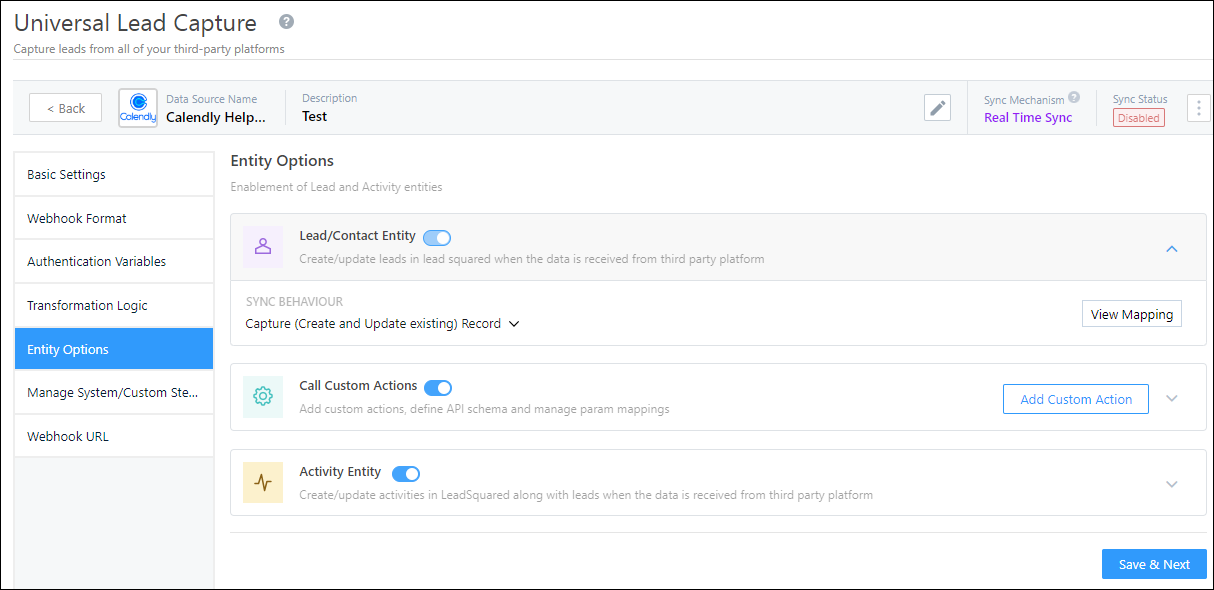
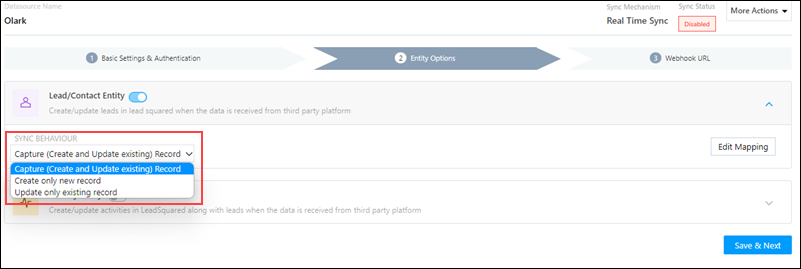
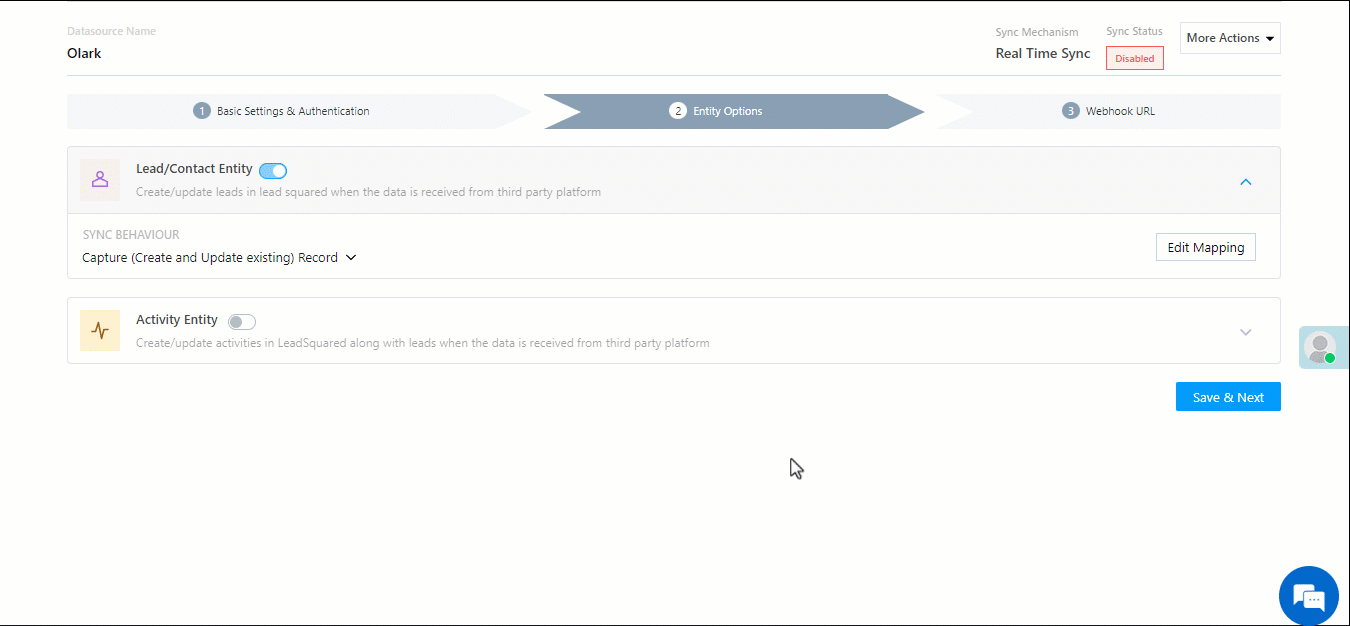
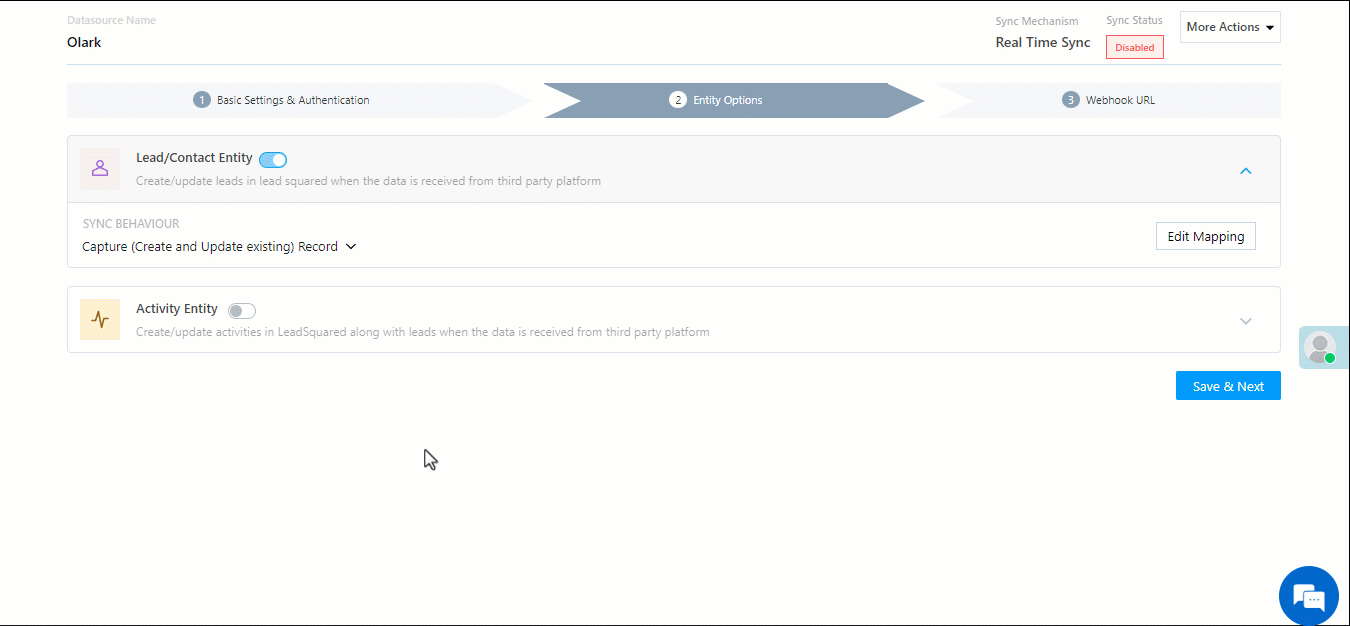
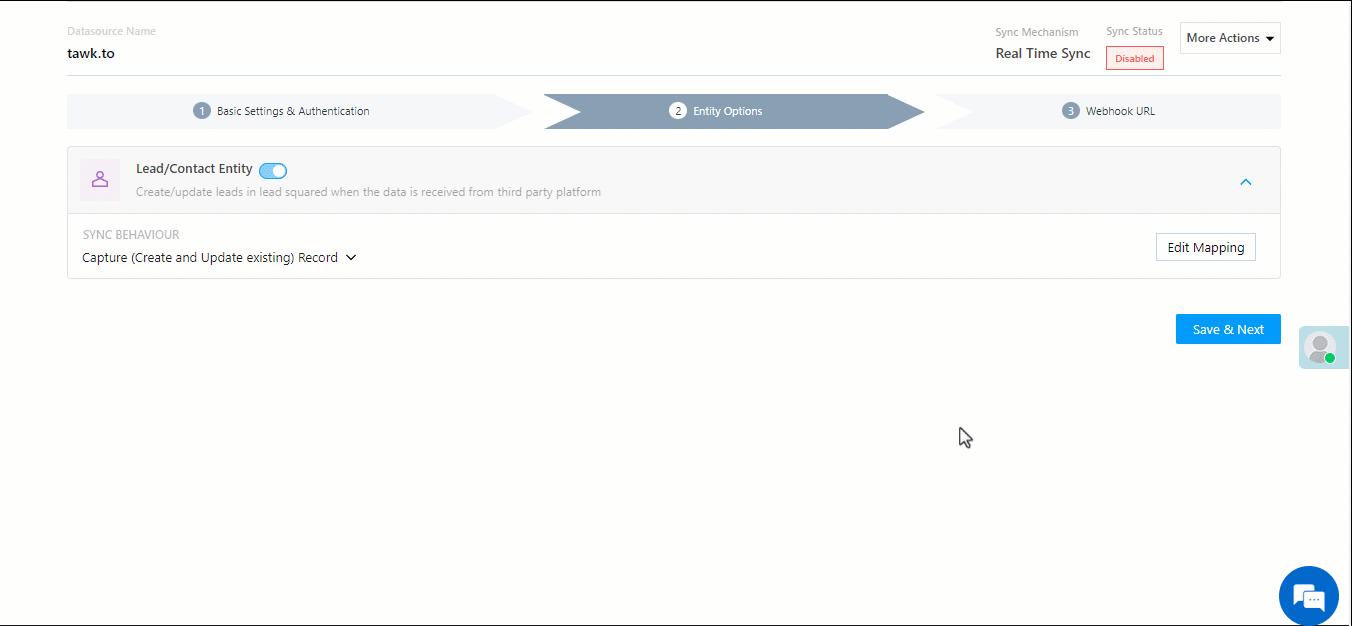
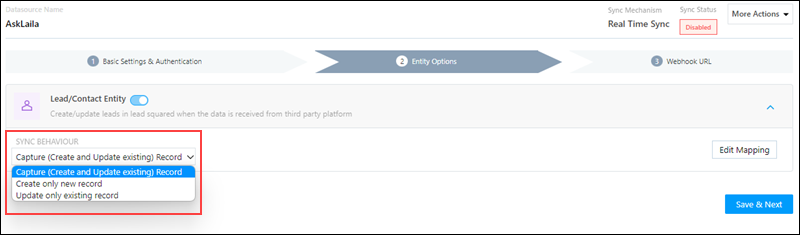
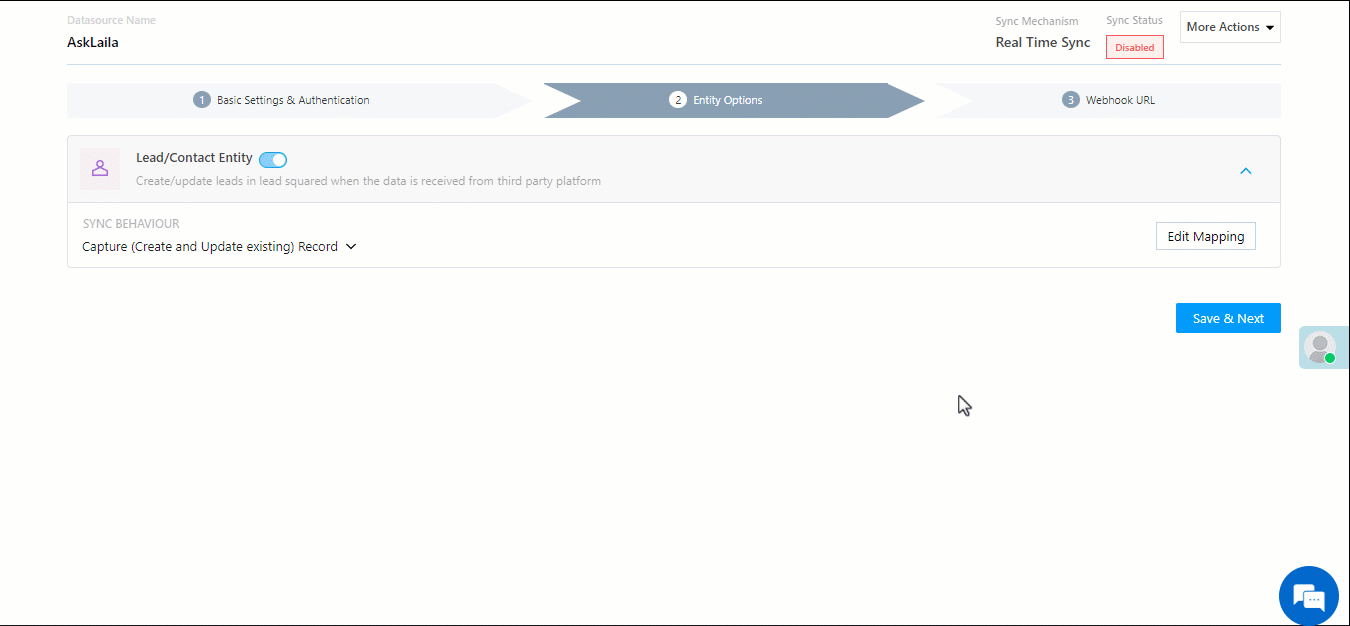
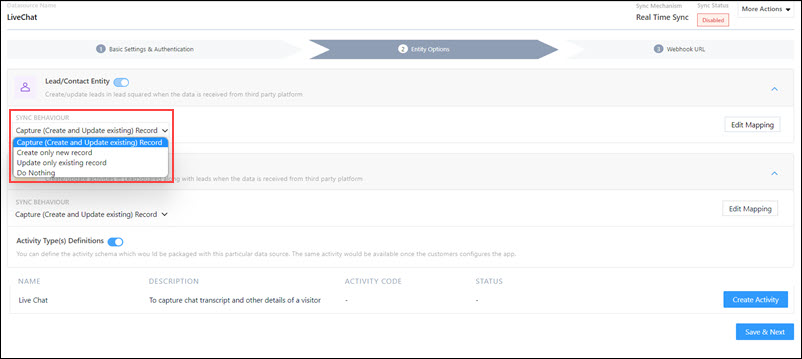
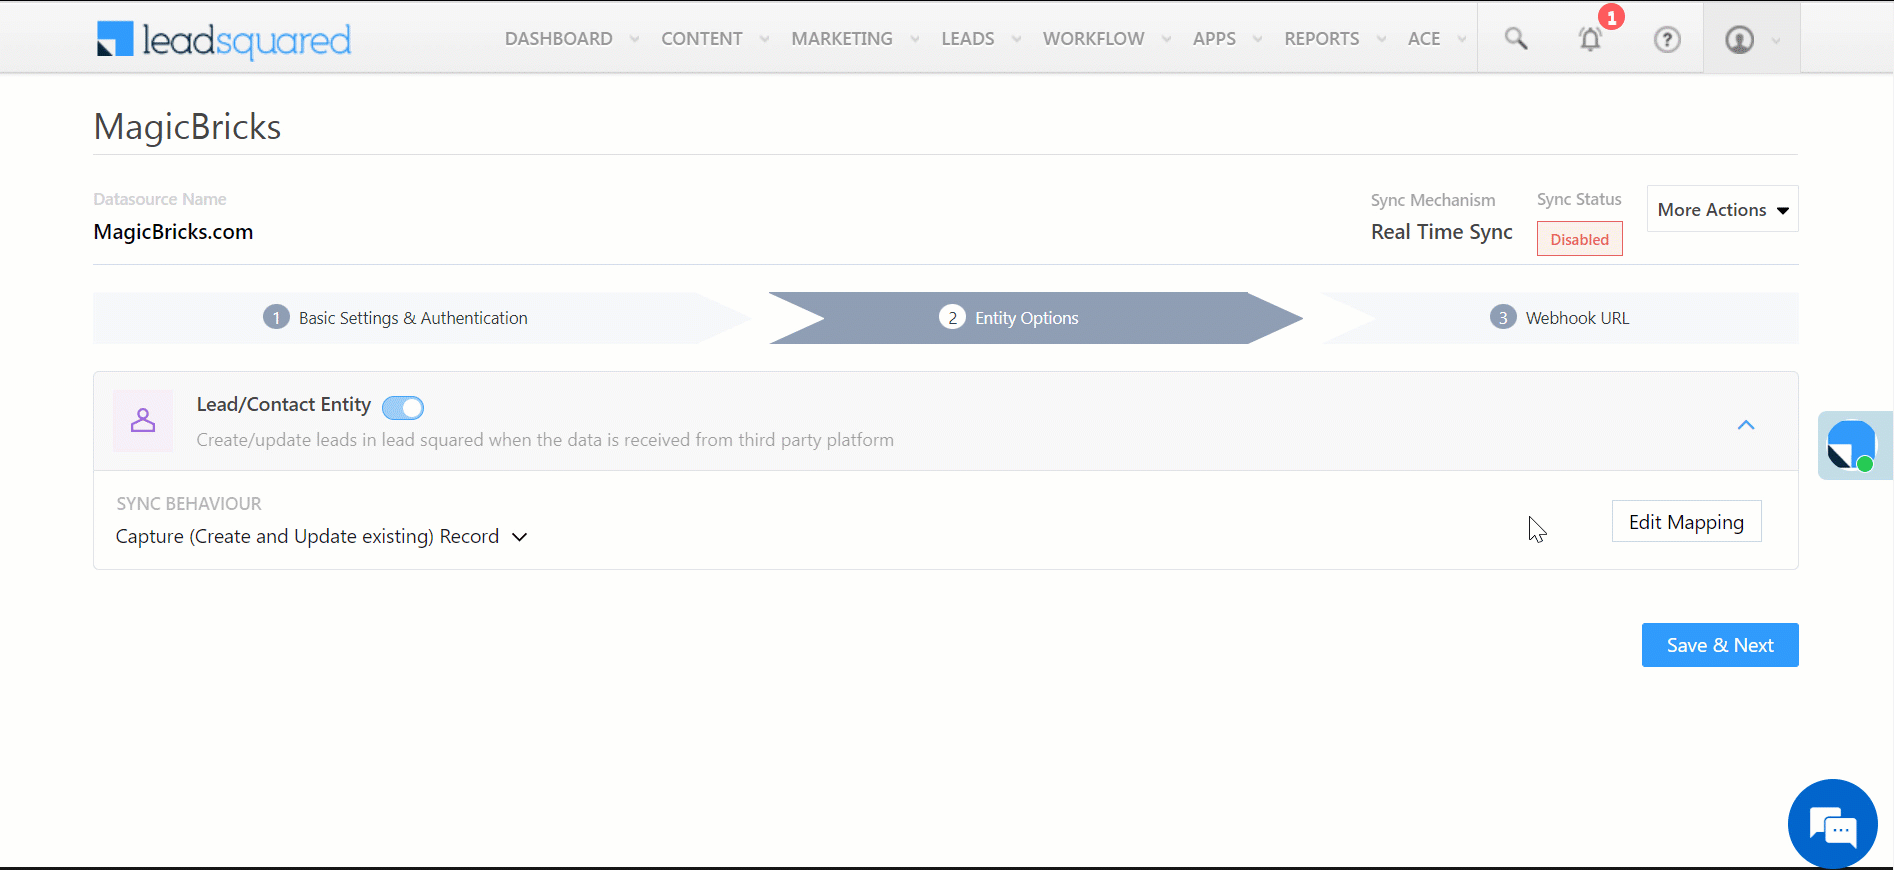
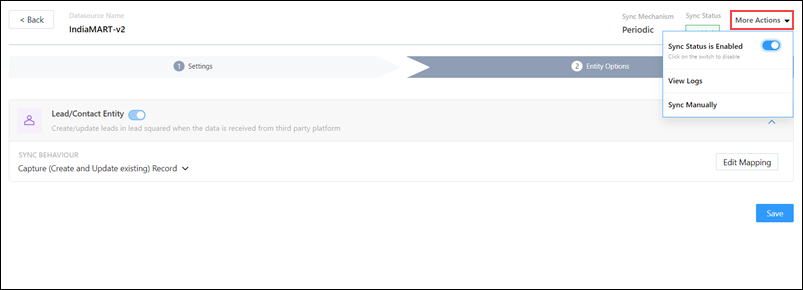
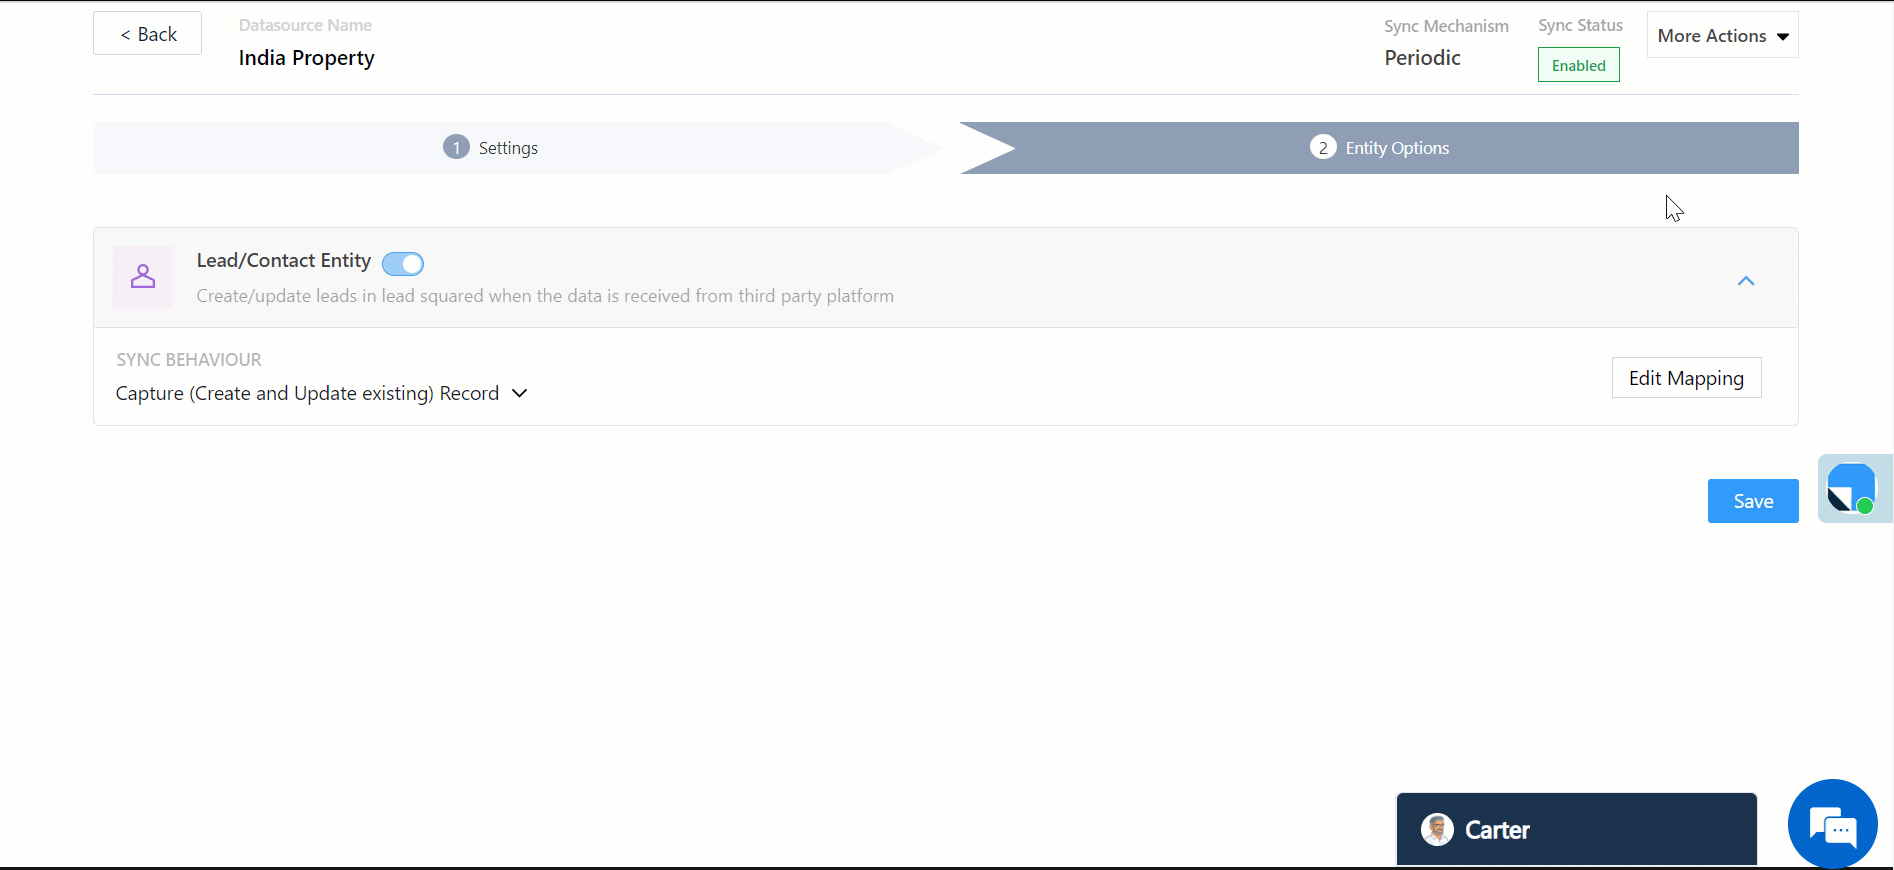
Lead/Contact Entity
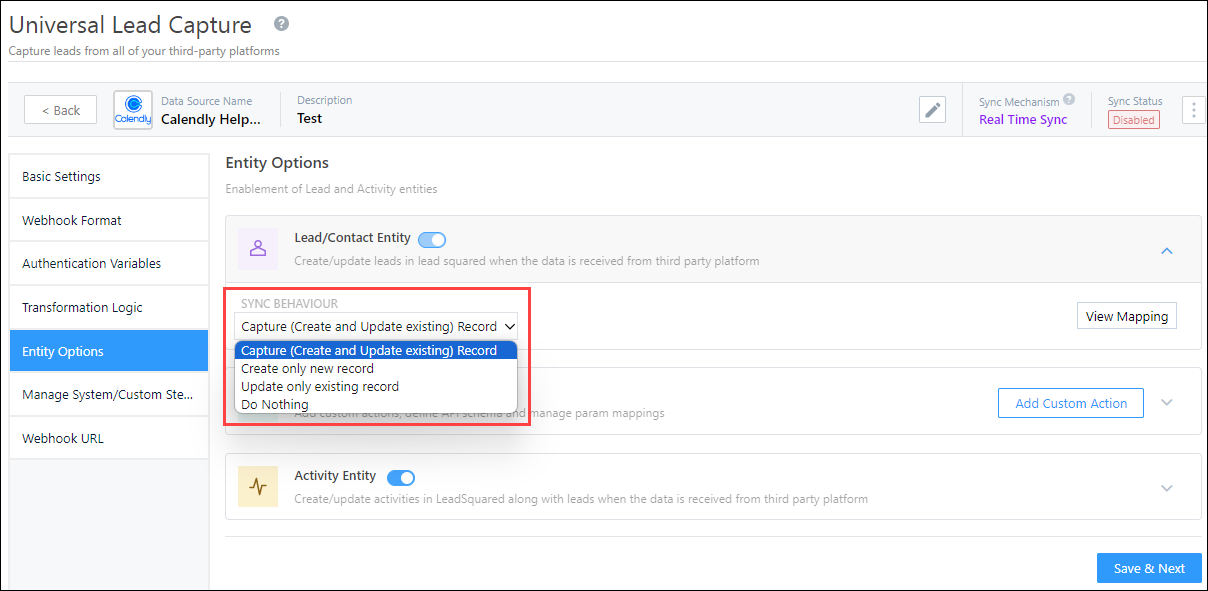
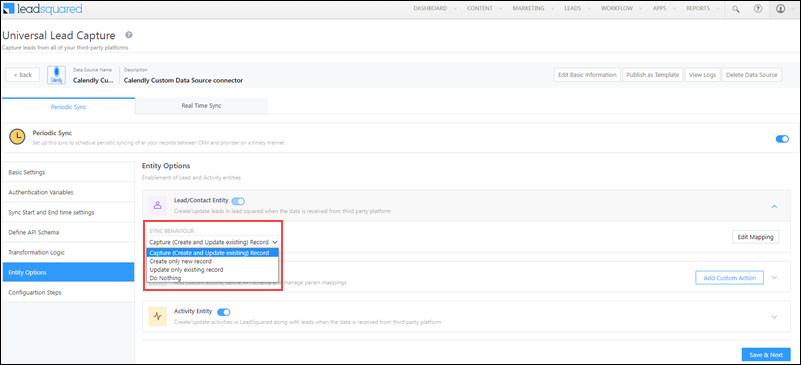
Based on the Lead Capture Search By criteria (email Id, phone number, etc.), LeadSquared identifies and captures leads from your data provider. Lead capture is enabled by default, and it cannot be disabled. The following options are available to configure the connector’s Sync Behaviour –
- Capture (Create and Update existing) Record – Leads that only exist in your data provider’s account (but not in your LeadSquared account) will get created in LeadSquared. Leads that exist in both your data provider and LeadSquared accounts will get updated.
- Create only new record – Leads that only exist in your data provider’s account (but not in your LeadSquared account) will get created in LeadSquared.
- Update only existing record – Leads that exist in both your data provider’s account and LeadSquared accounts will get updated in LeadSquared.
- Do Nothing – When a lead is created or updated in your data provider’s account, no action will be performed in your LeadSquared account.
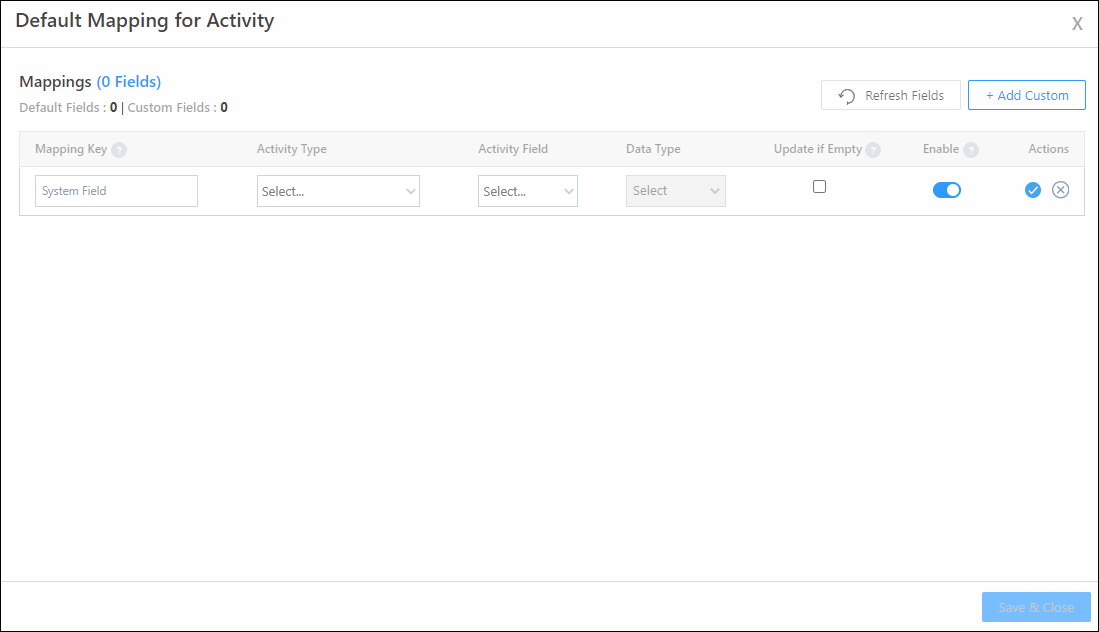
Edit Mapping
Once you configure the Sync Behaviour, you’ll have to ensure the field mapping is accurate. To do this, click Edit Mapping.
On the Default Mapping screen, map the API response to the corresponding LeadSquared lead and activity fields. To help you understand how to map your responses, we’ve listed down a few examples –
i) A straightforward, key-value pair response would be –
{
"page_name": "Final Lender Landing Page",
"page_id": "Summer-Campaign-1364",
"page_url": "http://aroundtheworldin80ways.com/Ladakh"
}
For such a response, you can map the keys to the corresponding LeadSquared lead fields (e.g., page_id to Related Landing Page ID, etc.).
ii) Nested key-value pairs –
{
"campaign":{
"id":"Zendesk-1364",
"title":"Zendesk_Leads"

},
"lead":{
"Name":"Paul Adams",
"email":"paul@example.com",
"phone":"9999999999"
}
}
Here, there’s a key-value pair (“title”) nested within an object (“campaign”). To map the parameters within the object to the corresponding LeadSquared lead fields, map it as a dot notation response (e.g., campaign.title to Source Campaign, etc.).
iii) A key containing a dotted notation –
{
"page_name":"Visit Ladakh",
"page_id":"Summer-Campaign-1364",
"data.json":{
"email":"paul@example.com",
"mobile_number":"9999999999",
"date_submitted":"2021-04-24"
}
}
Here, the key (“data.json”) that contains different parameters (“email”, mobile”, “date_submitted”), is rendered as a dotted notation. To map this key to the corresponding lead field, map it as follows – data*json.email to Email, data*json.mobile_number to Mobile Number, etc.).
iv) An encoded value –
{
"FirstName":"Paul+MX",
"Phone":"9999999999",
"Source":"Zendesk",
"EmailAddress":"mx%example.com"
}
Here, the response value (“EmailAddress”) is encoded (“mx%example.com”). To get the masked value, decode it when mapping the response (e.g., decode=>EmailAddress).
v) When you only want to capture data from certain fields –
{
"items":[
{

"nickname":"Paul",

"body":"From visitor",

"visitor_nickname":"Paul_1364",

"kind":"MessageToOperator",

"timestamp":"1629476535.249866"

},

{

"nickname":"Jai",

"body":"Hi from agent",

"operatorId":"5763330742157312",

"kind":"MessageToVisitor",

"timestamp":"1629476545.909106"

},

{

"nickname":"Jai",

"body":"how agent can help?",

"operatorId":"5763330742157312",

"kind":"MessageToVisitor",

"timestamp":"1629476556.704914"

}
]
}
To capture certain of the fields of the JSON object (“nickname”, “body”) use the parseTranscript key, followed by the JSON section (items in our case), and then give the fields you want to capture (parseTranscript=>items=>[“nickname”,”body”]).
To map your fields to LeadSquared –
- Pass the –
- Mapping Key
- Display Name
- Lead Field in which you want to store the field value.
- Data Type of the data present in this field.
- Click the Update if Empty checkbox if you don’t want to update the value of a field every time the sync takes place.
- This is helpful to prevent re-updating important/sensitive identification-related fields like Social Security Numbers, PAN Card numbers, etc.
- To provide a default value for any field, click , enter the value under Default Value, and click .
- If the data provider doesn’t send data for any lead/activity field, then the default value will get assigned to that specific field. But if the field already has an existing value, then the default value will be ignored.
- To disable lead data capture for any field, disable the
 slider.
- To create a custom Calendly lead/activity field, click the Add Custom button.
- Once this field is created, you must map it to the relevant LeadSquared lead/activity field.
- After the field is mapped, to save the custom field, click .
- To delete a custom field, click .
Note:
- You can’t enable ‘Update if Empty’ on a unique field (primary/secondary search key, and searchable key in the activity entity).
- You can enable ‘Update if Empty’ on a maximum of 10 fields.
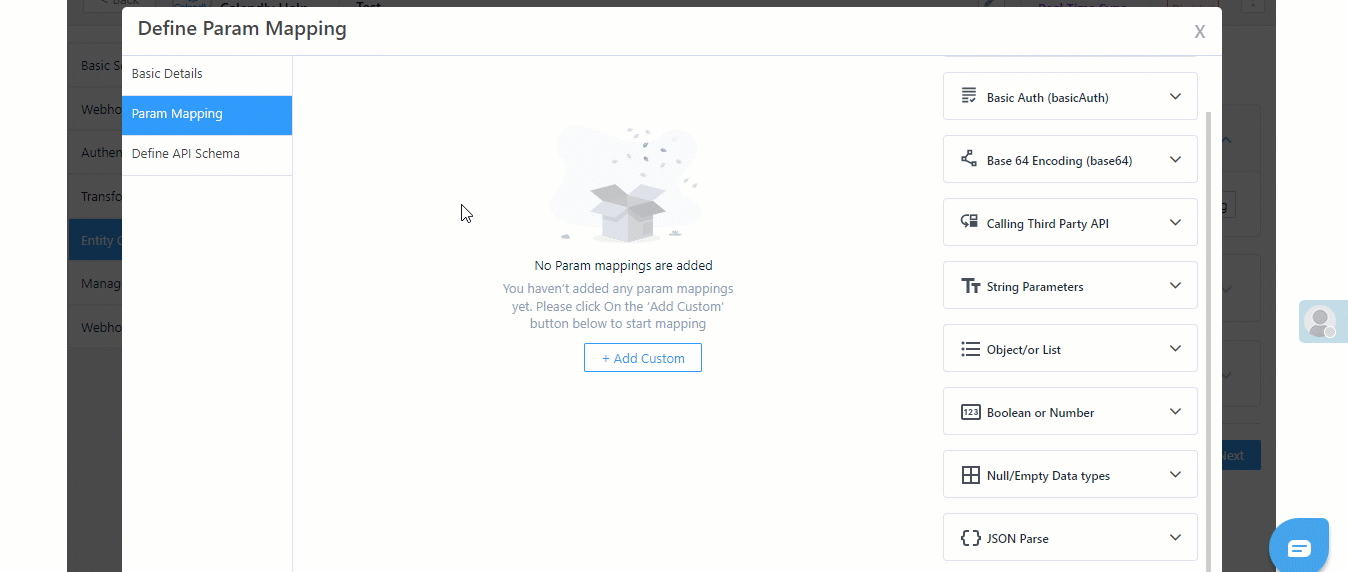
Call Custom Actions
If required, you can configure the connector instance to perform other actions such as Create Task, Update Task, Create Opportunity, etc. This can be achieved by adding and configuring the relevant LeadSquared API for the action you want to perform. To configure the action –
- Alongside Call Custom Actions, enable , and click Add Custom Action.
- On the Define Param Mapping pop-up, enter the following details –
- Basic Details – Enter the Name and Description of the action (e.g., Create an Appointment). Once you’re done, click Save & Next.
-
- Param Mapping – Here you’ll have to map the API parameters to capture details from your LeadSquared account and from the data provider’s account.
- Click Add Custom, and enter the following details –
- API Params – The parameters present in the API you’re passing.
- Default Mapping Key – The default value for the corresponding parameter.
- Description – The description for the parameter and key you’ve added.
- In our example, we’ve added all the mandatory parameters listed under the Create an Appointment API.
- The values for the first four parameters your see (“TaskType“, “RelatedEntity“, “Reminder“, “NotifyBy“) are present within LeadSquared. This allows us to hardcode the Default Mapping Key for these values.
- The Default Mapping Key values for the other parameters are dynamic, since the values are being pulled from the data source provider’s account (Calendly in our example). To ensure there’s no format mismatch between LeadSquared and the data provider’s account, we recommend you pass the Default Mapping Key in the LiquidJS format.
- We’ve passed two additional parameters that are not present in the Create an Appointment API – “event” and “eventId“. These are differentiator parameters. These parameters allow us to perform two different actions (e.g. Create and Update/Create and Delete, etc.) using the same API webhook we’re creating.
- In our example, if we only pass “event“, a new Appointment task will get created. But if we only pass “eventId“, then an existing Appointment task will get updated.
- If you’re looking to create a single API that allows you to perform two different actions, we recommend that you add similar differentiator parameters.
- To add more parameters, click Add Custom.
- Once you’re done, click Save & Next.
- Once the API is working as expected, click Save & Close.
Note: You can configure custom actions only using
LeadSquared APIs. Configuration using third-party APIs is not supported.
-
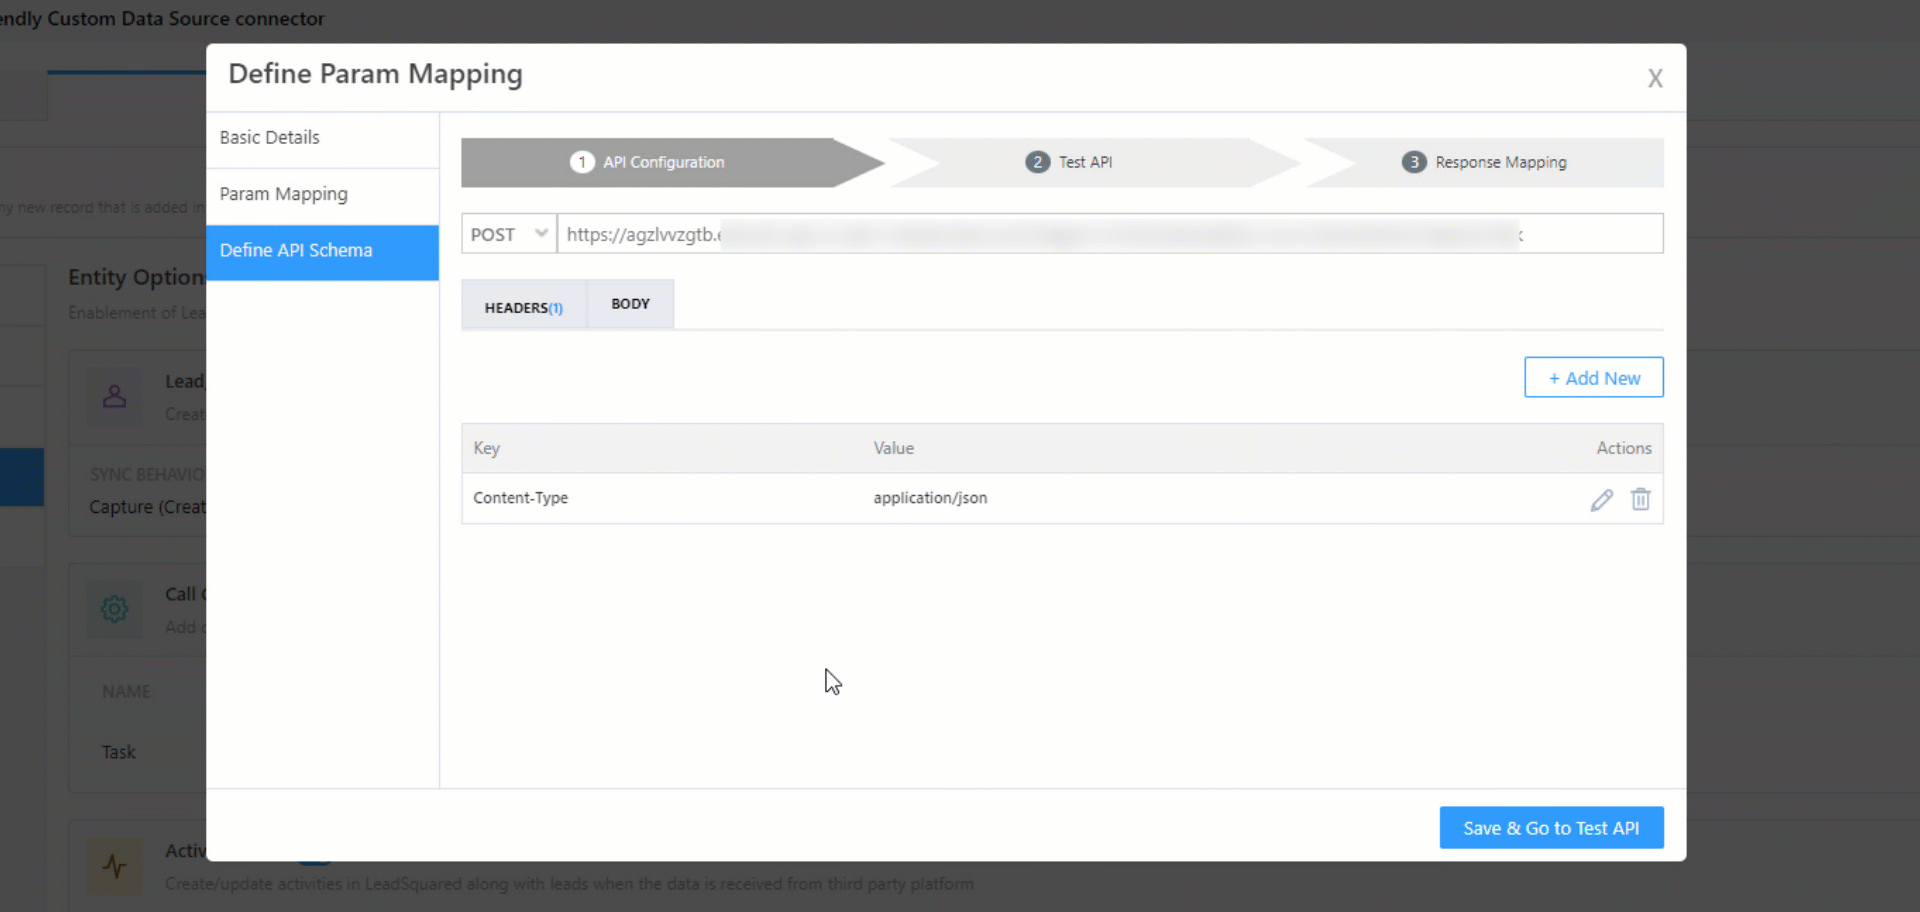
- Define API Schema – Add and configure the API through which the custom actions will be performed in LeadSquared.
- API Configurations – Add and configure the API URL, the Header and the Body.
- In the Request URL box, enter the base URL and the other parameters you want to pass in the API.
- Click the Add New button to enter the API headers (accessKey, secretKey, etc.).
- You can configure the content type format from the available options (Form Data, Raw JSON and x-www-form-urlencoded).
- You can configure the API language from the available options (JSON or XML).
- Parameters for which the values that are hardcoded are automatically added to the Body.
- The “orgID” parameter is optional. You can include it in the Body when testing the API, and you can remove it once the API works as expected. The “orgID” is automatically picked up from your account.
- Once you’re done, click Save & Go to Test API.
- Test API – Once the API details are added, pass values to test the API. Once you’ve added the values, click Send Test.
- If the API works as expected, click Go to Response Mapping.
- If the API doesn’t work as expected, identify the errors by viewing the logs. Once they’re fixed, click Go to Response Mapping.
- Response Mapping – To help LeadSquared make sense of the API response, map the response parameters as success, failure or error
- Under the Key and Value fields, map relevant key-value responses.
- From the Mapping dropdown, select the correct outcome for that particular response.
- Under Message, enter the message you want to display in the response.
- After mapping a response, click . To map additional responses, click the Add Mapping button.
- Once you’re done, click Save & Close. The custom action you’ve configured will now fire as expected.
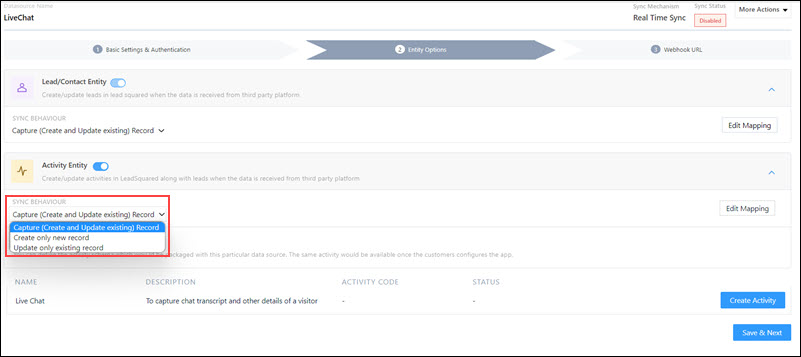
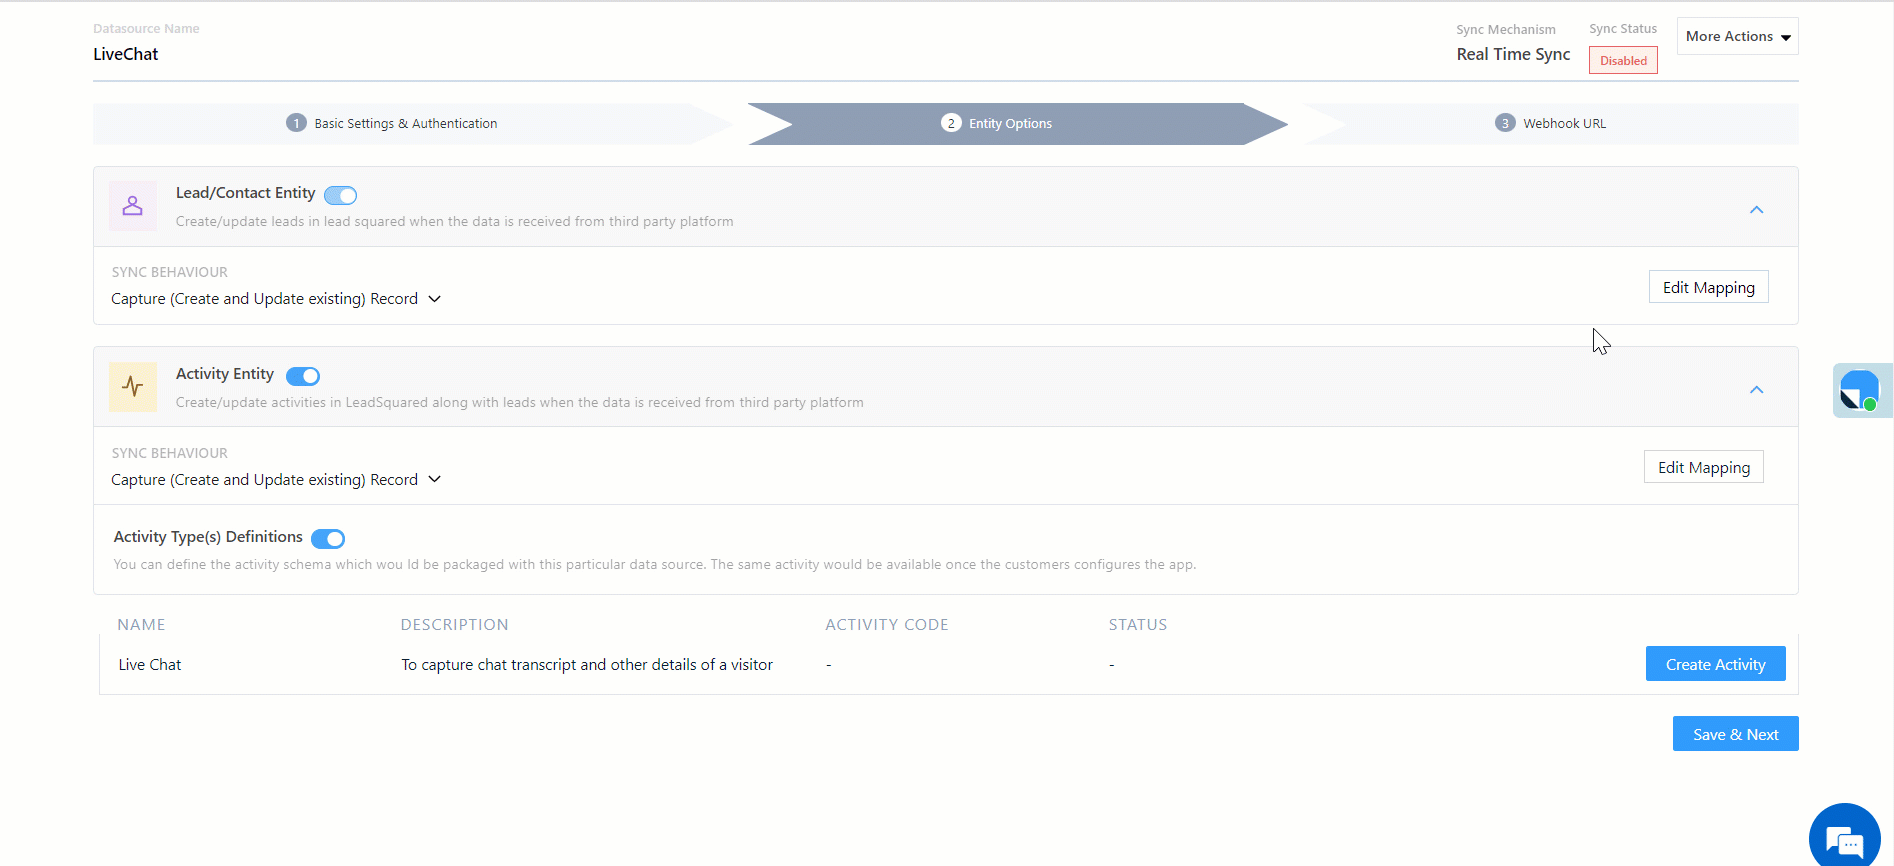
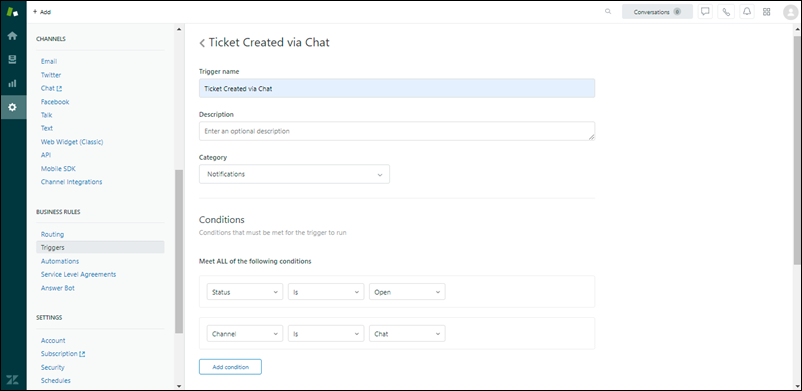
Activity Entity
Once leads are captured to LeadSquared, you can post custom activities to these leads (e.g., Ticket Creation, Chat Transcript, etc.). These activities will help users keep track of the lead’s journey to conversion. To post activities to the leads captured, alongside Activity Entity, enable the slider. The following options are available to configure the connector’s Sync Behaviour when activities are synced to LeadSquared –
- Capture (Create and Update existing) Record – New activities will get posted to the lead in LeadSquared, while existing activities will get updated.
- Create only new record – Only new activities will get posted to leads in LeadSquared.
- Update only existing record – Only existing activities on the leads captured will get updated in LeadSquared.
The steps to configure mapping is the same as the steps listed above, under Edit Mapping (for leads).
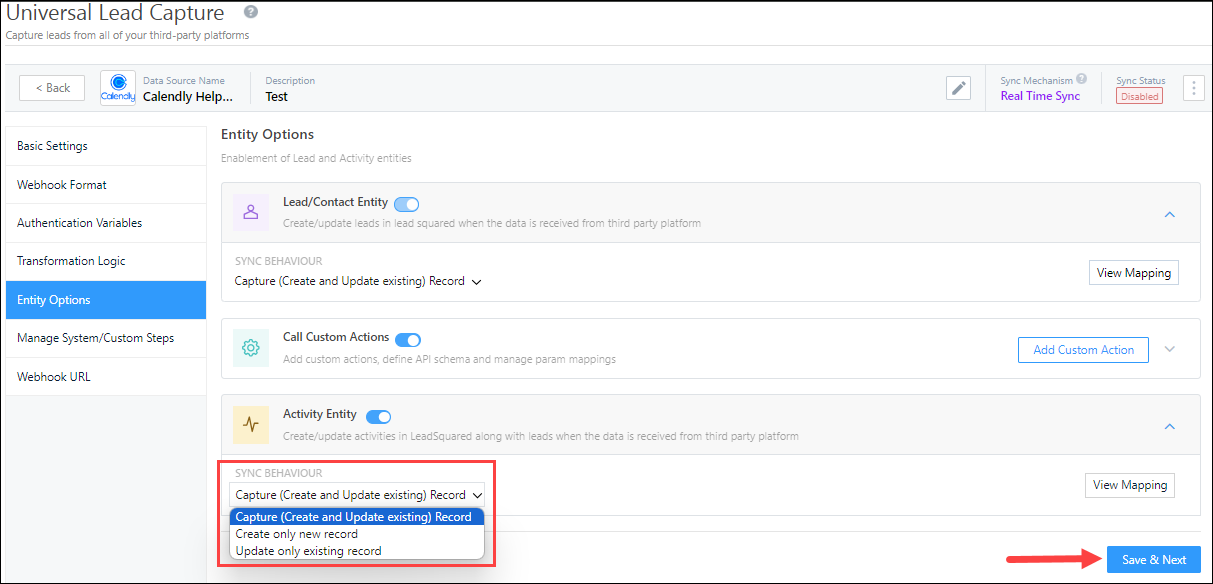
Note: You can view and configure the Activity Type when editing the mapping.
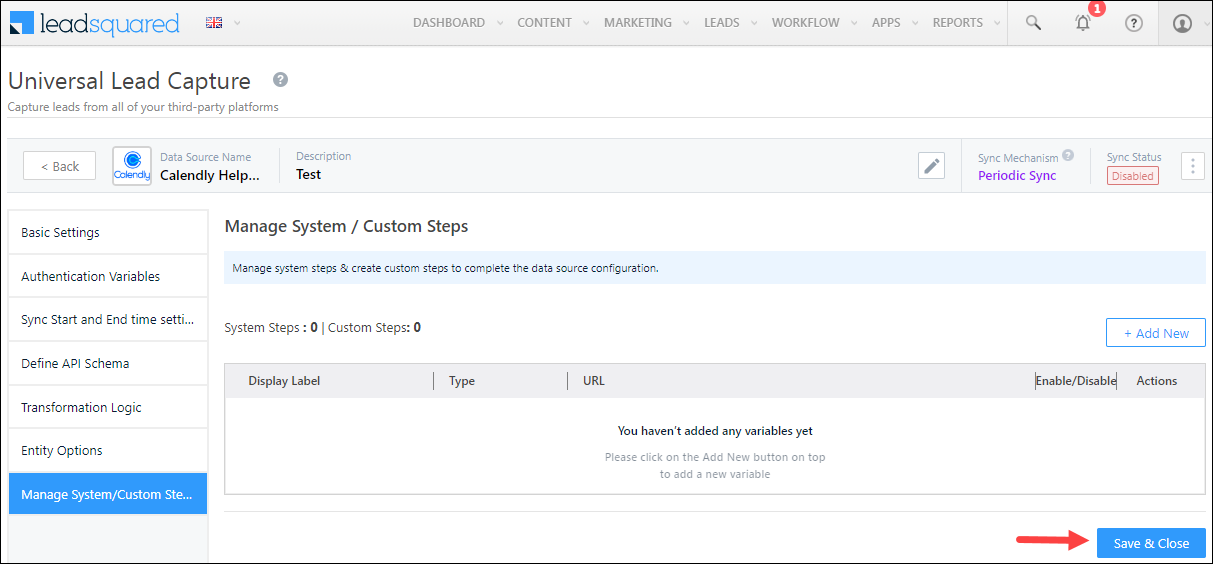
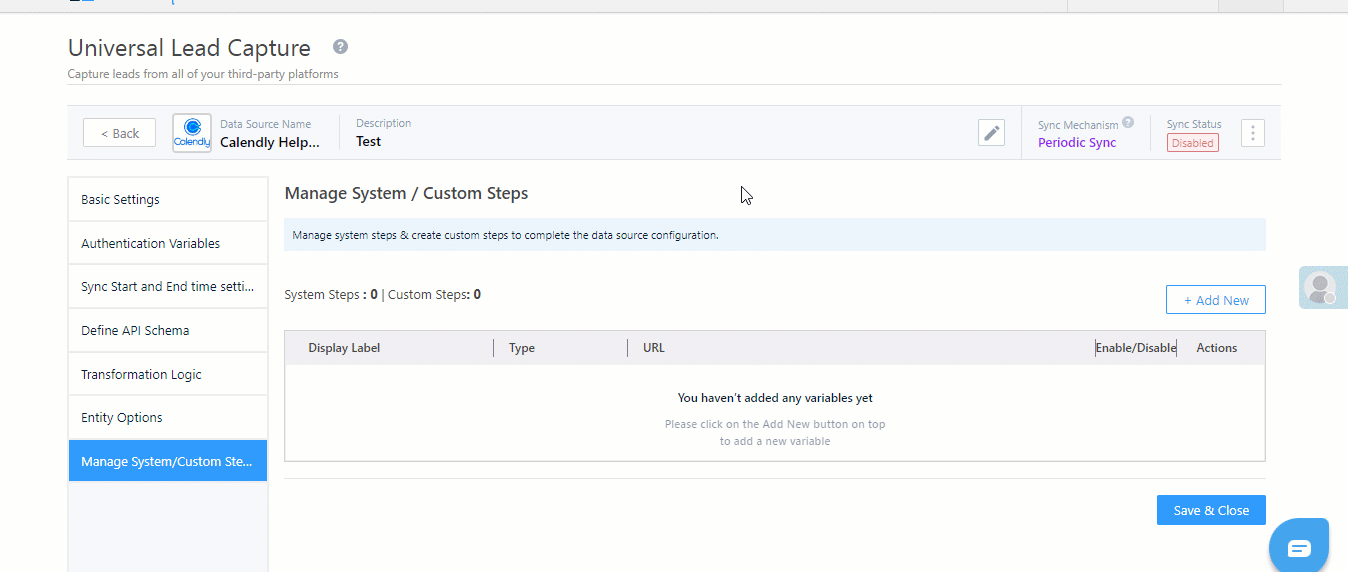
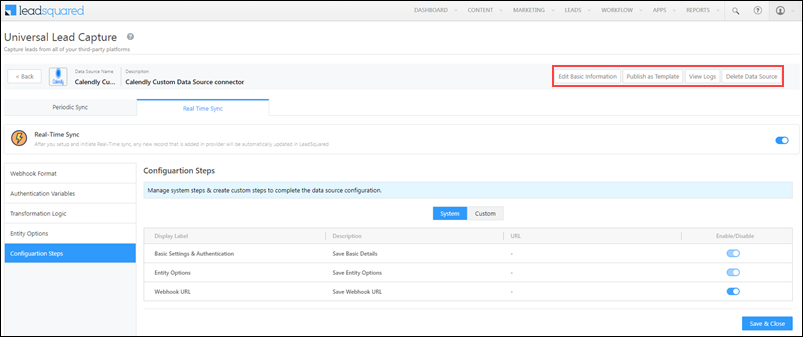
6.6 Manage System/Custom Steps
Identify the pages you want to display to your users when they’re configuring the connector. By default, the Webhook URL page is displayed to your users.
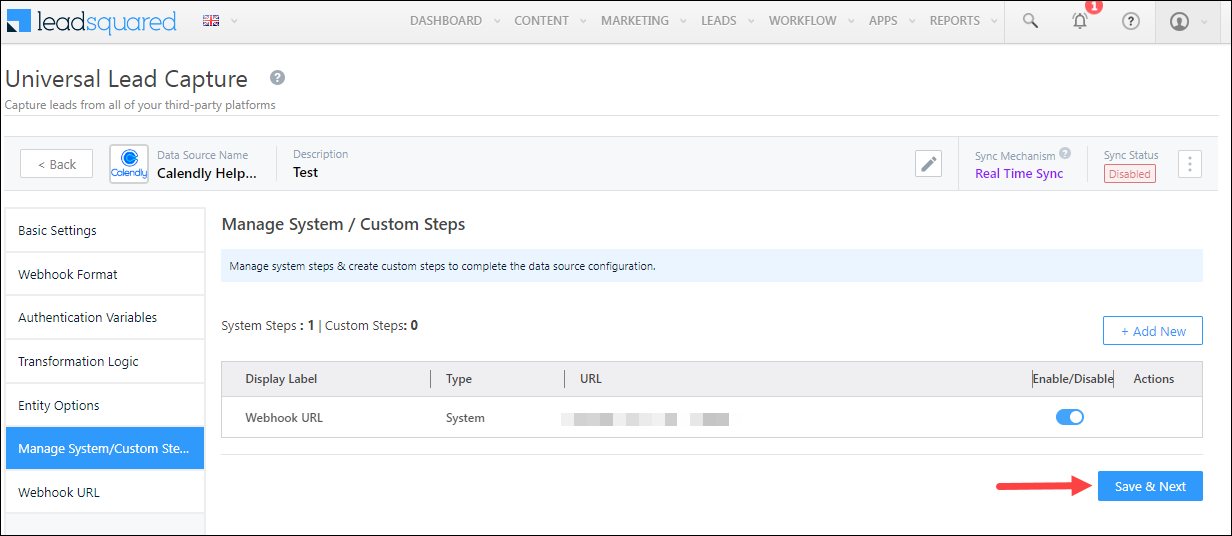
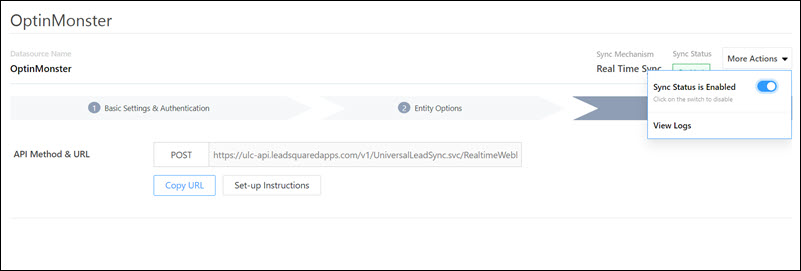
Once the connector configuration is completed, a webhook URL is generated. Use this URL to integrate your data source with LeadSquared.
You have the option to allow your users to access or not access the Webhook URL that’s generated for the connector. To revoke access, disable the slider. By revoking access, you can prevent manual errors from occurring when your users copy and paste the URL in your data provider’s account.
Additionally, when you disable access, you have the option to develop and add a webpage in the connector, which automatically configures the webhook URL in your data provider’s account. Once you build this webpage, to include it in your connector and display the page to your users –
- Alongside Webhook URL, disable the slider.
- Click Add New.
- Enter the following details –
- Display Label – The display name of the page you’re displaying to your users.
- Description – A description for the page you’re adding.
- URL – The URL of the webpage you’ve developed.
- Enable – To revoke page access to your users, disable the slider.
- Once you’re done, click .
- To add additional pages, click Add New, and repeat the steps listed above.
Once you’re done identifying the pages you want to display to your users, click Save & Close. Once the webhook URL is configured
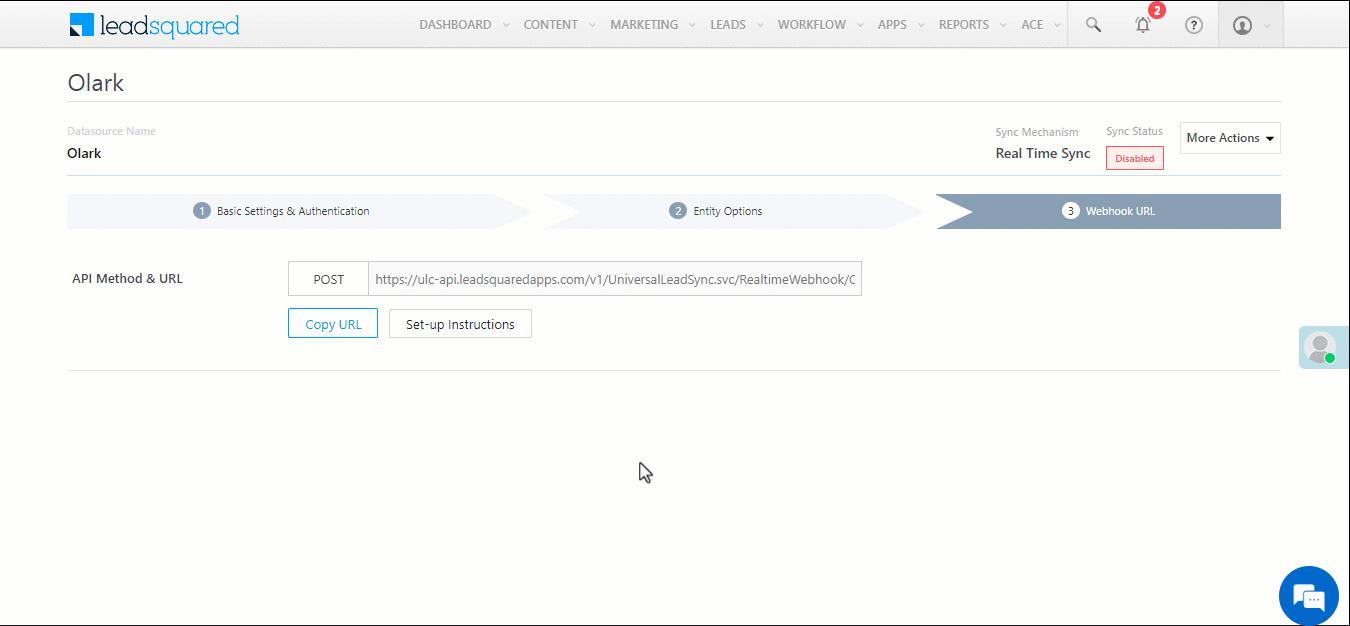
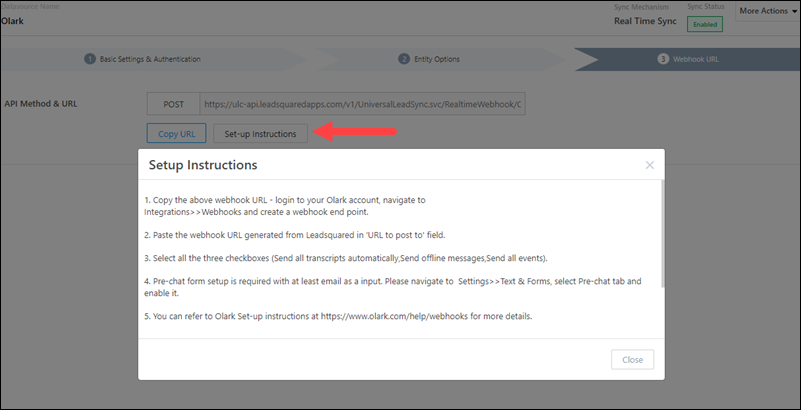
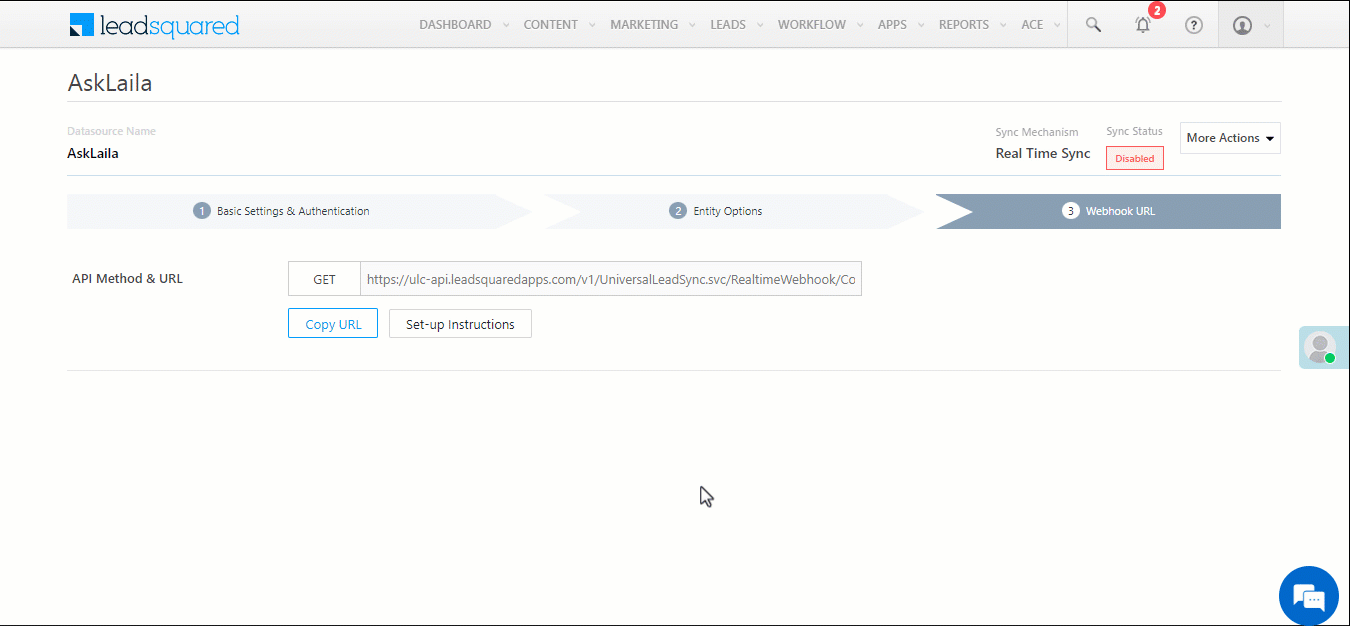
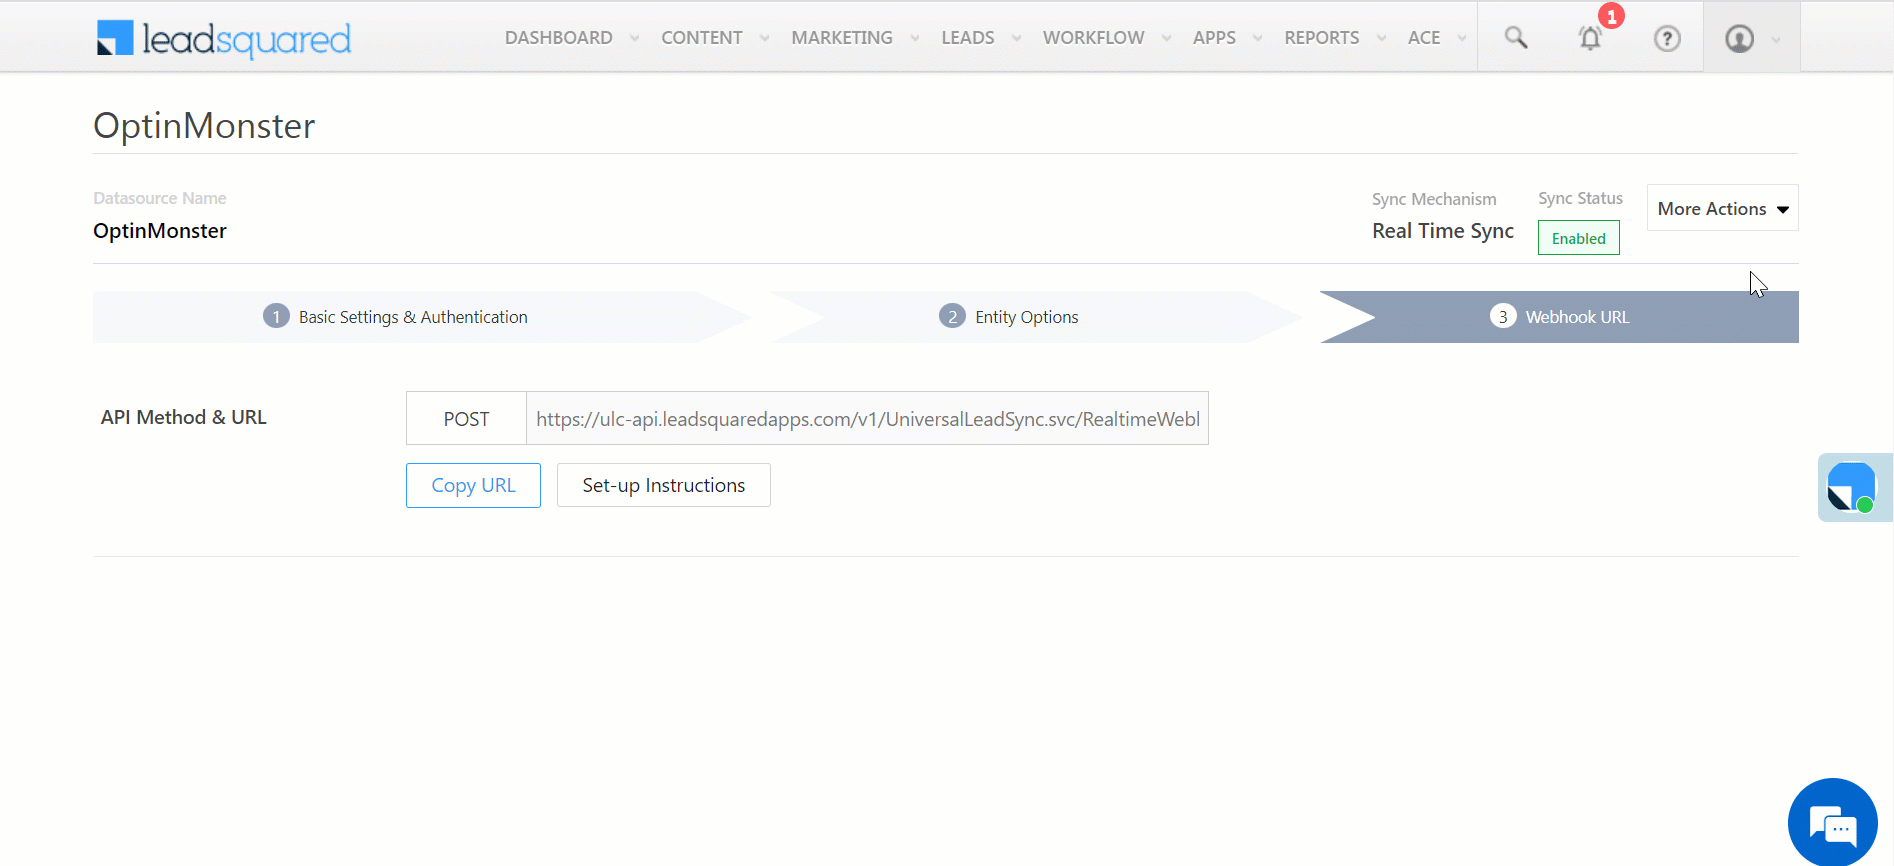
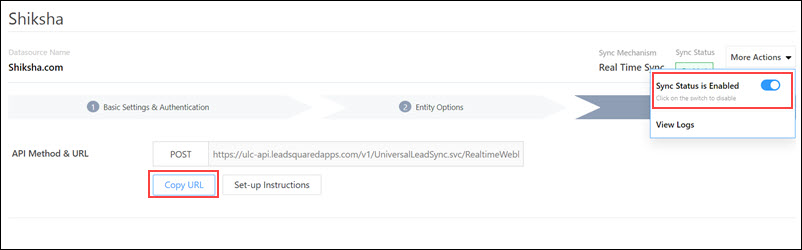
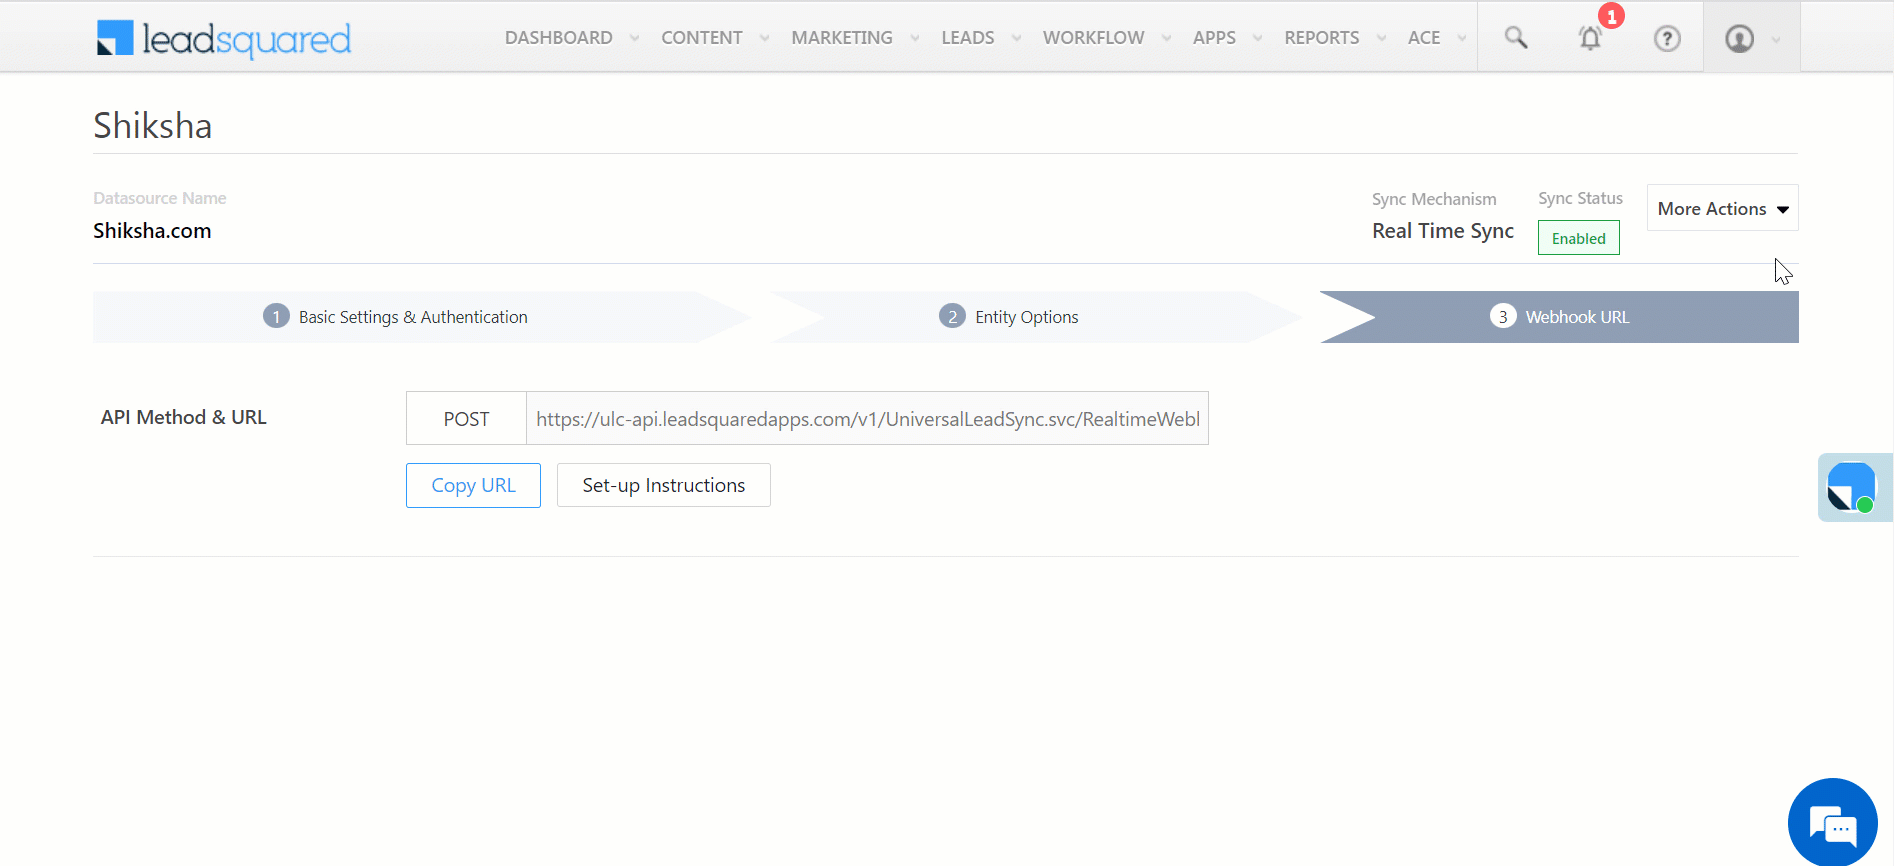
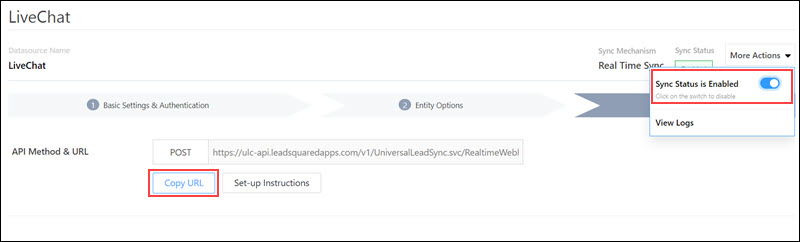
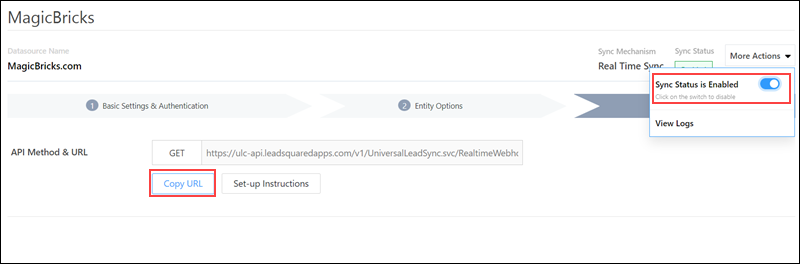
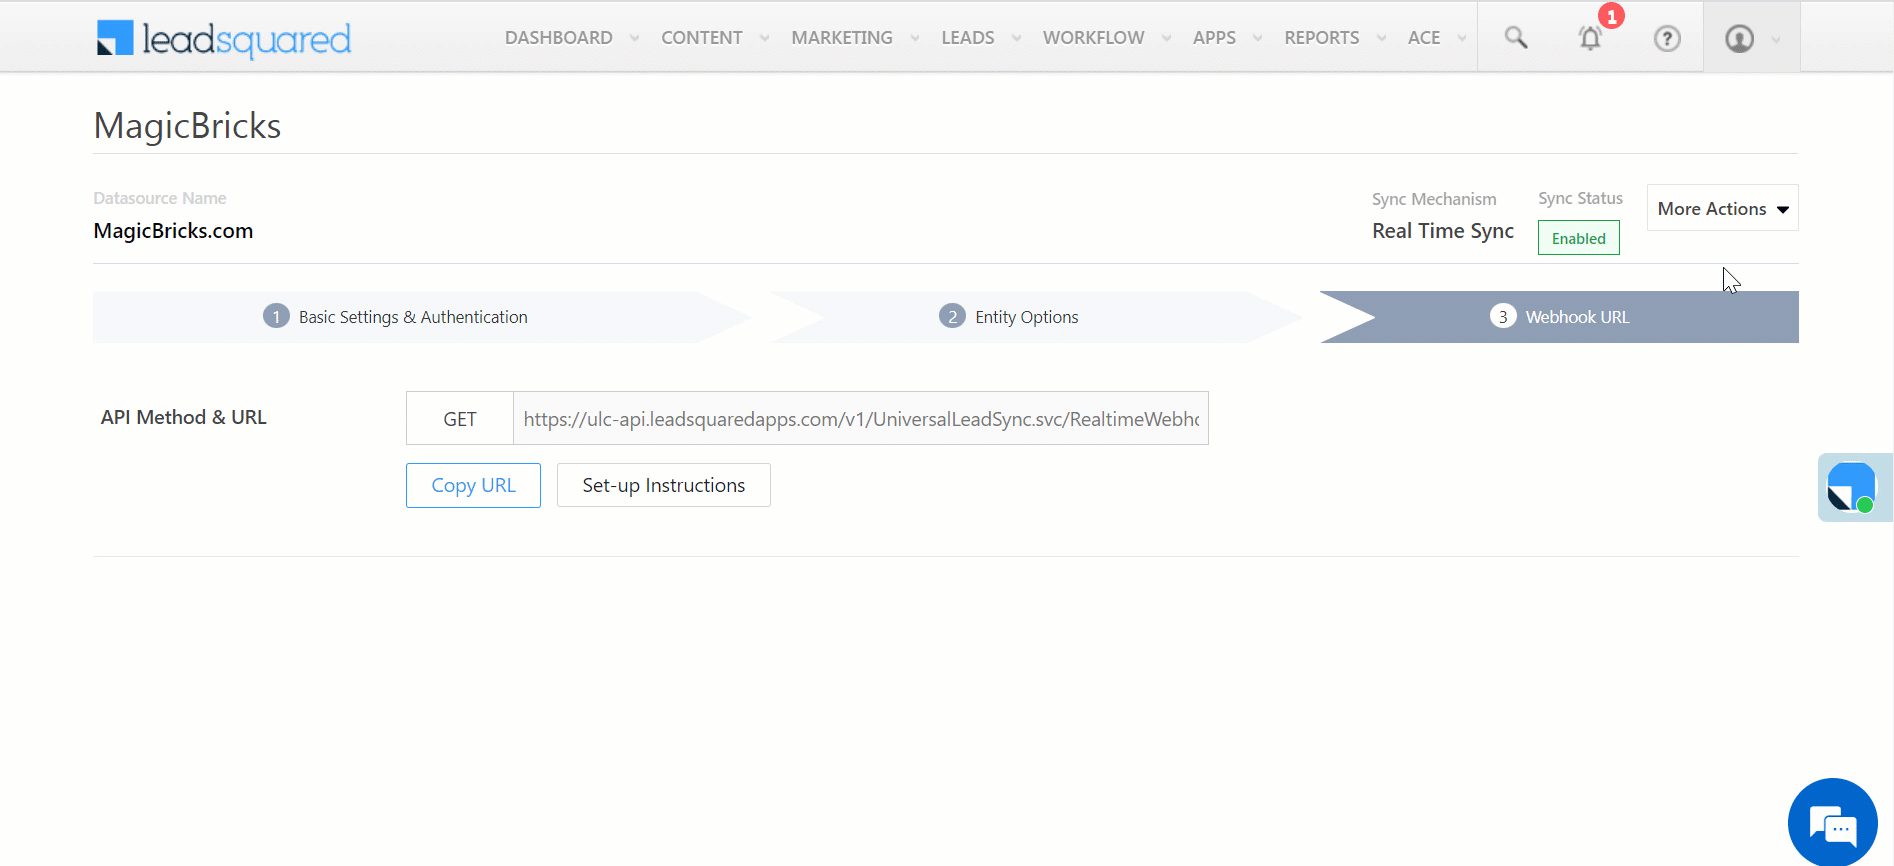
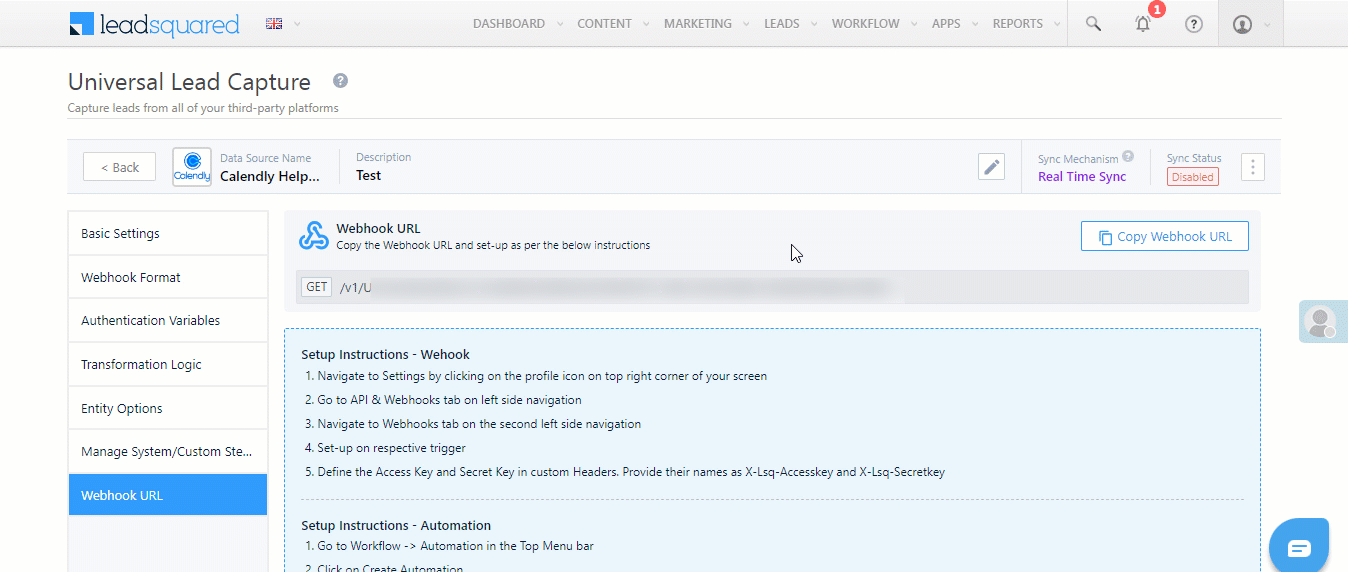
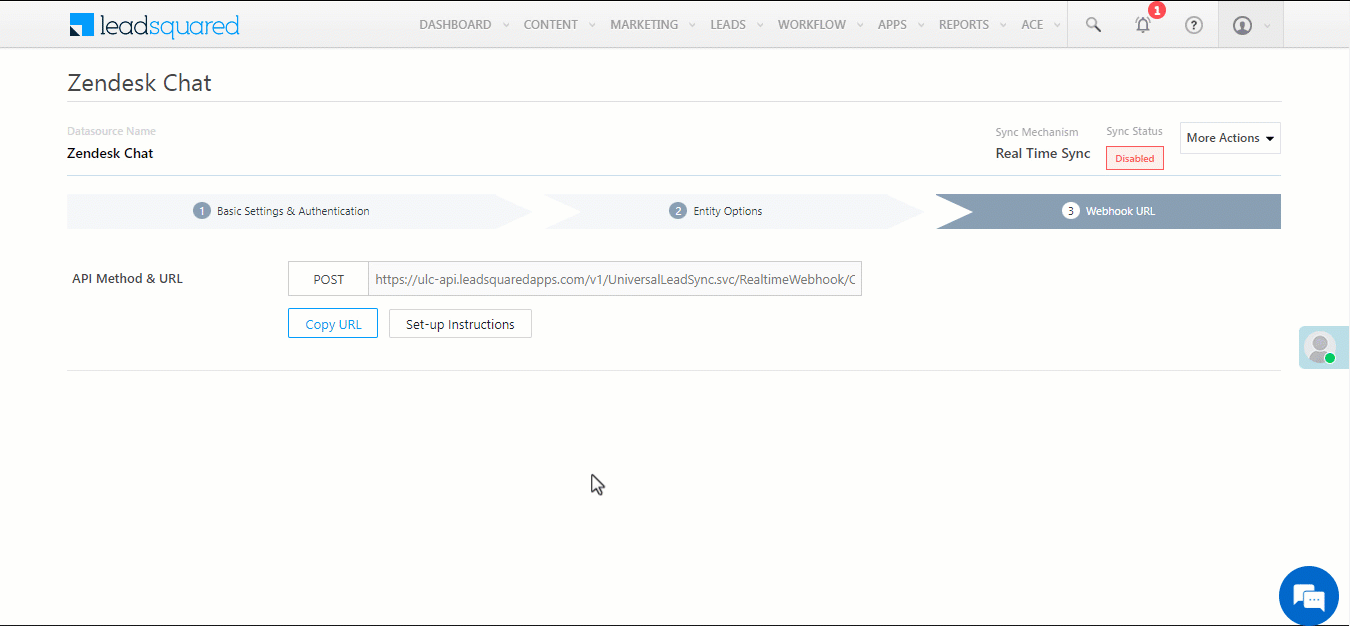
6.7 Webhook URL
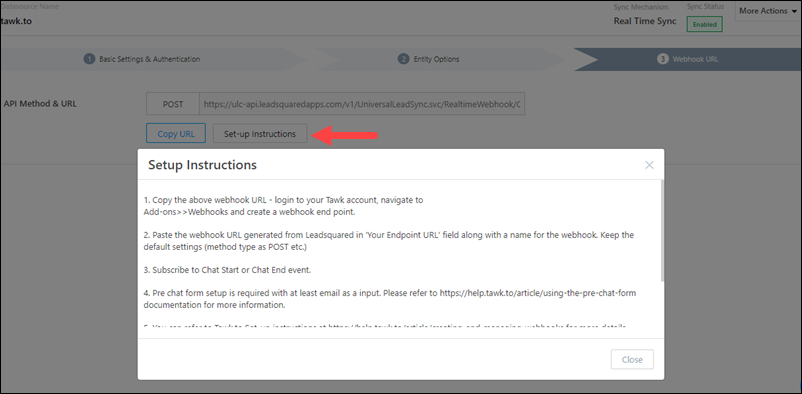
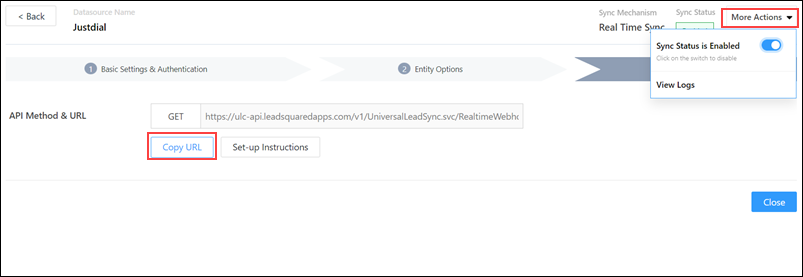
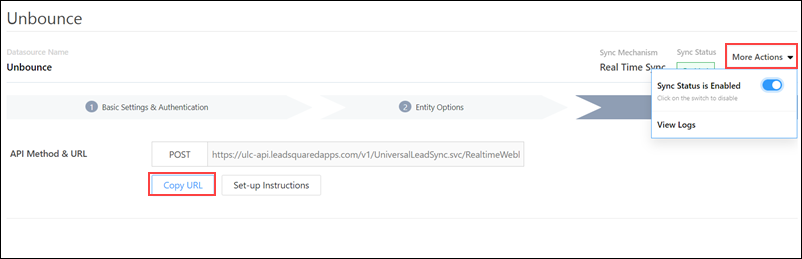
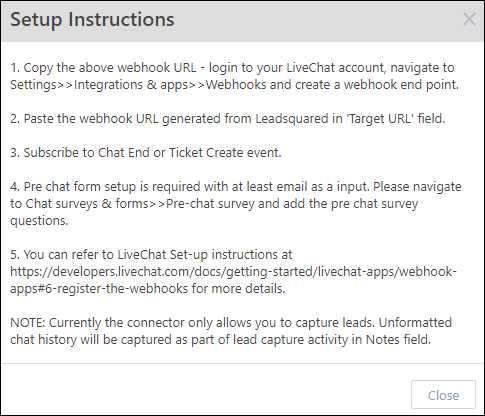
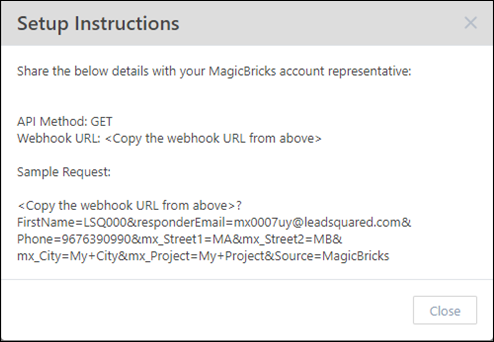
After you provide basic details and finish field mapping, a custom webhook URL is generated. To automate lead capture, copy this URL and use it to configure a webhook, or build an automation in your LeadSquared account.
After you’ve set up the webhook, click More Actions, and enable the sync job. This ensures that through the webhook, lead data from your custom data provider’s account is pushed to LeadSquared.
7. Set-up Periodic Sync
On the Universal Lead Capture screen, click Periodic Sync.
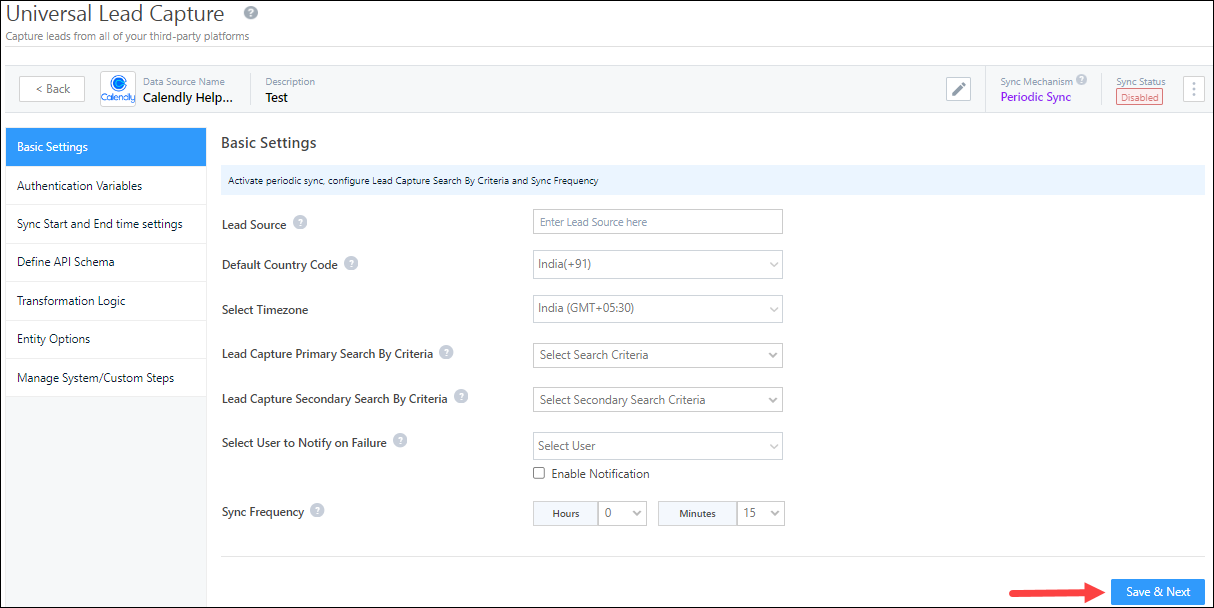
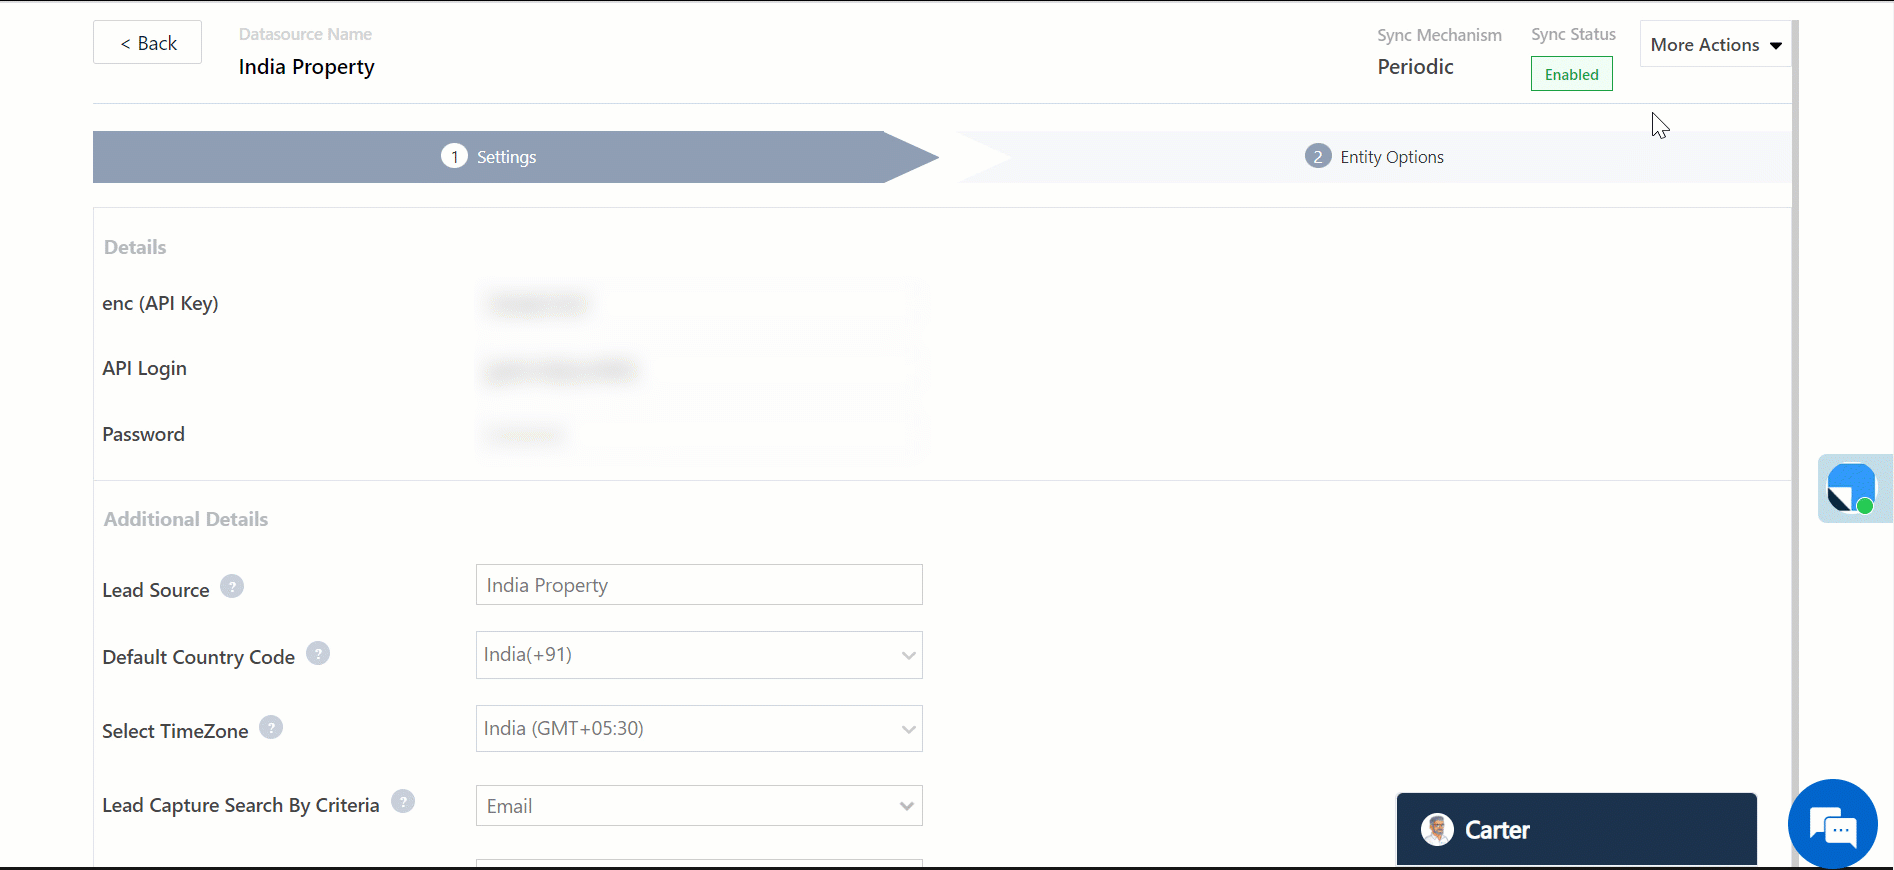
7.1 Basic Settings
On the Basic Settings screen, enter the following details –
| Property |
Description |
| Lead Source |
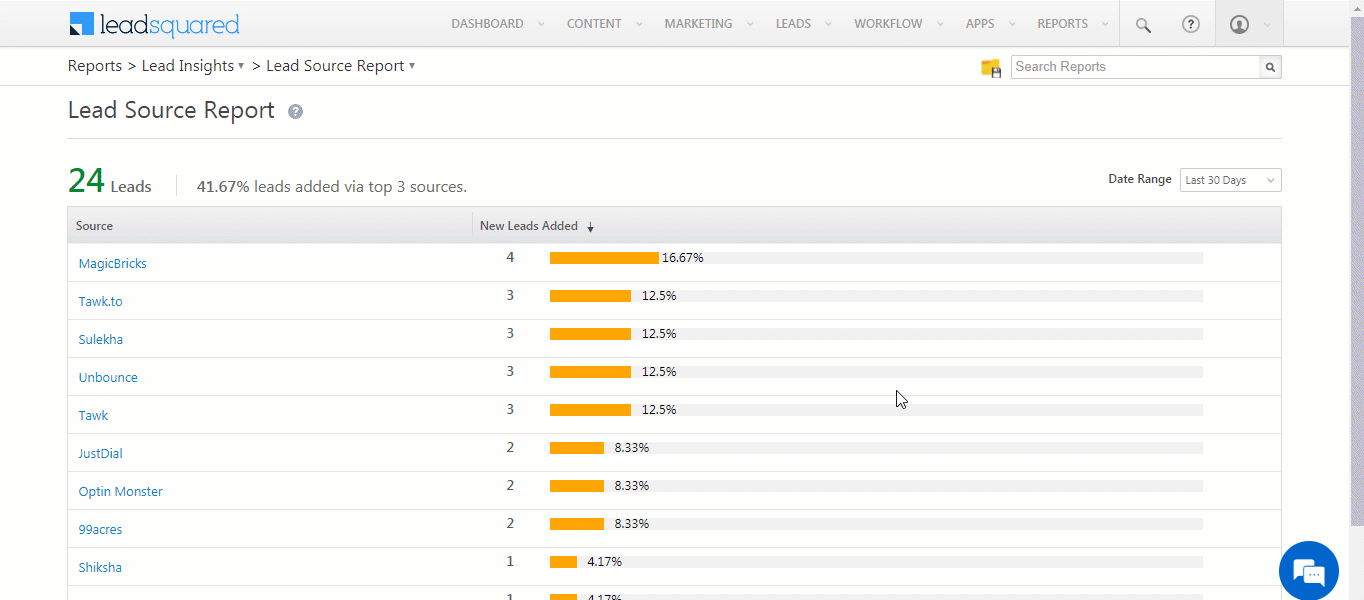
Enter the lead source through which the leads were captured (e.g., Zendesk, QuikrHomes, email campaign, etc.). This detail will be displayed on the Lead Details page, under Lead Source.
To make the lead source Editable, click the checkbox. |
| Default Country Code |
If the lead’s mobile number is captured without a country code, the system will automatically append the default country code selected from the dropdown to the lead’s mobile number. |
| Select Timezone |
The timezone followed in your custom data source’s account. |
| Lead Capture Search By Criteria |
To avoid capturing duplicate leads, select one unique lead field (e.g., email Id, mobile number, PAN number, etc.) as the search key. This will be used to identify and pull leads from your data provider’s account.
To know how to mark a LeadSquared lead field as unique, please refer to How to Make a Custom Field Unique. |
| Lead Capture Secondary Search By Criteria |
If lead identification and capture fail through the primary Search By criteria, a re-attempt will be made using the secondary Search By criteria. |
| Select User to Notify on Failure |
If there’s an error in fetching leads, the chosen user will receive a failure message via email. Select a user from the list of available users in your LeadSquared account.To know more about the type of errors, please refer to Error Notifications. |
| Enable Notification |
To ensure notification emails are sent to the selected user when there’s a failed query, enable the checkbox. |
| Sync Frequency |
Using the ‘Hours’ and ‘Minutes’ dropdowns, define the time intervals in which data is pulled. |
Once you’ve entered the details, click Save & Next.
7.2 Authentication Variables
System Variables
A set of system variables are generated by default, which can be used to configure the API. These variables can be used to define the Transformation Logic, Lead Mapping, Custom Action Parameters, Activity Mapping, and custom configuration URLs.
Custom Variables
Depending on the data source you’re working with, define your own set of authentication variables (e.g., Base URL, Token, API Keys, etc.).
- Navigate to the Custom Variables tab, click the Add New button, and enter the following details –
- Display Label – The display name of the variable (e.g., Secret Key, Token, etc.).
- Variable – The variable name that’s passed (e.g., {{secretKey}}, {{token}}, etc.). This variable should be written within curly brackets “{{example}}”.
- Value – The value of the variable that’s passed. Based on your requirements, you can choose to –
- Call API/Lapps – The value will be fetched from an API or Lapps. This can be used to fetch the authentication value from a different API. You can do this by calling the API/Lapp in the API Builder pop-up, and map its response as the value.
- Custom Values – Select this option to pass a custom value. In the pop-up, enter the custom value, and click Save & Close.
- Type – Select the data type of the variable from the following options –
- Text
- Password
- Boolean
- Number
- Sensitive Info – When this checkbox is enabled, the variable is marked as sensitive, and it will not be displayed on the interface. A log of this variable will not be maintained either.
- Once you’re done entering all the details, click to save the variable.
- To add more variables, click the Add New button.
- Once you’re done adding variables, click Save & Next.,
Note:
- To edit an existing variable, click .
- To delete an existing variable, click .
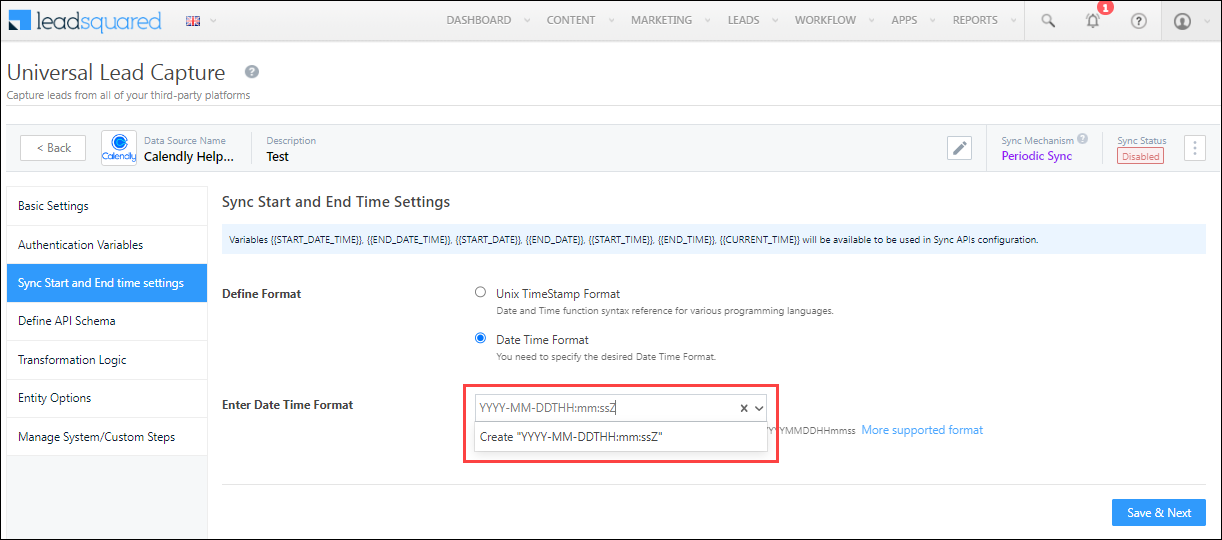
7.3 Sync Start and End Time Settings
Each data provider follows a specific date-time format (Unix TimeStamp Format, MM-dd-yyyy HH:mm:ss, etc.). Here, you can define the date-time format followed by your data provider.
- Define Format by either choosing Unix TimeStamp Format or Date Time Format.
- If you chose Date Time Format, from the Enter Date Time Format dropdown, specify the format your data provider follows.
- From the Selected Time Zone dropdown, select the timezone your data source provider follows.
- Once you’re done, click Save & Next.
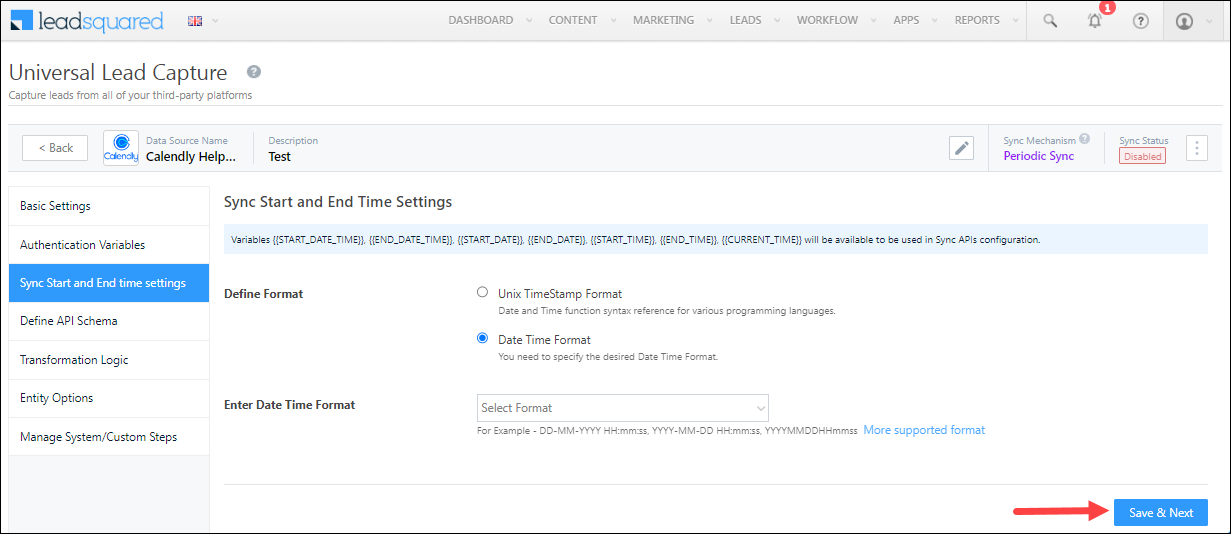
Note: You can also add your own custom Date Time format, by pasting it (e.g., YYYY-MM-DDTHH:mm:ssZ, etc.) in the Enter Date Time Format box.
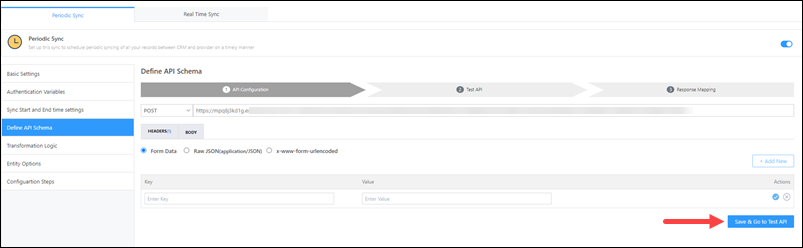
7.4 Define API Schema
Add and configure the API through which leads will be pulled from the custom data source.
API Configuration
First, configure the API.
- Select the API request method from the options available (GET or POST).
- In the Request URL box, enter the base URL and the other parameters you want to pass in the API.
- Click the Add New button to enter the API headers (accessKey, secretKey, etc.).
- Click Body, and then click the Add New button to enter the other parameters (startTime, etc.).
- To edit a parameter, click .
- To delete a parameter, click .
- Then, from the available options (Form Data, Raw JSON and x-www-form-urlencoded), select the content type.
- Once you’re done, click Go to Test API.
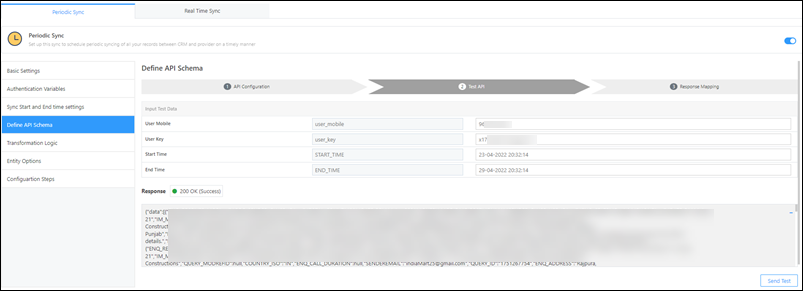
Test API
After the API is configured, test it to ensure leads are being pulled as expected.
- Against the corresponding boxes, enter the values for each parameter.
- After you’ve entered the values, click Send Test.
- Once a Success response is returned, in the response, you can view the lead data that’s being pulled.
- Then, click Go to Response Mapping.
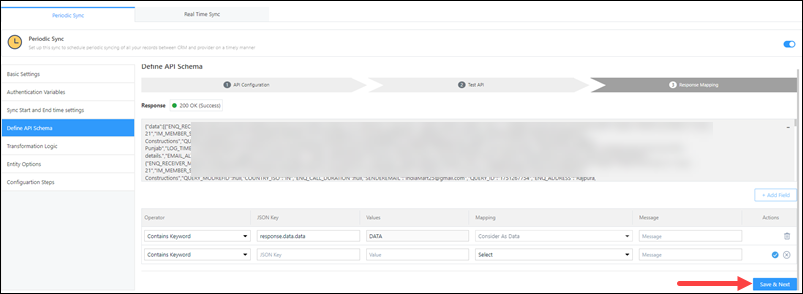
Response Mapping
To help LeadSquared make sense of the API response, map the response parameters as data, success or failure.
For example, if your response looks like this –
{

"users":[

{

"id":35436,

"name":"Robert Jones",

"email":"robert@gmail.com"

},

{

"id":9873843,

"name":"Terry Gilliam"

}]}
For the mapping, response.data.users will be ‘Considered as Data’. This will consider the entire ‘Users’ object as data. You can then map the parameters within the object to the corresponding LeadSquared lead fields – e.g., name to First Name, email to Email, etc.
To map the API response –
- Click the Add Mapping button.
- Under the Key and Value fields, map relevant key-value responses.
- To delete an existing key-value pair, under Actions, click .
- From the Mapping dropdown, select the correct outcome for that particular response. You can choose Consider as Success, Consider as Error or Consider as Data.
- After mapping a response, click .
- To map additional responses, click the Add Mapping button.
- Once you’re done, click Save & Next.
7.5 Transformation Logic
If the data received via Sync API is complex in structure and needs further transformation to a flat JSON structure, you can configure an External API here to parse the data.
To do this, enable , and configure the transformation API. The steps to configure the API are similar to the previous section, Define API Schema.
Note: This step is optional. If required, you can transform the Sync API response.
7.6 Entity Option
Note: To learn how to map the entity options for lead capture,
click here.
Here, define the sync behaviour of the connector when leads, activities and other entities are captured.
Lead/Contact Entity
Based on the Lead Capture Search By criteria (email Id, phone number, etc.), LeadSquared identifies and captures leads from your data provider. Lead capture is enabled by default, and it cannot be disabled. The following options are available to configure the connector’s Sync Behaviour –
- Capture (Create and Update existing) Record – Leads that only exist in your data provider’s account (but not in your LeadSquared account) will get created in LeadSquared. Leads that exist in both your data provider and LeadSquared accounts will get updated.
- Create only new record – Leads that only exist in your data provider’s account (but not in your LeadSquared account) will get created in LeadSquared.
- Update only existing record – Leads that exist in both your data provider’s account and LeadSquared accounts will get updated in LeadSquared.
- Do Nothing – When a lead is created or updated in your data provider’s account, no action will be performed in your LeadSquared account.
Edit Mapping
Once you configure the Sync Behaviour, you’ll have to ensure the field mapping is accurate. To do this, click Edit Mapping.
On the Default Mapping screen, map the API response to the corresponding LeadSquared lead and activity fields. To help you understand how to map your responses, we’ve listed down a few examples –
i) A straightforward, key-value pair response –
{
"page_name": "Final Lender Landing Page",
"page_id": "Summer-Campaign-1364",
"page_url": "http://aroundtheworldin80ways.com/Ladakh"
}
For such a response, you can map the keys to the corresponding LeadSquared lead fields (e.g., page_id to Related Landing Page ID, etc.).
ii) Nested key-value pairs –
{
"campaign":{
"id":"Zendesk-1364",
"title":"Zendesk_Leads"

},
"lead":{
"Name":"Paul Adams",
"email":"paul@example.com",
"phone":"9999999999"
}
}
Here, there’s a key-value pair (“title”) nested within an object (“campaign”). To map the parameters within the object to the corresponding LeadSquared lead fields, map it as a dot notation response (e.g., campaign.title to Source Campaign, etc.).
iii) A key containing a dotted notation –
{
"page_name":"Visit Ladakh",
"page_id":"Summer-Campaign-1364",
"data.json":{
"email":"paul@example.com",
"mobile_number":"9999999999",
"date_submitted":"2021-04-24"
}
}
Here, the key (“data.json”) that contains different parameters (“email”, mobile”, “date_submitted”), is rendered as a dotted notation. To map this key to the corresponding lead field, map it as follows – data*json.email to Email, data*json.mobile_number to Mobile Number, etc.).
iv) An encoded value –
{
"FirstName":"Paul+MX",
"Phone":"9999999999",
"Source":"Zendesk",
"EmailAddress":"mx%example.com"
}
Here, the response value (“EmailAddress”) is encoded (“mx%example.com”). To get the masked value, decode it when mapping the response (e.g., decode=>EmailAddress).
v) When you only want to capture data from certain fields –
{
"items":[
{

"nickname":"Paul",

"body":"From visitor",

"visitor_nickname":"Paul_1364",

"kind":"MessageToOperator",

"timestamp":"1629476535.249866"

},

{

"nickname":"Jai",

"body":"Hi from agent",

"operatorId":"5763330742157312",

"kind":"MessageToVisitor",

"timestamp":"1629476545.909106"

},

{

"nickname":"Jai",

"body":"how agent can help?",

"operatorId":"5763330742157312",

"kind":"MessageToVisitor",

"timestamp":"1629476556.704914"

}
]
}
To capture certain of the fields of the JSON object (“nickname”, “body”) use the parseTranscript key, followed by the JSON section (items in our case), and then give the fields you want to capture (parseTranscript=>items=>[“nickname”,”body”]).
To map your fields to LeadSquared –
- Pass the –
- Mapping Key
- Display Name
- Lead Field in which you want to store the field value.
- Data Type of the data present in this field.
- Click the Update if Empty checkbox if you don’t want to update the value of a field every time the sync takes place.
- This is helpful to prevent re-updating important/sensitive identification-related fields like Social Security Numbers, PAN Card numbers, etc.
- Note:
- You can’t enable ‘Update if Empty’ on a unique field (primary/secondary search key, and searchable key in the activity entity).
- You can enable ‘Update if Empty’ on a maximum of 10 fields.
- To provide a default value for any field, click , enter the value under Default Value, and click .
- If the data provider doesn’t send data for any lead/activity field, then the default value will get assigned to that specific field. But if the field already has an existing value, then the default value will be ignored.
- To disable lead data capture for any field, disable the slider.
- To mark a unique lead/activity field as the search key, click
 .
.
- To create a custom Calendly lead/activity field, click the Add Custom button.
- Once this field is created, you must map it to the relevant LeadSquared lead/activity field.
- After the field is mapped, to save the custom field, click .
- To delete a custom field, click .
Call Custom Actions
If required, you can configure the connector instance to perform other actions such as Create Task, Update Task, Create Opportunity, etc. This can be achieved by adding and configuring the relevant LeadSquared API for the action you want to perform. To configure the action –
- Alongside Call Custom Actions, enable , and click Add Custom Action.
- On the Define Param Mapping pop-up, enter the following details –
- Basic Details – Enter the Name and Description of the action (e.g., Create an Appointment). Once you’re done, click Save & Next.
-
- Param Mapping – Here you’ll have to map the API parameters to capture details from your LeadSquared account and from the data provider’s account.
- Click Add Custom, and enter the following details –
- API Params – The parameters present in the API you’re passing.
- Default Mapping Key – The default value for the corresponding parameter.
- Description – The description for the parameter and key you’ve added.
- In our example, we’ve added all the mandatory parameters listed under the Create an Appointment API.
- The values for the first four parameters your see (“TaskType“, “RelatedEntity“, “Reminder“, “NotifyBy“) are present within LeadSquared. This allows us to hardcode the Default Mapping Key for these values.
- The Default Mapping Key values for the other parameters are dynamic, since the values are being pulled from the data source provider’s account (Calendly in our example). To ensure there’s no format mismatch between LeadSquared and the data provider’s account, we recommend you pass the Default Mapping Key in the LiquidJS format.
- We’ve passed two additional parameters that are not present in the Create an Appointment API – “event” and “eventId“. These are differentiator parameters. These parameters allow us to perform two different actions (e.g. Create and Update/Create and Delete, etc.) using the same API webhook we’re creating.
- In our example, if we only pass “event“, a new Appointment task will get created. But if we only pass “eventId“, then an existing Appointment task will get updated.
- If you’re looking to create a single API that allows you to perform two different actions, we recommend that you add similar differentiator parameters.
- To add more parameters, click Add Custom.
- Once you’re done, click Save & Next.
- Once the API is working as expected, click Save & Close.
Note: You can configure custom actions only using
LeadSquared APIs. Configuration using third-party APIs is not supported.
-
- Define API Schema – Add and configure the API through which the custom actions will be performed in LeadSquared.
- API Configurations – Add and configure the API URL, the Header and the Body.
- In the Request URL box, enter the base URL and the other parameters you want to pass in the API.
- Click the Add New button to enter the API headers (accessKey, secretKey, etc.).
- You can configure the content type format from the available options (Form Data, Raw JSON and x-www-form-urlencoded).
- You can configure the API language from the available options (JSON or XML).
- Parameters for which the values that are hardcoded are automatically added to the Body.
- The “orgID” parameter is optional. You can include it in the Body when testing the API, and you can remove it once the API works as expected. The “orgID” is automatically picked up from your account.
- Once you’re done, click Save & Go to Test API.
- Test API – Once the API details are added, pass values to test the API. Once you’ve added the values, click Send Test.
- If the API works as expected, click Go to Response Mapping.
- If the API doesn’t work as expected, identify the errors by viewing the logs. Once they’re fixed, click Go to Response Mapping.
- Response Mapping – To help LeadSquared make sense of the API response, map the response parameters as success, failure or error
- Under the Key and Value fields, map relevant key-value responses.
- From the Mapping dropdown, select the correct outcome for that particular response.
- Under Message, enter the message you want to display in the response.
- After mapping a response, click . To map additional responses, click the Add Mapping button.
- Once you’re done, click Save & Close. The custom action you’ve configured will now fire as expected.
Activity Entity
Once leads are captured to LeadSquared, you can post custom activities to these leads (e.g., Ticket Creation, Chat Transcript, etc.). These activities will help users keep track of the lead’s journey to conversion. To post activities to the leads captured, alongside Activity Entity, enable the slider. The following options are available to configure the connector’s Sync Behaviour when activities are synced to LeadSquared –
- Capture (Create and Update existing) Record – New activities will get posted to the lead in LeadSquared, while existing activities will get updated.
- Create only new record – Only new activities will get posted to leads in LeadSquared.
- Update only existing record – Only existing activities on the leads captured will get updated in LeadSquared.
The steps to configure mapping is the same as the steps listed above, under Edit Mapping.
Note: You can view and configure the Activity Type when editing the mapping.
7.7 Manage System/Custom Steps
Click Add New to add the connector pages you want to display or hide from your users when they’re configuring the connector. Once you’re done, click Save & Close.
7.8 Enable Sync
After mapping the data source fields to the corresponding LeadSquared lead fields, enable status sync. To do this, from the  dropdown, click the slider, and then click Save & Close. Once the sync is enabled, LeadSquared will pull leads from your data source at regular intervals, depending on the Sync Frequency configured.
You can also manually sync leads, outside of the Sync Frequency that’s configured. This is especially useful if you have old/legacy lead data in your data source provider’s account.
- From the dropdown, click Sync Manually.
- On the Sync Manually pop-up, enter Start Date, End Date, and Time during which the lead data was captured in your TradeIndia account.
- Once you’re done, click Submit. The leads that were captured during the selected time frame will be synced to LeadSquared.
Note:
- It is recommended you run a manual sync job right after you configure the connector. This will ensure all the historic lead data available on your data provider’s account will be synced to LeadSquared.
- The Sync Start Time & End Time must be within a date range of seven days (e.g., from 20th July to 26th July).
- You can sync up to 4,000 leads at once.

8. Other Actions
You can perform the following actions on your custom integration –
- Edit Basic Information – Change and edit the basic details (data source name, logo, etc.).
- View Logs – View logs of all the sync jobs that have taken place.
- Delete Data Source – Delete the entire data source, including all the settings.
Any Questions?
Did you find this article helpful? Please let us know any feedback you may have in the comments section below. We’d love to hear from you and help you out!

 icon.
icon. icon.
icon.


 .
.