1. Feature Overview
Record the audio of face-to-face meetings through the LeadSquared mobile app. These recordings are automatically posted as attachments to activities, against your leads. This will help managers review client meetings, and provide feedback to sales users on the quality of the meetings/interactions.
Note:
- To obtain the Activity Code for an activity, on the web app, navigate to My Profile>Settings>Leads>Custom Activities & Scores. You’ll find it under the Code.
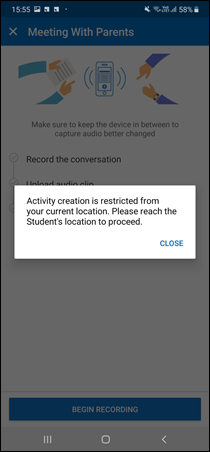
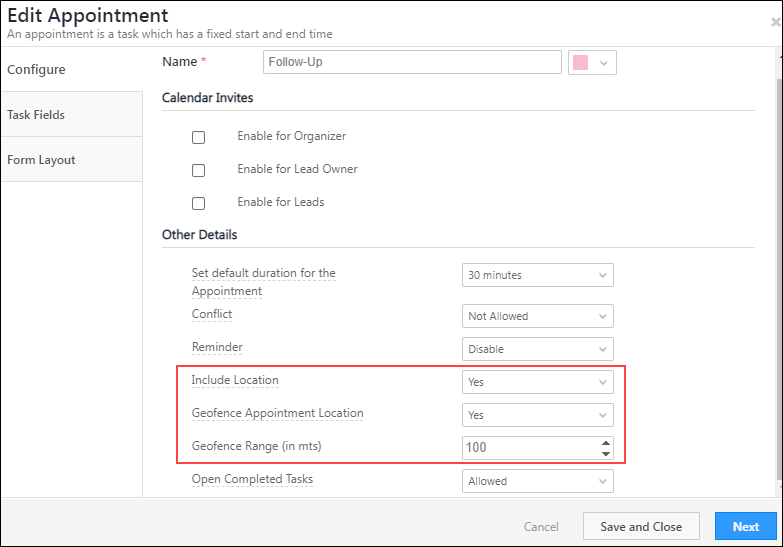
- To ensure your field sales users can post the Activity Audio Recordings only when they are physically present in the lead’s vicinity, enable LeadSquared Geofencing.
- This feature can be enabled on both default and dynamic forms.
This feature is available in 2 modes, Single Activity Mode or Dual Activity Mode.
Under the Dual Activity Mode, two activities are posted to the lead for each audio recording. The first activity (Start Activity) is posted when the audio recording activity is started by the user, and the second activity (End Activity) is posted when the audio recording activity is completed. This option can be used when managers want to informed/notified when the audio recording began, as well as when the audio recording was completed.
Note: This feature can be set-up only for default activity forms. It cannot be set up for
dynamic forms used to capture activities.
2. Single Activity Mode JSON Set-Up
Under the Single Activity Mode, after the audio recording is completed, only an end activity is posted against the lead. This option can be used when managers don’t want to be informed/notified about when the meeting/recording has started, and are only interested in reviewing the recordings post-meeting.
2.1 Prerequisites
Within the custom activity type for which you want to capture audio recordings (e.g., F2F meeting), you must create three fields against which the following data will be mapped (to learn more, see How to Add Custom Activities Types) –
- RecordingStartTimeField – You must create any DateTime field against which the start time of the audio recording can be stored.
- RecordingEndTimeField – You must create any DateTime field against which the end time of the audio recording can be stored.
- RecordingDurationField – You must create any text or number field against which the duration of the audio recording can be stored. The duration is always posted in minutes.
2.2. Enable Single Activity Mode
To enable the single activity mode,
- Login to the LeadSquared web application.
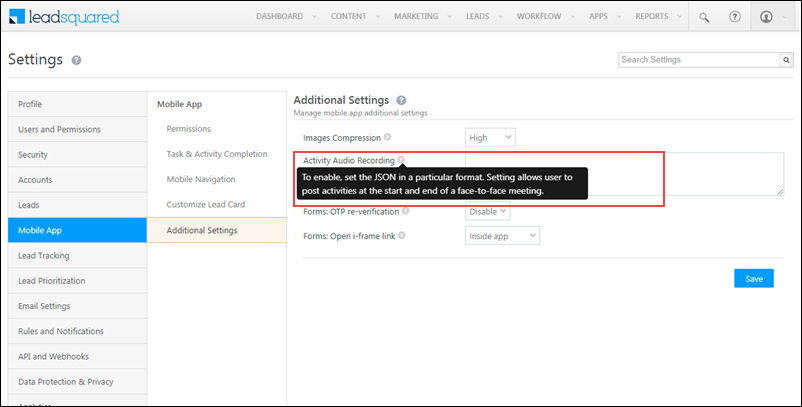
- Navigate to My Profile>Settings>Mobile App>Additional Settings.
- Against Activity Audio Recording, copy and paste the following JSON. Once you’ve added it, click Save.
{

"RecordingEnabled":true,

"Message":"Make sure to keep the device in between to capture audio better changed",

"Mode":"SingleActivity",

"Data":[

{

"MeetingStartEventCode":158,

"RecordingStartTimeField":"mx_Custom_1",

"RecordingEndTimeField":"mx_Custom_2",

"RecordingDurationField":"mx_Custom_3",

"Validations":{

"ActivityCreationLimitValidation":{

"TimeIntervalInDays":30,

"ActivityCount":1,

"RestrictedActivity":209,

"DisplayMessage":"Activity Creation validation Failed"

}

}

},

{

"MeetingStartEventCode":205,

"RecordingStartTimeField":"mx_Custom_1",

"RecordingEndTimeField":"mx_Custom_2",

"RecordingDurationField":"mx_Custom_3",

"Validations":{

"OTPValidation":{

"PhoneNumberFieldsSchema":[

"Phone",

"Mobile"

]

},

"ActivityCreationLimitValidation":{

"TimeIntervalInDays":2,

"ActivityCount":5,

"RestrictedActivity":167,

"DisplayMessage":"Activity Creation validation Failed"

},

"ActivityPostedCountValidations":[

{

"TimeIntervalInDays":1,

"MinimumActivityCount":1,

"Activity":154,

"DisplayMessage":"CFS activity has been created"

}

]

}

}

]

}
| Field |
Description |
| RecordingEnabled |
To enable the audio recording feature on your account, pass true. |
| Message |
The message you want to display to your users, before the recording begins. Add the message within quotes. |
| Mode |
The activity mode type. Since this is a Single Activity Mode recording, pass “Single Activity”. |
| MeetingEndEventCode |
The activity code of the End Meeting activity. The activity form linked to this activity type will open once the meeting has ended. All the recordings and other fields will be posted on this activity. |
| DisplayName (Optional) |
The display name for the End Meeting activity. If this field is blank, then the End Meeting activity name will be displayed. |
| RecordingStartTimeField |
You must add the schema name of a relevant DateTime field to which the activity start time will be posted. This is posted on the End Meeting activity. This field will be disabled in the Add/Edit mode of the activity default form. |
| RecordingEndTimeField |
You must add the schema name of a relevant DateTime field to which the activity end time will be posted. This is posted on the End Meeting activity. This field will be disabled in the Add/Edit mode of the activity default form. |
| RecordingDurationField |
You must add the schema name of a relevant number field to which the activity duration time will be posted. This value will always be displayed in minutes. This is posted on the End Meeting activity. This field will be disabled in the Add/Edit mode of the activity default form. |
| Validations |
- OTP Validation – To prevent your users from posting unwanted recordings against a lead, pass this field. When this field is passed, your lead will receive an OTP before the recording starts. Once this OTP is entered by your user, the recording will begin. This field is optional.
- Activity Creation Limit Validation – To limit the number of recording activities your users can post against a lead, pass this field. This field is optional.
- Time Interval – The number of days across which the user can post the activities (e.g., 5 days).
- Activity Count – The number of activities the user can post across the selected time interval (e.g., 3 activities).
- Activity Posted Count Validations – This restricts your users from posting the activity audio recording unless they first post activity on the lead, within the past ‘N’ days. For e.g., you can configure the JSON to allow your users to post the activity audio recording only after they’ve posted the Phone Call activity on the lead in the past 7 days. This is optional.
- Time Interval – The number of days in the past within which the user should have posted the additional activity (e.g., 7 days).
- Minimum Activity Count – The minimum number of times the user should have posted the selected activity within the given time interval (e.g., 1).
- Activity – The activity code of the additional activity the user must complete in order to post the audio recording.
|
3. Dual Activity Mode JSON Set-Up
Under the Dual Activity Mode, when the audio recording is started, a start activity is posted against the lead, and when the audio recording is completed, an end activity is posted against the lead. This option can be used when managers want to be informed/notified about when the meeting/recording has started, as well as when the meeting/recording has ended.
3.1 Prerequisites
You must create an activity that’ll be posted when the audio recording is started. This activity must not contain any mandatory fields, because it’s posted automatically in the background, from your mobile app. In the JSON, this activity is passed as “MeetingStartEventCode”.
Within the custom activity type for which you want to capture audio recordings (e.g., F2F meeting), you must create three fields against which the following data will be mapped (to learn more, see How to Add Custom Activities Types) –
- RecordingStartTimeField – You must create any DateTime field against which the start time of the audio recording can be stored.
- RecordingEndTimeField – You must create any DateTime field against which the end time of the audio recording can be stored.
- RecordingDurationField – You must create any text or number field against which the duration of the audio recording can be stored. The duration is always posted in minutes.
3.2. Enable Dual Activity Mode
To enable the dual activity mode,
- Login to the LeadSquared web application.
- Navigate to My Profile>Settings>Mobile App>Additional Settings.
- Against Activity Audio Recording, copy and paste the following JSON. Once you’ve added it, click Save.
You must pass the following API to enable the Dual Activity Audio Recording feature. To add the API, from your LeadSquared main menu (on the desktop app), navigate to My Profile>Settings>Mobile App>Additional Settings, and add the below API against Activity Audio Recording. Once you’ve added it, click Save.
{

"RecordingEnabled":true,

"Message":"Make sure to keep the device in between to capture audio better changed",

"Mode":"DualActivity",

"Data":[

{

"MeetingStartEventCode":209,

"MeetingEndEventCode":210,

"DisplayName":"Meeting name",

"MeetingEndFormErrorMessage":"This activity cannot be added. Please add 'Appointment Start' activity",

"RecordingStartTimeField":"mx_Custom_1",

"RecordingEndTimeField":"mx_Custom_2",

"RecordingDurationField":"mx_Custom_3",

"Validations":{

"ActivityCreationLimitValidation":{

"TimeIntervalInDays":30,

"ActivityCount":1,

"RestrictedActivity":209,

"DisplayMessage":"Activity Creation validation Failed"

}

}

},

{

"MeetingStartEventCode":221,

"MeetingEndEventCode":222,

"DisplayName":"Meeting name",

"MeetingEndFormErrorMessage":"This activity cannot be added. Please add 'Appointment Start 2' activity",

"RecordingStartTimeField":"mx_Custom_1",

"RecordingEndTimeField":"mx_Custom_2",

"RecordingDurationField":"mx_Custom_3",

"Validations":{

"OTPValidation":{

"PhoneNumberFieldsSchema":[

"Phone",

"Mobile"

]

},

"ActivityCreationLimitValidation":{

"TimeIntervalInDays":2,

"ActivityCount":5,

"RestrictedActivity":167,

"DisplayMessage":"Activity Creation validation Failed"

},

"ActivityPostedCountValidations":[

{

"TimeIntervalInDays":1,

"MinimumActivityCount":1,

"Activity":154,

"DisplayMessage":"CFS activity has been created"

}

]

}

}

]

}
| Field |
Description |
| Recording Enabled |
To enable the audio recording feature on your account, pass true. |
| Message |
The message you want to display to your users, before the recording begins. Add the message under quotes. |
| Mode |
The activity mode type. Since this is a Dual Activity Mode recording, pass “Dual Activity”. |
| MeetingStartEventCode |
The activity code of the Start Meeting activity to be posted before the audio recording begins. This activity must not contain any mandatory fields, because it’s being posted automatically in the background, from the mobile app. This activity cannot be edited. |
| MeetingEndEventCode |
The activity code of the End Meeting activity. The activity form linked to this activity type will open once the meeting has ended. All the recordings and other fields will be posted on this activity. |
| DisplayName (we need this in the JSON) |
The display name for the End Meeting activity. If this field is blank, then the End Meeting activity name will be displayed. |
| MeetingEndFormErrorMessage |
The error message to be displayed if the End Meeting activity is posted without posting the Start Meeting activity. Add the message under quotes. |
| RecordingStartTimeField |
You must add the schema name of a relevant DateTime field to which the activity start time will be posted. This is posted on the End Meeting activity. This field will be disabled in the Add/Edit mode of the activity default form. |
| RecordingEndTimeField |
You must add the schema name of a relevant DateTime field to which the activity end time will be posted. This is posted on the End Meeting activity. This field will be disabled in the Add/Edit mode of the activity default form. |
| RecordingDurationField |
You must add the schema name of a relevant number field to which the activity duration time will be posted. This value will always be displayed in minutes. This is posted on the End Meeting activity. This field will be disabled in the Add/Edit mode of the activity default form. |
| Validations |
- OTP Validation – To prevent your users from posting unwanted recordings against a lead, pass this field. When this field is passed, your lead will receive an OTP before the recording starts. Once this OTP is entered by your user, the recording will begin. This field is optional.
- Activity Creation Limit Validation – To limit the number of recording activities your users can post against a lead, pass this field. This field is optional.
- Time Interval – The number of days across which the user can post the activities (e.g., 5 days).
- Activity Count – The number of activities the user can post across the selected time interval (e.g., 3 activities).
- Activity Posted Count Validations – This restricts your users from posting the activity audio recording unless they post an additional activity on the lead, within the past ‘N’ days. For e.g., you can configure the JSON to allow your users to post the activity audio recording only after they’ve posted the Phone Call activity on the lead in the past 7 days. This is optional.
- Time Interval – The number of days in the past within which the user should have posted the additional activity (e.g., 7 days).
- Minimum Activity Count – The minimum number of times the user should have posted the selected activity within the given time interval (e.g., 1).
- Activity – The activity code of the additional activity the user must complete in order to post the audio recording.
|
Note: The below points are common for both the activity modes –
- Multiple recordings, up to 20 recordings, can be added.
- The maximum file size must not exceed 10MB (approximately: Android ~ 90 mins, and iOS ~ 40 mins). If you require larger recordings, reach out to your account manager or contact us at support@leadsquared.com.
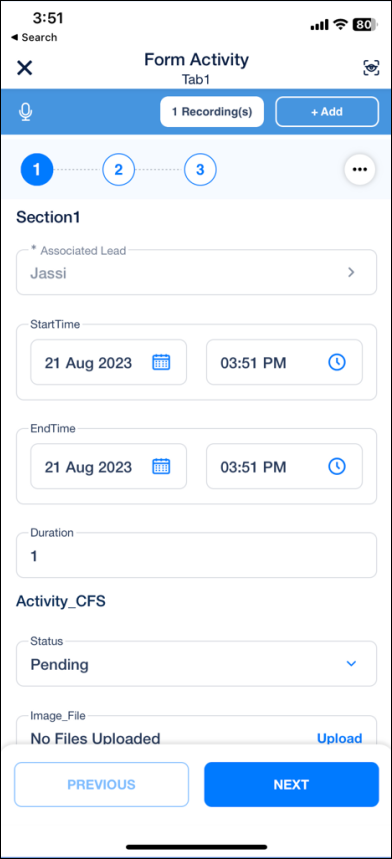
4. Add Activity Audio Recording to Dynamic Forms
For face-to-face meetings, users can now record the details they gather from the client while filling out the dynamic form. Recorded files will be associated with the activity present in the form which is defined in the JSON. To add activity audio recording to your dynamic forms, on the Mobile App Additional Settings page, enter the relevant JSON (single or dual activity mode) and include the form ID in it.
Sample JSON –
{
"RecordingEnabled": true,
"Data": [
{
"FormId": "1bf1xxxx-xxxx-xxxx-xxx-0a9xxxxc4542",
"RecordingStartTimeField": "mx_Custom_3",
"RecordingEndTimeField": "mx_Custom_4",
"RecordingDurationField": "mx_Custom_5",
"PauseOngoingRecording": false,

"StopOngoingRecording": false
}
]
}
Note:
- If
"PauseOngoingRecording" is false, the pause recording button will be hidden in the UI.
- If
"StopOngoingRecording" is false, the stop recording button will be hidden in the UI.
- Users can upload multiple recordings (up to 20 and size 10mb/file) by tapping Add. You also have an option view and listen to the previously recorded files by tapping Recordings.
- On form submission, all the recordings will be uploaded and associated with the relevant Activity (which is defined in the JSON).
- If a user tries to exit the form without saving the details, then the recording will be displayed in the Pending recording section of the app’s menu. You can perform any action on the form directly from this section.
Conditions for Adding Activities to Dynamic Forms
- This feature is supported specifically within the following work areas –
- Lead/Opportunity details>Add Activity
- Lead/Opportunity>single selection>Add Activity
- Lead/ Opportunity>card swipe > Add Activity.
- If there are multiple activity types in the form, the described flow is applicable only for the activity type in the main form.
- If main form does not contain any activity, then the first subform activity will be considered.
- Flow is not applicable for subform added via the Add more setting.
- If Save at each step form is being used, the recording will continue uninterrupted until the form is submitted, regardless of the current step the user is on. If the user decides to dismiss the form after saving a few steps, the recording will be stored in the ‘Pending recording’ section. Start time, end time and duration fields will also be updated only on form submission if the form type is Save at each step.
- If there is no activity in the form configured in Json, then the flow is not applicable (Incorrect configuration).
- In multi-level forms, the flow is applicable only for the first form in the process
- If the activity in the main form has Create restrictions, then the recording flow will not function.
Limitations
- If the user relaunches the app or restarts his device while a meeting is in progress, the data filled in the form will be lost. However, the recording will still be intact in the “Pending Recording” section.
- If Save at each step is enabled in the form and user decides to dismiss the form after saving a few steps, the form submission will not have any recordings associated with it, unless the user submits the form again along with the audio from the pending recording section.
5. Send OTP via Lapps
To send OTP via Lapps, pass the SendOTPViaLapp parameter in the Validations object.
"Validations":{

"OTPValidation":{

"PhoneNumberFieldsSchema":[

"Phone",

"Mobile"

],

"SendOTPViaLapp":{

"LappId":"da_46224_a63081b7_1",

"LappEnv":"Live"}

}}
You can pass additional parameters within the Lapp to control –
- The number of times users can attempt to resend OTPs.
- The time between attempts the resend OTP button gets activated (to avoid sending multiple OTPs).
- The custom message displayed to the user triggering the OTP.
Parameters to pass in the Lapp Configuration –
{"RemainingRetryCount":n,

"RetryTimeInterval":n,

"DisplayMessage":"enter custom message"}
If these parameters are not passed, the default configuration (system message, no counter, no timer) will apply.
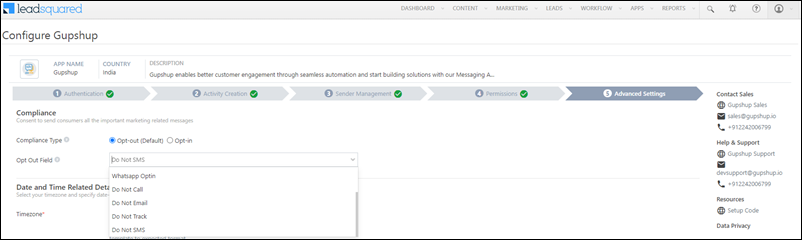
Note: To enable OTP verification on a lead’s masked phone number, contact your account manager, or write to
support@leadsquared.com.
6. Process – Dual Activity Mode
6.1 Android
- On the mobile app, tap on a lead, open the Activity History tab and tap the
 Add Activity button.
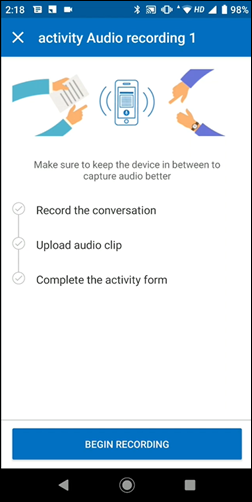
- From the list, select the default activity form you want to add. Once selected, the recording confirmation screen with the custom message will show up. This feature is only available for default forms, and not dynamic forms.
- When you click Begin Recording, you’ll be redirected to a screen where the recording starts.
- You can pause, stop, and restart the recording anytime on this screen.
- You cannot navigate to other screens on the LeadSquared mobile app when the conversation is being recorded.
- If the permission popup appears, tap Allow.
- When you stop the recording, tap Upload. Once the activity form is filled up and submitted, the recording gets posted to the server.
- The Activity audio recording can be applied to Activities that need to be posted on Task completion as well. If the task is marked incomplete and the recording is complete, but the activity has not been posted, then the recording is saved under Pending Recording, and the task will remain open.
- Once the Activity is created, you can listen to or download the recording from the app.
Note: The above GIF is for the Dual Activity Mode. Except for the Begin Meeting activity being posted, the other steps remain the same for the Single Activity Mode as well.
Edge Cases
- You can record the conversation even if your device is offline (not connected to the internet). The conversation is saved under Pending Recording.
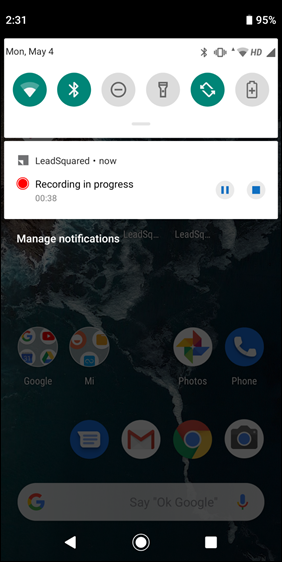
- If you exit this app and leave it running in the background, the recording will continue, and it will show up as a notification on your device.
- While the recording is in progress, if the app is –
- in the background, then the recording will continue, and it will be saved in the Pending Recordings section.
- if the app is killed or the device is switched off, then the recording will be discarded.
- When recording has stopped, then in all cases the recording is saved in the Pending Recordings section.
- When a phone call is received and attended to during the recording in progress, then that recording will stop. But the user can continue recording the audio by adding another file.
6.2 iOS
The steps on an iOS device are similar to those on Android.
The only point of difference is if you kill the app, switch off your device or log out of the app while the conversation is being recorded, whatever has been recorded up to then is saved in the Pending Recordings section.
Note: The above GIF is for the Dual Activity Mode. Except for the Begin Meeting activity being posted, the other steps remain the same for the Single Activity Mode as well.
Edge Cases –
- You can record the conversation even if your device is offline (not connected to the internet). The conversation is saved under Pending Recording.
- If you exit this app and leave it running in the background, the recording will continue, and it will show up as a notification on your device.
- While the recording is in progress, if the app is in the background, then the recording will continue, and it will be saved in the Pending Recordings section.
- When recording has stopped, then in all cases the recording is saved in the Pending Recordings section.
- When a phone call is received and attended to during the recording in progress, then that recording will stop. But the user can continue recording the audio by adding another file.
Any Questions?
Did you find this article helpful? Please let us know any feedback you may have in the comments section below. We’d love to hear from you and help you out.


 .
.